This content originally appeared on foobartel.com :: Stream and was authored by foobartel.com :: Stream
In one of my recent projects I got to work with Shopify again to build an e-commerce site from scratch. This was an exciting project and I liked working on it a lot, but it also posed a few challenges, since in some regards Shopify is a little limited and some things need workarounds to achieve the desired functionality.
One of these challenges was the implementation of something called “Looks”. The idea behind creating shopable “Looks” was to have collections within collections, something that Shopify doesn’t allow you to do out of the box. To clarify, a "Look" was meant to be a collection containing certain products of a look or outfit. These looks exist for girls and boys and to display all of them within a collection called “Looks” is where the “collection in a collection” would have come in handy. This could have also been solved by working with collections and tags, but for some reason the “collections in a collection” seemed the better solution to manage them as well as in regards to the resulting URLs.
That said, I tried to find a way to make this possible. It took me a little while to come up with a working solution, but after some prototyping with lots of trial and error, it finally worked the way I wanted it to work.
The final solution looks something like this:
Collection “Looks Girls” (/looks-girls): The main “Looks” collection that basically just serves as the overview page to enter the looks section. This collection is always empty and does not contain any products.
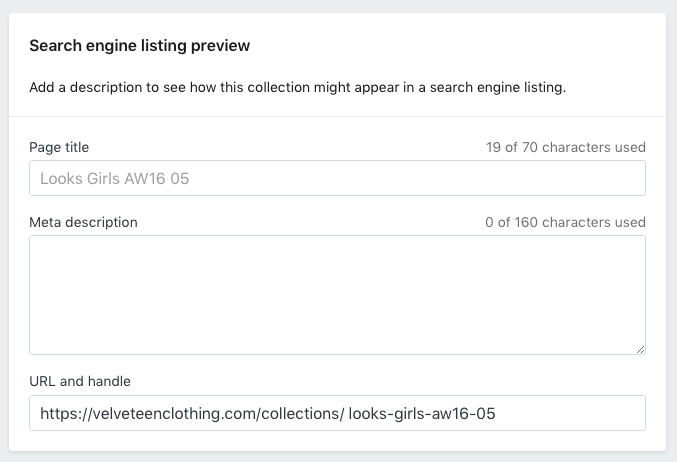
The actual looks collections are the ones that actually contain the products for each specific look. These collection names always have to start with either “Looks Girls NameOfLook” (resulting handle: “looks-girls-…”) or “Looks Infants” (resulting handle: “looks-infants-…”) to make everything work. These collections then get displayed on the overview at /looks.
Note: When entering a collection name that is not starting correctly and then changing the title after saving the collection, the handle doesn’t change automatically, but keeps the initial handle. In that case the handle can still be changed in the SEO settings of the collection.

Following I will explain what is required, template- and code-wise.
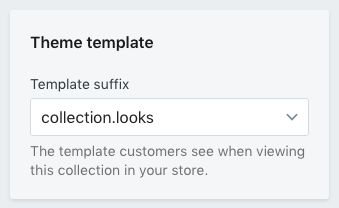
First of all, a new template is needed. Since this template is only used for the looks collection, I called it “collections.looks.liquid”. When creating a new looks collection, this also is the template that has to be selected to render the particular collection.

The collection.looks.liquid file contains the following code:
First of all, I’m checking if the current collection handle is “looks-girls”. If that’s the case, I go ahead and find all collections with a name containing “looks-girls-“ — the important part here is the trailing “-“ in the handle. This basically means that the collection is one of the ones containing products, since “looks-girls” is only an empty collection, which is the one that will be excluded from this output.
Once we have these, we can output them in the overview to display all looks collections. I’m also removing the words “looks” & “girls” from the title, since I don’t want to show these. Thus a collection with the name “Looks Girls AW 01 16” will result in a title of “AW 01 16”, which later gets modified to read “Look: AW 01 16”.
{% if collection.handle == "looks-girls" %}
    {% for collection in collections %}
      {% if collection.handle contains 'looks-girls-' %}
        {% unless collection.handle == 'looks-girls' %}
        <div class="product-item">
          <div class="product-item-media">
            <a href="{{ collection.url }}">
              <img src="{{ collection.image | collection_img_url: 'grande' }}" alt="{{ collection.title | escape }}" />
            </a>
            <div class="product-item-cta">
              <a href="{{ collection.url }}" class="button">View now</a>
            </div>
          </div>
          <div class="product-item-info">
            <a href="{{ collection.url }}">
              <p>
                <span class="product-item-title">{{ collection.title | remove: "looks" | remove: "Looks" | remove: "Girls" | remove: "girls" }}</span>
              </p>
            </a>
          </div>
        </div>
        {% endunless %}
      {% endif %}
    {% endfor %}
  {% endif %}
The above block can be repeated for different looks, e.g. I have another block of this code for “looks-infants-“. Just adjust the wording as needed.
Now that we have found a way to display all collections that belong to a certain looks category, I want to display a look and its products when selected. I’m checking for the current handle and if the handle contains “looks-girls-“ – again, the trailing dash is the important part here – we’re getting the required information as well as the contained products. This block of code also removes the words “looks” and “girls” and replaces them with “Look:”, as mentioned above.
{% if collection.handle contains 'looks-girls-' %}
    <div class="product-detail-media-wrapper">
      <div class="row">
        <div class="product-detail-media">
          <div>
            <a href="{{ collection.image | img_url: '1600x' }}">
              <img src="{{ collection.image | img_url: '1024x' }}" alt="{{ collection.title }}">
            </a>
          </div>
          <div class="product-detail-zoom">
            <a href="#"><img alt="" src="{{ 'icon-zoom-grey.svg' | asset_url }}"></a>
          </div>
        </div>
        <div class="product-detail-thumbs " id="product-detail-thumbs">
          <a href="{{ collection.image | img_url: '2048x' }}" data-standard="{{ collection.image | img_url: '1024x' }}">
            <img class="product-detail-thumb-item" alt="{{ collection.title }}" src="{{ collection.image | img_url: '1024x' }}" />
          </a>
        </div>
      </div>
    </div>
    <div class="product-detail-info">
      <h2 class="product-detail-title"><span class="color-flip">Look: </span>{{ collection.title | remove: "looks" | remove: "Looks" | remove: "Girls" | remove: "girls" }}</h2>
      <div id="description" class="product-detail-description">
        {{ collection.description }}
      </div>
      <h3 class="options-headline">Items in this look</h3>
      <div class="product-thumb-wrapper bordered looks-thumbs">

{% comment %}
After the basic collection information, get the product details for all products contained within the collection.
{% endcomment %}

      {% for product in collection.products %}
        <div class="product-thumb-item">
          <div class="product-thumb-item-media">
            <a href="{{ product.url | within: collection }}">
              <img src="{{ product.featured_image | product_img_url: 'grande' }}" alt="{{ product.title | escape }}" />
            </a>
          </div>
          <div class="product-thumb-item-info">
            <a href="{{ product.url | within: collection }}">
              <span class="product-item-title">{{ product.title }}</span>
              <span class="product-item-desc">{{ product.price | money_with_currency }}</span>
            </a>
          </div>
        </div>
      {% endfor %}
      </div>
    </div>
  {% endif %}
For the working example of the site where I used this technique to create the looks pages, visit Velveteen’s Looks.
This is all that’s required to create a collection that displays all collections “within” a collection. I hope you find this help- or useful and if you have any questions or comments, feel free to reach out.
This content originally appeared on foobartel.com :: Stream and was authored by foobartel.com :: Stream
foobartel.com :: Stream | Sciencx (2016-09-29T22:00:00+00:00) Shopify: Achieving Collections in Collections. Retrieved from https://www.scien.cx/2016/09/29/shopify-achieving-collections-in-collections/
Please log in to upload a file.
There are no updates yet.
Click the Upload button above to add an update.
