This content originally appeared on Level Up Coding - Medium and was authored by Rajtilak Pal

Answer me one question. Do you think that writing programs are easy? Well, it depends on the problem (and on the programmer’s mood too). Do you think writing structured programs are easy? Adding one word to the question made a lot of change. First of all, what do you mean by structured programs? And how do you write programs that are easily understood by other people without even reading your code comments? It is a fairly difficult task and the concept of Object-Oriented Programming tries to solve it by using four principles: Abstraction, Encapsulation, Polymorphism, and Inheritance. With the advent of Design Patterns, it became easier and easier for people to write structured code. It is simple, just follow the patterns. How do you learn the patterns? Just make applications that use it, simple.
This Series “Powerful Design Patterns to create an Amazing Stopwatch App” will give you a feel about how you can apply common design patterns like Observer and State to create Structured programs that are easily understood. We will also use the concepts of Threading to give this app a smoother UX.
We will use Java Swing to create the Stopwatch App (you will soon get a preview of the completed application). The reason we are using Swing is because Applications in other platforms take a lot of time to get their environment set up. Swing does not need anything except a JDK and is easy for writing GUI programs without any kind of HTML being involved in it. I have divided the series into Six parts, slowly building it from scratch, and this is the first part. In the first 3 parts, we will be focusing on making our core stopwatch class better and better and in the next 3, we will make our Swing App. All the code is available to download from Github.
Let’s get a preview of the finished application that we will be building. The Full code can be found here.
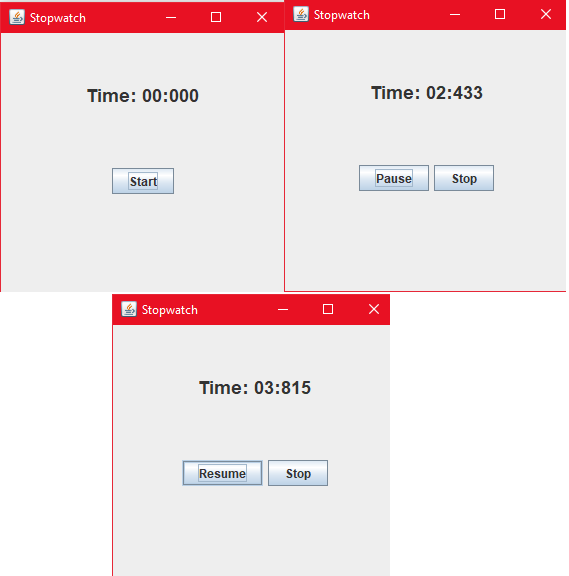
Looks pretty old school right? But that’s how a Swing Application looks like. Our goal here is not to have an app with a very beautiful UI but to build the backend in such a way so that it is strong and can be understood easily by everyone. Our main focus will be on injecting Design Patterns.
But we are not going to start off with any kind of pattern right at the start. Let us first figure out how our core Stopwatch Class will work.
Well, the “Stopwatch” will be a normal class (Stopwatch.java), it’s internal value (internal time) should be initialized to zero. We can start the stopwatch, we should be able to pause it, resume it and we should be able to stop it. Right? What more do you expect from a Stopwatch!
But to make our life simpler, we will implement only the pause and resume methods only. That means we will only be able to resume our stopwatch from where we left it and pause it anytime. The classes that will be using this stopwatch can take care of implementing all the functionalities of start, pause, resume and stop. Technically, you could implement all four features in the stopwatch class but that is a lot of hard work, and implementing only pause and resume will just be fine.
Note: Pause and Resume functionalities will be implemented using stop() and start() methods of the Stopwatch class. Also, there will be a getTime() method to get the time the stopwatch currently has.
Let’s get a clearer picture of what’s going to happen:
- First, we will create an object of “Stopwatch”. Its internal time will be initialized to zero and it will be in the stopped state.
- When we click the start() method, the stopwatch should resume its counting by taking into account the internal time and update the internal time too.
- When we click the stop() method, the stopwatch should pause its counting.
That’s it. That is all that our stopwatch class is going to do.
Now let’s figure out the logic through which the internal time will be stored in our class. This might be a little confusing but hold on till the end. I will try my best to make you understand.
At this point, I would like to encourage you to find out the logic with the clue that java has a convenient method to give the System time.
System.currentTimeInMillis(); // Gives system current time in Miliseconds
Let’s begin:
All we need to store in our Stopwatch class is
- an “offset” which is the total time that the stopwatch has been running,
- the state of the stopwatch (“isStopped”), and
- the “currentStart”.
The offset is first initialized to 0 when the stopwatch is first created. The isStopped is set to true indicating the stopwatch is in paused/stopped state. The “currentStart” stores the timestamp when the last start() method was called.
Now every time we hit the start() method, we will note down the currentStart by storing the current system time into it. Then, we will subtract the offset from the currentStart. And make the state of the stopwatch running by putting “false” into the isStopped boolean.
Every time we hit the stop() method, we just note the offset to be the “current System time - currentStart” . And then we make the isStopped boolean true.
getTime() method is the one that gives us the time (in milliseconds) the stopwatch has been running (display time). When we call getTime(), we return “current system time - currentStart”. (We don’t write any formatting logic just now but we can add it later on down the road)
All this logic might be a little too difficult to grasp at the first time, so let’s go through an example.
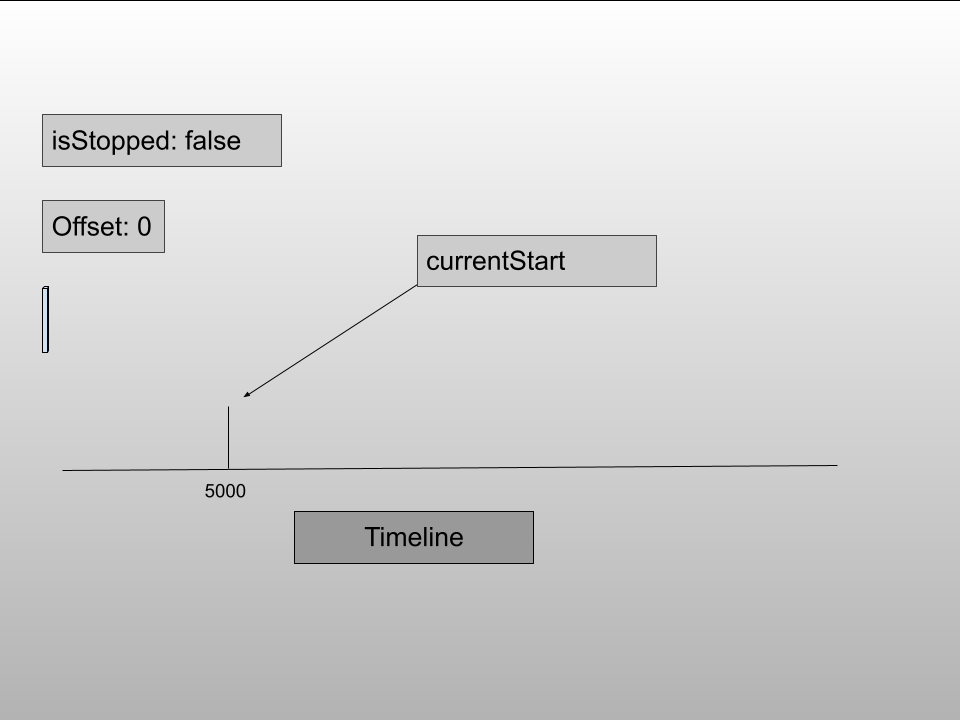
Suppose that we just created the stopwatch. The offset will be zero and the stopwatch is in stopped state. When we start it, consider the current system time is 5000 millisecs (which is highly unlikely but consider it as an example) which gets stored in currentStart (because 5000 - 0 = 5000). The state of the stopwatch is this.
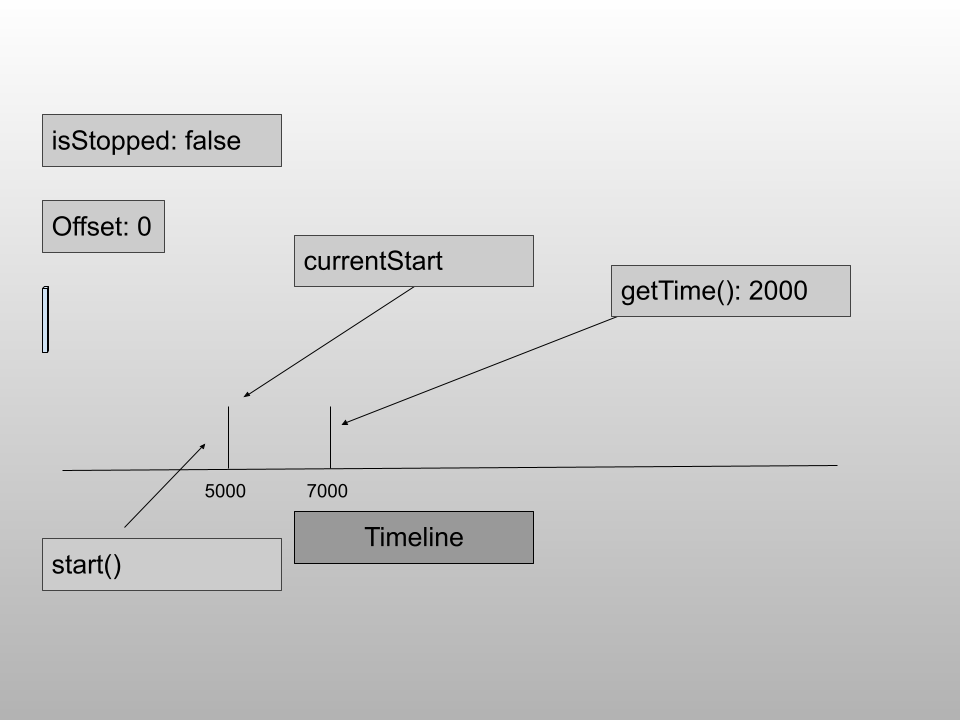
Now, after 2000 milliseconds we call getTime() to know the time. At this point of time, the system current time is 7000 ms and the stopwatch has been running for 2000 ms. Therefore, the time that will be returned to us will be current time - currentStart, which is 7000 - 5000 = 2000.
Now, after 2000 ms we call the stop() method to pause the stopwatch. The “offset” becomes “current time - currentStart” = 9000 - 5000 = 4000.
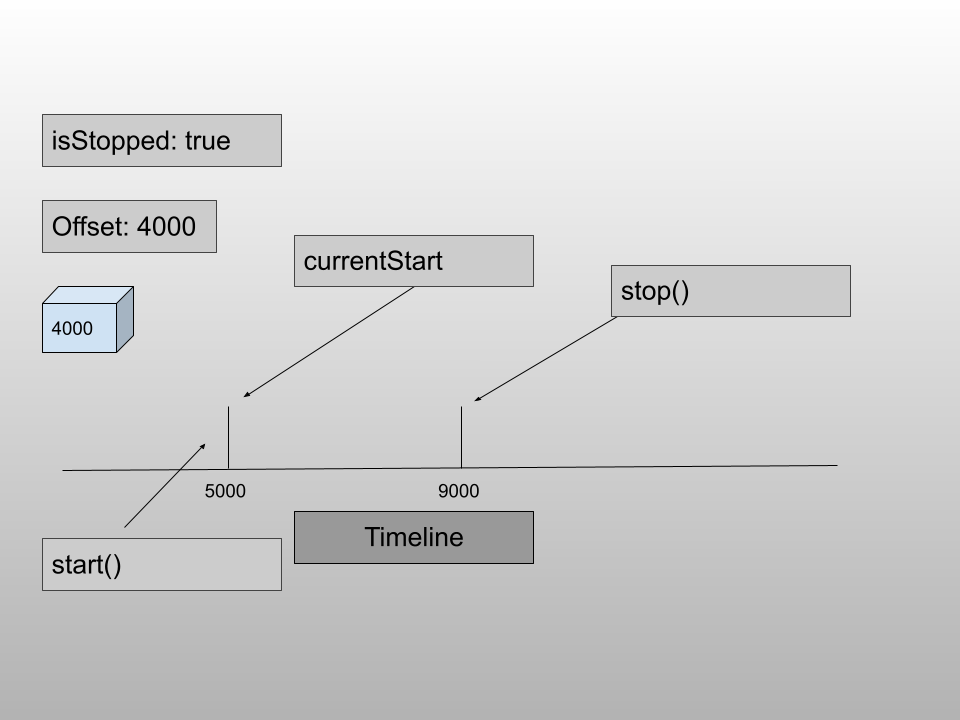
Now, when we call getTime() it should return the offset instead of the current system time - currentStart as the stopwatch is in the stopped state. Let’s go through the same process one more time.
After 2000 ms, we call the start() again. Notice the start method is called at 11000 ms but the currentStart is at 7000 ms. This accounts for the fact that the stopwatch was started initially at 5000 ms and was paused for 2000 ms in its whole lifetime till now.
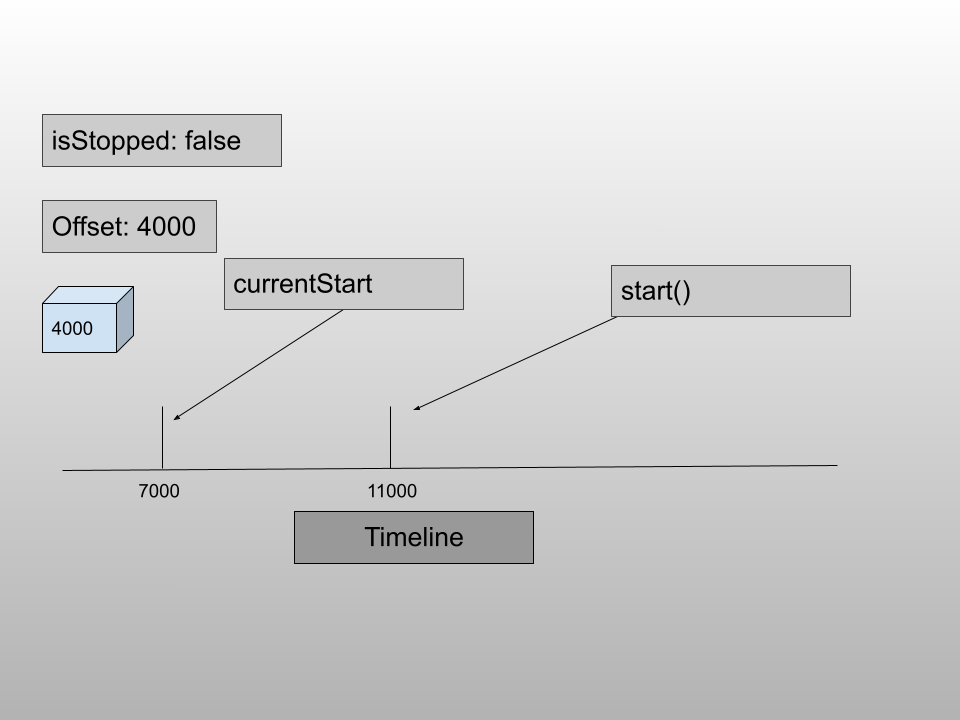
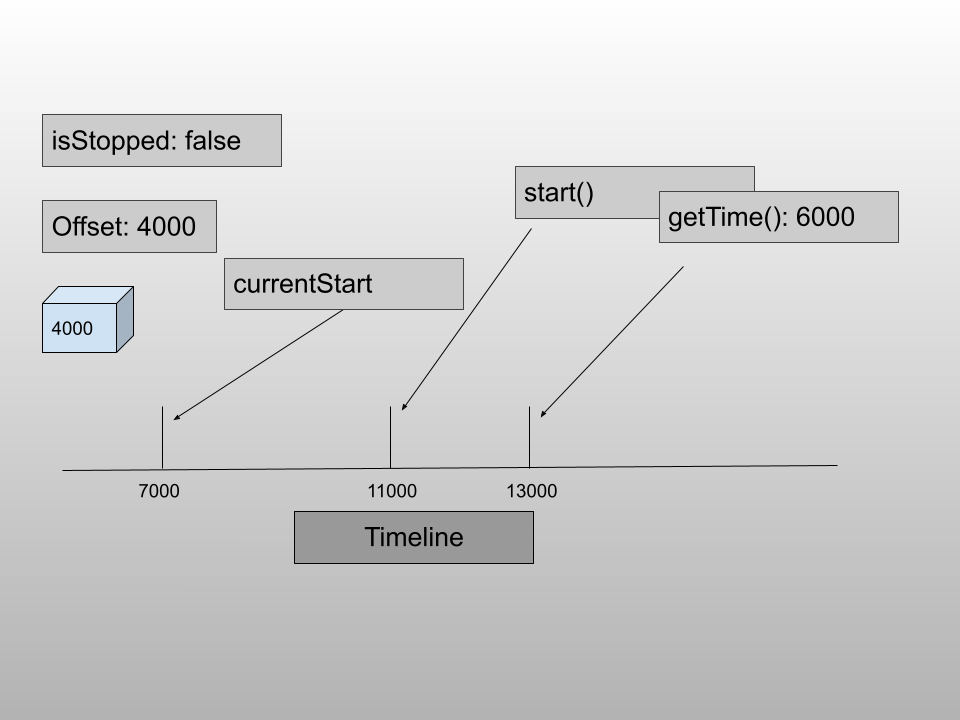
After 2000 ms, when we call getTime(), we get back 6000 ms which is the time the stopwatch has been running till now.
At last, after 2000 ms when we press stop(), the total running time gets stored in the offset and helps the stopwatch to resume correctly afterwards.
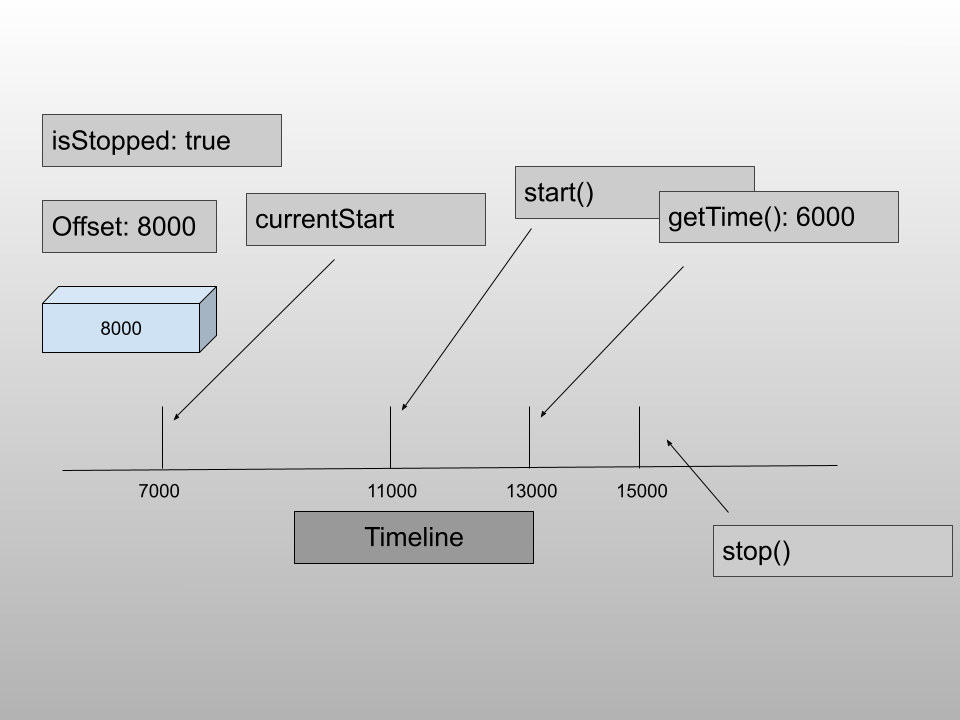
This sequence follows every time when you press start() and stop() to resume and pause your stopwatch respectively.
Now that we have figured out what logic our stopwatch is going to follow, let’s code this thing out. First, let’s make a new java file “Stopwatch.java” and make the Stopwatch class.
public class Stopwatch
{
}
Let us add the class variables: offset (long), currentStart (long) and isStopped (boolean) and initialize them in the constructor.
public class Stopwatch
{
    private long offset, currentStart;
    private boolean isStopped;

    public Stopwatch()
    {
        offset = 0L;
        currentStart = System.currentTimeMillis();
        isStopped = true;
    }
}
offset is set to zero, the currentStart can be anything for now and isStopped is true indicating that the stopwatch is in the stopped state. Then, we add the start() method which starts/resumes the stopwatch.
public class Stopwatch
{
    ....

    public void start()
    {
        if(isStopped)
        {
            currentStart = System.currentTimeMillis() - offset;
        }

        isStopped = false;
    }
}
Notice the “if” statement. This means only if the stopwatch is in the stopped state, we will start it. Otherwise, nothing will happen. Next, we make our stop() method which stops/pauses the stopwatch.
public class Stopwatch
{
   ...

    public void stop()
    {
        if(!isStopped)
        {
            offset = System.currentTimeMillis() - currentStart;
        }
        isStopped = true;
    }
}
And as explained the getTime() method is also created which gives the current time of the stopwatch.
public class Stopwatch
{
    ...

    public long getTime()
    {
        if(!isStopped)
            return System.currentTimeMillis() - currentStart;
        else
            return offset;
    }
}
Notice the “if” statement. This says that when the stopwatch is in the stopped state, return the offset. Otherwise, the current time of the stopwatch.
That is all in our “Stopwatch.java” class. Now let’s test this out. Make another file “StopwatchTest.java” and in the main method create a Stopwatch, call the start(), stop(), getTime() methods a couple of times and we’re done.
public class StopwatchTest {
    public static void main(String[] args) {
        Stopwatch sw = new Stopwatch();

        System.out.println("\nStarting Stopwatch: ");
        sw.start();
        System.out.println(sw.getTime());
        sw.stop();
        System.out.println("\nStopwatch Stopped. ");

        System.out.println("\nStarting Stopwatch: ");
        sw.start();
        System.out.println(sw.getTime());
        sw.stop();
        System.out.println("\nStopwatch Stopped. ");

    }
}
The output might not be satisfactory. You might see something like this.
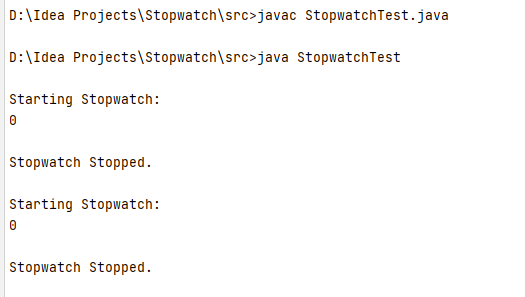
It’s obvious, we are not giving any time for the stopwatch to run and that is the reason when we call getTime() just after start(), we get zeros. We can introduce time delays by injecting Thread.sleep() which makes the current Thread sleep for a certain time period. Since Thread.sleep() method requires a try-catch to handle the InterruptedException, we will make a method named sleep().
public class StopwatchTest {
   ...

    public static void sleep(int time)
    {
        try {
            Thread.sleep(time);
        } catch (InterruptedException e) {
            e.printStackTrace();
        }
    }
}
Now, we can write
public class StopwatchTest {
    public static void main(String[] args) {
        Stopwatch sw = new Stopwatch();

System.out.println("\nStarting Stopwatch: ");
        sw.start();
sleep(2000); // 2 sec time delay
        System.out.println(sw.getTime());
sleep(2000);
        sw.stop();
        System.out.println("\nStopwatch Stopped. ");

sleep(2000);

        System.out.println("\nStarting Stopwatch: ");
        sw.start();
sleep(2000);
        System.out.println(sw.getTime());
sleep(2000);
        sw.stop();
        System.out.println("\nStopwatch Stopped. ");

    }

    ...
}
Once you run this, you will see the time 2000 ms after the start() is called.
But is this what we really wanted? This is not satisfactory to see whether this stopwatch is working properly or not (at least not for me). I want to see the stopwatch running. Any Idea on how we can do that? Well, we could make another thread and display the time on that thread while the control logic is on the main thread.
Note: If you are not comfortable using threads, you should definitely try it out.
This is what we are going to do. We are going to create a new Thread and print out the stopwatch time on that thread.
public class StopwatchTest {
    public static void main(String[] args) {
        Stopwatch sw = new Stopwatch();

        Thread observerThread = new Thread(new Runnable() {
            @Override
            public void run() {

}
        });
        observerThread.start();


        ...

    }
Notice we are creating a new thread named “observerThread” and passing it a Runnable. The code that you write inside the run() method is what is going to run on a different thread. After creating the Thread, we write observerThread.start() to start the thread. Inside the run method, we will infinitely print out the stopwatch time using its getTime() method (we will modify it in the upcoming tutorials).
...
Thread observerThread = new Thread(new Runnable() {
    @Override
    public void run() {
        while (true)
        {
            System.out.print("\rTime: "+ sw.getTime());
sleep(10);
        }

    }
});
...
We run an infinite loop continuously printing out the time of the stopwatch after every 10 ms. Notice the “\r” in the print statement. “\r” stands for carriage return. Its job is to return the cursor to the beginning of the current line so that new stuff can be printed on the same line. It is similar to “\n” which prints messages on a new line. I think we all understand the importance of “\r” over “\n” otherwise all our print statements would come on a new line thereby spamming the whole command line. One last job is left, which is to clean up the getTime() methods and extra sleep statements that we wrote to see the time after start() was called.
public static void main(String[] args) {
    Stopwatch sw = new Stopwatch();

    ...


    System.out.println("\nStarting Stopwatch: ");
    sw.start();
sleep(2000);
    sw.stop();
    System.out.println("\nStopwatch Stopped. ");

sleep(2000);

    System.out.println("\nStarting Stopwatch: ");
    sw.start();
sleep(2000);
    sw.stop();
    System.out.println("\nStopwatch Stopped. ");

}
That’s it. Now when you run this code, you will see that the time will get updated every 10 ms, the stopwatch will resume and pause 2 times. I will attach a screenshot of the output but it will not be able to show the time updates.
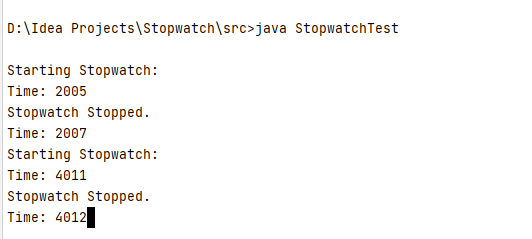
One problem that you might notice here is that the program doesn't fully stop execution even when all the code of the main thread has been finished. You can force it to stop the execution by pressing CTRL+C. I want you to figure out why this might be happening. We will mend this in the next tutorial.
This is only the beginning. Until now, we are using a different thread, created on the client-side, to view the stopwatch updates. But we can make this better by encapsulating the Thread logic inside the Stopwatch class. What I mean is that the stopwatch will run on a different thread every time it is started. This will make the client’s life easier as he will no longer have to create a different thread to view the stopwatch. This is something that we are going to do in the next tutorial.
Next Tutorial:
Encapsulating the Thread Logic.
Full Code
The Full code for this tutorial.
Stopwatch.java
public class Stopwatch
{
    private long offset, currentStart;
    private boolean isStopped;

    public Stopwatch()
    {
        offset = 0L;
        currentStart = System.currentTimeMillis();
        isStopped = true;
    }

    public void start()
    {
        if(isStopped)
        {
            currentStart = System.currentTimeMillis() - offset;
        }

        isStopped = false;
    }

    public void stop()
    {
        if(!isStopped)
        {
            offset = System.currentTimeMillis() - currentStart;
        }
        isStopped = true;
    }

    public long getTime()
    {
        if(!isStopped)
            return System.currentTimeMillis() - currentStart;
        else
            return offset;
    }
}
StopwatchTest.java
public class StopwatchTest {
    public static void main(String[] args) {
        Stopwatch sw = new Stopwatch();

        Thread observerThread = new Thread(new Runnable() {
            @Override
            public void run() {
                while (true)
                {
                    System.out.print("\rTime: "+ sw.getTime());
sleep(10);
                }

            }
        });
        observerThread.start();


        System.out.println("\nStarting Stopwatch: ");
        sw.start();
sleep(2000);
        sw.stop();
        System.out.println("\nStopwatch Stopped. ");

sleep(2000);

        System.out.println("\nStarting Stopwatch: ");
        sw.start();
sleep(2000);
        sw.stop();
        System.out.println("\nStopwatch Stopped. ");

    }

    public static void sleep(int time)
    {
        try {
            Thread.sleep(time);
        } catch (InterruptedException e) {
            e.printStackTrace();
        }
    }
}
References:
- Book: Head First Design Patterns, by Eric Freeman, Elisabeth Robson, Bert Bates, Kathy Sierra.
Powerful Design Patterns to create an Amazing Stopwatch App (Part 1) was originally published in Level Up Coding on Medium, where people are continuing the conversation by highlighting and responding to this story.
This content originally appeared on Level Up Coding - Medium and was authored by Rajtilak Pal
Rajtilak Pal | Sciencx (2021-03-26T12:23:07+00:00) Powerful Design Patterns to create an Amazing Stopwatch App (Part 1). Retrieved from https://www.scien.cx/2021/03/26/powerful-design-patterns-to-create-an-amazing-stopwatch-app-part-1/
Please log in to upload a file.
There are no updates yet.
Click the Upload button above to add an update.
