This content originally appeared on Level Up Coding - Medium and was authored by Rajtilak Pal

Welcome to the 4th tutorial of this series. From the last 3 tutorials, we have been focusing on our Core Stopwatch class. We tried to make it better and better, reducing the client-side code as much as possible. Now it’s time to move on and focus on using this Stopwatch class in our Swing App.
Previous Tutorial
If you are reading this part first, you should definitely check out Part 3 of this series to catch up.
Before diving into any of the code, let’s take a look at what we are going to make.
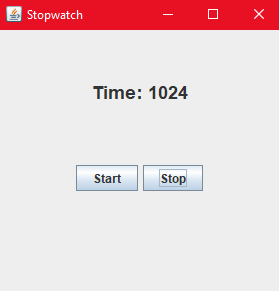
This is what our App is going to look like after this tutorial ends. There are three main components here: Timer Display, Start button, and Stop button.
Note: The time is still in milliseconds and I want you to figure out the formatting logic.
Let’s take a deeper look at the components that we are using here. The main component here is the JFrame. This JFrame is going to contain all other components.
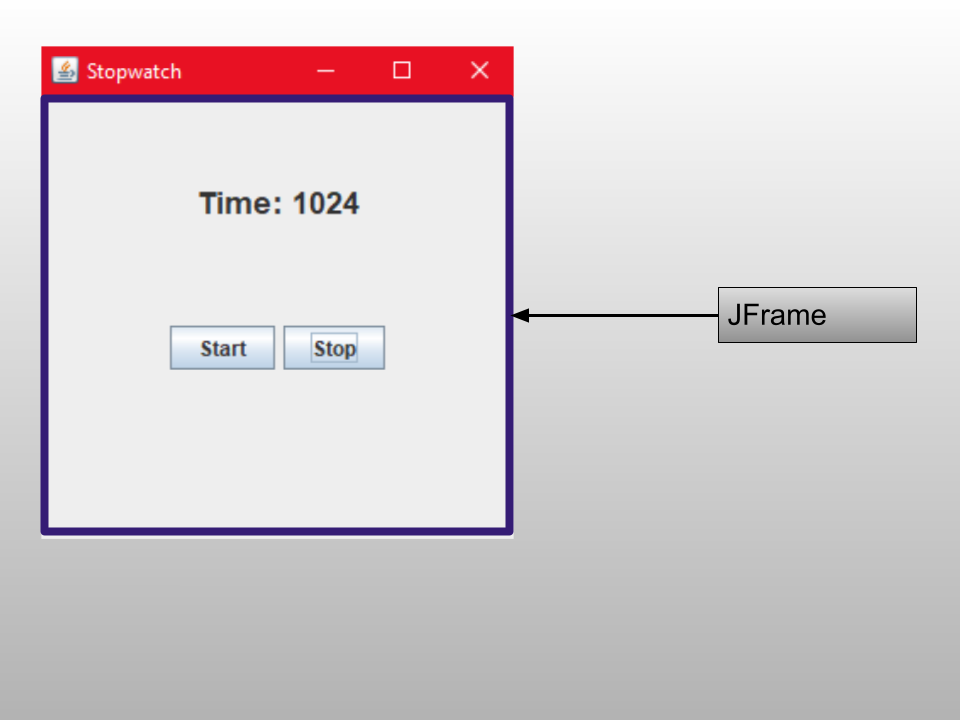
This JFrame has a layout of GridLayout with 2 rows and 1 column.
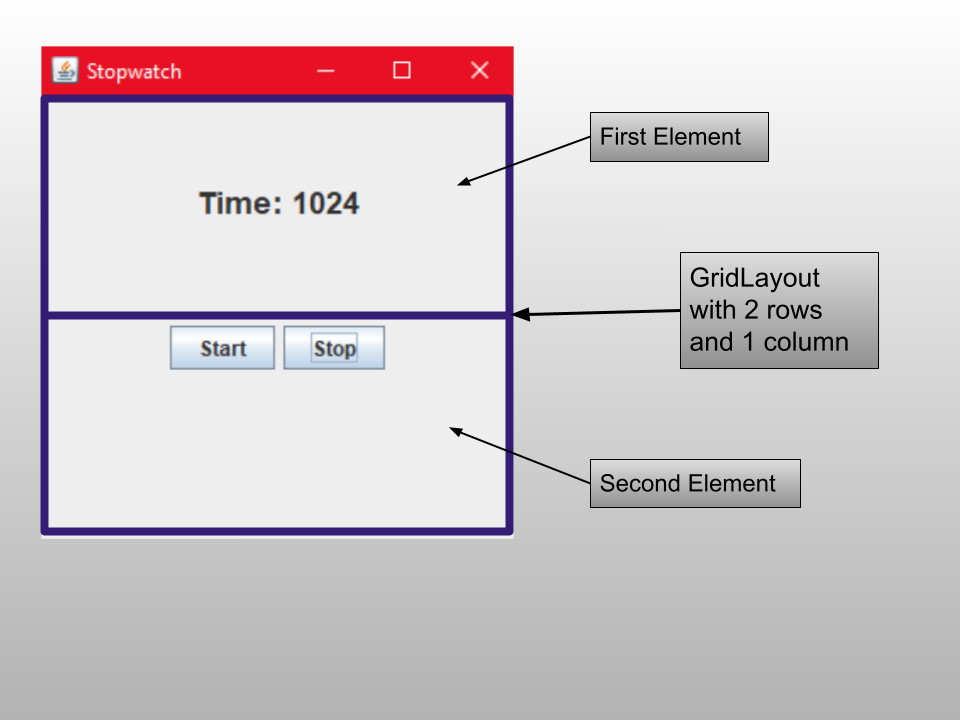
Each element of the GridLayout has a JPanel with FlowLayout.
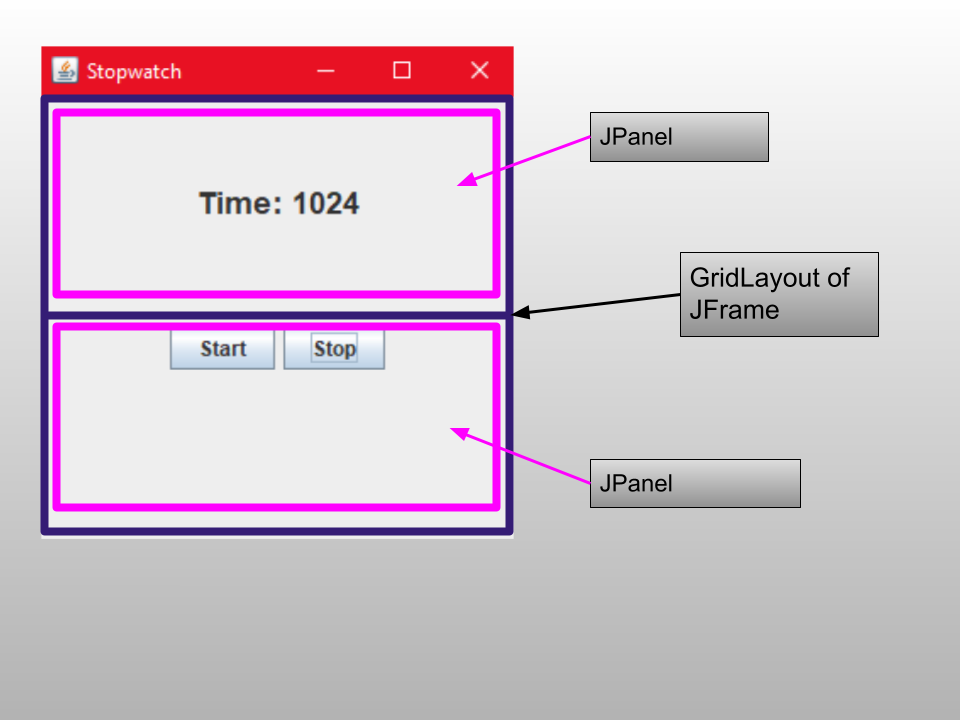
In the first JPanel there is a JLabel named “timerDisplay” and in the second JPanel there are two buttons: Start and Stop.
We will keep this app as simple as possible. The only thing that the user will be able to do with this stopwatch is just Start and Stop it. After our UI is built up and ready, we can add more features. But, for now, let’s go ahead and start making this.
We will start by making our application’s main class. Create a new java file and name this “StopwatchSwing.java”
public class StopwatchSwing {
}
Next, we are going to make the main() method and let swing know that this is the main class of our application (Don’t forget the imports).
import java.awt.*;
import javax.swing.*;
public class StopwatchSwing {


    public static void main(String[] args) {
        SwingUtilities.invokeLater(new Runnable() {
            @Override
            public void run() {
                new StopwatchSwing();
            }
        });
    }

}
Let’s add some UI widgets to our class.
public class StopwatchSwing {
    JFrame frame;
    JPanel panel1, panel2;
    JLabel timerDisplay;
    JButton start, stop;

    .....
}
Notice we added the main JFrame, 2 JPanels, timerDisplay JLabel, and Start and Stop JButtons. Let us now set up the UI in the constructor of this class.
public class StopwatchSwing {

    ....

    StopwatchSwing()
    {
// Initializing the JFrame
frame = new JFrame("Stopwatch");
frame.setSize(300,300);
frame.setMinimumSize(new Dimension(300,300));
frame.setLayout(new GridLayout(2,1));
frame.setDefaultCloseOperation(JFrame.EXIT_ON_CLOSE);
}
}
You can see we are initializing our “frame” by creating a new JFrame object and giving it the name “Stopwatch”. This is going to be the title of the window of our application. Then, we are setting the initial size of the frame as 300,300 pixels. We are adding a minimum size to our window so that the user cannot contract the window below this size. Next, we are adding the layout of our frame. We are using GridLayout here with 2 rows and 1 column. At last, we are setting the default close operation of this frame as EXIT_ON_CLOSE.
Next, we will set up our JPanels in each of the Grid Element.
StopwatchSwing()
{
        // Initializing the JFrame
        frame = new JFrame("Stopwatch");
        frame.setSize(300,300);
        frame.setMinimumSize(new Dimension(300,300));
        frame.setLayout(new GridLayout(2,1));
        frame.setDefaultCloseOperation(JFrame.EXIT_ON_CLOSE);
// Setting Up Panels
panel1 = new JPanel();
panel1.setLayout(new FlowLayout(FlowLayout.CENTER, 0, 50));
panel2 = new JPanel();
panel2.setLayout(new FlowLayout(FlowLayout.CENTER));
}
We are creating two JPanels and setting their layouts to be FlowLayouts. Now let’s make our JLabel “timerDisplay” and add it to “panel1”.
StopwatchSwing()
{
...
// Setting Up Panels
panel1 = new JPanel();
panel1.setLayout(new FlowLayout(FlowLayout.CENTER, 0, 50));
timerDisplay = new JLabel("Time: 000");
Font font = timerDisplay.getFont();
timerDisplay.setFont(new Font(font.getFontName(), font.getStyle(), 18));
panel1.add(timerDisplay);
panel2 = new JPanel();
panel2.setLayout(new FlowLayout(FlowLayout.CENTER));
}
We are initializing timerDisplay with a new JLabel object and giving it an initial text of “Time: 000”. Then, we are changing the font size to 18. At last, we are adding the timerDisplay to panel1. Next, we make our 2 buttons and add them to panel2.
StopwatchSwing()
{
...
panel2 = new JPanel();
panel2.setLayout(new FlowLayout(FlowLayout.CENTER));
start = new JButton("Start");
stop = new JButton("Stop");
panel2.add(start);
panel2.add(stop);
}
We are creating two buttons and adding them to panel2. There are only two things left here. Adding the two panels to the JFrame and making the Frame visible.
StopwatchSwing()
{
// Initializing the JFrame
frame = new JFrame("Stopwatch");
frame.setSize(300,300);
frame.setMinimumSize(new Dimension(300,300));
frame.setLayout(new GridLayout(2,1));
frame.setDefaultCloseOperation(JFrame.EXIT_ON_CLOSE);
// Setting Up Panels
panel1 = new JPanel();
panel1.setLayout(new FlowLayout(FlowLayout.CENTER, 0, 50));
timerDisplay = new JLabel("Time: 000");
Font font = timerDisplay.getFont();
timerDisplay.setFont(new Font(font.getFontName(), font.getStyle(), 18));
panel1.add(timerDisplay);
panel2 = new JPanel();
panel2.setLayout(new FlowLayout(FlowLayout.CENTER));
start = new JButton("Start");
stop = new JButton("Stop");
panel2.add(start);
panel2.add(stop);
frame.add(panel1);
frame.add(panel2);
frame.setVisible(true);
}
This is the full code of the constructor. In the end, we are adding our two panels to the frame and making the frame visible using its setVisible() method.
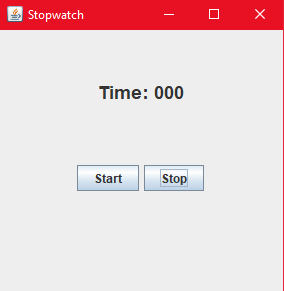
At this point, our app looks like this. Notice, hitting the Start and Stop buttons doesn’t do anything which is kind of obvious because we do not have any listeners attached to it yet.
To attach a listener to a button, we have to use the addActionListener() method of the JButton class. We can add the listeners to the buttons after they are created, therefore a good place to add the listeners will be the constructor. Go to the end of the constructor and add the listeners like this.
import javax.swing.*;
import java.awt.*;
import java.awt.event.ActionEvent;
import java.awt.event.ActionListener;
public class StopwatchSwing {
...
StopwatchSwing()
{
....
frame.setVisible(true);
// Adding Listeners to the Buttons
start.addActionListener(new ActionListener() {
@Override
public void actionPerformed(ActionEvent e) {
    }
});
stop.addActionListener(new ActionListener() {
@Override
public void actionPerformed(ActionEvent e) {
}
});
}
}
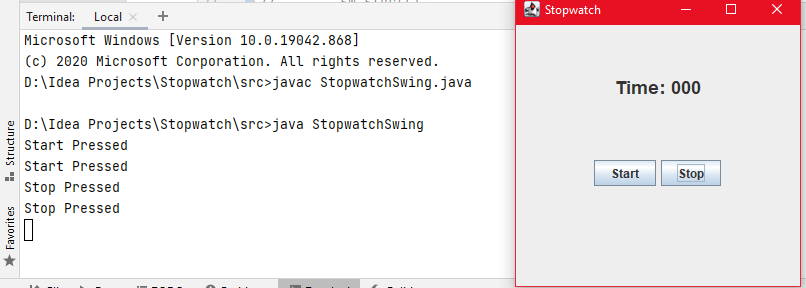
Here, we are adding an ActionListener to each button. The code that will be executed on hitting the buttons is required to be written inside the actionPerformed() method of each ActionListener. For now, we are going to print out a message on hitting the Start and Stop methods.
start.addActionListener(new ActionListener() {
@Override
public void actionPerformed(ActionEvent e) {
System.out.println("Start Pressed");
}
});
stop.addActionListener(new ActionListener() {
@Override
public void actionPerformed(ActionEvent e) {
System.out.println("Stop Pressed");
}
});After writing this code, run the code and hit the Start and Stop methods a couple of times and you will see that the appropriate messages are being printed out on the console.
Now let us go ahead and add the Stopwatch to this class. We will start by making this class an Observer as this is the class that is going to observe the stopwatch object.
public class StopwatchSwing implements Observer {
...
@Override
public void update(long time) {
timerDisplay.setText("Time: "+time);
}
}The update() method needs to be overridden and inside it, we are just going to display the time that we will receive using the setText() method of the timerDisplay JLabel. Next, we add the Stopwatch to our class.
public class StopwatchSwing implements Observer {
Stopwatch sw;
.....
StopwatchSwing()
{
sw = new Stopwatch();
sw.registerObserver(this);
.....
}
}
We are creating a new Stopwatch object and registering an observer which is the StopwatchSwing class itself. On hitting the Start button, we should start the stopwatch and on hitting the Stop button, we should stop the stopwatch. Therefore we have to change the listeners.
start.addActionListener(new ActionListener() {
@Override
public void actionPerformed(ActionEvent e) {
sw.start();
}
});
stop.addActionListener(new ActionListener() {
@Override
public void actionPerformed(ActionEvent e) {
sw.stop();
}
});In the start listener, we are just adding sw.start() to start the stopwatch and in the stop listener, we are just adding sw.stop() to pause the stopwatch.
Now, it is a good practice to keep the logic of a button listener into another function. You will understand the need for this in the next tutorial when the button listener logic grows to a more complex one.
StopwatchSwing()
{
....
// Adding Listeners to the Buttons
start.addActionListener(new ActionListener() {
@Override
public void actionPerformed(ActionEvent e) {
handleStartPress();
}
});
stop.addActionListener(new ActionListener() {
@Override
public void actionPerformed(ActionEvent e) {
handleStopPress();
}
});
}
private void handleStartPress() {
sw.start();
}
private void handleStopPress(){
sw.stop();
}
We made two methods: handleStartPress() and handleStopPress() who will be responsible for handling the appropriate button presses.
Remember what we have done till now.
- We are creating a stopwatch object and registering the StopwatchSwing object as an Observer.
- On hitting the Start button, the stopwatch’s start() method is getting called.
- The start() method creates a new thread and starts the thread.
- The thread starts notifying the time to all observers every 10 ms.
- Since our StopwatchSwing class is an observer of this stopwatch, it’s update() method is called every 10 ms. The update() method updates the time in the timerDisplay with the time that is received from the Stopwatch class.
Run your code now. On hitting the Start button, your stopwatch should start updating the timerDisplay JLabel. On hitting the Stop button, the stopwatch will pause. On hitting Start again, it will resume. The only way we can reset the Stopwatch is by starting the application again.
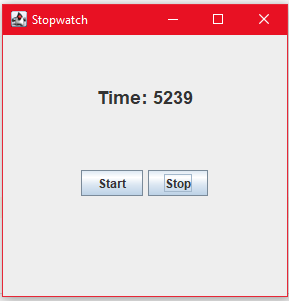
Of course, we don’t want to reset the Stopwatch by restarting the application again and again. In fact, we will have to give the users features for Start, Pause, Resume and Stop. Without these features, our Stopwatch Application is useless. Keep in mind, the Core Stopwatch class does not have all these features implemented. It can only Pause and Resume. It is the responsibility of the StopwatchSwing class to give these features to the user. That’s something we are going to figure out in the next tutorial.
Next Tutorial:
Adding Start, Pause, Resume and Stop to our App.
Full Code
StopwatchSwing.java
import javax.swing.*;
import java.awt.*;
import java.awt.event.ActionEvent;
import java.awt.event.ActionListener;

public class StopwatchSwing implements Observer {

    Stopwatch sw;
    JFrame frame;
    JPanel panel1, panel2;
    JLabel timerDisplay;
    JButton start, stop;

    StopwatchSwing()
    {
        sw = new Stopwatch();
        sw.registerObserver(this);

        // Initializing the JFrame
        frame = new JFrame("Stopwatch");
        frame.setSize(300,300);
        frame.setMinimumSize(new Dimension(300,300));
        frame.setLayout(new GridLayout(2,1));
        frame.setDefaultCloseOperation(JFrame.EXIT_ON_CLOSE);

        // Setting Up Panels
        panel1 = new JPanel();
        panel1.setLayout(new FlowLayout(FlowLayout.CENTER, 0, 50));

        timerDisplay = new JLabel("Time: 000");
        Font font = timerDisplay.getFont();
        timerDisplay.setFont(new Font(font.getFontName(), font.getStyle(), 18));

        panel1.add(timerDisplay);


        panel2 = new JPanel();
        panel2.setLayout(new FlowLayout(FlowLayout.CENTER));
        start = new JButton("Start");
        stop = new JButton("Stop");
        panel2.add(start);
        panel2.add(stop);

        frame.add(panel1);
        frame.add(panel2);

        frame.setVisible(true);


        // Adding Listeners to the Buttons

        start.addActionListener(new ActionListener() {
            @Override
            public void actionPerformed(ActionEvent e) {
                handleStartPress();
            }
        });

        stop.addActionListener(new ActionListener() {
            @Override
            public void actionPerformed(ActionEvent e) {
                handleStopPress();
            }
        });


    }

    private void handleStartPress() {
        sw.start();
    }
    private void handleStopPress(){
        sw.stop();
    }

    public static void main(String[] args) {
        SwingUtilities.invokeLater(new Runnable() {
            @Override
            public void run() {
                new StopwatchSwing();
            }
        });
    }


    @Override
    public void update(long time) {
        timerDisplay.setText("Time: "+time);
    }
}
References:
- Book: Head First Design Patterns, by Eric Freeman, Elisabeth Robson, Bert Bates, Kathy Sierra.
Starting with the Swing App (Part 4) was originally published in Level Up Coding on Medium, where people are continuing the conversation by highlighting and responding to this story.
This content originally appeared on Level Up Coding - Medium and was authored by Rajtilak Pal
Rajtilak Pal | Sciencx (2021-03-26T12:22:58+00:00) Starting with the Swing App (Part 4). Retrieved from https://www.scien.cx/2021/03/26/starting-with-the-swing-app-part-4/
Please log in to upload a file.
There are no updates yet.
Click the Upload button above to add an update.
