
This content originally appeared on Level Up Coding - Medium and was authored by Antonio Lagrotteria
Micro-frontends with AWS Amplify (Part 1)
This story is the first part of a series of tutorials where, starting from a trivial micro-frontends (MFE) application, I will dive deep in AWS Amplify, a very promising framework allowing developers (and I would say start-ups) to easily build and deploy full-stack applications managed by AWS.
Goal
Part 1 will focus on creating a quick micro frontend app, so it will be “frontend-heavy”. We will deploy it to AWS using Amplify in Part 2. The overall architecture (more in depth in Part 2) will look like this:

The user flow is pretty straight-forward: once logged in, users access the application by landing to a shell app, a React-based parent micro-frontend app acting as container two child Angular-based micro-frontend apps responsible for accounts and payments domains respectively.
The parent / shell app will contain the two child apps by referencing their generated bundle in the index.html page. You may already argue on how will a React-based app happily live together with an Angular one. The answer (one of many) is Web Components, which converts your framework specific module into basic custom HTML elements universally understood. There are a number of other approaches for micro-frontend web apps such as roasted iframe, javascript libraries and special features of javascript bundlers. I chose Web Components to keep it simple for demo purpose.
Prerequisites
To follow along with this demo, make sure to have installed or have access to following latest NodeJS & NPM. For future stories, make sure you create a free AWS account (do not use root account to play around!).
Let’s start with Accounts team
Let’s put our “Accounts team” hat and create an Angular 11 app from scratch, by suing Angular 11. Install it if you do not have it already:
npm install -g @angular/cli
ng new mfe-accounts
cd mfe-accounts
ng serve
A basic Angular11 app is now created (press enter when asked to choose additional features during the prompt such as routing and stylesheet format). Lets remove some redundant html and lets launch the client at localhost:4200.

Now let’s focus on two problems:
- Since we will reference the generated bundle from the parent shell app, we need to ensure that we get a single bundle for each app.
- How do we compile this app into a web component?
Single bundle generation
To solve the first challenge we will use ngx-build-plus package, by typing:
ng add ngx-build-plus
Above command extends Angular CLI commands with extra functionality, modifying the angular.json file. We will generate a single bundle with below command, which we can add in our scripts section in package.json:
"scripts": {
   "ng": "ng",
   "start": "ng serve",
"build": "ng build --prod --single-bundle",
   "test": "ng test",
   "lint": "ng lint",
   "e2e": "ng e2e"
}
App as Web Component
Since Angular 6, Angular Elements allow to publish Angular components as custom elements, by exposing it as a web component.
ng add @angular/elements
This exposes utilities to wrap our application in a custom element. Modify the app.module.ts file as shown below in order to simply expose AppModule as a Web Component.
import { Injector, NgModule } from '@angular/core';
import { APP_BASE_HREF } from '@angular/common';
import { BrowserModule } from '@angular/platform-browser';
import { AppRoutingModule } from './app-routing.module';
import { AppComponent } from './app.component';
import { createCustomElement } from '@angular/elements';
@NgModule({
declarations: [AppComponent],
imports: [BrowserModule, AppRoutingModule],
providers: [{ provide: APP_BASE_HREF, useValue: '/' }],
bootstrap: [AppComponent]
})export class AppModule { constructor(private injector: Injector) {
const app = createCustomElement(AppComponent,{injector});
customElements.define('app-accounts', app);
} ngDoBootstrap() {}}
Repeat for the Payments Team
To create a Payments micro-frontend, just repeat same steps as mentioned above but applied to payments. Make sure to change port number and call the custom element as app-payments.
ng new mfe-payments
cd mfe-payments
ng serve --port 4201
With due minor changes, app should look like:

Let Core Team glue everything
Now, as Core Team member, it is time to display the newly created micro-frontends under the parent application. To convince you that Angular apps are exposed as custom elements, we will create the parent app as a React one and start it at http://localhost:3000:
npx create-react-app mfe-parent
cd mfe-parent
yarn start
The quickest approach to show the newly created application within the React app is to add references to the accounts and payments main bundles. This can be achieved by the following commands:
npm install copyfiles -g
cd mfe-accounts
npm run build
copyfiles "./dist/mfe-accounts/main*js" ../mfe-parent/public
cd ..
cd mfe-payments
npm run build
copyfiles "./dist/mfe-payments/main*js" ../mfe-parent/public
By executing above commands you should end up in a folder structure like below:
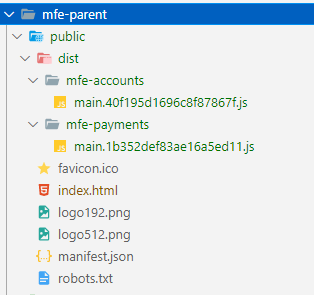
Next, reference both generated main bundles inside index.html file (Zone.js is also needed):
...
<body>
<div id="root"></div>
<script src="https://cdnjs.cloudflare.com/ajax/libs/zone.js/0.9.1/zone.min.js"></script>
<script src="./dist/mfe-accounts/main.40f195d1696c8f87867f.js"></script>
<script src="./dist/mfe-payments/main.1b352def83ae16a5ed11.js"></script>
</body>
...
Finally, access React App.js file, modify look and feel and add custom HTML elements defined in mfe-accounts and mfe-payments modules:
function App() {
   return (
      <div className="App">
         ...
<app-accounts></app-accounts>
         <header className="App-header">
            <img src={logo} className="App-logo" alt="logo"/>
         </header>
<app-payments></app-payments>
      </div>
   );
}
Once refreshed, the React app will look like the below:
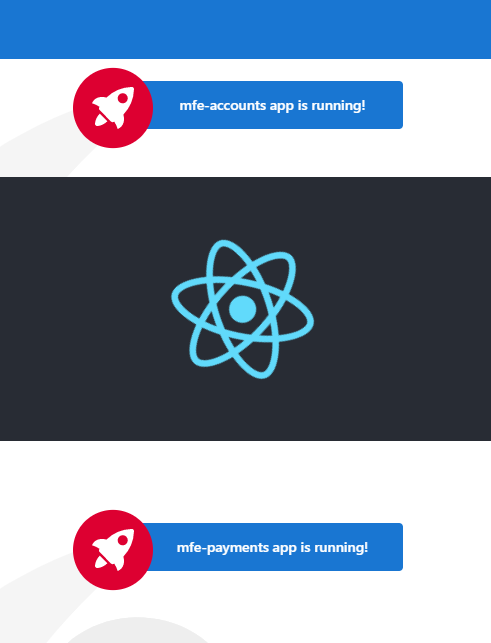
Congrats! We just displayed two dummy Angular-based micro-frontend applications into a parent React application.
Summary
Surely things can and will be more complex than above in real life, but take this as a proof of concept for people approaching to this new architectural style, in the hope to give you some motivation to try things out, evaluate pros and cons and have fun. In upcoming Part 2 we will deploy this app in AWS so that users can access it. Thank you!
References
Micro-frontends with AWS Amplify was originally published in Level Up Coding on Medium, where people are continuing the conversation by highlighting and responding to this story.
This content originally appeared on Level Up Coding - Medium and was authored by Antonio Lagrotteria
Antonio Lagrotteria | Sciencx (2021-03-30T17:52:41+00:00) Micro-frontends with AWS Amplify. Retrieved from https://www.scien.cx/2021/03/30/micro-frontends-with-aws-amplify/
Please log in to upload a file.
There are no updates yet.
Click the Upload button above to add an update.