
This content originally appeared on Envato Tuts+ Tutorials and was authored by Monika Zagrobelna

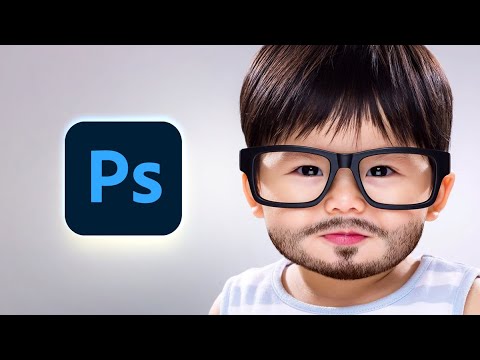
If you want to create a beard in Photoshop, or if you simply want to learn how to Photoshop a mustache on someone's face, in this tutorial I'll show you how to create facial hair in Photoshop. We're going to start by creating two custom facial hair brushes, and then we'll add the beard to a photo of a cute baby!
And if you want to save time, you can use this facial hair Photoshop action from Envato Elements! You only need to select the area on the face, and the action will create the beard for you—you don't need to know how to add a mustache in Photoshop for this to work!

What You'll Learn in This Facial Hair Photoshop Tutorial
- How to create facial hair Photoshop brushes from scratch
- How to add a beard in Photoshop
- How to add a mustache in Photoshop
- How to Photoshop a mustache
- How to use masks and Blend If settings in photo manipulation
- How to create a beard texture in Photoshop
Follow along with us over on our Envato Tuts+ YouTube channel:
What You'll Need
You can use your own photo, but if you want to create the same end result as me, here's the photo I used:
1. How to Create Facial Hair Photoshop Brushes
Step 1
First, we need to create a brush. Open a New File in Photoshop using these dimensions:

Step 2
Draw two points at some distance from each other using the Curvature Pen Tool (P). Make sure your Pen Tool is currently in the Path mode.


Step 3
Drag the line between these two points to create a slight curve.

Step 4
Take the Brush Tool (B) now and open the Brushes panel. Go to Legacy Brushes > Default Brushes and select Round Point Stiff. Set its size to 6 pixels.

Step 5
Take the Pen Tool (P) again, right-click on the canvas, and select Stroke Path. Select Brush and check Simulate Pressure.

Step 6
We have our first hair! To turn it into a brush, go to Edit > Define Brush Preset. Name it Beard Temp and press OK.

Step 7
Create a New File with larger dimensions—here we're going to test and adjust the settings of our brush. Set the background and foreground colors to two example colors of a beard. It will be possible to change them later, but we need something for the start.


Step 8
Press F5 to open the Brush Settings panel, and apply the following changes:


Step 9
Click Create a New Brush, check all the options, and name it Beard. You can now delete the previous brush.

Step 10
Let's create one more brush. Create another file and use the Line Tool (U) in the Shape mode to draw a black, vertical line. Turn it into a brush as well, naming it Stubble Temp.


Step 11
Go back to our test file and adjust the settings of this brush the following way:


Step 12
Save the brush and name it Stubble.

2. How to Add a Beard in Photoshop
Step 1
These two brushes are all we need to create beard texture in Photoshop. Now we're ready to add some facial hair to our model! Open the photo that you want to use for this purpose. Take the Object Selection Tool (W) and outline roughly the lower part of the face.


Step 2
Create a New Layer and add a Layer Mask to it. Name this layer Beard.

Step 3
Take a Soft Round Brush and paint the basic shape of the facial hair with black.

Step 4
Double-click the Beard layer and go to the Blend If section. Hold the Alt key and drag the lower white marker to make the beard more transparent.


Step 5
Create a New Layer and name it Detailed Hair. Press Alt and drag the Layer Mask from the previous layer to it.

Step 6
Lower the Opacity of the Beard layer to make it more subtle.

Step 7
Now select both colors for your beard and start painting the hair, using the Beard brush. Try to paint over the area painted on the layer below. Because facial hair grows in different directions depending on the area of the face, open the Brush Settings panel (F5) and change the Angle and shape of the hair with these settings. You can also check Flip X to turn the curve the other way.
If you're not happy with the colors that this brush produces, experiment with the Color Dynamics section, or turn it off altogether.


Adjust the density of the hair and the size of the brush depending on the area for a more natural effect. Start slow, covering the area defined by the previous layer, and only then make the hair denser where it needs to be. The more attention you pay to the direction of the hair, the more natural the end result will be. If you paint the whole beard without adjusting the settings, it's likely to look fake.

Step 8
Duplicate this layer with Control-J. Hide it for a moment and go back to the previous layer.

Step 9
Double-click the layer and go to the Blend If section. Drag the lower white marker to the left until the beard starts disappearing. Then press Alt and drag it some more to create a smoother transition between the skin and beard.


Step 10
Now go back to the copied layer and make it visible. Take the Soft Round brush and paint with black on the Layer Mask to remove the hair. Then make the brush smaller and paint with white to reveal the thin layer of hair around the face. You can also use it to make certain patches of hair darker.

Step 11
To make the effect more realistic, create a New Layer and paint some stubble on it, using the Stubble brush. Just as previously, adjust the Angle in the settings. You can also change the Roundness to adjust the length of the hair. When you're done, you can make the effect smoother with a Layer Mask.


Step 12
Let's shade the beard a little now. Open the Adjustments panel and select Hue/Saturation. Press Alt and drag the Layer Mask of the Beard layer to it.


Step 13
Make the Lightness lower and the Saturation higher to create a nice-looking shadow. Then paint over the Layer Mask with a soft brush to remove the shadow from the illuminated areas.


Step 14
The beard is done, and now you only need to make minor adjustments to it to make it look more convincing to you. You can lower the Opacity of the Beard layer to make the effect subtler, paint on the masks to remove hair from certain areas, or add more hair. Adding lighter hair in the brighter areas may make it shinier, but you need to turn off Color Dynamics for that.

Good Job!
Now you know how to make facial hair in Photoshop! Now, if you want, you can add a mustache in Photoshop, or add facial hair in Photoshop.
And if you enjoyed this tutorial, maybe give these a try as well:
 Photoshop BrushesHow to Make a Bokeh Brush in Photoshop
 Photoshop ActionsHow to Create an Instagram Filter Photoshop Action
 Photo ManipulationHow to Make a Matrix Effect in Photoshop
 Photoshop ActionsHow to Create a Cyberpunk Photoshop Effect Action
 Photoshop ActionsHow to Create a Smoke Effect Photoshop Action
This content originally appeared on Envato Tuts+ Tutorials and was authored by Monika Zagrobelna
Monika Zagrobelna | Sciencx (2021-04-01T07:00:00+00:00) How to Make Facial Hair in Photoshop. Retrieved from https://www.scien.cx/2021/04/01/how-to-make-facial-hair-in-photoshop/
Please log in to upload a file.
There are no updates yet.
Click the Upload button above to add an update.