This content originally appeared on DEV Community and was authored by Sowmen Rahman
What is load balancing?
Load balancing is a technique(algorithm) used to distribute incoming network traffic onto a group of servers. It provides a single entry point for all public users to a service hosted by a server. Production-grade servers are generally run behind load balancers because they can “even-out” the incoming load across the servers, thus preventing server overloads. Load balancers also provide a secondary functionality to the servers they are routing traffic to: they act as a reverse proxy. A reverse proxy is like a middle-man between the group of servers and the users. All requests handled by the reverse-proxy are forwarded to the appropriate server based on the request conditions. The server then responds back with its data, which is then directed to the users from the reverse proxy. In this way, r-proxies keep the identity of servers anonymous alongside preventing access to the main servers where sensitive data like configuration files, tokens, secrets, etc. are stored.

NGINX and AWS ELB as load balancers
NGINX is a fast and free open-source load balancer that can also act as a reverse proxy. On the other hand, ELB is a load-balancing service provide by Amazon AWS. ELB can further be of 3 main types: (1) ALB, (2) CLB and (3) NLB. A newer class of load-balancers called the gateway load-balancers have also been add into the family of cloud services AWS provides. The idea for this tutorial is to form a cascading multi load-balancer architecture that can provide a highly available Node.js server running on multiple ports.
Note to users : There are many ways of implementing infrastructure for Node.js applications on AWS, including ones that utilize AWS’s own ECS and ECR ecosystem for docker applications. However, this tutorial doesn’t focus on that, and aims to better understand the mechanism behind EC2 instances, load balancers and how they interact with docker over load-balanced and proxied ports.
Overview of the architecture
This is the architecture that we’re aiming for. Multi-level load balancers managed by AWS and NGINX which will help us maintain multiple ports on each EC2 instance for our node apps. The good thing about this architecture is that the 2 instances are in different availability zones (AZ1 and AZ2), as a result, even if one zone goes down, the other zone remains functional. And our application doesn’t crash.
The Node.js app
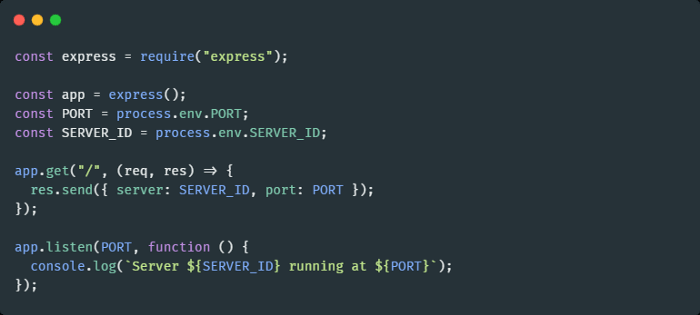
For the sake of simplicity, we use a standard starter Express node app, which looks like this:

The ports are provided to the express app via the PORT environment variable. We will feed these port values via Docker. This is a very simple task thanks to docker-compose. There’s another environment variable SERVER_ID, however don’t worry, as it’s only for demonstration purposes only. Once the whole setup is ready, the SERVER_ID will let us know which server the load balancers are pulling the response from. This will help us to validate that our infrastructure configuration using the multi-level load-balancer/r-proxy is running the way it should be.
These type of configurations are common in production pipelines. Generally the main app servers are placed in a VPC in such cases. One informational point about the load balancers is that, level 1 load balancers are often categorized as public-facing, as they deal with the actual client requests, while those at level 2 are internal load-balancers, whose job is to route requests between sources.
Launching EC2 servers
Log in to your AWS account and go to EC2 dashboard. We will be following these steps to setup new servers and get them ready for Docker:
- From the dashboard, click on Launch instances at the top-right corner.
- From the quick start section, select Amazon Linux 2 AMI.
- Choose instance type t2.micro (you can avail the free tier on this instance type if its still available on your account). You may also choose any other type you like instead.
- For this demonstration only, we’ll launch the 2 instances separately, since we want these two instances in different availability zones. In my case, the region is us-east-1, so I selected the default subnet under us-east-1a.
-
Under User data section, paste code from this script below. This will install the prerequisite software for running our node.js docker apps.
For Add Storage and Add Tags sections, keep the defaults and skip.
For Configure Security Group, create a new security group with ports 22(SSH) and 80(HTTP) open. For IP range you may select Anywhere or My IP*8. Since this is for testing only, you may choose either one. I went with **Anywhere.
Click Review and Launch and then Launch.
Create a new keypair to SSH into this instances. We will need this later to build the docker images for the app and the internal load balancer.
The first of the 2 instances have been launched now. Follow the same steps for launching the next instance, only changing the subnet to some other value than the previous one, and using the SSH keypair you created a while ago.
Containerizing the app and NGINX configuration
For this tutorial, we will use this repo for the app:
Link: https://github.com/sowmenappd/load_balanced_nodejs_app
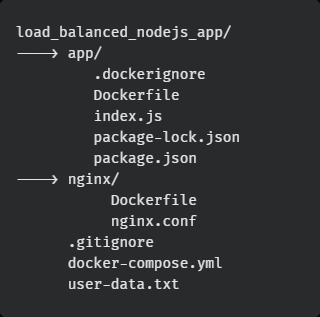
This will help us speed the process through. The hierarchical view of the repo is given below:

The app folder contains the node server source code along with the Dockerfile. In the nginx folder, there is a configuration file nginx.conf that defines the upstream server port configuration:
http{
    upstream lb {
        server 172.17.0.1:1000 weight=1;
        server 172.17.0.1:2000 weight=1;
        server 172.17.0.1:3000 weight=1;
    }
    server {
        listen 80;
        location / {
            proxy_pass http://lb;
        }
    }
}
e configuration files specifies that the main NGINX server should listen to port 80, the root location “/” will relay the request(proxy pass) to an upstream defined in this file named lb. This is an upstream object that specifies how many servers will be included(these are the express servers that we mount via docker-compose, more on that in a later section), and what ports these servers will be internally running on, while the reverse proxy load balances the traffic from port 80.
In our case, the upstream proxy will direct traffic to ports 1000, 2000, and 3000. These port numbers must match the internal PORT value that is sent to each express server instance as an env-var, which we will define in the docker-compose YAML file.
For each of the launched instances, we do the following:
- SSH into the instance using created keypair
- Run the following terminal commands to build the app image from its Dockerfile
git clone https://github.com/sowmenappd/load_balanced_nodejs_app.git
cd load_balanced_nodejs_app/app
docker build -t app .
- Next build the nginx server docker image
cd ../nginx
docker build -t nginx-s .
- Run
docker imagesand you should see something like this:
For the second server, we need to change the docker-compose.yml file. The env-var SERVER_ID should be changed to 2 for all apps (app1, app2, app3). This is definitely nothing to be concerned about, and no production server will ever have something like that. We’re doing this only for the sake of demonstration.
Run the final commands:
cd ..
docker-compose up -d
Your isolated servers should now be running three process of the express app in the background. All we need now is to mount this system using the load-balancer AWS gives us, AWS ALB.
Mounting the system with AWS ALB
At this point, both the instances are ready for mounting. We are going to set up an application load balancer in AWS by following these steps:
- Navigate to EC2 Dashboard and click on Target Groups. Click Create target group.
- Choose target type: Instances and provide a valid target group name, and click Next.
- Select the two running instances and click Include as pending below, with the port as 80.
- Click Create target group.
- Next, click on Load balancer from the side menu (left).
- Click Create load balancer and click Create on Application Load Balancer card.
- In the next screen, select the availability zones you had chosen earlier while launching the instances, and proceed.
- Create a new security group with port 80 open to all IP range, and then click Next.
- Select Existing target group, and point it to the target group you created.
- Rest of the settings are fine, you can click on Create.
The load balancer should be up and running within minutes after registering the instances and getting health checks running. Now, we grab the DNS name of the load balancer from EC2 Dashboard > Load balancers, copy the DNS name attribute of the load balancer.
Paste the DNS name into the browser, and hit Enter. You will see that every time you refresh your browser page, the response sends back different PORT and SERVER_ID values. This validates the system because by default, NGINX and AWS load balancers use Round Robin algorithm for load balancing.
Conclusion
Our system is now guaranteed to be very highly available and able to withstand spiky and massive amount of traffic over prolonged durations of operation, given the multi-load balancer configuration we have deployed. As a follow up to this tutorial, I shall also post another article showing how to create and maintain a deployment pipeline that integrates with source control and deploys our changes to the servers upon commits to the GitHub repo.
Resources
- Dockerfile reference | Docker Documentation
- Compose file | Docker Documentation
- What is an Application Load Balancer? — Elastic Load Balancing (amazon.com)
- Target groups for your Application Load Balancers — Elastic Load Balancing (amazon.com)
- Basics of configuring NGINX. This article contains how to do the… | by Nethmini Romina | FAUN
This content originally appeared on DEV Community and was authored by Sowmen Rahman
Sowmen Rahman | Sciencx (2021-04-15T09:40:57+00:00) Build a highly available Node.js application using Docker, NGINX and AWS ELB. Retrieved from https://www.scien.cx/2021/04/15/build-a-highly-available-node-js-application-using-docker-nginx-and-aws-elb/
Please log in to upload a file.
There are no updates yet.
Click the Upload button above to add an update.


