This content originally appeared on DEV Community and was authored by P V Vighnesh
Welcome back!
This is the continuation of the previous blog Lightning web components - Conditional Rendering.
In the last part, we built a new component employeeDetails, saw how 'formatted' tags work and conditionally rendered the details section. We'll see how we can render lists in this part.
There are two ways we can do this in LWC. We can either use for:each directive or the iterator directive to iterate over an array. Add the directive to a nested tag that encloses the HTML elements you want to repeat.
The iterator directory has special properties, first and last that let you apply special behaviors to the first and last items in an array.
Regardless of which directive you use, you must use a key directive to assign a unique ID to each item. When a list changes, the framework uses the key to rerender only the item that changed.
for:each
When using the for:each directive, use for:item to access the current item.
To assign a key to the first element in the nested template, use the key={uniqueId} directive.
Iterator
To apply special behaviour to the first or last item in a list, use the iterator directive, iterator:iteratorName={array}. Use the iterator directive on a template tag.
Let's build something!
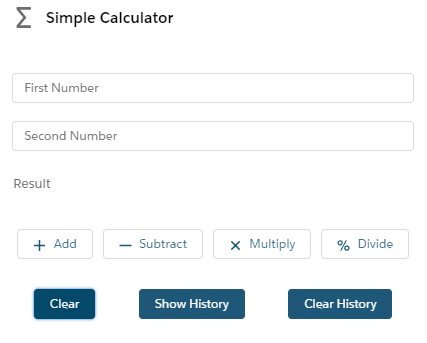
We can use our old simpleCalculator component to play around with for:each and iterator. We'll add two more buttons to the UI to show the previous calculation history and to clear the history.
    <lightning-card title="Simple Calculator" icon-name="utility:advanced_function" class="slds-text-align_center">
        <div class="slds-p-around_medium">
            <lightning-input type="number" name="firstNum" value={firstNumber} placeholder="First Number" onchange={handleFirstNum}></lightning-input>
            <lightning-input type="number" name="secondNum" value={secondNumber} placeholder="Second Number" onchange={handleSecondNum}></lightning-input>
            <lightning-input type="text" name="result" value={result} placeholder="Result" readonly></lightning-input>
        </div>
        <div class="slds-grid slds-p-around_medium">
            <lightning-button label="Add" icon-name="utility:add" size="small" onclick={handleAdd} class="slds-col"></lightning-button>
            <lightning-button label="Subtract" icon-name="utility:dash" size="small" onclick={handleSub} class="slds-col"></lightning-button>
            <lightning-button label="Multiply" icon-name="utility:close" size="small" onclick={handleMul} class="slds-col"></lightning-button>
            <lightning-button label="Divide" icon-name="utility:percent" size="small" onclick={handleDiv} class="slds-col"></lightning-button>
        </div>
        <div class="slds-grid slds-p-around_medium">
            <lightning-button class="slds-col" variant="brand" label="Clear" onclick={handleclear} ></lightning-button>
            <lightning-button-stateful class="slds-col" label-when-off="Show History" label-when-on="Hide History" variant="brand"  selected={isSelected} onclick={handleClick}></lightning-button-stateful>
            <lightning-button class="slds-col" label="Clear History" variant="brand" onclick={handleClearHistory}></lightning-button>
        </div>
           <template if:true={isSelected}>
            <div class="slds-text-align_center">Previous Calculations
                {historyData}
            </div>
        </template>
    </lightning-card>
</template>
Now, this should make our UI look like this.
We'll modify the JavaScript file to handle the two buttons we added to the HTML.
import { LightningElement } from 'lwc';

export default class SimpleCalculator extends LightningElement {
    firstNumber;
    secondNumber;
    result;
    isSelected = false;
    historyData = [];
    id;

    handleFirstNum(event) {
        this.firstNumber = event.target.value;
    }

    handleSecondNum(event) {
        this.secondNumber = event.target.value;
    }

    handleAdd() {
        this.result = `The result of ${this.firstNumber} + ${this.secondNumber} is: ${parseFloat(this.firstNumber) + parseFloat(this.secondNumber)}`;
        this.historyData.push(this.result);
    }

    handleSub() {
        this.result = `The result of ${this.firstNumber} - ${this.secondNumber} is: ${parseFloat(this.firstNumber) - parseFloat(this.secondNumber)}`;
        this.historyData.push(this.result);
    }

    handleMul() {
        this.result = `The result of ${this.firstNumber} * ${this.secondNumber} is: ${parseFloat(this.firstNumber) * parseFloat(this.secondNumber)}`;
        this.historyData.push(this.result);
    }

    handleDiv() {
        if(this.secondNumber > 0) {
            this.result = `The result of ${this.firstNumber} / ${this.secondNumber} is: ${parseFloat(this.firstNumber) / parseFloat(this.secondNumber)}`;
        }
        else {
            this.result = "Invalid Input";
        }
        this.historyData.push(this.result);

    }

    handleclear() {
        this.firstNumber = '';
        this.secondNumber = '';
        this.result = '';
    }

    handleClick() {
        this.isSelected = !this.isSelected;
        showHistory(this.isSelected);
    }

    showHistory(isSelected) {
        if(isSelected) {
            this.showHistoryData = true;
        }
    }
    handleClearHistory() {
        this.historyData = [];
    }
}
Now, let's try the same with for:each directive. Modify the nested <template> tag in the HTML.
 <template if:true={isSelected}>
        <div class="slds-text-align_center">Previous Calculations
              <ul class="slds-m-around_medium">
                    <template for:each={historyData} for:item="res">
                          <li key={res}>
                            {res}
                          </li>
                   </template>
             </ul>
        </div>
 </template>
The lines are coming one after the other, instead of on the same line.

Let's try the same using the Iterator.
Modify the nested template tag again to add the Iterator.
<template if:true={isSelected}>
            <div class="slds-text-align_center">Previous Calculations
                 <ul>
                    <template iterator:res={historyData}>
                        <li key={res.value}>
                            <div if:true={res.first} class="slds-border_top background"></div>
                            {res.value}
                            <div if:true={res.last} class="slds-border_bottom background"></div>
                        </li>
                    </template>
                </ul>
            </div>
        </template>
Notice how we are able to use first and last properties? That's something only Iterator offers. Let's see out it looks now.
It's not much of a difference but using first and last properties, we managed to add a border at the top and at the bottom. Along with that, all the other buttons we added are working fine.
We had previously built the simpleCalculator component that could do basic Arithmetic operations and a button to clear out the values. In this part, we enhanced that application by adding a button to reveal Previous data conditionally and also a button to clear out the history. We also saw how to implement both using for:each and Iterative directives.
In the next part, we will see how to create Child and Parent component and how to pass data between them.
If you liked this, follow the series for some more cool stuff on lwc. There will be one post every day.
Thanks for reading! :D
This content originally appeared on DEV Community and was authored by P V Vighnesh
P V Vighnesh | Sciencx (2021-04-15T16:44:44+00:00) Lightning web components – Rendering Lists. Retrieved from https://www.scien.cx/2021/04/15/lightning-web-components-rendering-lists/
Please log in to upload a file.
There are no updates yet.
Click the Upload button above to add an update.


