This content originally appeared on DEV Community and was authored by Nathan B Hankes
Introduction
In this tutorial, you'll learn about GraphQL mutations, authorization, and get a step-by-step demonstration of how to change you GitHub status sending a mutation request to the GitHub GraphQL API.
If you missed the other parts to this API series, you can find the rest at:
Part 1 - An Intro to APIs
Part 2 - The REST API, fetch(), and AXIOS
Part 3 - GraphQL and Sending Queries With fetch()
Prerequisites
Some familiarity with HTML, Git, and Javascript.
What Is A GraphQL Mutation
A GraphQL mutation changes data in an API database. Mutations encompass the REST API POST, PUT, PATCH, and DELETE methods. These GraphQL mutations are defined by the API and will often require some form of authorization to complete.
Getting Started With Your First Mutation
APIs can change over time, so please take the time to study the GitHub GraphQL API documentation should you encounter any
issues if you are reading this tutorial far out from its
publication date.
In this tutorial, you'll be learning about mutations in the context of the GitHub GraphQL API. In order to gain insight into what types of data the API allows us to change, we'll have to reference the API documentation for a list of mutations. By navigating to the Mutation Reference page, we encounter a list of all the mutations allowed by the API.
In this tutorial, we're going to use the fetch() method to update our user status. The mutation allowing this behavior is called changeUserStatus and is described by the Mutation Reference documentation like so:

We see two clearly defined fields listed: The Input fields and the Return fields.
Input fields
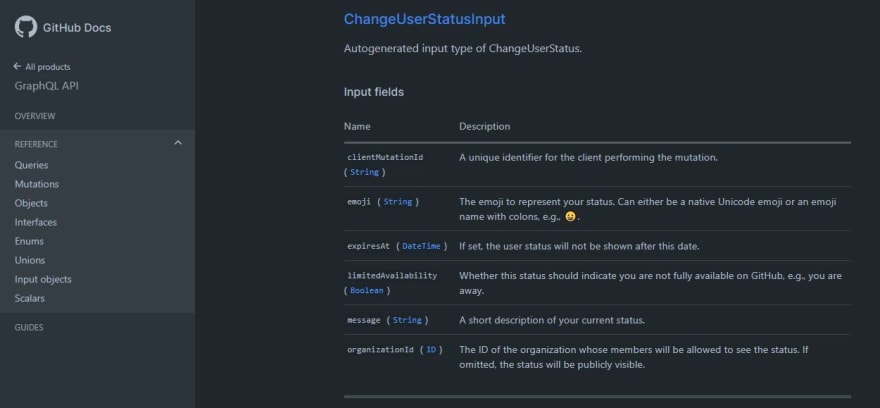
Input fields are the inputs the API will accept for this particular mutation. We will include these input fields and values in our mutation request so that the API knows what fields to update and what values to update them to. The ChangeUserStatusInput! object provides the fields we can change, as seen below:

In the above photo, we see a list of all the inputs the changeUserStatus mutation will accept. These include:
clientMutationId
emoji
expiresAt
limitedAvailability
message
organizationId
The input name column also includes the type of data the input field expects to receive: String, DateTime, Boolean, ID, etc. And the description columns provides further details, such as whether the input is required for a successful mutation.
Return fields
Return fields represent the data that the changeUserStatus mutation returns after completion. In this way, every GraphQL mutation is also a query. This is ideal because we can immediately verify that our fields updated to match our input fields or update them on the user's screen in real time. This mutation returns the following data:
clientMutationId
status {
    UserStatus {
        createdAt
        emoji
        emojiHTML
        expiresAt
        id
        indicatesLimitedAvailability
        message
        organization
        updatedAt
        user {
            User {
                A list of all the User fields...
                }
            }
        }
    }
While the changeUserStatus Return field documentation lists two rows, the status row accepts the UserStatus object, which has several of its own fields. And the user field points toward another object, and so on. To keep your project load times as fast as possible, it's good practice to only return what is needed. In this example, we'll be returning the following fields:
clientMutationId
status {
     message
     emoji
     updatedAt
        }
Writing Your First GraphQL Mutation
The GitHub GraphQL API documentation tells us exactly what is required to make a successful mutation. The GraphQL Foundation website provides additional documentation regarding the GraphQL syntax and conventions. From GitHub's guide "Forming Calls with GraphQL," the following components are required to complete a successful GraphQL mutation:
- Mutation name. The type of modification you want to perform.
- Input object. The data you want to send to the server, composed of input fields. Pass it as an argument to the mutation name.
- Payload object. The data you want to return from the server, composed of return fields. Pass it as the body of the mutation name.
So here's how our changeUserStatus mutation will look:
    mutation {
        changeUserStatus(input: {clientMutationId: "YOUR_USERNAME", emoji: ":rocket:", expiresAt: "2021-05-09T00:00:00", limitedAvailability: true,  message:"Working on an API tutorial"}) {
                    clientMutationId
                    status {
                        message
                        emoji
                        updatedAt
                    }
            }
In the above code we have the mutation name of changeUserStatus, we have the Input object and the values we want to pass to it, and we also have the payload object, which consists of the return fields we previously decided on. This satisfies the three numbered components listed in GitHub's "Forming Calls with GraphQL" guide. In order to ensure that the above mutation is drafted correctly, we'll go into GitHub's GraphQL API Explorer interface. This is a powerful tool that helps us ensure we're structuring our queries and mutations correctly. I added this mutation into the Explorer, inserting my username in the clientMutationId input filed value, and here's what I saw:
The leftmost column contains the mutation, input fields and values, and the return fields. The center column displays what API response after clicking on the circular Play button in the top left corner. And the rightmost column provides the API documentation, which helps when drafting the mutation or query. And since the GitHub API Explorer requires user login, this mutation actually executes. The return fields are displaying the status listed on my profile. Success!
Setting Up The Project
Before we can insert our mutation into a fetch() request, we'll need to generate a personal access token that creates scoped permissions and allows us to make changes to the GitHub API. Below is a step-by-step list of how to do this:
- Login into your GitHub account
- Click on your avatar in the top right corner
- Navigate to the "Settings" item and click through
- Navigate to the "Developer Settings" item and click through
- Navigate to the "Personal access tokens" item and click through
- Click the "Generate new token" button. You'll be prompted to enter your password. Do it.
- Check the boxes setting the following permissions recommended by GitHub:
user
public_repo
repo
repo_deployment
repo:status
read:repo_hook
read:org
read:public_key
read:gpg_key
- Click the "Generate token" button. GitHub will generate the token, which will look like a string of random characters. Keep the window open for later use.
So now we have our mutation formed and our authorization token available. We'll also need the GitHub GraphQL API URL, which is found in the GitHub GraphQL API documentation: https://api.github.com/graphql
Okay, so now we're ready to dive into our editor of choice to make this mutation. In this example, we'll be creating an HTML and JS project and run the fetch request on our local system.
The code used in this tutorial can be reviewed here
Create two files inside of a new project folder:
index.html
script.js
Copy and paste the following code into the HTML file:
<!DOCTYPE html>
<html lang="en">
  <head>
    <meta charset="UTF-8" />
    <meta http-equiv="X-UA-Compatible" content="IE=edge" />
    <meta name="viewport" content="width=device-width, initial-scale=1.0" />
    <script src="script.js"></script>
    <title>JS-GraphQL-Mutation-Demo</title>
  </head>
  <body>
    <button type="text/javascript" onclick="myAlert()">
      Check Script Connection
    </button>
  </body>
</html>
In the above code, we've set up a standard HTML document, linked our script.js file, and created a button that will execute a function called myAlert().
Now in our script.js file, insert our myAlert() function:
function myAlert() {
    alert("Documents Successfuly Connected!");
}
The above code is designed to verify that our index.html and script.js are in fact connected. It's not required, but gives us confidence and ensures we don't waste time troubleshooting this later on.
To execute the function, run the project using an extension like Live Server. Click the "Check Script Connection" button on the browser. If the files are connected, you'll see an alert pop up that reads "Documents Successfully Connected!"
So our project foundation is set, and we can begin crafting our fetch statement. We'll pass the mutation, the API URL, and the fetch options to our fetch as variables. So let's create the variables like so:
const mutation = `
    mutation {
        changeUserStatus(input: {clientMutationId: "YOUR_USERNAME", emoji: ":rocket:", expiresAt: "2021-05-09T00:00:00", limitedAvailability: true,  message:"Working on API tutorial"}) {
                    clientMutationId
                    status {
                        message
                        emoji
                        updatedAt
                    }
            }
        }
                `;


const url = "https://api.github.com/graphql";


let opts = {
    method: "POST",
    headers: { "Content-Type": "application/json", "Authorization": "Bearer PERSONAL_ACCESS_TOKEN" },
    body: JSON.stringify({query: mutation })
    };
At this phase, you'll want to replace "YOUR_USERNAME" and "PERSONAL_ACCESS_TOKEN" with the actual values you want to use. We already generated the personal access token in GitHub, so copy that value and replace the PERSONAL_ACCESS_TOKEN string with the token. Your USER_NAME is your GitHub user name. You'll also want to adjust the expiresAt input variable to some time in the future.
Next, we'll pass the variables to our fetch, which will look like this:
fetch(url, opts)
  .then(res => res.json())
  .then(console.log)
  .catch(console.error);
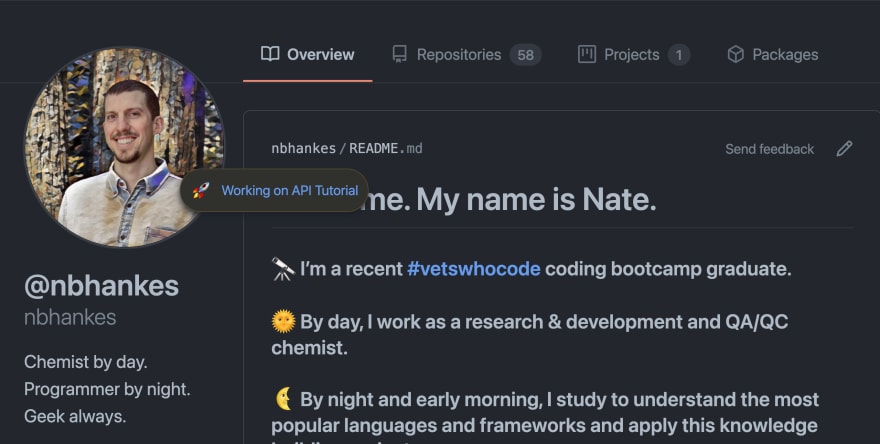
Now save your project and check the console in developer tools. The input values should be returned in the return fields. If you login to you GitHub account and navigate your profile, you'll see that the mutation worked:
This content originally appeared on DEV Community and was authored by Nathan B Hankes
Nathan B Hankes | Sciencx (2021-05-13T12:36:16+00:00) The API Series – Part 4: Updating Your GitHub Status With a GraphQL Mutation. Retrieved from https://www.scien.cx/2021/05/13/the-api-series-part-4-updating-your-github-status-with-a-graphql-mutation/
Please log in to upload a file.
There are no updates yet.
Click the Upload button above to add an update.


