How to Build an Online Store with React, AWS, and Stripe

Building an online store with React, AWS, and Stripe

How do all these technologies fit together?

Nowadays, Online Book Stores are gaining enormous popularity. If you plan to develop one, there are many technology choices you need to make. What if someone helps you make those choices and provide a step by step guide to implement one using React and Serverless technologies?

In this article, I will guide you through building an Online Book Store that uses a React frontend, AWS serverless backend, and Stripe for payment processing.

Here, I will explain the four main modules of the Online Book Store application with reference to,

  1. Creating the Resources on AWS. (E.g. DynamoDB Database, AppSync API, S3 Image Storage, Lambda Serverless Functions, etc.)
  2. Consuming those Resources from the Online Book Store Frontend React Application.

My main intention is to show you how all these technologies fit together to create a secure, scalable, and cost-effective real-world architecture.

If you are new to AWS, I have also included further reading references for the AWS services used in this application. You can also download the application code by navigating to the below Github repository.

Github Repo — https://github.com/mjzone/bookstore-v2

Overview

By following this article, you will learn,

  • How to handle authentication and authorization with React and AWS Cognito.
  • How to upload images to S3 with different permission types.
  • How to work with a GraphQL API that is connected to multiple data sources. (E.g. DynamoDB and Lambda)
  • How to use Lambda Functions to execute operations in sequential order. (E.g. Order creation Process)
  • Further improvements to make the payment processing more robust and resilient.

Architecture Overview

Let’s start our discussion with an overview of the online book store architecture.

Architecture Diagram — Online Book Store
  1. Online Book Store frontend is a React application that is hosted in an S3 bucket (A). The bucket has static web hosting enabled so that it can serve the website over the internet.
  2. All the book images are stored in another S3 bucket (B) with public access so that both authenticated and unauthenticated users can view book images.
  3. The React application communicates with the AWS backend resources securely via AWS Amplify JavaScript Library (C).
  4. Authentication and Authorization are handled by Amazon Cognito (D) that provides a scalable user directory with user authentication flows.
  5. The book store has a GraphQL API powered by AWS AppSync (E). The React application uses the Amplify library to handle all the CRUD (Create, Read, Delete, Update) operations by issuing Queries and Mutations to the AppSync API.
  6. The AppSync API is connected with two data sources — Amazon DynamoDB and Lambda. The Lambda data source will be used when a customer has placed a book order. The DynamoDB data source is used for the rest of the queries and mutations.
  7. The AppSync API will use VTL (Velocity Template Language) scripts (G) to manipulate data in the DynamoDB (F). AWS Amplify Library automatically generates these VTL scripts.
  8. When a customer has placed an order, AppSync invokes the “Make Payment” lambda function(H). It will attempt to charge the customer using Stripe. If the payment has been successful, AppSync will invoke the “Create Order” lambda function(I) to create the order in the database.

In this architecture, the AWS Amplify plays a significant role. Let’s talk about that in the next section.

AWS Amplify Framework

Amplify Framework — Tools

AWS Amplify is a Framework that provides us with many tools to make our lives easy.

  1. Amplify CLI — It is used to provision backend resources. We used the CLI in the book store application to provide all the resources in AWS such as S3 buckets, Cognito User Pool, AppSync API, DynamoDB database, Lambda functions, etc.
  2. Amplify Library — It is used to communicate with the provisioned resources securely. We used the Amplify JavaScript Library to communicate with the above resources provisioned by the CLI.
  3. Amplify UI Component Library — It provides UI components that can be directly integrated into web/mobile application with a single line of code. In this application, we used the Auth Component to handle all the login flows.
  4. Amplify Console — It is used to host the application with Continuous Delivery.

Please refer to Amplify docs for installation instructions.

All the modules in the online store use AWS Amplify CLI to provision related resources and use AWS Amplify JavaScript library to interact with them.

Now that we have come to know about Amplify Framework, let’s dive into the four main modules of the application and understand them better.

Module 01 — The GraphQL API Powered by AWS AppSync

The Online Book Store uses a GraphQL API powered by AWS AppSync. AWS AppSync is the managed GraphQL service offered by AWS.

How to Create the API?

To create the GraphQL API, we can use the following command in the Amplify CLI.

amplify add api

It will ask several questions from you to configure the API to suit the requirements of the project. Among these questions, we need to define the Schema for the project.

The Application Entities

Many To Many Relationship between Customer Orders and Books

There are two main entities in the application — Customer Orders and Books. These two entities have a Many-to-Many Relationship. i.e, An order can have multiple books, and a book can be part of multiple orders.

The many-to-many relationship is implemented with two one-to-many relationships with a third table — BookOrder.

The following is the graphQL schema used to implement the above relationships.

The GrapqhQL Schema

We have used the “@connection attribute” from Amplify Library to set up the relationships among the entity types. Have a look at the following Type Definitions and their connections.

type Book
{
id: ID!
title: String!
description: String
image: String
author: String
featured: Boolean
price: Float
orders: [BookOrder] @connection(keyName: "byBook", fields: ["id"])
}
type BookOrder
{
id: ID!
book_id: ID!
order_id: ID!
book: Book @connection(fields: ["book_id"])
order: Order @connection(fields: ["order_id"])
}
type Order
{
id: ID!
user: String!
date: String
total: Float
books: [BookOrder] @connection(keyName: "byOrder", fields: ["id"])
}

Handling API Authorization

We need to set up some authorization logic in the schema above. The following are the list of authorization logic used in the Online Book Store application.

  1. Allow only the admins to create, update, and delete books in the store.
  2. Allow all the authenticated and unauthenticated users to view books.
  3. Allow only the owners to see their orders.
  4. Allow admins to view all the orders.
  5. Allow admins to create book orders for customers by using customer email in Lambda.

Here are the updated type definitions with the above authorization logic.

type Book
@auth(
rules: [
# allow admins to create, update and delete books
{ allow: groups, groups: ["Admin"] }
# allow all authenticated users to view books
{ allow: private, operations: [read] }
# allow all guest users (not authenticated) to view books
{ allow: public, operations: [read] }
]
)
{
id: ID!
title: String!
description: String
image: String
author: String
featured: Boolean
price: Float
orders: [BookOrder] @connection(keyName: "byBook", fields: ["id"])
}
type BookOrder
@auth(
rules: [
# Allow admins to create bookorders using customer email in lambda
{ allow: owner, identityClaim: "email",ownerField:"customer"}
{ allow: groups, groups: ["Admin"] }
]
)
{
id: ID!
book_id: ID!
order_id: ID!
book: Book @connection(fields: ["book_id"])
order: Order @connection(fields: ["order_id"])
}
type Order
@auth(
rules: [
# only owner can see his orders
{ allow: owner, identityClaim: "email",ownerField:"customer" }
# allow admins to view orders
{ allow: groups, groups: ["Admin"] }
]
)

{
id: ID!
user: String!
date: String
total: Float
books: [BookOrder] @connection(keyName: "byOrder", fields: ["id"])
}

Note how we have used “@auth directive” to create authorization rules for the entity types.

Creating Database Tables

So far, we have defined the relationships between the entities and setup authorization rules. Next, we need to create database tables based on the application entities.

We can use the “@model directive” in AWS Amplify Library to create corresponding tables in the DynamoDB and automatically generate VTL(Velocity Template Language) scripts to perform CRUD (Create, Read, Update, Delete) operations for the table.

Have a look at the updated Type Definitions below.

type Book
@model(subscriptions: null)
@auth(
rules: [
{ allow: groups, groups: ["Admin"] }
{ allow: private, operations: [read] }
{ allow: public, operations: [read] }
]
) {
id: ID!
title: String!
description: String
image: String
author: String
featured: Boolean
price: Float
orders: [BookOrder] @connection(keyName: "byBook", fields: ["id"])
}
type BookOrder
@model(queries: null, subscriptions: null)
@key(name: "byBook", fields: ["book_id", "order_id"])
@key(name: "byOrder", fields: ["order_id", "book_id"])

@auth(
rules: [
{ allow: owner, identityClaim: "email",ownerField:"customer" }
{ allow: groups, groups: ["Admin"] }
]
) {
id: ID!
book_id: ID!
order_id: ID!
book: Book @connection(fields: ["book_id"])
order: Order @connection(fields: ["order_id"])
}
type Order
@model(subscriptions: null)
@key(name: "byUser", fields: ["user"])

@auth(
rules: [
{ allow: owner, identityClaim: "email",ownerField:"customer" }
{ allow: groups, groups: ["Admin"] }
]
)
{
id: ID!
user: String!
date: String
total: Float
books: [BookOrder] @connection(keyName: "byOrder", fields: ["id"])
}

Note that we have used “@key directive” to create indexes for the tables to optimize the query efficiency.

You can view the full GraphQL schema file here.

Working with Multiple Authorization Modes

One of the important things about AWS AppSync is that it does NOT support Public Access to the API. All the requests made to the API must be signed with one of the following authorization types.

  1. Amazon Cognito User Pool — Users must be logged in to the application
  2. API Keys — API key must be attached to the request
  3. OpenID Connect Providers — Use of OpenID connect providers. (We don’t use OpenID connect providers in this application)

We should allow guest users who aren’t logged into the application to view the books.

We can use the API Keys Authorization Type to accomplish it. However, if a user wanted to buy a book, then he needs to log into the application. Therefore, We use Amazon Cognito User Pool Authorization Type for logged in users.

Have a look at the following example of using both of these authorization types.

Using the API from the React Application

In our React frontend, we use the amplify Javascript library to issue queries and mutations to the API.

Note how the default Cognito User Pool Authorization Mode is used to create book mutation, and API Key authorization is used to list books for all the guest users.

import { API, graphqlOperation } from 'aws-amplify';
// The default AMAZON_COGNITO_USER_POOLS authorization mode
API.graphql(graphqlOperation(createBook, { input: bookDetails }));
// API_KEY Authorization Mode is for guest users to view the books
const { data } = await API.graphql({
query: listBooks,
authMode: "API_KEY"
});

Module 02 — Authentication with User Pool

Online Book Store uses AWS Cognito to handle authentication flows of the users. AWS Cognito provides a highly scalable user directory — A User Pool, with authentication and access control methods.

We use Amplify CLI to provision the resources for the User Pool. We also use the Amplify Sign-in UI component to create all the user-flows of authentication automatically e.g., Sign-Up, Sign-In, Forget Password, etc.

How to Create a User Pool with Amplify CLI?

The following amplify command will initiate a CLI wizard to gather configuration details to provision resources of the Cognito User Pool.

amplify add auth

Configuring Auth UI Component in the React App

Once the user pool is deployed, we use the Amplify JavaScript library and Amplify UI Component Library for React to add the Auth Higher-Order Component.

import Amplify from 'aws-amplify';
import awsExports from "./aws-exports";
import { AmplifyAuthenticator } from '@aws-amplify/ui-react';
// Configure Amplify
Amplify.configure(awsExports);
// Checkout Page - Login UI Component
<AmplifyAuthenticator></AmplifyAuthenticator>

The Output

As the output, we get fully-featured authentication screens that support all the login flows.

Amplify Auth Component

Module 03 — Storing Book Images in S3

Next, let’s talk about how we store images in the online book store application.

All the users (Authenticated & Guest Users) should be able to view the books that are uploaded by the admins via the admin panel.

When an admin uploads a book, the book image will be uploaded to the “Image S3 Bucket” as shown in the above diagram.

We use the Amplify library to create that S3 bucket and upload the images with “public permission.”

There are Three types of S3 object permissions supported by AWS Amplify Library.

  1. Public Access — Files are publically accessible to everyone.
  2. Protected Access — Everyone can read the file, but only the owner can write(update/delete) to the file.
  3. Private Access — Only the owner can read and write to the file.

In this application, we will be setting public access when uploading files (Book Images) via the admin panel.

Creating Image Upload S3 Bucket with Amplify CLI

The following line of the CLI command will guide us to configure and provision the Image S3 Bucket.

amplify add storage

Uploading Images to the S3 bucket with Public Permission

Note how we have set the permission level to “public” when uploading images from the Admin panel.

import { Storage } from 'aws-amplify';
// Upload the file to s3 with public access level.
await Storage.put(key, file, {
level: 'public',
contentType: file.type
});
// Retrieve the uploaded file to display
const image = await Storage.get(key, { level: 'public' })

Module 04 — Processing Orders with Lambda

Imagine a customer who makes a book order from the online book store. Then we need to do the following things.

  1. Charge the customer
  2. Process the order

If the customer’s payment got failed for some reason, we should not proceed with the order.

This can be accomplished with two lambda functions shown in the diagram above — Make Payment Lambda and Create Order Lambda.

Charging the Customer with Stripe

Make Payment Lambda handles the customer payment. It is responsible for interacting with Stripe and charge the customer.

/*
* 1. Get the total price of the order
* 2. Charge the customer
*/
exports.handler = async (event) => {
try {
const { id,cart,total,address,token} = event.arguments.input;
const { username } = event.identity.claims;
const email = await getUserEmail(event);
await stripe.charges.create({
amount: total * 100,
currency: "usd",
source: token,
description: `Order ${new Date()} by ${email}`
});

return { id, cart, total, address, username, email };
} catch (err) {
throw new Error(err);
}
};

You can view the full code for the Make Payment Lambda here.

Creating the Order

The Create Order Lambda function is responsible for recording the order if the payment is successful. Have a look at the sample code below.

/*
* Get order details from Make Payment Lambda
* Create the order
* Link books to the order which allows users to see the past orders and admins can view orders by user
* Email the invoice
*/
exports.handler = async (event) => {
try {
let payload = event.prev.result;
payload.order_id = uuidv4();
// create a new order
await createOrder(payload);
// links books with the order
await createBookOrder(payload);
// Email the Invoice
return "SUCCESS";
} catch (err) {
console.log(err);
return new Error(err);
}
};

You can view the full code for Create Order Lambda here.

How to Execute the Functions Sequentially?

To execute these two functions sequentially, we use a Pipeline Resolver.

AWS AppSync pipeline resolvers can be used to execute multiple lambda functions in sequence. If one lambda function throws an error, the pipeline resolver will return without executing other lambda functions in the pipeline.

Creating the Lambda Functions with AWS Amplify CLI

We can issue the following CLI command to configure the first lambda function and deploy to AWS.

Similarly, we can use the same command to configure and deploy the second lambda function.

amplify add function

How to Invoke the Lambdas from the React Frontend?

We will not be directly invoking the lambda function from our React code; instead, we will set the lambda functions as the data source to the processOrder Mutation in the AppSync API.

When a user clicks on the Checkout Button, the processOrder Mutation will be issued and AppSync will execute the two lambda functions sequentially in the pipeline resolver.

Have a look at the following schema and note how we configured the lambda data source for the processOrder mutation.

// Schema
type Mutation{
processOrder(input: ProcessOrderInput!): OrderStatus
@function(name: "makePaymentLambda")
@function(name: "createOrderLambda")
}
// Call Process Order Mutation on Checkout Button Click
API.graphql(graphqlOperation(processOrder, { input: payload}));
console.log("Order is successful");

Earlier, we used the “@model directive” to create a DynamoDB table and the VTL scripts to handle the CRUD operations for the selected entity. But here we use “@function directive” to invoke the makePaymentLambda and createOrderLambda functions sequentially.

Further Improvements

We have discussed the main modules of the online bookstore application in detail. As the next steps, the following improvements can be introduced to the application to further improve the robustness and the resiliency of the payment handling process.

  • The pipeline resolver with two lambda functions can be replaced with a state machine using Step Functions. The Step functions will improve the resiliency of the payment handling process by adding retry logic and proper error handling the architecture.
  • If something goes wrong during the payment processing flow, we can use the Saga Pattern with Step Function to reset the application state.
  • We can also use AppSync HTTP Resolver to directly invoke a Step Function Workflow without writing an intermediary lambda function.

References

The Step by Step Video Guide to Build an Online Store with React, AWS, and Stripe — https://www.youtube.com/watch?v=cWDJoK8zw58

Github repository with the completed application code — https://github.com/mjzone/bookstore-v2

Amplify GraphQL API Documentation — https://docs.amplify.aws/lib/graphqlapi/getting-started/q/platform/js

Amplify Storage Documentation — https://docs.amplify.aws/lib/storage/getting-started/q/platform/js

Amplify Authentication Documentation — https://docs.amplify.aws/lib/auth/getting-started/q/platform/js

Summary

In this lengthy article, we have discussed an architecture where multiple technologies (React, AWS, and Stripe) work together to create a secure, scalable, and cost-effective online book store.

Thanks for reading and if you have any questions, let me know in the comments below. ?

Develop & share independent components with Bit

Bit is an ultra-extensible tool that lets you create truly modular applications with independently authored, versioned, and maintained components.

Use it to build modular apps & design systems, author and deliver micro frontends, or simply share components between applications.

Bit: The platform for the modular web

Related Stories


How to Build an Online Store with React, AWS, and Stripe was originally published in Bits and Pieces on Medium, where people are continuing the conversation by highlighting and responding to this story.


This content originally appeared on Bits and Pieces - Medium and was authored by Manoj Fernando

Building an online store with React, AWS, and Stripe

How do all these technologies fit together?

Nowadays, Online Book Stores are gaining enormous popularity. If you plan to develop one, there are many technology choices you need to make. What if someone helps you make those choices and provide a step by step guide to implement one using React and Serverless technologies?

In this article, I will guide you through building an Online Book Store that uses a React frontend, AWS serverless backend, and Stripe for payment processing.

Here, I will explain the four main modules of the Online Book Store application with reference to,

  1. Creating the Resources on AWS. (E.g. DynamoDB Database, AppSync API, S3 Image Storage, Lambda Serverless Functions, etc.)
  2. Consuming those Resources from the Online Book Store Frontend React Application.

My main intention is to show you how all these technologies fit together to create a secure, scalable, and cost-effective real-world architecture.

If you are new to AWS, I have also included further reading references for the AWS services used in this application. You can also download the application code by navigating to the below Github repository.

Github Repo — https://github.com/mjzone/bookstore-v2

Overview

By following this article, you will learn,

  • How to handle authentication and authorization with React and AWS Cognito.
  • How to upload images to S3 with different permission types.
  • How to work with a GraphQL API that is connected to multiple data sources. (E.g. DynamoDB and Lambda)
  • How to use Lambda Functions to execute operations in sequential order. (E.g. Order creation Process)
  • Further improvements to make the payment processing more robust and resilient.

Architecture Overview

Let’s start our discussion with an overview of the online book store architecture.
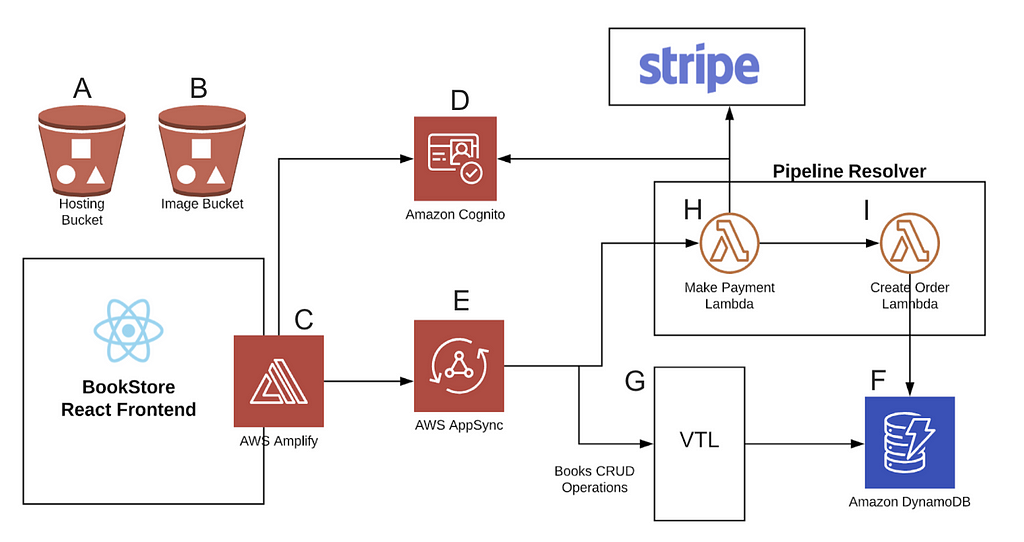
Architecture Diagram — Online Book Store
  1. Online Book Store frontend is a React application that is hosted in an S3 bucket (A). The bucket has static web hosting enabled so that it can serve the website over the internet.
  2. All the book images are stored in another S3 bucket (B) with public access so that both authenticated and unauthenticated users can view book images.
  3. The React application communicates with the AWS backend resources securely via AWS Amplify JavaScript Library (C).
  4. Authentication and Authorization are handled by Amazon Cognito (D) that provides a scalable user directory with user authentication flows.
  5. The book store has a GraphQL API powered by AWS AppSync (E). The React application uses the Amplify library to handle all the CRUD (Create, Read, Delete, Update) operations by issuing Queries and Mutations to the AppSync API.
  6. The AppSync API is connected with two data sources — Amazon DynamoDB and Lambda. The Lambda data source will be used when a customer has placed a book order. The DynamoDB data source is used for the rest of the queries and mutations.
  7. The AppSync API will use VTL (Velocity Template Language) scripts (G) to manipulate data in the DynamoDB (F). AWS Amplify Library automatically generates these VTL scripts.
  8. When a customer has placed an order, AppSync invokes the “Make Payment” lambda function(H). It will attempt to charge the customer using Stripe. If the payment has been successful, AppSync will invoke the “Create Order” lambda function(I) to create the order in the database.

In this architecture, the AWS Amplify plays a significant role. Let’s talk about that in the next section.

AWS Amplify Framework
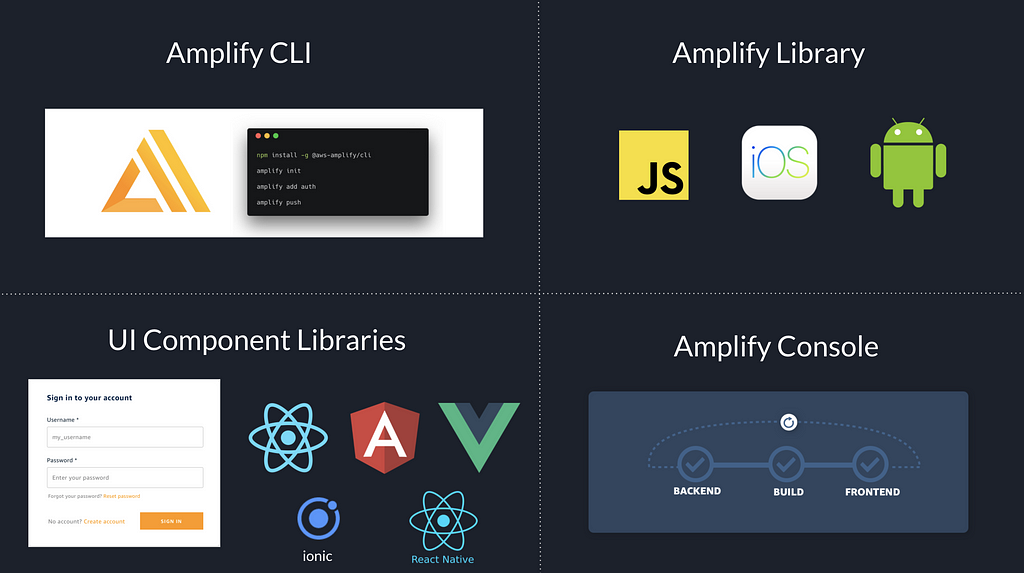
Amplify Framework — Tools

AWS Amplify is a Framework that provides us with many tools to make our lives easy.

  1. Amplify CLI — It is used to provision backend resources. We used the CLI in the book store application to provide all the resources in AWS such as S3 buckets, Cognito User Pool, AppSync API, DynamoDB database, Lambda functions, etc.
  2. Amplify Library — It is used to communicate with the provisioned resources securely. We used the Amplify JavaScript Library to communicate with the above resources provisioned by the CLI.
  3. Amplify UI Component Library — It provides UI components that can be directly integrated into web/mobile application with a single line of code. In this application, we used the Auth Component to handle all the login flows.
  4. Amplify Console — It is used to host the application with Continuous Delivery.

Please refer to Amplify docs for installation instructions.

All the modules in the online store use AWS Amplify CLI to provision related resources and use AWS Amplify JavaScript library to interact with them.

Now that we have come to know about Amplify Framework, let’s dive into the four main modules of the application and understand them better.

Module 01 — The GraphQL API Powered by AWS AppSync

The Online Book Store uses a GraphQL API powered by AWS AppSync. AWS AppSync is the managed GraphQL service offered by AWS.
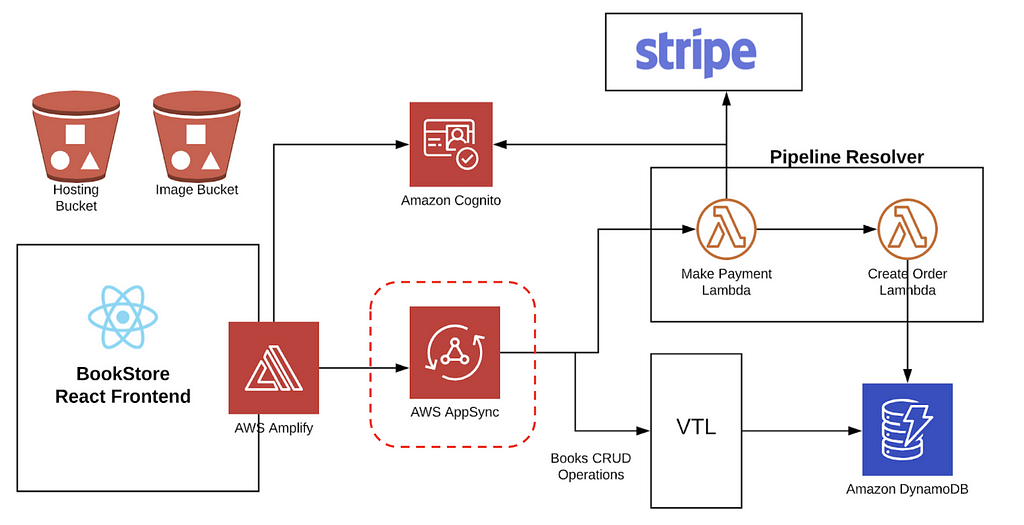
How to Create the API?

To create the GraphQL API, we can use the following command in the Amplify CLI.

amplify add api

It will ask several questions from you to configure the API to suit the requirements of the project. Among these questions, we need to define the Schema for the project.

The Application Entities
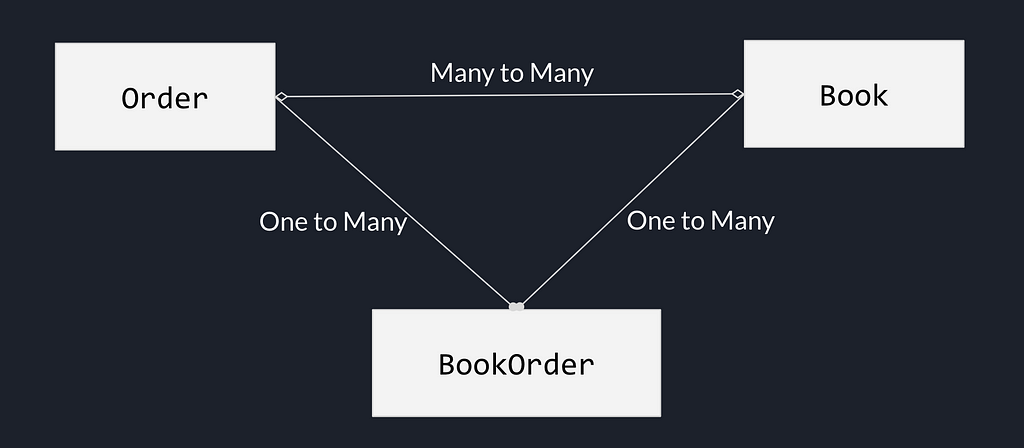
Many To Many Relationship between Customer Orders and Books

There are two main entities in the application — Customer Orders and Books. These two entities have a Many-to-Many Relationship. i.e, An order can have multiple books, and a book can be part of multiple orders.

The many-to-many relationship is implemented with two one-to-many relationships with a third table — BookOrder.

The following is the graphQL schema used to implement the above relationships.

The GrapqhQL Schema

We have used the “@connection attribute” from Amplify Library to set up the relationships among the entity types. Have a look at the following Type Definitions and their connections.

type Book
{
id: ID!
title: String!
description: String
image: String
author: String
featured: Boolean
price: Float
orders: [BookOrder] @connection(keyName: "byBook", fields: ["id"])
}
type BookOrder
{
id: ID!
book_id: ID!
order_id: ID!
book: Book @connection(fields: ["book_id"])
order: Order @connection(fields: ["order_id"])
}
type Order
{
id: ID!
user: String!
date: String
total: Float
books: [BookOrder] @connection(keyName: "byOrder", fields: ["id"])
}

Handling API Authorization

We need to set up some authorization logic in the schema above. The following are the list of authorization logic used in the Online Book Store application.

  1. Allow only the admins to create, update, and delete books in the store.
  2. Allow all the authenticated and unauthenticated users to view books.
  3. Allow only the owners to see their orders.
  4. Allow admins to view all the orders.
  5. Allow admins to create book orders for customers by using customer email in Lambda.

Here are the updated type definitions with the above authorization logic.

type Book
@auth(
rules: [
# allow admins to create, update and delete books
{ allow: groups, groups: ["Admin"] }
# allow all authenticated users to view books
{ allow: private, operations: [read] }
# allow all guest users (not authenticated) to view books
{ allow: public, operations: [read] }
]
)
{
id: ID!
title: String!
description: String
image: String
author: String
featured: Boolean
price: Float
orders: [BookOrder] @connection(keyName: "byBook", fields: ["id"])
}
type BookOrder
@auth(
rules: [
# Allow admins to create bookorders using customer email in lambda
{ allow: owner, identityClaim: "email",ownerField:"customer"}
{ allow: groups, groups: ["Admin"] }
]
)
{
id: ID!
book_id: ID!
order_id: ID!
book: Book @connection(fields: ["book_id"])
order: Order @connection(fields: ["order_id"])
}
type Order
@auth(
rules: [
# only owner can see his orders
{ allow: owner, identityClaim: "email",ownerField:"customer" }
# allow admins to view orders
{ allow: groups, groups: ["Admin"] }
]
)

{
id: ID!
user: String!
date: String
total: Float
books: [BookOrder] @connection(keyName: "byOrder", fields: ["id"])
}

Note how we have used “@auth directive” to create authorization rules for the entity types.

Creating Database Tables

So far, we have defined the relationships between the entities and setup authorization rules. Next, we need to create database tables based on the application entities.

We can use the “@model directive” in AWS Amplify Library to create corresponding tables in the DynamoDB and automatically generate VTL(Velocity Template Language) scripts to perform CRUD (Create, Read, Update, Delete) operations for the table.

Have a look at the updated Type Definitions below.

type Book
@model(subscriptions: null)
@auth(
rules: [
{ allow: groups, groups: ["Admin"] }
{ allow: private, operations: [read] }
{ allow: public, operations: [read] }
]
) {
id: ID!
title: String!
description: String
image: String
author: String
featured: Boolean
price: Float
orders: [BookOrder] @connection(keyName: "byBook", fields: ["id"])
}
type BookOrder
@model(queries: null, subscriptions: null)
@key(name: "byBook", fields: ["book_id", "order_id"])
@key(name: "byOrder", fields: ["order_id", "book_id"])

@auth(
rules: [
{ allow: owner, identityClaim: "email",ownerField:"customer" }
{ allow: groups, groups: ["Admin"] }
]
) {
id: ID!
book_id: ID!
order_id: ID!
book: Book @connection(fields: ["book_id"])
order: Order @connection(fields: ["order_id"])
}
type Order
@model(subscriptions: null)
@key(name: "byUser", fields: ["user"])

@auth(
rules: [
{ allow: owner, identityClaim: "email",ownerField:"customer" }
{ allow: groups, groups: ["Admin"] }
]
)
{
id: ID!
user: String!
date: String
total: Float
books: [BookOrder] @connection(keyName: "byOrder", fields: ["id"])
}

Note that we have used “@key directive” to create indexes for the tables to optimize the query efficiency.

You can view the full GraphQL schema file here.

Working with Multiple Authorization Modes

One of the important things about AWS AppSync is that it does NOT support Public Access to the API. All the requests made to the API must be signed with one of the following authorization types.

  1. Amazon Cognito User Pool — Users must be logged in to the application
  2. API Keys — API key must be attached to the request
  3. OpenID Connect Providers — Use of OpenID connect providers. (We don’t use OpenID connect providers in this application)

We should allow guest users who aren’t logged into the application to view the books.

We can use the API Keys Authorization Type to accomplish it. However, if a user wanted to buy a book, then he needs to log into the application. Therefore, We use Amazon Cognito User Pool Authorization Type for logged in users.

Have a look at the following example of using both of these authorization types.

Using the API from the React Application

In our React frontend, we use the amplify Javascript library to issue queries and mutations to the API.

Note how the default Cognito User Pool Authorization Mode is used to create book mutation, and API Key authorization is used to list books for all the guest users.

import { API, graphqlOperation } from 'aws-amplify';
// The default AMAZON_COGNITO_USER_POOLS authorization mode
API.graphql(graphqlOperation(createBook, { input: bookDetails }));
// API_KEY Authorization Mode is for guest users to view the books
const { data } = await API.graphql({
query: listBooks,
authMode: "API_KEY"
});

Module 02 — Authentication with User Pool
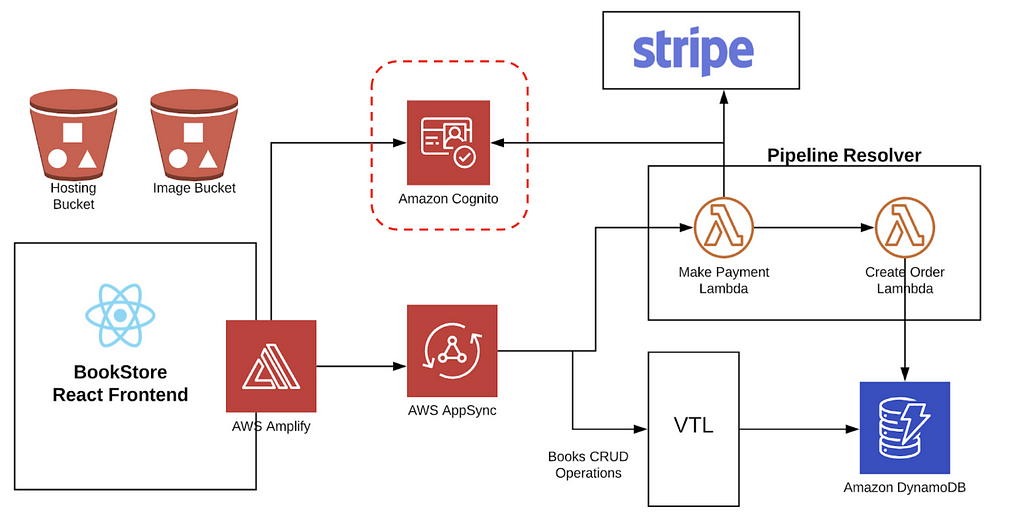
Online Book Store uses AWS Cognito to handle authentication flows of the users. AWS Cognito provides a highly scalable user directory — A User Pool, with authentication and access control methods.

We use Amplify CLI to provision the resources for the User Pool. We also use the Amplify Sign-in UI component to create all the user-flows of authentication automatically e.g., Sign-Up, Sign-In, Forget Password, etc.

How to Create a User Pool with Amplify CLI?

The following amplify command will initiate a CLI wizard to gather configuration details to provision resources of the Cognito User Pool.

amplify add auth

Configuring Auth UI Component in the React App

Once the user pool is deployed, we use the Amplify JavaScript library and Amplify UI Component Library for React to add the Auth Higher-Order Component.

import Amplify from 'aws-amplify';
import awsExports from "./aws-exports";
import { AmplifyAuthenticator } from '@aws-amplify/ui-react';
// Configure Amplify
Amplify.configure(awsExports);
// Checkout Page - Login UI Component
<AmplifyAuthenticator></AmplifyAuthenticator>

The Output

As the output, we get fully-featured authentication screens that support all the login flows.
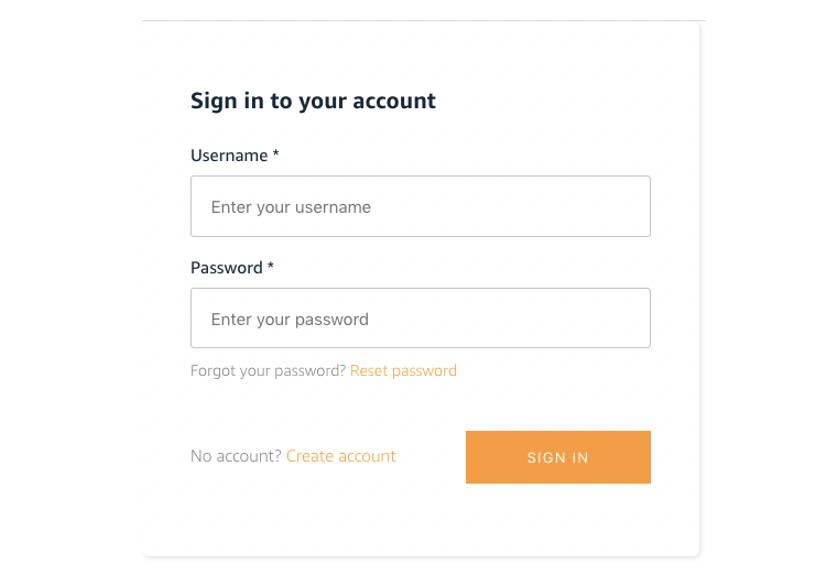
Amplify Auth Component

Module 03 — Storing Book Images in S3

Next, let’s talk about how we store images in the online book store application.

All the users (Authenticated & Guest Users) should be able to view the books that are uploaded by the admins via the admin panel.
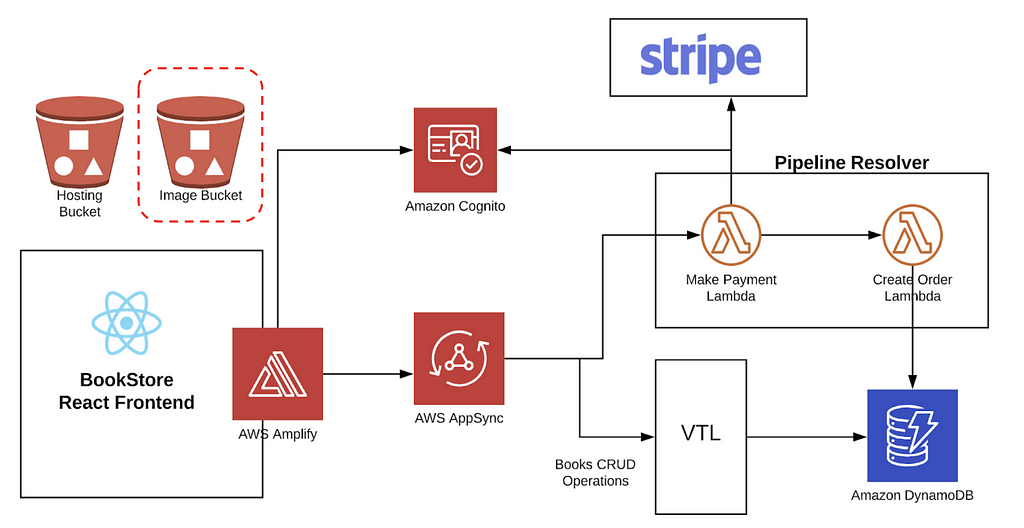
When an admin uploads a book, the book image will be uploaded to the “Image S3 Bucket” as shown in the above diagram.

We use the Amplify library to create that S3 bucket and upload the images with “public permission.”

There are Three types of S3 object permissions supported by AWS Amplify Library.

  1. Public Access — Files are publically accessible to everyone.
  2. Protected Access — Everyone can read the file, but only the owner can write(update/delete) to the file.
  3. Private Access — Only the owner can read and write to the file.

In this application, we will be setting public access when uploading files (Book Images) via the admin panel.

Creating Image Upload S3 Bucket with Amplify CLI

The following line of the CLI command will guide us to configure and provision the Image S3 Bucket.

amplify add storage

Uploading Images to the S3 bucket with Public Permission

Note how we have set the permission level to “public” when uploading images from the Admin panel.

import { Storage } from 'aws-amplify';
// Upload the file to s3 with public access level.
await Storage.put(key, file, {
level: 'public',
contentType: file.type
});
// Retrieve the uploaded file to display
const image = await Storage.get(key, { level: 'public' })

Module 04 — Processing Orders with Lambda
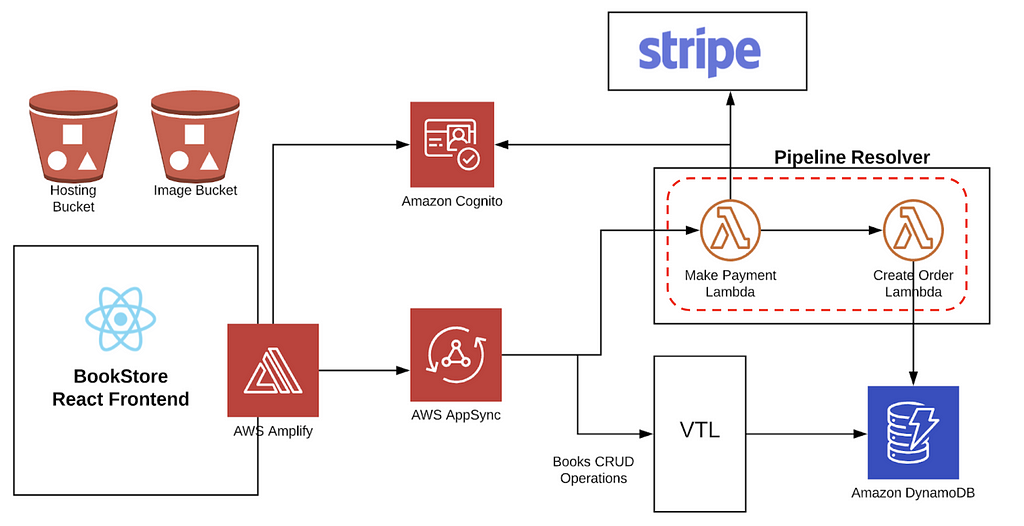
Imagine a customer who makes a book order from the online book store. Then we need to do the following things.

  1. Charge the customer
  2. Process the order

If the customer’s payment got failed for some reason, we should not proceed with the order.

This can be accomplished with two lambda functions shown in the diagram above — Make Payment Lambda and Create Order Lambda.

Charging the Customer with Stripe

Make Payment Lambda handles the customer payment. It is responsible for interacting with Stripe and charge the customer.

/*
* 1. Get the total price of the order
* 2. Charge the customer
*/
exports.handler = async (event) => {
try {
const { id,cart,total,address,token} = event.arguments.input;
const { username } = event.identity.claims;
const email = await getUserEmail(event);
await stripe.charges.create({
amount: total * 100,
currency: "usd",
source: token,
description: `Order ${new Date()} by ${email}`
});

return { id, cart, total, address, username, email };
} catch (err) {
throw new Error(err);
}
};

You can view the full code for the Make Payment Lambda here.

Creating the Order

The Create Order Lambda function is responsible for recording the order if the payment is successful. Have a look at the sample code below.

/*
* Get order details from Make Payment Lambda
* Create the order
* Link books to the order which allows users to see the past orders and admins can view orders by user
* Email the invoice
*/
exports.handler = async (event) => {
try {
let payload = event.prev.result;
payload.order_id = uuidv4();
// create a new order
await createOrder(payload);
// links books with the order
await createBookOrder(payload);
// Email the Invoice
return "SUCCESS";
} catch (err) {
console.log(err);
return new Error(err);
}
};

You can view the full code for Create Order Lambda here.

How to Execute the Functions Sequentially?

To execute these two functions sequentially, we use a Pipeline Resolver.

AWS AppSync pipeline resolvers can be used to execute multiple lambda functions in sequence. If one lambda function throws an error, the pipeline resolver will return without executing other lambda functions in the pipeline.

Creating the Lambda Functions with AWS Amplify CLI

We can issue the following CLI command to configure the first lambda function and deploy to AWS.

Similarly, we can use the same command to configure and deploy the second lambda function.

amplify add function

How to Invoke the Lambdas from the React Frontend?

We will not be directly invoking the lambda function from our React code; instead, we will set the lambda functions as the data source to the processOrder Mutation in the AppSync API.

When a user clicks on the Checkout Button, the processOrder Mutation will be issued and AppSync will execute the two lambda functions sequentially in the pipeline resolver.

Have a look at the following schema and note how we configured the lambda data source for the processOrder mutation.

// Schema
type Mutation{
processOrder(input: ProcessOrderInput!): OrderStatus
@function(name: "makePaymentLambda")
@function(name: "createOrderLambda")
}
// Call Process Order Mutation on Checkout Button Click
API.graphql(graphqlOperation(processOrder, { input: payload}));
console.log("Order is successful");

Earlier, we used the “@model directive” to create a DynamoDB table and the VTL scripts to handle the CRUD operations for the selected entity. But here we use “@function directive” to invoke the makePaymentLambda and createOrderLambda functions sequentially.

Further Improvements

We have discussed the main modules of the online bookstore application in detail. As the next steps, the following improvements can be introduced to the application to further improve the robustness and the resiliency of the payment handling process.

  • The pipeline resolver with two lambda functions can be replaced with a state machine using Step Functions. The Step functions will improve the resiliency of the payment handling process by adding retry logic and proper error handling the architecture.
  • If something goes wrong during the payment processing flow, we can use the Saga Pattern with Step Function to reset the application state.
  • We can also use AppSync HTTP Resolver to directly invoke a Step Function Workflow without writing an intermediary lambda function.

References

The Step by Step Video Guide to Build an Online Store with React, AWS, and Stripe — https://www.youtube.com/watch?v=cWDJoK8zw58

Github repository with the completed application code — https://github.com/mjzone/bookstore-v2

Amplify GraphQL API Documentation — https://docs.amplify.aws/lib/graphqlapi/getting-started/q/platform/js

Amplify Storage Documentation — https://docs.amplify.aws/lib/storage/getting-started/q/platform/js

Amplify Authentication Documentation — https://docs.amplify.aws/lib/auth/getting-started/q/platform/js

Summary

In this lengthy article, we have discussed an architecture where multiple technologies (React, AWS, and Stripe) work together to create a secure, scalable, and cost-effective online book store.

Thanks for reading and if you have any questions, let me know in the comments below. ?

Develop & share independent components with Bit

Bit is an ultra-extensible tool that lets you create truly modular applications with independently authored, versioned, and maintained components.

Use it to build modular apps & design systems, author and deliver micro frontends, or simply share components between applications.

Bit: The platform for the modular web

Related Stories


How to Build an Online Store with React, AWS, and Stripe was originally published in Bits and Pieces on Medium, where people are continuing the conversation by highlighting and responding to this story.


This content originally appeared on Bits and Pieces - Medium and was authored by Manoj Fernando


Print Share Comment Cite Upload Translate Updates
APA

Manoj Fernando | Sciencx (2021-06-03T15:08:27+00:00) How to Build an Online Store with React, AWS, and Stripe. Retrieved from https://www.scien.cx/2021/06/03/how-to-build-an-online-store-with-react-aws-and-stripe/

MLA
" » How to Build an Online Store with React, AWS, and Stripe." Manoj Fernando | Sciencx - Thursday June 3, 2021, https://www.scien.cx/2021/06/03/how-to-build-an-online-store-with-react-aws-and-stripe/
HARVARD
Manoj Fernando | Sciencx Thursday June 3, 2021 » How to Build an Online Store with React, AWS, and Stripe., viewed ,<https://www.scien.cx/2021/06/03/how-to-build-an-online-store-with-react-aws-and-stripe/>
VANCOUVER
Manoj Fernando | Sciencx - » How to Build an Online Store with React, AWS, and Stripe. [Internet]. [Accessed ]. Available from: https://www.scien.cx/2021/06/03/how-to-build-an-online-store-with-react-aws-and-stripe/
CHICAGO
" » How to Build an Online Store with React, AWS, and Stripe." Manoj Fernando | Sciencx - Accessed . https://www.scien.cx/2021/06/03/how-to-build-an-online-store-with-react-aws-and-stripe/
IEEE
" » How to Build an Online Store with React, AWS, and Stripe." Manoj Fernando | Sciencx [Online]. Available: https://www.scien.cx/2021/06/03/how-to-build-an-online-store-with-react-aws-and-stripe/. [Accessed: ]
rf:citation
» How to Build an Online Store with React, AWS, and Stripe | Manoj Fernando | Sciencx | https://www.scien.cx/2021/06/03/how-to-build-an-online-store-with-react-aws-and-stripe/ |

Please log in to upload a file.


There are no updates yet.
Click the Upload button above to add an update.

You must be logged in to translate posts. Please log in or register.