This content originally appeared on DEV Community and was authored by Mạnh Đạt
This post was originally posted here
Preface
I've been trying installing a Kubernetes cluster for while following the official documentation without any success. It turned out the official documentation was missing some important steps (or they put the missing steps else where I couldn’t find). Anyways, if you are struggling to get a Kubernetes up and running, this step by step tutorial is for you.
I’m going to setup a k8s cluster with 1 master node and 1 worker node. Once you have a master node up and running, adding one or more worker nodes does not require extra expertise.
I also use VirtualBox running two identical Ubuntu 18.04 VM. I guess that the newer Ubuntu versions should work fine (haven’t tested).
Step by step to install kubernetes cluster
Here are the steps you need to run on all nodes
Step 1: Disable swap
To disable swap, simply remove the line with swap in /etc/fstab
sudo vim /etc/fstab
Comment out the line with swap

Step 2: Install docker run time
 sudo apt-get update
 sudo apt-get install \
    apt-transport-https \
    ca-certificates \
    curl \
    gnupg \
    lsb-release

curl -fsSL https://download.docker.com/linux/ubuntu/gpg | sudo gpg --dearmor -o /usr/share/keyrings/docker-archive-keyring.gpg

 sudo apt-get update
 sudo apt-get install docker-ce docker-ce-cli containerd.io
Step 3: Configure cgroup
Switch to root and run
cat > /etc/docker/daemon.json <<EOF
{
  "exec-opts": ["native.cgroupdriver=systemd"],
  "log-driver": "json-file",
  "log-opts": {
    "max-size": "100m"
  },
  "storage-driver": "overlay2",
  "storage-opts": [
    "overlay2.override_kernel_check=true"
  ]
}
EOF

systemctl restart docker
Step 4: Install kubeadm, kubelet, kubectl
sudo curl -fsSLo /usr/share/keyrings/kubernetes-archive-keyring.gpg https://packages.cloud.google.com/apt/doc/apt-key.gpg

echo "deb [signed-by=/usr/share/keyrings/kubernetes-archive-keyring.gpg] https://apt.kubernetes.io/ kubernetes-xenial main" | sudo tee /etc/apt/sources.list.d/kubernetes.list

sudo apt-get update
sudo apt-get install -y kubelet kubeadm kubectl
sudo apt-mark hold kubelet kubeadm kubectl
Now, that's all the common commands you need to run on all nodes. Next comes the command you only run on the master node:
Step 5: start master node
kubeadm init
You should see similar message after a few minutes:
Copy the kubeadm join... command to later run on worker nodes.
Finally, you need to install network plugin for the master node (super important!)
sudo kubectl apply -f "https://cloud.weave.works/k8s/net?k8s-version=$(sudo kubectl version | base64 | tr -d '\n')"
Wait for a few minutes for the master node to be ready. You can run:
kubectl cluster-info
and wait until the status of the master node is Ready
Step 6: Join the cluster on worker nodes
Then, switch to the worker node and run the join command (the one you got after kubeadm init)
kubeadm join 192.168.1.98:6443 --token 0mfz2s.4xt0waiyfnpxiyt9 \
        --discovery-token-ca-cert-hash sha256:12e48d3bbfb435536618fc293a77950c13ac975fbea934c49c39abe4b7335ce1
Back to the master node and run
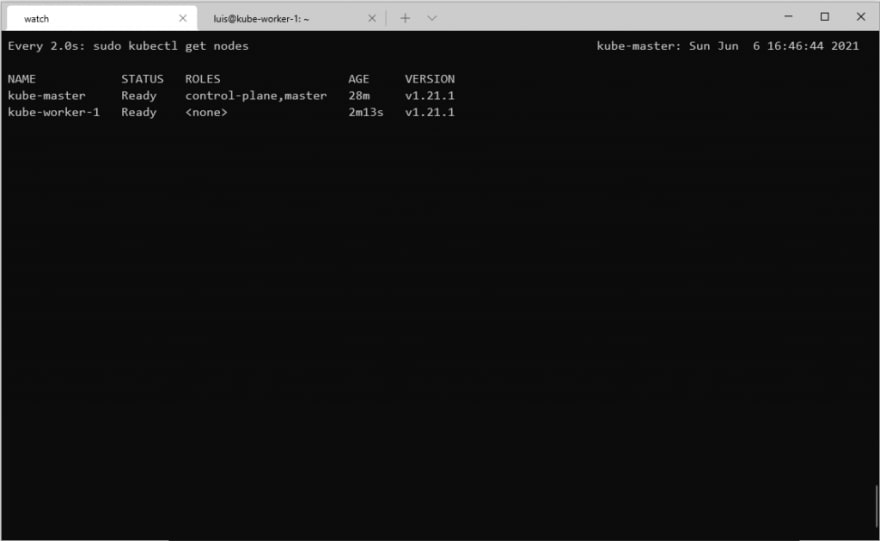
watch kubectl get nodes
It will watch the cluster and after a few minutes, you should see all the nodes are ready:

Congratulations! You have successfully setup a kubernetes cluster
This content originally appeared on DEV Community and was authored by Mạnh Đạt
Mạnh Đạt | Sciencx (2021-06-07T00:21:49+00:00) Step by step to install kubernetes cluster. Retrieved from https://www.scien.cx/2021/06/07/step-by-step-to-install-kubernetes-cluster/
Please log in to upload a file.
There are no updates yet.
Click the Upload button above to add an update.

