ECDSA — How to programmatically sign a transaction

ECDSA — How to programmatically sign a transaction

Cryptography series IV — ECDSA explained: we are going to grab a message and do all the steps for ECDSA signing — the most commonly used digital signature algorithm in blockchains

If you are in the blockchain space, almost for sure, you have heard about ECDSA. ECDSA stands for Elliptic Curve Digital Signature Algorithm and uses the elliptic curve cryptography.

ECDSA is the signature scheme used in Bitcoin. Every Bitcoin address (the one you use to send and receive funds) is a cryptographic hash of the ECDSA public key. You can check this article to learn more about cryptographic hashing.

For this ECDSA article, we will follow Ethereum’s method with Ethereum libraries.

ECDSA is also used in many other applications other than blockchains. For example, the Apple ecosystem widely uses ECDSA, and it is one of the main signing mechanisms of iOS; it’s used in iMessage, iCloud and so on.

ECDSA VS RSA

Why we need ECDSA when we have already RSA, which is the gold standard for asymmetric cryptography?

Well, it happens that to break an RSA key requires to factor 2 large prime numbers (we have talked about the prime number factorization for RSA here). We are getting better and better at doing this, which requires having larger and larger RSA keys.

On the other hand, breaking ECDSA requires solving the Elliptic Curve Discrete Logarithm Problem (ECDLP), which is much harder. This means that with ECDSA, we can have the same level of security as RSA but with smaller keys which means less data which translates into faster transactions (which is very important in blockchains). To crack ECDSA, you would have to guess a point in the elliptic curve that was generated from a large random number.

Let’s sign a transaction with ECDSA step-by-step!

Now please stick with me to navigate through transaction signing with ECDSA. I promise you will have fun reading this article ?. This is an essential function in blockchain and cryptography. Not as critical as chocolate… but still essential.

Do you remember the previous Cryptography series article where we talked about RSA, Alice and Bob share and sign a message? Now we will do the ESDSA digital signature signing (apologies for the redundancy), and we will do it programmatically! ?
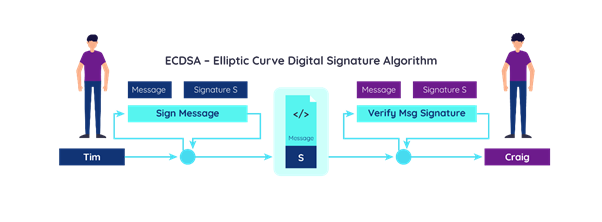
To sign a transaction, the users need to follow a few steps. To be more precise, the user’s wallet or software will do it and not really the user. Thankfully, this complex process of signing a transaction is pretty much seamless and automatic. From the user experience point of view, all it takes is to press a button. However, we want to learn what’s behind the scenes and how transactions are actually signed and verified.

Any transaction that is sent must be signed, and we can always check the validity of that signature and who has signed it.

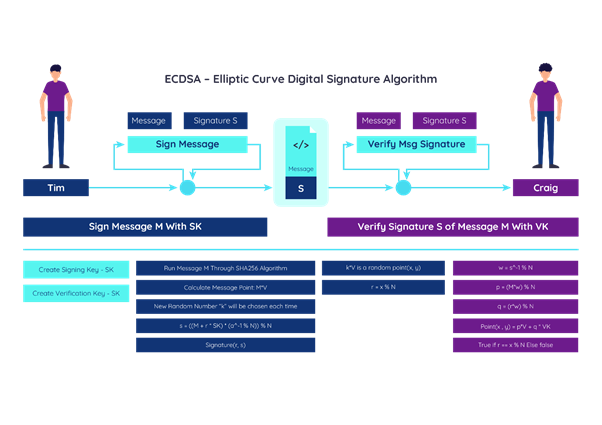
In our case, the sender will sign a message with a signing key, pack the message with the signature and send it to the recipient. Then the recipient will take the signature and verify the message with the verification key.

To sign a transaction with ECDSA, we will be using the recommended 192-bit elliptic curve domain parameters, more specifically the parameters for secp192k1 which can be found in Daniel R. L. Brown’s “SEC 2: Recommended Elliptic Curve Domain Parameters”, which are part of the industry standards developed by the SECG — Standards for Efficient Cryptography Group. This is an extremely useful document if you are into cryptography. We will need to come back to the SEC 2: Recommended Elliptic Curve Domain Parameters to get the parameters to build our ECDSA.

Let’s start! ?

Let’s go through the step by step to sign, sending a message and verify the message with ECDSA. To start, let’s use the Python3 command prompt. If you don’t have Python3 installed, please go ahead and install Python. You will then be able to run it in your command prompt (that black screen that pops up when you type “cmd” in your Windows search bar). This may work even better if you have an Ubuntu machine.

Alright, once you have Python installed and the command prompt opens, type “python” to run your command python command line.

Now let’s import Keccak. Keccak-256 is a variation of the SHA3 algorithm adopted in Ethereum.

Let’s make sure you have the libgmb3 and fastecdsa libraries by running the commands

sudo apt install gcc python-dev libgmp3-dev
pip3 install fastecdsa

First, we are going to import Keccak from the Crypto Hash library (yes, this is basically a crypto hash library). Let’s do this running the following command:

from Crypto.Hash import keccak

and let’s add the elliptic curve domain parameters extracted from the recommended parameters document for secp192k1, as “Pcurve” and the N cofactor for the elliptic curve that we are going to use to sign.

You can find these values in this document section, but I will copy them below to make your life easier.

They are both big prime numbers, and they are part of the conditions for the private key. From your python3 console, type:

Pcurve = 2**256–2**32–2**9–2**8–2**7–2**6–2**4–1

Which is the same as the hexadecimal notation below

Then add

N = 0xFFFFFFFFFFFFFFFFFFFFFFFFFFFFFFFEBAAEDCE6AF48A03BBFD25E8CD0364141

Our private key will be within the range from 1 to N.

Now, add the following:

Ac = 0
Bc = 7
Gx = 0x79BE667EF9DCBBAC55A06295CE870B07029BFCDB2DCE28D959F2815B16F81798
Gy = 0x483ADA7726A3C4655DA4FBFC0E1108A8FD17B448A68554199C47D08FFB10D4B8

These are the parameters that we will use to generate the public and private key.

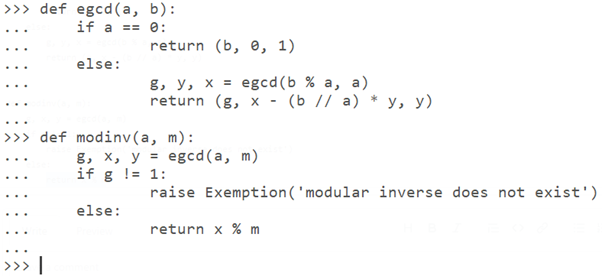
There are also 2 functions that we will need to import, the egcd (greatest common divider function from the extended Euclidean algorithm) and the modular inverse:

def egcd(a, b):
if a == 0:
return (b, 0, 1)
else:
g, y, x = egcd(b % a, a)
return (g, x - (b // a) * y, y)
def modinv(a, m):
g, x, y = egcd(a, m)
if g != 1:
raise Exemption('modular inverse does not exist')
else:
               return x % m

You can also find the scripts here: https://gist.github.com/Bitatlas/4a6fa3742713f50c07ed6aa6ae78bd94

NOTE: if you find any errors with Python scripts, 86,8% of the cases it’s related to the indentations. Indentations must be correctly aligned.
Once you have imported these two functions, we will need to add the following imports:

from fastecdsa.curve import Curve
from fastecdsa.point import Point
from fastecdsa.curve import secp256k1

These are all the libraries and recommended values for the parameters that we will need to sign a message!
Great, we now have everything we need to start doing the ECDSA signature!

Let’s start by signing the message “I LOVE BLOCKCHAIN”, doing as it follows:

keccak.new(data=b’I LOVE BLOCKCHAIN’, digest_bits=256).hexdigest()

Okay, we just got the message hash.

Let’s also create a variable msgHash by using the command below. Note that we are adding “0x” just to represent the value in hexadecimal.

msgHash = ‘0x’ + keccak.new(data=b’I LOVE BLOCKCHAIN’, digest_bits=256).hexdigest()

The next thing we have to do is create a generator point that will help create the verifying key. The verifying key will be created by the multiplication of the signing key with the generator point.

GenPoint = Point(Gx, Gy, curve=secp256k1)

If we printout GenPoint, we will see the X and Y of our elliptic curve, which is the same curve used in Ethereum and Bitcoin.

Now we need to create a signing key and the verification key. The signing key is generated by creating a random number (this is why it’s important to create truly random numbers), so we can just randomly create a smaller number than N. Then, we create the verification key by multiplying the signing key with the GenPoint. We will then have this:

Next, we need X and Y, another point, which needs to be a random number. The more random a number is, the more N secure it is. We could just type a “random” number on the keyboard, but let’s try to do something that will generate a number a little more random than that:

import random
random.randint(99999, 999999999999)
randNum = random.randint(99999, 999999999999)

And finally, create the XY1 point and r:

Now let’s create our “s”. Note that we will need to use the msgHash value as an integer without the quote marks. For this, I called msgHash and copy-paste the value without the quote marks again to msgHash.

Then we can create s:

s = ((msgHash + r * SK) * modinv(randNum, N)) % N

And voila!!! We have our signature r and s. Signature(r, s)

Now we can go through the ECDSA verification process. The condition to the verification process is r = x % N, and every time we want to conduct a new signature, we need to create a new k from a random point k*V as a random point(x, y) in our elliptic curve.

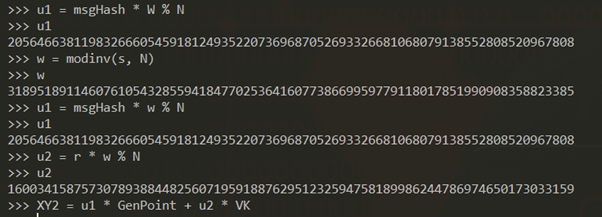
Let’s go for the verification:

w = modinv(s, N)
u1 = msgHash * w % N
u2 = r * w % N
XY2 = u1 * GenPoint + u2 * VK
And we can go lastly to the final verification:

r == XY2.x % N

We get “True”! We have successfully signed and verified a transaction! Weeeee! Is it just me, or this is super exciting stuff to do?
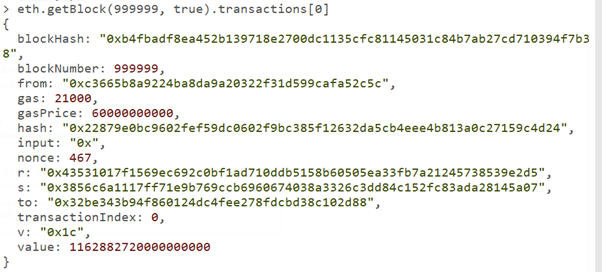
When we look again at a transaction, the r, s and the v, it makes more sense why they exist and their role in signing and verifying a transaction!

Elliptic Curve is a powerful cryptography tool. Perhaps even more useful than RSA when quantum computers become a reality. ECDSA is becoming widely used on the internet and blockchain applications, including most of the major cryptocurrencies like Bitcoin and Ethereum have ECDSA as part of their toolset.

Let me know if you have any questions, and also check my blockchain course below, where I explain in details all the cryptography components of blockchains.

? Follow me, and please also check my ? blockchain courses:

? The First-Ever Dogecoin Course

?‍? Fintech, Cloud and Cybersecurity Course

? The Complete NFTs Course

?‍? Unblockchain Course — The Brain-Friendly Blockchain Course


ECDSA — How to programmatically sign a transaction was originally published in Level Up Coding on Medium, where people are continuing the conversation by highlighting and responding to this story.


This content originally appeared on Level Up Coding - Medium and was authored by Henrique Centieiro


Print Share Comment Cite Upload Translate Updates
APA

Henrique Centieiro | Sciencx (2021-06-20T16:43:41+00:00) ECDSA — How to programmatically sign a transaction. Retrieved from https://www.scien.cx/2021/06/20/ecdsa%e2%80%8a-%e2%80%8ahow-to-programmatically-sign-a-transaction/

MLA
" » ECDSA — How to programmatically sign a transaction." Henrique Centieiro | Sciencx - Sunday June 20, 2021, https://www.scien.cx/2021/06/20/ecdsa%e2%80%8a-%e2%80%8ahow-to-programmatically-sign-a-transaction/
HARVARD
Henrique Centieiro | Sciencx Sunday June 20, 2021 » ECDSA — How to programmatically sign a transaction., viewed ,<https://www.scien.cx/2021/06/20/ecdsa%e2%80%8a-%e2%80%8ahow-to-programmatically-sign-a-transaction/>
VANCOUVER
Henrique Centieiro | Sciencx - » ECDSA — How to programmatically sign a transaction. [Internet]. [Accessed ]. Available from: https://www.scien.cx/2021/06/20/ecdsa%e2%80%8a-%e2%80%8ahow-to-programmatically-sign-a-transaction/
CHICAGO
" » ECDSA — How to programmatically sign a transaction." Henrique Centieiro | Sciencx - Accessed . https://www.scien.cx/2021/06/20/ecdsa%e2%80%8a-%e2%80%8ahow-to-programmatically-sign-a-transaction/
IEEE
" » ECDSA — How to programmatically sign a transaction." Henrique Centieiro | Sciencx [Online]. Available: https://www.scien.cx/2021/06/20/ecdsa%e2%80%8a-%e2%80%8ahow-to-programmatically-sign-a-transaction/. [Accessed: ]
rf:citation
» ECDSA — How to programmatically sign a transaction | Henrique Centieiro | Sciencx | https://www.scien.cx/2021/06/20/ecdsa%e2%80%8a-%e2%80%8ahow-to-programmatically-sign-a-transaction/ |

Please log in to upload a file.


There are no updates yet.
Click the Upload button above to add an update.

You must be logged in to translate posts. Please log in or register.