This content originally appeared on Level Up Coding - Medium and was authored by Henrique Centieiro
Ethereum Node Series I — Step-by-step to deploy an Ethereum on AWS Cloud using an Ubuntu VM
First, a Brief Ethereum Intro (to refresh our memory)
Created in 2013 by Vitalik Buterin, Ethereum has its native currency, Ether, ticker symbol ETH, which has a market cap of around 200 billion dollars as of June 2021. Ether is used both for transactions and used as currency to reward the miners for their work through transaction fees paid by the users and smart contracts. Per day, Ethereum processes more than one million transactions which are approximately four times more than Bitcoin.
Ethereum is a proof of work blockchain just like Bitcoin. It’s moving however to Ethereum 2.0 which will adopt proof of stake as a consensus mechanism.
It’s important to say that Ethereum is completely free to read, i.e. the blockchain is completely public, but it’s not free to write. To write on the blockchain, any code, smart contract, data or transaction, payment in fees, also called gas, must be made. It’s kinda like this: you can see who is at the party, you can hear what music they are listening to, but to enter the party, you will have to pay!
There are entire industries being built on top of Ethereum thanks to the smart contract capabilities. Hundreds of ICOs raised billions of dollars. Many NFTs marketplaces buy and sell non-fungible tokens for art, collectibles, and cute criptokitties. Dozens of DeFi platforms are running on Ethereum, building entire banks on the platform.

Enough BS, let’s get our hands dirty and deploy that Ethereum node
Let’s play around with Mr Ethereum! We will need to use a Virtual Machine to deploy your Ethereum node using Ethereum Geth for this section. You can follow along (it’s a fantastic way to learn) or just read it. If you get stuck for some reason, please don’t hesitate to reach out to me and ask for help!
This section will have many screenshots from the command line so that it is easier to follow along and check what is actually being done.
There are two main options: to deploy an Ubuntu Virtual Machine using Oracle VM VirtualBox (it’s free to use), or you can use one of the major cloud providers — AWS, Google Cloud, Azure, Alibaba Cloud or IBM — to deploy an Ubuntu virtual machine. The second option is probably easier, more flexible and faster. Ubuntu is just a Linux operating system, just like Windows or macOS, but it’s straightforward to use for this case.
Going back to deploying your Ubuntu VM, if you deploy a Virtual Machine on your laptop, it may consume many resources from your computer and make it very slow. For this reason, deploying on the cloud is probably the best option. This article’s purpose is not to teach how to deploy a virtual machine, but there is a lot of content online, or alternatively, you can ping me a message on LinkedIn, and I will reply as fast as possible.
A third alternative would be to do it directly from your computer eventually. Still, it’s safer if you connect from an isolated virtual machine that you can basically use as a playground. Also, suppose you connect with your personal computer. In that case, you will be exposing your IP to the Ethereum network and being a computer dealing with crypto, and you become a honeypot for hackers.
Okay, let’s get our Ubuntu machine ready on AWS!
I will leave you here a quick step by step to deploy an Ubuntu VM on AWS. It’s effortless. Just follow the steps below.
- If you don’t have an AWS account, go ahead and create one. It takes 3 minutes.
- Once your AWS account is ready, navigate to services and select EC2
- Click instances → Launch instances
- Choose AMI: scroll down until you find the first “Ubuntu Server” option. Click select

5. Select the instance type. The free tier may be ok to play around for a bit but note that the instance on the “free tier” may become slow when running an Ethereum node. If that’s the case, the alternative may be selecting a t2.large or t2.xlarge and stop the instance whenever you are not using it to avoid incurring additional costs. Click next
6. Configure instance details. You can leave most of it as it is. In “auto-assign public IP”, select “enable”. To save some money, you can also click “request spot instance”. Spot instances may allow you to save around 50% of the cost, but note AWS may terminate the instances if the spot price increases. You should not use a spot instance if you are running a production blockchain.
7. Add storage. We will need some storage for our node. To play around, 200GB to 300GB of general-purpose SDD should be enough. Click next.
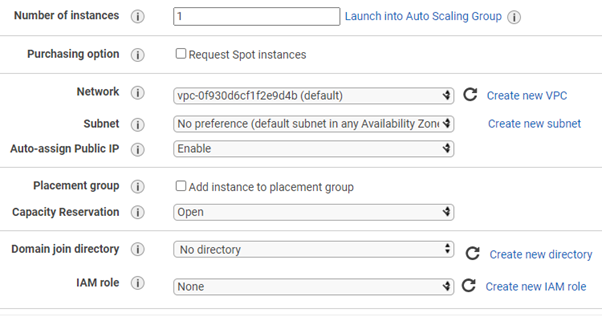
8. Tags. You can name your Ethereum node here. Type “Name” in the key field and “Ethereum node” in the Value field.
9. Configure security groups: make sure SSH port 22 is open to the IP range 0.0.0.0/0. This means that it is open to the world. Make sure you remove this once the playground is finished. Click review and launch
10. Select a key pair that you already use or create and download a new key pair. Don’t forget where you download the key pair. We will need this later to SSH into our node.
NOTE: if you are just testing and playing with your new Ethereum node, don’t forget to terminate the EC2 instances, even if they are free tier. The free tier has a limit, for example, 750 hours, after which you will start paying. These EC2 instances may cost a few cents per hour, but they may add up a quite expensive bill if you leave them running for one full month.
The best setup is to have a t2.xlarge which can run at around 60% of the CPU utilization to update an Ethereum light node:

So if you can, you can request a t2.xlarge or equivalent to avoid having the node crashing all the time and generally having a better experience. The t2.xlarge will give you 4 vCPU, 16GB memory and better network performance. On AWS, you can request the spot instances, which will have a better price.
Okay! Now that your Ubuntu EC2 instance is created, you need to SSH into it to interact with the VM and install the Ethereum software.
In the EC2 panel, select your new instance and click connect:

Follow one of the options. You can use the EC2 Instance Connect option, a web-based command-line interface provided by AWS, or SSH into it, using any CLI — Command Line Interface. I prefer the SSH option. To SSH, follow the steps as shown you the SSH option. You can use the Command Prompt on your computer — for Windows, click the Windows menu and type cmd. For Mac, open the applications folder, then utilities and double-click on Terminal, or press Command — spacebar to launch Spotlight and type “Terminal”. Alternatively, you can download a cool console emulator like Cmder, which is what I use.

To follow along, you need to locate the folder where your AWS key pair is stored and then follow the commands just like shown in the AWS connect page for your instance.
Once you connect/SSH to your Ubuntu machine, run the following commands, one by one, to install some packages and libraries that we will need. And hey, don’t copy what’s between ()
sudo apt-get install (to install APT — Advanced Package Tools)
sudo apt-get update (for updating a package)
sudo add-apt-repository ppa:ethereum/ethereum (to install the ethereym repository repository)
sudo apt-get update (to update the package)
sudo apt-get install ethereum (to install the latest version of Ethereum Go/Geth)
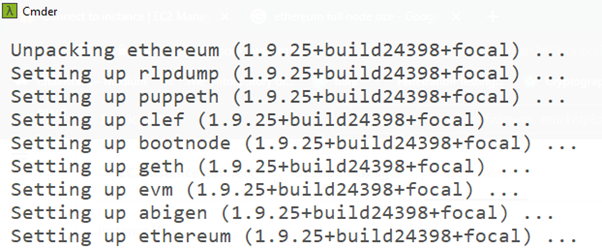
We are now ready to go! Now that we have installed Ethereum Geth, you can look at the help option by typing.
geth –help.
You can also take a quick look at the folders inside your node to see what’s inside the Ethereum folder. For this, type the command.
ls -all
(this will list the objects and folders store in the instance. You should be able to see .ethereum as per the image below) and then,
cd .ethereum/
(to enter the .ethereum folder, note that it may take a few minutes to update)
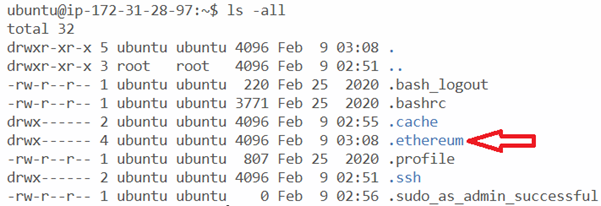
.ethereum/ is our default path to call any functions in our Ethereum node, and we will use geth.ipc to later connect to the blockchain.
If you cant find your .ethereum folder for some reason, it may be related to the path to the .ethereum folder. You can probably try typing the following path to enter the .ethereum folder. This is your default path.
cd /home/ubuntu/.ethereum/
To start our node, the first step is to sync it with the blockchain. As a blockchain node, we need to be synchronized with the other nodes on the blockchain. However, downloading the full blockchain to the node could take days and a lot of space.
According to Etherscan, the Ethereum blockchain is currently more than 600GB and growing every minute. Consequently, it requires a lot of space to be an Ethereum full node.
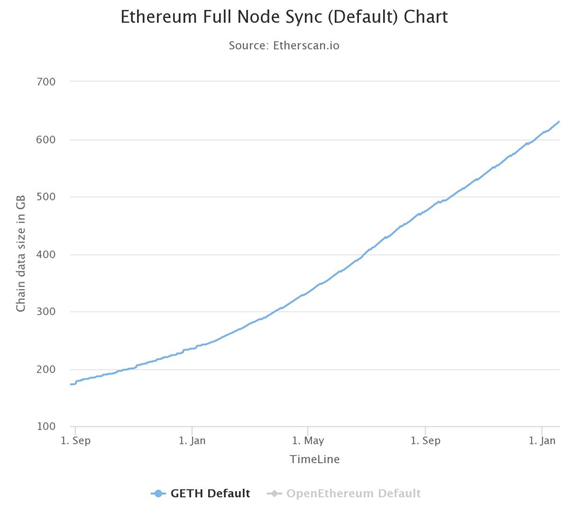
Considering the blockchain’s size, we can allocate a maximum cache to our node (we are using an EC2 instance with only a few gigabytes available). We want to select a synchronization mode that will allow doing more lightweight synchronization. There are 3 modes for Ethereum node synchronization: fast, light and full.
syncmode=fast — it downloads block headers and snapshot with the last 64 blocks. It does not replay transactions and reduces the amount of work that your machine needs to do
syncmode=light — it downloads only block headers and validates the data against the headers’ hash. Complete updates on the go connecting to other peer full nodes. The syncmode light is not compatible with mining
syncmode=full — it runs a full node, downloading all the blockchain since the genesis block. It goes through all the transactions in the blockchain, one by one, replaying them all and providing a full validation of the blockchain. It requires a lot of resources in terms of computing power, broadband and storage
In this case, because we just want to play around with the network, we will use the syncmode=fast, where our node will only download the block headers and validate only the last 1000 blocks.
There’s also another type of node: the archive node. This kind of node is like an expansion of the full node. Archive nodes need much more space — between 2 and 3 terabytes, and they store all the historical data, allowing us to retrieve information much faster. Archive nodes allow to retrieve all historical data, speeding up the process quickly. Most people won’t need an archive node, but this kind of node may give advantages to exchanges, block explorers, wallet vendors and other companies that need to retrieve information quickly.
Let’s get back to our node. The next step to connect to start our Ethereum node is to start synchronizing it. Let’s start by typing:
geth — syncmode=fast
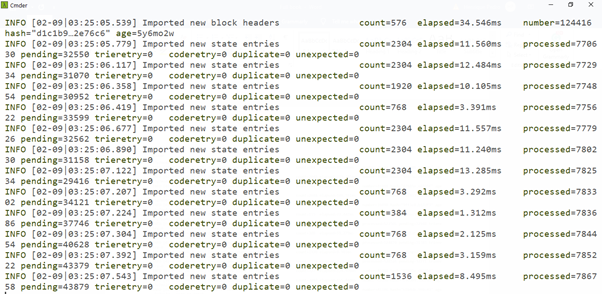
Once you run this command, the node will start synchronizing, and you should start seeing something like the screenshot below. Using — syncmode=fast or — syncmode=light, your node may take around 30 minutes to get synced with the network.
NOTE: To use the geth console or use the Python3 console to interact with the Ethereum network, you will need to run the Ethereum node. Otherwise, it will just not work.
If instead of connecting to the Ethereum main network, you want to connect to one of the testnets, like Goerli, Rinkeby or Ropsten, you can use one of the following commands:
Geth — goerli
Geth — rinkeby
Geth — ropsten
Connecting to the test networks allow you to play around without the need to top up your account with real Ether. Testnets have faucets that allow you to get some free test Ether. Note that Goerli and Rinkeby are proof of authority blockchains and may not replicate the Ethereum main network. By the way, if you didn’t guess yet what the testnet names have in common, these test networks were named after Swedish villages.
Okay, now that the node is running, we can connect to the Geth Javascript console and start interacting with the blockchain.
Open a second command line in a new window and SSH into your instance
In your command line, type
geth attach
to start the Geth Javascript console, just like the screenshot below
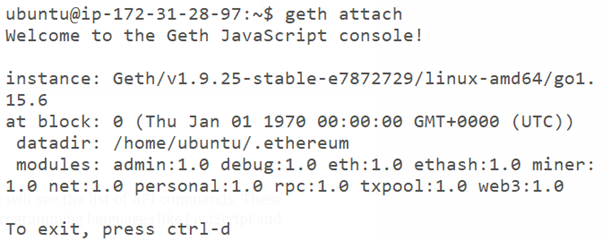
? Welcome to the matrix! You are connected to the Ethereum network! ??
Now we can start playing around. One of the first commands to learn in the Geth console is
eth. and press the tab key twice very fast.
You will see the list of API commands. These API commands are compatible with different programming languages like JavaScript and Python.
I will stop this article here and continue with the Ethereum geth commands on the next article, so stay tuned!
? Follow me, and please also check my ? blockchain courses:
? The First-Ever Dogecoin Course
?? Fintech, Cloud and Cybersecurity Course
?? Unblockchain Course — The Brain-Friendly Blockchain Course
Deploying an Ethereum node on AWS Cloud was originally published in Level Up Coding on Medium, where people are continuing the conversation by highlighting and responding to this story.
This content originally appeared on Level Up Coding - Medium and was authored by Henrique Centieiro
Henrique Centieiro | Sciencx (2021-06-27T18:20:24+00:00) Deploying an Ethereum node on AWS Cloud. Retrieved from https://www.scien.cx/2021/06/27/deploying-an-ethereum-node-on-aws-cloud/
Please log in to upload a file.
There are no updates yet.
Click the Upload button above to add an update.
