This content originally appeared on Level Up Coding - Medium and was authored by Henrique Centieiro
Exploring the Ethereum block
Ethereum Node Series II — Retrieving Ethereum Block data using Geth
In the previous article of the Ethereum Node Series, we went through the steps to deploy an Ethereum node on AWS Cloud. Now that our node is deployed and running let’s start playing around with it, learn how to retrieve Egthereum blocks, understand the different components of the Ethereum block and understand a few other commands related to the Ethereum network.
Ethereum — the world’s biggest distributed computer
Ethereum is also described as a second-generation blockchain (being Bitcoin-like blockchains, the first-generation), supporting the first-time smart contracts and scripting functionality. Smart contracts allow a world of possibilities, and they can pretty much automate anything, being self-executing computer code that lives in a decentralized blockchain. Once conditions on a smart contract are met, an event (whatever the smart contract was designed for) is triggered, fulfilling the smart contract’s purpose.

In Ethereum, the smart contracts are written in a programming language called Solidity and these programs are run in the EVM — Ethereum Virtual Machine. You can see the EVM as a giant Turing-complete, decentralized virtual machine distributed across all the Ethereum nodes worldwide. In total, there are around 8500 nodes, and pretty much anyone can be a node in the network. The EVM is the core of smart contract execution. Due to its decentralized nature, it’s also highly redundant, high fault-tolerant, and very resistant to attacks such as DDoS stacked and immutable. What’s the catch? The trade-off is that Ethereum may have a bit low throughput, and/or the transaction fees may be high sometimes.
The Ethereum block
The Ethereum block is composed of several fields represented below. We are going to break down all of them. Below, you can see a block that we retrieve from the Ethereum blockchain.
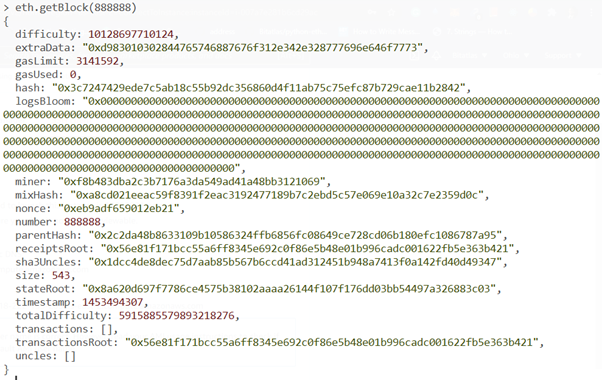
The Ethereum block is slightly different when comparing to Bitcoin, although some of the fields are identical. This is an actual block, more precisely the block 888888 that was mined with time timestamp 1453494307 (epoch time), which in human-readable time is January 22, 2016, 8:25:07 PM GMT. This block sample illustrates well what any other Ethereum block looks like.
Start using Ethereum Geth commands
Assuming that you have already an Ethereum geth machine running, we can start playing around. If you don’t have a node running yet, you can check this article where I explain how to deploy an Ethereum node on AWS.
Let’s get into it! One of the first commands to learn in the Geth console is
eth.
and press the tab key twice very fast.
You will see the list of API commands. These API commands are compatible with different programming languages like JavaScript and Python.
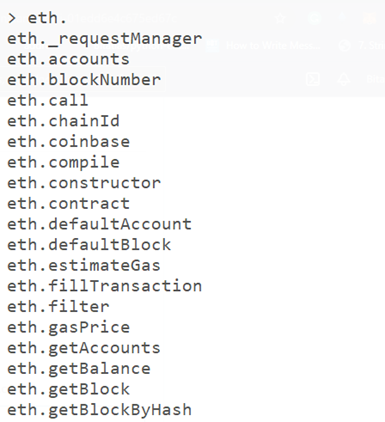
The command line auto-completes any commands that you start writing to facilitate writing commands if you press the tab key. For example, you can type eth.syn and if you press the tab key, it should autocomplete to eth.syncing
To do a health check to your Ethereum connection and see if the node is synchronizing, you can use the following command:
eth.syncing
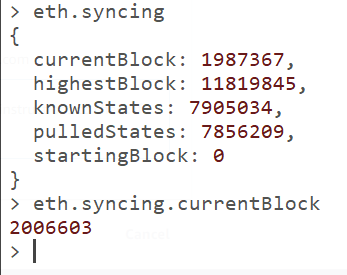
Here we can see that we are syncing with the network, the status, the current block in the blockchain, etc.
There are a few additional commands under “eth.syncing”. To check the list, you can type eth.syncing. and press the tab key twice very fast.
With the syncing commands, we can see that the node is synchronizing, and we can use the command eth.syncing or eth.syncing.currentBlock to see the current block that our node is synchronizing.
Checking the Ethereum node network status
Let’s now check our network status and check if our node is listening and connected to other peer nodes. To retrieve data from the blockchain and synchronize, you will need to be connected.

Using the command net.listening, we can see that our net.listening=true, which is good, and by running,
net.peerCount
we see that we are connected to 16 peer nodes. Sweet!
Another interesting command to understand how is your network composed is
admin.peers
which will give you information about the peer nodes you are connected to.

In this screenshot, we can see some information about this node, including the version of his software — in this case, he is using Geth v1.9.25 — and we also see the IP address of the peer node. The IP address is exposed to the world, and that’s why you shouldn’t run a node from your personal laptop.
If you want to get the details of your node, you can run
admin.nodeInfo
and you will get similar information from your own node, including your version, the IP address, the blocks, consensus, and much more.
Exploring the Ethereum block
Okay, once you check that you are connected to the network, you can start exploring the blocks and retrieve data. You can take a look and explore any block in the Ethereum blockchain as long as your node is synchronized.
This is one of the magics of blockchains: anyone can check, audit or track any block, ensuring that the network can be trusted. All data can be verified.
Let’s get, for example, block 987654 using the following command:
eth.getBlock()
You can either search for a block number, for example
eth.getBlock(987654)
or search for a block hash, if you know the hash of the block you are looking for
eth.getBlock(“0x4ca44f16a98a6bc8206c152057cf0d7a6caeb0b287e845e21a1da2849bea4c8a”)
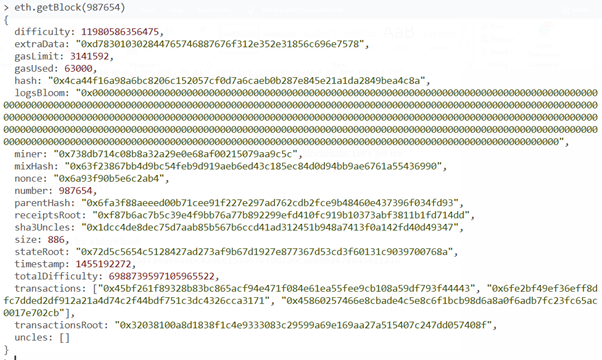
Here you can see all the information about the block, including the difficulty, gasLimit and gasUsed, hash, the nonce in hexadecimal, timestamp in UNIX time, totalDifficulty and the hash of the transactions.
timestamp: the block timestamp is expressed in seconds since Unix epoch time. Time is the time when the block was mined. The timestamp is set by the miner that mined that block. As such, the miner can somehow manipulate the timestamp of the blocks or transactions, as long as they respect some basic rules like a block’s timestamp must be a time in the future and not in the past.
What is the Unix time or epoch Unix time? Unix time is basically the way computers measure time. The Unix time is the number of seconds since 1st January 1970. Unix time “0” means midnight 1st January 1970, and you may see this date, for example, when you reset an old mobile phone. 1455192272 means in human time GMT Thursday, February 11, 2016, 12:04:32 PM.
stateRoot: the start root can be seen as a giant Merkle Tree of all the previous blocks, transactions and code in the Ethereum blockchain hashed into the stateRoot of this block.
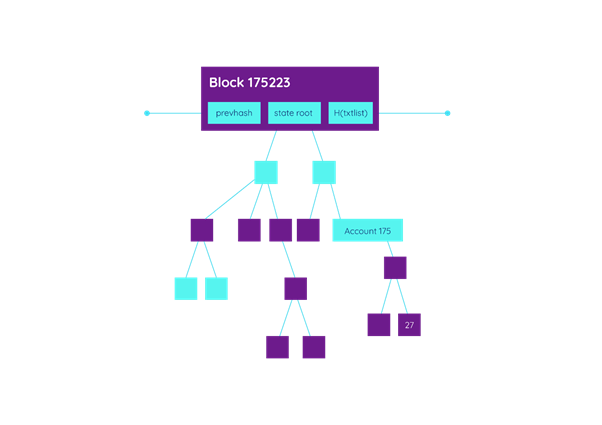
This state root has an essential purpose: it allows any node to easily validate with an excellent degree of assurance that the block he has is correct without verifying all the blockchain blocks. He can instead verify only the hash tree from the other blocks. This is especially important when a node is a light node.
logsBloom: logsBloom is a 256 bytes string, and it’s not really a log in the classical sense. It’s the bloom filter for the block logs, and it allows to filter the hash of each element in the block. The objective is to minimize the number of queries that clients need to make by storing some events like historical transactions in the bloom. When there’s a query “Is data z in the set?” the response can be “maybe” or “no”. Thus is a probabilistic data structure.
receiptsRoot: this 32 bytes string is the root hash of the transactions receipts.
Transactions: here, you see the hash of all the transactions in the block.
TransactionsRoot: a 32 bytes string is the root hash of the Merkle tree of all the transactions in the block.
We can also add a bit of magic to our eth.getBlock() and get the transaction details by using the command like this:
eth.getBlock(987654, true)
This will also retrieve all the transactions in that same block.
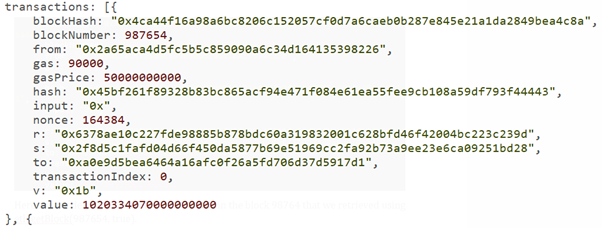
Here are the details of one of the transactions in block 98764 that we retrieved using eth.getBlock(987654, true).
The next article will continue playing around with the Ethereum network and getting additional information from Ethereum, like transaction information!
? Follow me, and please also check my ? blockchain courses:
? The First-Ever Dogecoin Course
?? Fintech, Cloud and Cybersecurity Course
?? Unblockchain Course — The Brain-Friendly Blockchain Course
Exploring the Ethereum block…. was originally published in Level Up Coding on Medium, where people are continuing the conversation by highlighting and responding to this story.
This content originally appeared on Level Up Coding - Medium and was authored by Henrique Centieiro
Henrique Centieiro | Sciencx (2021-06-29T15:24:59+00:00) Exploring the Ethereum block….. Retrieved from https://www.scien.cx/2021/06/29/exploring-the-ethereum-block/
Please log in to upload a file.
There are no updates yet.
Click the Upload button above to add an update.
