GitHub and Git for beginners – Part 1

Photo by Roman Synkevych on Unsplash

Today’s blog will be the first part of a two-part series on the basics of GitHub and Git. GitHub is a version control software and is an essential skill for all programmers. GitHub is used by many different companies such as Microsoft, Apple, and so on. This is their website.

An example would be that you have made an error in your code that crashed your entire program. In that case, you can use GitHub to essentially go back to a point at which your code was working. There are many more features that can help you in your programming journey.

Before we go ahead, I highly recommend you learn the basic commands of the terminal or command prompt. We will need those.

Let’s start with Git. You can think of Git as basically the command line version of GitHub. You can use Git to send changes made locally to your code to your GitHub repository. I’ll explain what a repository is later in the blog.

So to get started, you need to do two main but relatively easy things. The first one is to create an account in github.com, and the second one is to install Git. Click on this link to install it. macOS and Linux users don’t have to install Git because it already comes built-in.

Installing Git in windows will also install another application called git bash. I highly recommend to windows users to use git bash so that you can use macOS commands. Now that we have both set up. We need to configure few things. Firstly, open up your terminal or command prompt or git bash depending on which operating system you are in and what you prefer. Then type:

git config --global user.name "Your Github username here"
git config --global user.email "Your email linked to github here"
git config --global core.editor "Your primary editor"

Here is an example(I am using VScode as my primary editor):

git config --global user.name Ishan-Choudhary
git config --global user.email your-email@gmail.com
git config --global core.editor "code --wait"

This sets up Git to know which GitHub account is being used and your primary code editor. The next thing to set up is autocrlf. Now, what is autocrlf? It is a configuration to handle the end of lines of the file you are uploading to GitHub. In windows, the end of line is marked with two unique characters. One is carriage return or ‘\r’, and the other is line feed or \n. In macOS or Linux systems, use only line feed or \n to mark end of lines. For example:

#ON WINDOWS
Hello \r\n
Hi
#ON MAC/LINUX
Hello \n
Hi

If we don’t configure Git to handle end-of-lines proper, it will cause some problems later. This configuration is called ‘autocrlf’. For example, suppose two users are working on one GitHub repository, and they don’t have autocrlf configured. One uses a Mac, and the other uses Windows. Now the Windows user makes a new line in a file and then uploads the changes to his GitHub repository. Now the Mac user wants to see the changes, so that person downloads the file into her folder and looks at it:

#WHAT THE WINDOWS USER SEE's
Hello \r\n
Hi
#WHAT THE MAC USER SEE's
Hello \r
Hi

The mac user sees this because, for them, the end of lines only means ‘\n’. So the ‘\n’ will be removed, but ‘\r’ will stay. Similarly, if the Mac user makes a new line, for him, it will only be line feed or ‘\n’. However, when a windows user sees the same file, there won’t be any new lines for him because, for the windows user, new lines are marked with a carriage return and a line feed or ‘\r\n’.

So if you are on windows. Type:

git config --global core.autocrlf true

And if you are on Mac or Linux type:

git config --global core.autocrlf input

And just like that, you have configured Git so that it automatically adds a ‘\r’ if a windows user downloads the file from GitHub, which had last been edited by a Mac/Linux machine. And remove ‘\r’ if a Mac user downloads the file that a windows machine had last edited from GitHub.

Alright, so to make final checks that our configuration is working, let’s go ahead and open the configuration file. So type:

git config --global --edit

Something like this should pop up:

I am using Visual Studio Code as my primary editor, so I get a window like this. A different window might pop up for people who have chosen a different editor. However, the contents should more or less be the same, except for the autocrlf field, which differs from OS to OS. If you want to change anything, you can change it here. Once you have completed the changes, close the window.

And with that, Git is set up, and now it is time to learn some commands to work with GitHub and Git.

Okay, so firstly, let’s create a new repository. A repository is a folder that contains all your files. The changes made locally in this folder will be updated in the repository created on GitHub’s websites. So navigate to your project folder. Open your terminal, or right-click and select ‘Git Bash here’ type:

git init

You should get this message:

Initialized empty Git repository in /path/to/project_folder/.git

It means a repository is made. The .git is a configuration folder of your project. It also shows that this is a repository. If you are using Git Bash, you should also see something like this:

See that “main”(or master) text written after the directory. This shows that you are in the main branch. Now, what are branches? Imagine a tree. A tree has many branches. You can think of your git repository as a tree with many branches you can make to add new features without changing the original code so that even if the code in that branch breaks, your ‘main’ or ‘master’ branch still has the code before the feature was added. By default, a repository always contains a ‘main’ or ‘master’ branch. We can also create new branches.

Now let’s create a sample file. Usually, whenever we make a repository, we add a file known as “README.md” to it. This is a file that will tell the steps on installing the repository and what the repository is. So type:

touch README.md
echo "#GitHub and Git for beginners" >> README.md

After echo, you can put any message you want. The ‘#’ key is used to specify a title text, which is why I put the article title over there. No message should pop up after you run this command, but if you check the README.md file (you can open it with notepad)

Okay, so now close the ‘README.md’, and let’s now save these changes to Git. So to save the changes, you have to first add the file to a staging area. A staging area is a place where the code is first sent so that if you work in a group, other people can review that code before we commit the changes. So to do that type:

git add .

The ‘.’ tells add the entire folder. If you only want to add a specific file, type the same command, but instead of the ‘.’ type the file name. Now let’s see if we have added our file to the staging area. Type:

git status

You should see something like this come:

This tells us that the README.md file has been added to the staging area. Now it’s time to commit the change. A commit is a snapshot of your saved code so that you can go back to it whenever you want. It is beneficial if, for example, your code crashes.

So type:

git commit -m "YOUR COMMIT MESSAGE"

A commit message is a text message you add to explain what changes you have made. If you prefer writing this message in an editor rather than the terminal. Type:

git commit

Your default code editor that you stated before will open up, and text like this will appear:

# Please enter the commit message for your changes. Lines starting
# with '#' will be ignored, and an empty message aborts the commit.
#
# On branch main
#
# Initial commit
#
# Changes to be committed:
#   new file:   README.md
#

Type your message below the last ‘#’ sign and then save and close the file. As soon as you close it, whatever you have changed till now, they will be committed.

Alright, that is it for this blog. In the next part of this blog, we’ll finally merge our code with GitHub and learn other commands. Follow me to get notified about part 2 of this blog.

Thanks for reading!


GitHub and Git for beginners – Part 1 was originally published in Level Up Coding on Medium, where people are continuing the conversation by highlighting and responding to this story.


This content originally appeared on Level Up Coding - Medium and was authored by Ishan Choudhary

Photo by Roman Synkevych on Unsplash

Today’s blog will be the first part of a two-part series on the basics of GitHub and Git. GitHub is a version control software and is an essential skill for all programmers. GitHub is used by many different companies such as Microsoft, Apple, and so on. This is their website.

An example would be that you have made an error in your code that crashed your entire program. In that case, you can use GitHub to essentially go back to a point at which your code was working. There are many more features that can help you in your programming journey.

Before we go ahead, I highly recommend you learn the basic commands of the terminal or command prompt. We will need those.

Let’s start with Git. You can think of Git as basically the command line version of GitHub. You can use Git to send changes made locally to your code to your GitHub repository. I’ll explain what a repository is later in the blog.

So to get started, you need to do two main but relatively easy things. The first one is to create an account in github.com, and the second one is to install Git. Click on this link to install it. macOS and Linux users don’t have to install Git because it already comes built-in.

Installing Git in windows will also install another application called git bash. I highly recommend to windows users to use git bash so that you can use macOS commands. Now that we have both set up. We need to configure few things. Firstly, open up your terminal or command prompt or git bash depending on which operating system you are in and what you prefer. Then type:

git config --global user.name "Your Github username here"
git config --global user.email "Your email linked to github here"
git config --global core.editor "Your primary editor"

Here is an example(I am using VScode as my primary editor):

git config --global user.name Ishan-Choudhary
git config --global user.email your-email@gmail.com
git config --global core.editor "code --wait"

This sets up Git to know which GitHub account is being used and your primary code editor. The next thing to set up is autocrlf. Now, what is autocrlf? It is a configuration to handle the end of lines of the file you are uploading to GitHub. In windows, the end of line is marked with two unique characters. One is carriage return or ‘\r’, and the other is line feed or \n. In macOS or Linux systems, use only line feed or \n to mark end of lines. For example:

#ON WINDOWS
Hello \r\n
Hi
#ON MAC/LINUX
Hello \n
Hi

If we don’t configure Git to handle end-of-lines proper, it will cause some problems later. This configuration is called ‘autocrlf’. For example, suppose two users are working on one GitHub repository, and they don’t have autocrlf configured. One uses a Mac, and the other uses Windows. Now the Windows user makes a new line in a file and then uploads the changes to his GitHub repository. Now the Mac user wants to see the changes, so that person downloads the file into her folder and looks at it:

#WHAT THE WINDOWS USER SEE's
Hello \r\n
Hi
#WHAT THE MAC USER SEE's
Hello \r
Hi

The mac user sees this because, for them, the end of lines only means ‘\n’. So the ‘\n’ will be removed, but ‘\r’ will stay. Similarly, if the Mac user makes a new line, for him, it will only be line feed or ‘\n’. However, when a windows user sees the same file, there won’t be any new lines for him because, for the windows user, new lines are marked with a carriage return and a line feed or ‘\r\n’.

So if you are on windows. Type:

git config --global core.autocrlf true

And if you are on Mac or Linux type:

git config --global core.autocrlf input

And just like that, you have configured Git so that it automatically adds a ‘\r’ if a windows user downloads the file from GitHub, which had last been edited by a Mac/Linux machine. And remove ‘\r’ if a Mac user downloads the file that a windows machine had last edited from GitHub.

Alright, so to make final checks that our configuration is working, let’s go ahead and open the configuration file. So type:

git config --global --edit

Something like this should pop up:
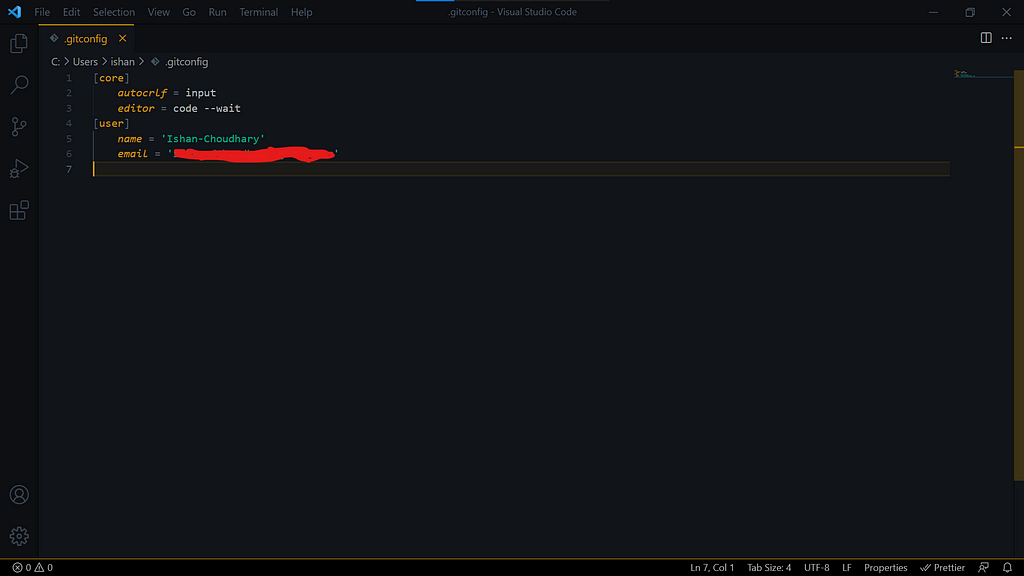
I am using Visual Studio Code as my primary editor, so I get a window like this. A different window might pop up for people who have chosen a different editor. However, the contents should more or less be the same, except for the autocrlf field, which differs from OS to OS. If you want to change anything, you can change it here. Once you have completed the changes, close the window.

And with that, Git is set up, and now it is time to learn some commands to work with GitHub and Git.

Okay, so firstly, let’s create a new repository. A repository is a folder that contains all your files. The changes made locally in this folder will be updated in the repository created on GitHub’s websites. So navigate to your project folder. Open your terminal, or right-click and select ‘Git Bash here’ type:

git init

You should get this message:

Initialized empty Git repository in /path/to/project_folder/.git

It means a repository is made. The .git is a configuration folder of your project. It also shows that this is a repository. If you are using Git Bash, you should also see something like this:

See that “main”(or master) text written after the directory. This shows that you are in the main branch. Now, what are branches? Imagine a tree. A tree has many branches. You can think of your git repository as a tree with many branches you can make to add new features without changing the original code so that even if the code in that branch breaks, your ‘main’ or ‘master’ branch still has the code before the feature was added. By default, a repository always contains a ‘main’ or ‘master’ branch. We can also create new branches.

Now let’s create a sample file. Usually, whenever we make a repository, we add a file known as “README.md” to it. This is a file that will tell the steps on installing the repository and what the repository is. So type:

touch README.md
echo "#GitHub and Git for beginners" >> README.md

After echo, you can put any message you want. The ‘#’ key is used to specify a title text, which is why I put the article title over there. No message should pop up after you run this command, but if you check the README.md file (you can open it with notepad)

Okay, so now close the ‘README.md’, and let’s now save these changes to Git. So to save the changes, you have to first add the file to a staging area. A staging area is a place where the code is first sent so that if you work in a group, other people can review that code before we commit the changes. So to do that type:

git add .

The ‘.’ tells add the entire folder. If you only want to add a specific file, type the same command, but instead of the ‘.’ type the file name. Now let’s see if we have added our file to the staging area. Type:

git status

You should see something like this come:

This tells us that the README.md file has been added to the staging area. Now it’s time to commit the change. A commit is a snapshot of your saved code so that you can go back to it whenever you want. It is beneficial if, for example, your code crashes.

So type:

git commit -m "YOUR COMMIT MESSAGE"

A commit message is a text message you add to explain what changes you have made. If you prefer writing this message in an editor rather than the terminal. Type:

git commit

Your default code editor that you stated before will open up, and text like this will appear:

# Please enter the commit message for your changes. Lines starting
# with '#' will be ignored, and an empty message aborts the commit.
#
# On branch main
#
# Initial commit
#
# Changes to be committed:
#   new file:   README.md
#

Type your message below the last ‘#’ sign and then save and close the file. As soon as you close it, whatever you have changed till now, they will be committed.

Alright, that is it for this blog. In the next part of this blog, we’ll finally merge our code with GitHub and learn other commands. Follow me to get notified about part 2 of this blog.

Thanks for reading!


GitHub and Git for beginners - Part 1 was originally published in Level Up Coding on Medium, where people are continuing the conversation by highlighting and responding to this story.


This content originally appeared on Level Up Coding - Medium and was authored by Ishan Choudhary


Print Share Comment Cite Upload Translate Updates
APA

Ishan Choudhary | Sciencx (2021-07-05T14:42:24+00:00) GitHub and Git for beginners – Part 1. Retrieved from https://www.scien.cx/2021/07/05/github-and-git-for-beginners-part-1/

MLA
" » GitHub and Git for beginners – Part 1." Ishan Choudhary | Sciencx - Monday July 5, 2021, https://www.scien.cx/2021/07/05/github-and-git-for-beginners-part-1/
HARVARD
Ishan Choudhary | Sciencx Monday July 5, 2021 » GitHub and Git for beginners – Part 1., viewed ,<https://www.scien.cx/2021/07/05/github-and-git-for-beginners-part-1/>
VANCOUVER
Ishan Choudhary | Sciencx - » GitHub and Git for beginners – Part 1. [Internet]. [Accessed ]. Available from: https://www.scien.cx/2021/07/05/github-and-git-for-beginners-part-1/
CHICAGO
" » GitHub and Git for beginners – Part 1." Ishan Choudhary | Sciencx - Accessed . https://www.scien.cx/2021/07/05/github-and-git-for-beginners-part-1/
IEEE
" » GitHub and Git for beginners – Part 1." Ishan Choudhary | Sciencx [Online]. Available: https://www.scien.cx/2021/07/05/github-and-git-for-beginners-part-1/. [Accessed: ]
rf:citation
» GitHub and Git for beginners – Part 1 | Ishan Choudhary | Sciencx | https://www.scien.cx/2021/07/05/github-and-git-for-beginners-part-1/ |

Please log in to upload a file.


There are no updates yet.
Click the Upload button above to add an update.

You must be logged in to translate posts. Please log in or register.