This content originally appeared on DEV Community and was authored by SalarC123
This is a follow up to my previous tutorial about how to implement authentication in your NodeJS/Express backend, so you might want to read that first for context

MERN Stack Authentication Tutorial (Part 1 - The Backend)
SalarC123 ・ Jun 24 ・ 9 min read
Also, all of the following code is on my github, but I used it in one of my projects, so you'll have to navigate around a bit to find the relevant code, and it might be slightly different since I modified this code to be more general
Packages To Install ?
react
react-router
- Here we'll need to install react-router for going to different routes, and for each route, I just fetch the data from the server because the frontend is only used for talking to the database. We just receive the data from the backend and display it with react. If you've done previous projects with NodeJS, you're probably aware of the
res.redirectfunction which redirects the user with NodeJS, but that won't do anything here because the frontend and backend are on different ports. Basically, the backend can't redirect the frontend because it can only send data and receive data from it. Since we can't use express for routing, we must thus use react-router.
If you've used express before, you might also be aware that you typically need an express engine such as EJS or Pug to display your data dynamically, but in this scenario, React is our view engine. So, from React, we need to get the data from the backend since we can't directly pass it down like with a view engine.
If you want to know how to connect a React frontend with an Express backend to let this happen, you can check out one of my previous articles.

How to connect a React frontend with a NodeJS/Express backend
SalarC123 ・ Jun 6 ・ 4 min read
File Structure ?
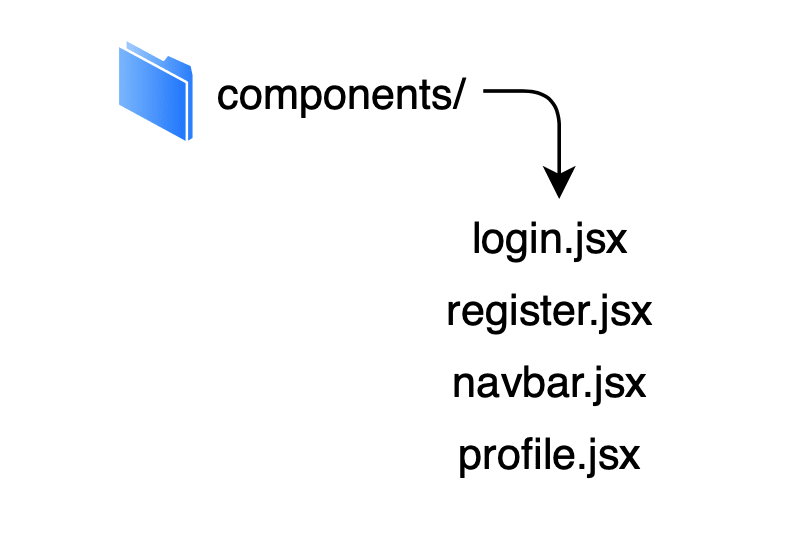
We'll have a login, register, and protected profile page (protected meaning that you need to login to access the page) to handle the flow of our app, and we'll start by making the components for these pages
React Router Setup
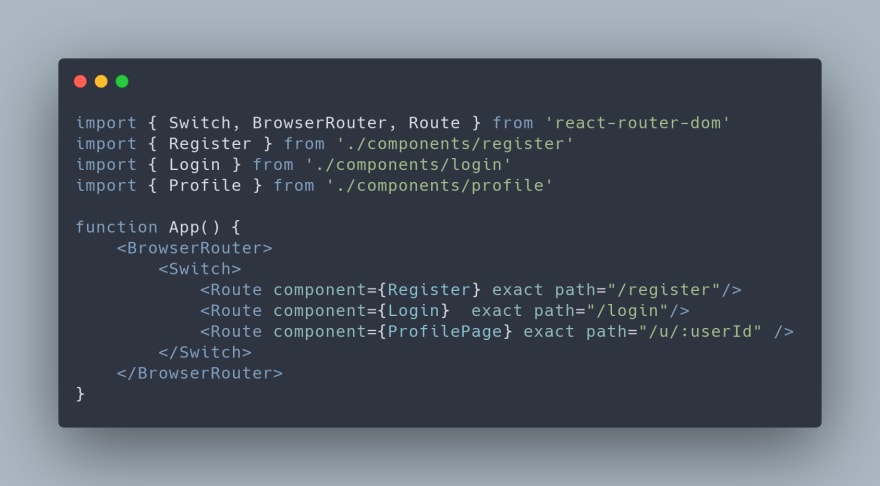
In our App.js component, we utilize three components from react-router that let us specify route names and what component to render on those routes. We can even render dynamic routes (using a colon followed by a variable name) as shown for the Profile Page route above. Also, make sure to add exact to each of your Route components because otherwise nested routes like "/first/second/third/page" will stop at "/".
Fetch Requests ?
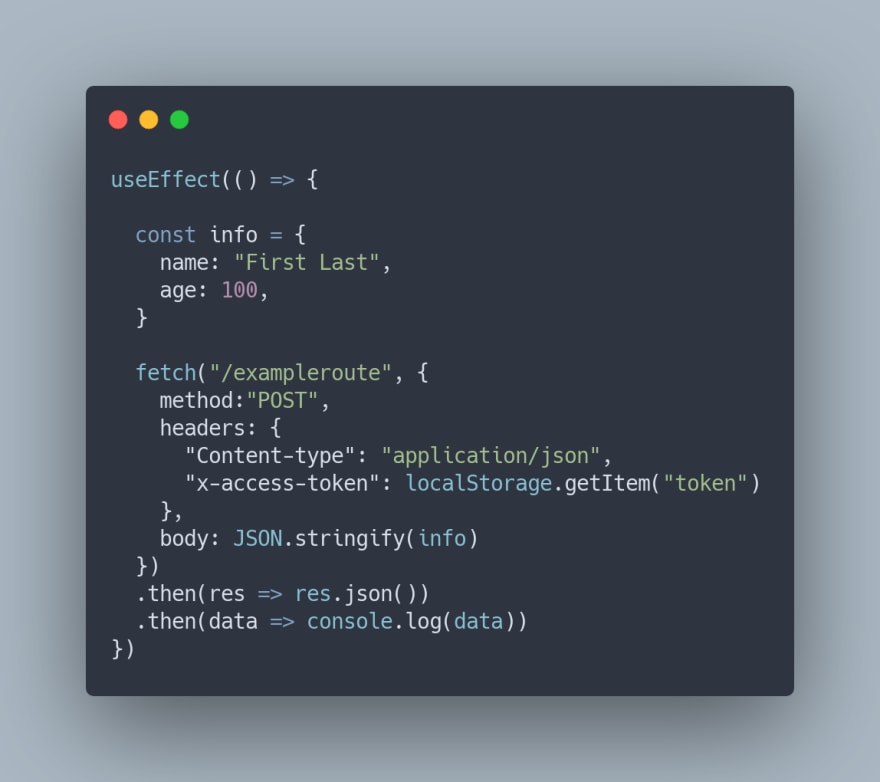
For each component, we need to make quite a few fetch requests, so it's important to understand how they work and why we write them as they are. First of all, when we make a POST request to send our login information to the backend, we are required to add "headers" which give context to the receiver about the request. The two headers that we'll be using are Content-type: "application/json" and x-access-token: localStorage.getItem("token").
The "Content-type" header specifies to the receiver that we are sending json and must be used in every POST request while the second header, if you remember from the first part, is passed to routes which need to authorize the user. I'll explain more about the localStorage part later, but for now, remember that we'll use the second header whenever we are fetching data that is custom to each user.
Addtionally, our fetch request won't need to specify localhost:BACKEND_PORT/exampleroute if we set a proxy in our package.json to proxy the backend, and we can instead just write /exampleroute
Under our headers, we need to pass a body in our request which consists of the main data we actually want to send. Make sure to JSON.stringify this body because we can only send strings to the backend. This stringified object will then be parsed by the body parser middleware we imported in our backend in part 1 so that we can use it.
Our fetch request returns a promise, so we can use .then afterwards to get back any data we pass back from the backend after processing the request
Login ?
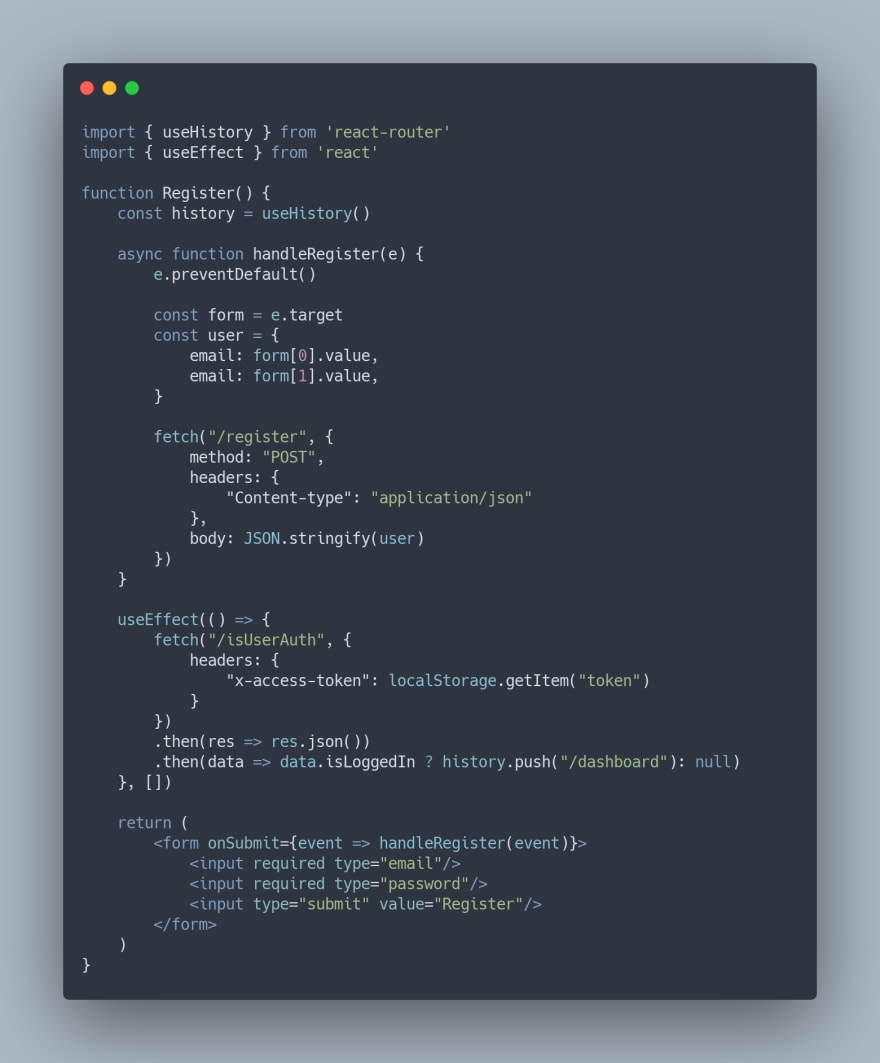
To walkthrough this code:
We first handle the form submission by grabbing the inputs and making a request to our login route which handles the validation, confirms the user exists, and signs a json web token for the user's session. Once the request has been fulfilled, we set the token we received from the backend or we display an error message
We are using localStorage to set this token so that it persists a page refresh and is global to our application but there are many pros and cons about saving tokens in localStorage which I will discuss later
This leads us right to our second block of code which is the useEffect. This code calls on our '/isUserAuth' route which has the sole purpose of confirming if the user is logged in. It does this by verifying that we have the right token. This is why need to send the
x-access-tokenheader. If the login fails, nothing will happen, but if the user successfully logs in, the json web token will be confirmed and we will use React Router's history API to redirect the user to our home page. Since the useEffect is run whenever the component is mounted, we are also ensured that a logged in user can not access the login page since they will always be immediately redirected with this useEffect call.We finally have our simple login form which uses an
onSubmitevent to transfer the data
Register ®️
The register component is exactly the same as the login component except that here we call the register route which creates the new user in our database and redirects the user to the login page once they fill out the form
Data Validation ?
For both the register and login routes, you should also make sure to add data validation to prevent users from breaking your app. I would suggest using an external package because they are typically safer and foolproof than a personal implementation (I prefer using joi).
Private Routes (Profile Page) ?
Before we move on, I want to mention that whenever we have a private route we need to call our '/isUserAuth' route that we defined in the backend part of this 2 part tutorial series. This route checks if the user has a valid json web token and sends back their username or other important information for the user if the token is valid.
Dynamically Rendering Navbar ⛵
Now you might wonder why I don't have my Navbar in my App.js component. Doing that could save me from manually placing the navbar in every component, but the problem with this is that it keeps the Navbar component static throughout the entire application. However, we don't want to do this because this is typically where the login/register/logout buttons are held, and those should be re-rendered whenever the user accesses a new page because we need to decide whether we should show the logout button or login/register buttons
To do this, we start by fetching the '/isUserAuth' route to ensure that the user is logged in, and if they are, we can set their username and display it in the navbar if we would like.
Then, if we go down to the JSX, we conditionally render the login/logout buttons based on if the username has been set. If it has been set, we render the logout button because we know they are logged in, and otherwise we render the login/register buttons which both use the Link component from react-router to let the user navigate to those pages easily.
Finally, our logout button calls a logout function that deletes the token from localStorage and then redirects the user to the login page so that our navbar can be re-rendered (we could also just refresh the page after deleting the token using history.go(0))
Where to store JWTs ?
To conclude this tutorial, I want to discuss different methods that you can use to store JWTs in the frontend because there are many pros and cons to using localStorage like I did above. The three main options are local storage, session storage, and cookies.
Local storage and session storage are prone to XSS (Cross site scripting) attacks, but are much easier to implement
Cookies, on the other hand, are prone to CSRF attacks while localStorage is not, but cookies can be more secure if you are using an httpOnly cookie.
Still however, both methods have limitations because they are each vulnerable to some type of attack, so I would recommend picking either one and then taking further security measures to prevent the respective attack to which your chosen method is vulnerable.
Thanks For Reading
This content originally appeared on DEV Community and was authored by SalarC123
SalarC123 | Sciencx (2021-07-18T14:57:17+00:00) MERN Stack Authentication Tutorial (Part 2 – The Frontend). Retrieved from https://www.scien.cx/2021/07/18/mern-stack-authentication-tutorial-part-2-the-frontend/
Please log in to upload a file.
There are no updates yet.
Click the Upload button above to add an update.


