This content originally appeared on DEV Community and was authored by Atharva Shirdhankar
Pre-requisites:
- Python 3 or higher.
- Flask
- Html and CSS
- Editor - VSCode / PyCharm
Part 1: Dependencies Installation
Open terminal and install the following dependencies.
Commands :
pip install flaskpip install SpeechRecognition
Part 2: Setting-Up Project
Now create a folder give it anyname. Here, I have given folder name as Flaskproject.

Now, open the empty folder in VSCode or PyCharm IDE(I preferred VSCode).
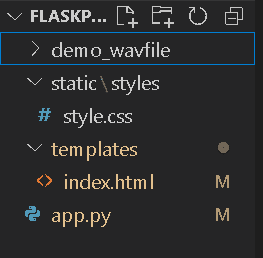
Inside the empty folder we have to create a python file (app.py), a templates directory and static directory and inside static directory create styles directory.

Part 3: Coding:
- Open the app.py file and enter the following code:
Code app.py:
from flask import Flask, render_template , request , redirect
import speech_recognition as sr

app = Flask(__name__)

@app.route("/", methods=["GET","POST"])
def index():
    transcript = ''
    if request.method == "POST":
         print("FORM DATA RECEIVED")

         if "file" not in request.files:
              return redirect(request.url)

         file = request.files["file"]
         if file.filename == "":
             return redirect(request.url)

         if file:
             recognizer = sr.Recognizer()
             wavfile = sr.AudioFile(file)
             with wavfile as source:
                 data = recognizer.record(source)
             transcript = recognizer.recognize_google(data, key=None)

    return render_template('index.html' , transcript = transcript)

if __name__ == " main ":
    app.run(debug=True, threaded=True)
2.Create index.html file in templates directory:
Code index.html:
<!DOCTYPE html>
<html lang="en">
<head>
    <meta charset="UTF-8">
    <meta http-equiv="X-UA-Compatible" content="IE=edge">
    <meta name="viewport" content="width=device-width, initial-scale=1.0">
    <title>FlaskProject - AudiotoText</title>
    <link rel="stylesheet" href="{{url_for('static', filename='styles/style.css')}}">
</head>
<body>
    <header>FlaskCaption</header>
    <div id="mainContainer">
        <h2>Upload Audio File</h2>
        <form method="post" enctype="multipart/form-data">
           <input type="file" name="file" id="fileinput">
           <br>
           <input type="submit" id="submitButton" value="Process"/>

        </form>
        {% if transcript != "" %}
        <div class="speechTranscriptContainer">
            <h1>Transcripted Text</h1>
            <p>{{transcript}}</p>
        </div>
        {% endif %}

    </div>
</body>
</html>
3.Create a styles.css file inside static/styles directory:
Code style.css:
body{
    margin: 0;
    padding: 0;
    background-color: aliceblue;

}

h1, p , input{
    font-family: cursive;
}

header{
    display: flex;
    justify-content: center;
    font-size: 50px;
    font-family: Georgia, 'Times New Roman', Times, serif;
}

#mainContainer{
    display: flex;
    align-items: center;
    flex-direction: column;
    border-radius: 10px;
    background-color: white;
    margin-top: 15%;
}

#submitButton{
    background-color: #0191FE;
    color: white;
    border: none;
    border-radius: 10px;
    margin-top: 10px;
    margin-left: 30%;
    padding: 10px;
}

#submitButton:hover{
    cursor: pointer;
}
Part 4: Execution
To run the flask webapp we need one command
flask run
This command will run our flask webapp locally on port number 5000 by default.
Part 5: Output
Some Pros of the Project:
- The accuracy of converting the Audio(Speech) to convert text is almost 92%
Some Cons of the Project:
- The project only take .wav file as a input.
Resources
Github Repository
Flask Doc
SpeechRecognition Doc
This content originally appeared on DEV Community and was authored by Atharva Shirdhankar
Atharva Shirdhankar | Sciencx (2021-07-20T14:45:30+00:00) FlaskCaption – Basic Flask Project. Retrieved from https://www.scien.cx/2021/07/20/flaskcaption-basic-flask-project/
Please log in to upload a file.
There are no updates yet.
Click the Upload button above to add an update.


