This content originally appeared on DEV Community and was authored by Jeiman Jeya
Part 1 of our article talks about the fundamentals of code quality with respect to Sonar Cloud. However, these are generic terms that can be applied to any code quality tool. In this article, we will explain how we can use Sonar Cloud to automate our code quality scanning with our GitHub repositories using GitHub Actions. The goal of this article is to ensure that you have a good understanding of how Sonar Cloud performs code analysis, how the integration features on GitHub (PR decorators, inline commenting, code quality overview using widgets) will benefit your engineering teams in the long run.
Some of the neat features that I found Sonar Cloud provides is:
- Enhances your workflow with continuous code quality and code security
- Supports all major programming languages you can think of
- Provides a clear overview of your overall code health in your repository, pull requests and pipelines
- Works with all famous Git providers (GitHub, Bitbucket, Azure DevOps and GitLab)
- Works with all famous CI/CD tools (GitHub Actions, Bitbucket Pipelines, Azure Pipelines, GitLab CI/CD, CircleCI, TravisCI, etc)
- Bug, Vulnerability, and Code Smell detection
- Top-notch coding rules
- In-ALM pull request feedback
- Go/No Go Quality Gate checks
- Automatic analysis (Currently limited to GitHub repositories)
Preliminaries
You will need the following:
- A GitHub repository with a backend or frontend application
- Access to GitHub Actions
- A Sonar Cloud account
- A Sonar Cloud project
- Some basic knowledge on CI/CD
Setup Process
1. Sign up and import repositories
- Ensure you have a GitHub repository readily available. For this, we will be choosing one of my NodeJS backend applications.
- Signup for a Sonar Cloud account and log in using your GitHub account to have a seamless experience.
-
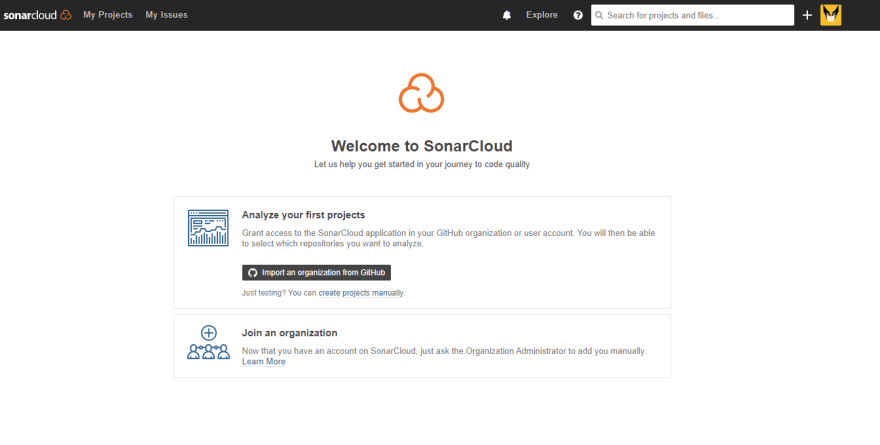
Once you have signed up, you will be redirected to this page:
From this page, you can import an organisation from GitHub.
Click on Import an organisation from Github.
-
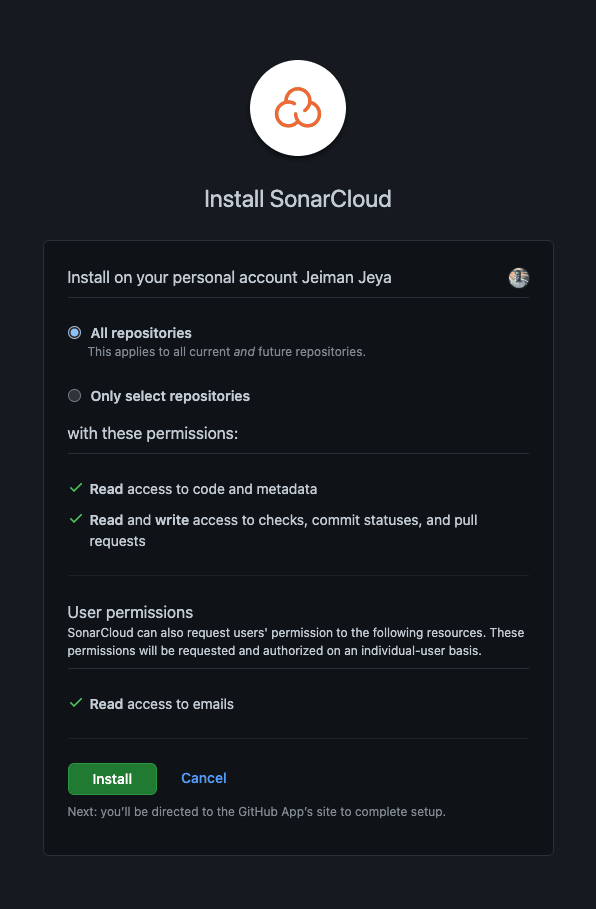
You will be redirected to your GitHub account where it will prompt you to choose an organisation to install SonarCloud. In this article, we will be choosing my own personal GitHub repository.
-
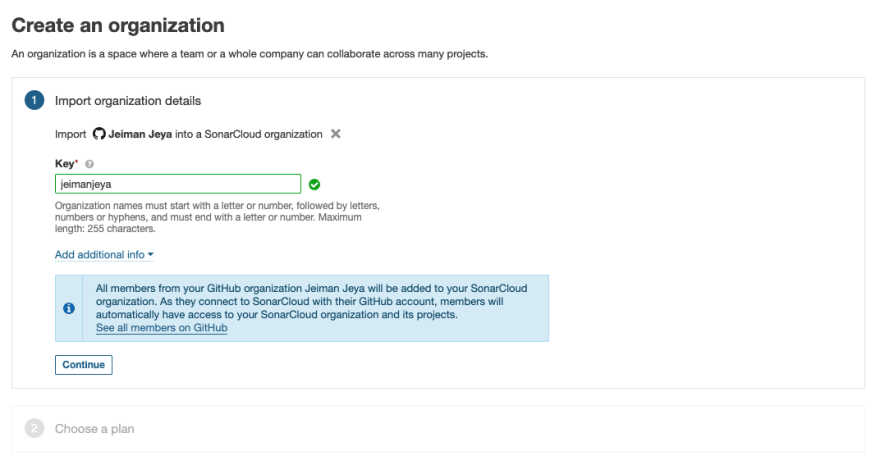
From there, you will be redirected back to Sonar Cloud, where you will create your Sonar Cloud organisation. Please note that at this point, you have already installed and connected the Sonar Cloud App on your GitHub account.
-
From the image above, you can provide an organisation key that will be used later in GitHub Actions to send your code analysis metrics.
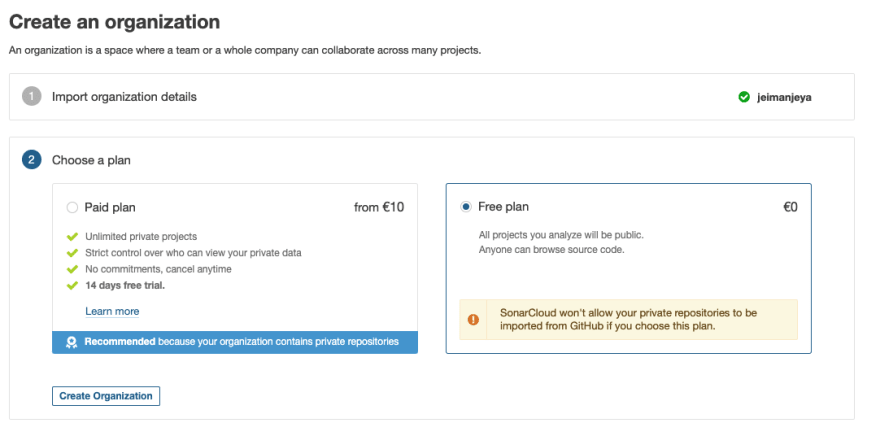
Next, you would need to choose a Pricing plan. There are 2 options: Paid and Free. For this article, we will be choosing the Free plan.
Click Create Organization.
-
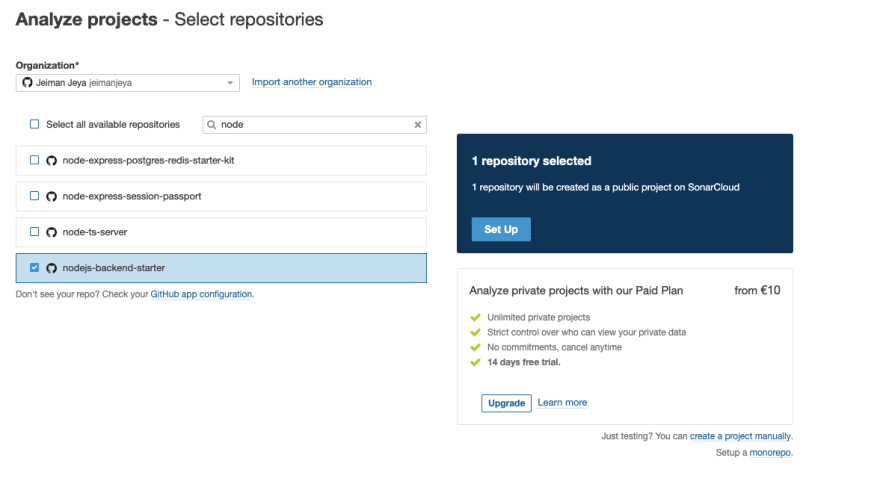
You will now be able to import any Public repository. If you have Paid for Sonar Cloud, you may import your Private repositories.
-
We have selected our public repository, named
nodejs-backend-starter. This repository contains a very basic Node.js backend application with Unit Testing and Code Coverage setup.- NOTE: There's also an option to set up a monorepo. Based on the image above, you may see a small section at the bottom right of the image that mentions setting up a monorepo.
Once you have selected your repositories, click Set Up.
It will do an Automatic Analysis of your project providing an initial analysis of it.
Although Sonar Cloud offers automatic analysis for GitHub repositories only, we will be disabling this option as we want our CI pipeline to handle the analysis process for us. With the CI pipeline, you may replicate this entire process for any Git provider and any CI/CD tool available.
-
Navigate to Administration > Analysis Method > SonarCloud Automatic Analysis. Turn off this option.
-
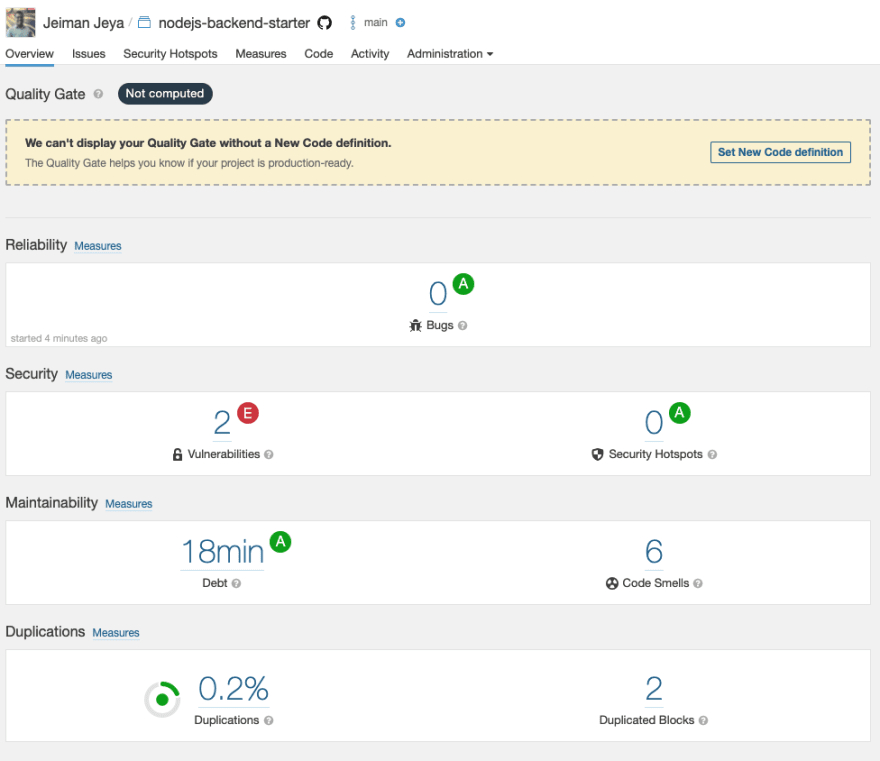
Navigate back to your project root page. Your project page should look something like the image below:
-
As you can see, it states that they can't display any Quality Gate without a New Code definition. Based on the Part 1 article, we will be setting up the following:
- A New Code Definition
- A Quality Gate
2 Sonar Cloud Configuration
2.1 Set Up New Code definition
There are 2 options available at this moment. You can either set up a New Code definition on:
- A project level
- An organisation level
For this article, we will set it up on a project level.
-
On your project page, click on Set New Code definition. If that is not available, you may navigate to Administration > New Code.
If you have read my previous article, you may know that there are a number of options to choose from. In this case, we will be choosing the Number of days that equates to 30 days by default. The reason is we are not going to be maintaining a version for the project on Sonar Cloud for now.
2.2 Setup a Quality Gate
- Navigate to your organisation page (https://sonarcloud.io/organizations/{username}/projects).
-
Select Quality Gates from the sub-navigation.
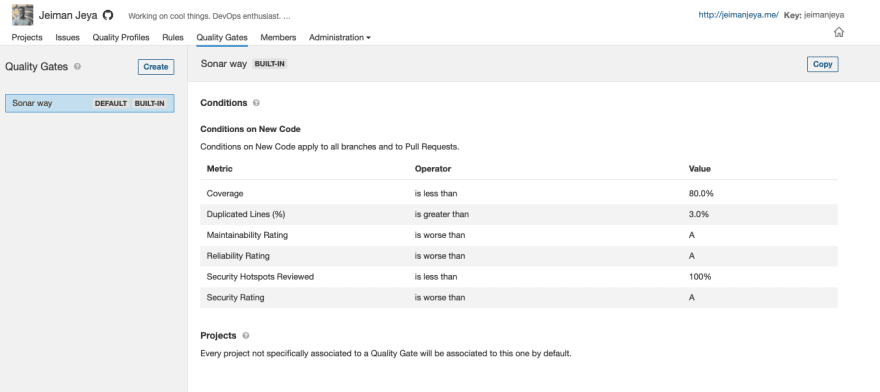
From the image above, there's already a default Quality Gate set up for you. We're going to be cloning this and creating our own. Click on Copy on the Sonar way Quality Gate*.*
Name your new cloned Quality Gate.
-
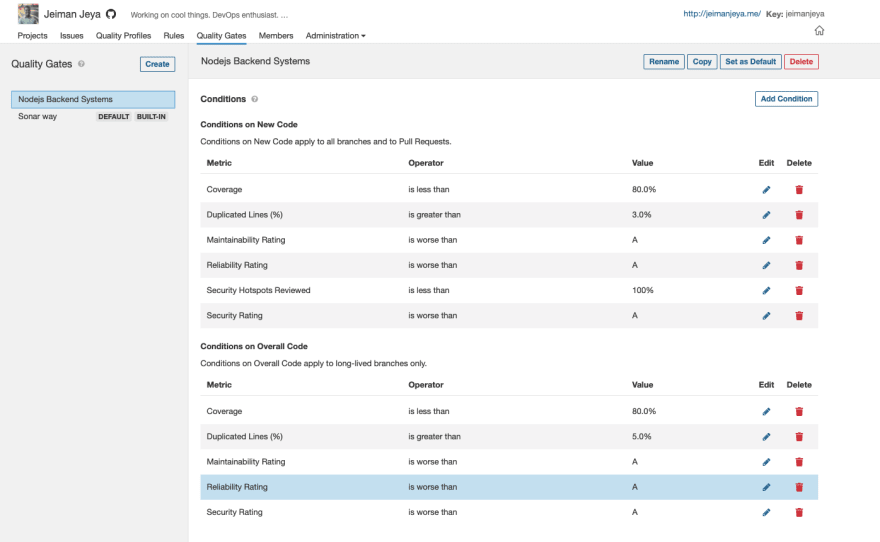
Since there are already New Code conditions, we are simply appending Overall Code conditions. For this article, we have added the following:
- Coverage is less than 80%
- Duplicated Lines is greater than 5%
- Maintainability Rating is worse than A
- Reliability Rating is worse than A
- Security Rating is worse than A
Set your new Quality Gate as Default.
Now that we have our project settings in place, we need to set up a project properties file next.
2.3 Setup a project properties file
This properties file will enable the CI pipeline to perform the necessary configuration and filtering in order to perform the code analysis. Furthermore, this will ensure we have the right settings in place when we push our commit to a branch or create a pull request that triggers the code analysis.
- In your code repository, create a
sonar-project.propertiesfile.
sonar.exclusions=**/*.bin
sonar.organization=jeimanjeya
sonar.projectKey=jeiman_nodejs-backend-starter
sonar.projectName=jeiman_nodejs-backend-starter
sonar.projectVersion=1.0
sonar.sourceEncoding=UTF-8
sonar.sources=src
sonar.exclusions=node_modules/**
sonar.test.inclusions=test/**
sonar.typescript.lcov.reportPaths=coverage/lcov.info
In this file, we're basically narrowing the focus of the scanner to configure the project source path, unit test inclusion path, coverage report path and exclude redundant folder paths (node_modules).
- Commit this file to your:
- Root directory: If it is a single application repository (microrepo) architecture (the case for us)
- Monorepo directory: If you have a monorepo architecture
Now that we have set up our project configuration and settings, we can focus on configuring the CI pipeline on GitHub Actions.
3. GitHub Actions
3.1 Pipeline/Workflow Structure
You have several to choose from options:
- Store all of your workflows in a single YAML file -
ci.yml - Separate them into branch workflows:
-
ci_develop.yml- for PR triggers and branch triggers ondevelopbranch -
ci_master.yml- for PR triggers and branch triggers onmainbranch
-
- Separate them into trigger workflows:
- PR triggers -
ci_pr.yml - Branch triggers -
ci_branch.yml
- PR triggers -
- Separate them into monorepo workflows:
-
spa-frontend.ymlandms-backend.yml- contains PR and branch triggers for bothdevelopandmainbranch
-
- Option 1 is difficult the maintain in the long run if you follow a monorepo architecture
- Option 2 or 3 is the best way of maintaining your workflows on GitHub
- Option 4 is useful for when you have a monorepo architecture
For this article, we are choosing Option 3 for simplification.
- Your final GitHub workflow for branch analysis will look like this:
name: Sonar Cloud - Branch Analysis

# Controls when the action will run. Triggers the workflow on push
# events but only for the main and release-* branch
on:
  push:
    branches:
      - main
      - release-*

# A workflow run is made up of one or more jobs that can run sequentially or in parallel
jobs:
  sonarcloud:
    name: Build (Sonar Cloud)
    runs-on: ubuntu-latest
    steps:
    - uses: actions/checkout@v2
      with:
        # Disabling shallow clone is recommended for improving relevancy of reporting
        fetch-depth: 0
    - uses: actions/setup-node@v2
      with:
        node-version: '15'

    - name: Node install dependencies
      run: npm install

    - name: Run unit tests
      run: npm run test

    - name: SonarCloud Scan
      uses: sonarsource/sonarcloud-github-action@master
      env:
        GITHUB_TOKEN: ${{ secrets.GITHUB_TOKEN }}
        SONAR_TOKEN: ${{ secrets.SONAR_TOKEN }}
- We have included an Action from GitHub Actions and that is the Sonar Cloud Scanner.
- In order for Sonar Cloud Scanner to authenticate and upload the analysis reports and metrics, you will need to store the
SONAR_TOKENsecret in your GitHub repository. - Navigate to your project settings and retrieve the project token, Project > Administration > Analysis Method > Analyze with a GitHub Action. It will present you with a token.
- Navigate back to your repository settings on GitHub, Repository Settings > Secrets > New repository secret. Name it as per the workflow secret name.
- For the
GITHUB_TOKEN, GitHub automatically appends the token for each workflow that runs on GitHub. -
Commit your code into the
mainbranch and watch the pipeline run. The summary for the branch analysis pipeline has indicated that the analysis was successful.
Navigating back to Sonar Cloud, you will notice that your project branch analysis report has been updated.
We'll move on to running code analysis on a long-living branch next.
3.2 Running code analysis on a long-living branch
- Simply check out a new branch from
mainand name it torelease-{anyname} - Commit your code and the CI pipeline will pick it up based on the branch trigger logic in the workflow YAML file.
-
The SC Scanner will upload your analysis reports to your project on Sonar Cloud.
-
Don't be alarmed if it shows Not computed as Sonar Cloud requires a second analysis to be able to show your Quality Gate on that long-living branch. It mentions Next scan will generate a Quality Gate.
We pushed another commit to the repository to the long-living branch to show the Quality Gate.
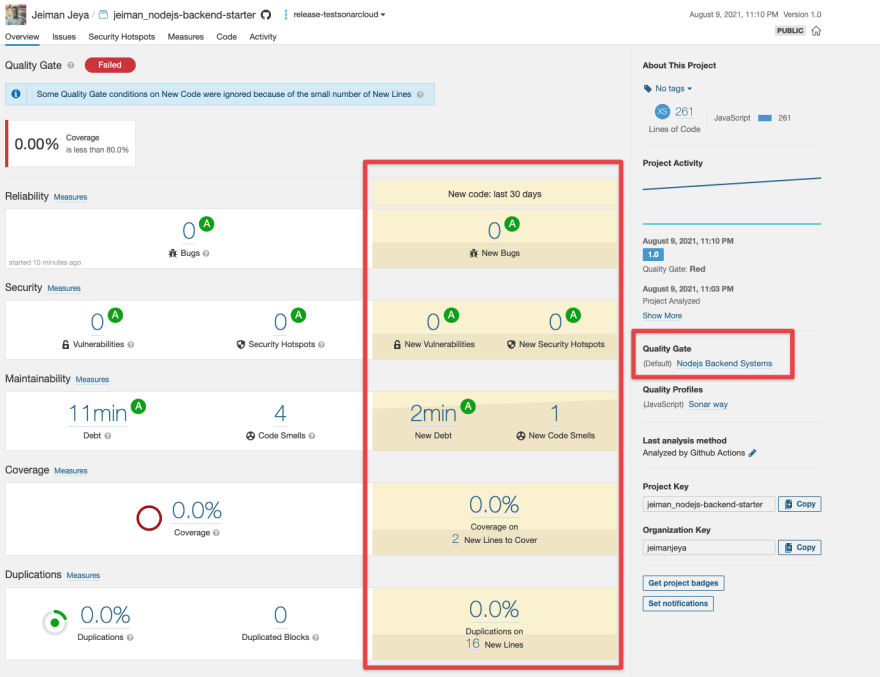
Your final Quality Gate for branch analysis (on long-living branch) will produce the following result.
3.3 Running code analysis on pull requests (PR)
- Clone the
ci_branch.yml. Name itci_pr.yml - The only section we are changing is the event trigger. Instead of a
pushevent, we are using thepull_requestevent.
on:
  pull_request:
    branches:
      - main
      - release-*
- Commit the code and raise a PR in your code repository.
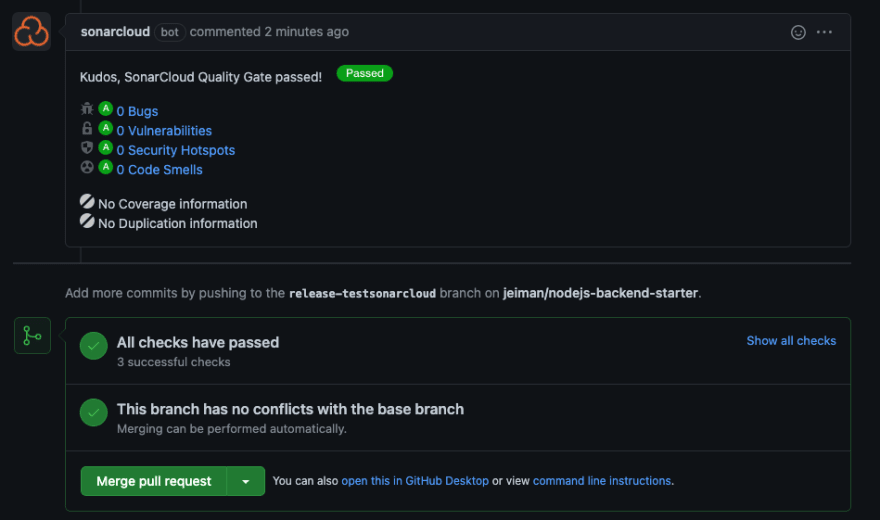
Your PR page should produce pipeline status checks alongside SonarCloud Code Analysis on your Merge PR section. Furthermore, your PR will contain decorations provided by the SonarCloud Bot.
Your PR status checks details page should give you a better overview of what needs fixing.
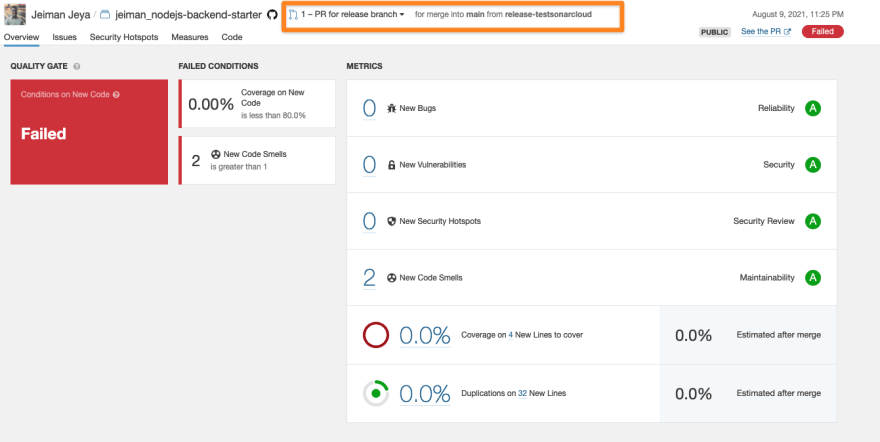
If you navigate back to your Sonar Cloud project and choose your PR analysis report from the branch dropdown menu, you will see similar statistics that were displayed on GitHub.
Let's go ahead and fix our code to ensure we don't have any code smells and fine tune our Quality Gate conditions to match with a Passed state.
Now our PR has clean code (however overall code requires fixes), we can now merge our PR. The pipeline will run another branch analysis on the main branch, which is our default branch on Sonar Cloud.
Piecing it all together
We have accomplished having a Sonar Cloud project connected to a GitHub repository that has GitHub Actions workflows in place to automate our code analysis for branch and PR triggers. Once these analyses are completed on the pipeline, you can navigate back to your Sonar Cloud project and view branch and PR analysis on both your main branch and long-living branches.
One of the plus points in having integration between GitHub and Sonar Cloud is that engineering teams can benefit from having decorations forming up in their pull requests and repository. This will speed up the developer's productivity in fixing bugs, code smells, and vulnerabilities and avoid having further technical debts in their projects.
Tips
- You can use any CI/CD tools to perform your code analysis. It does not need to be with GitHub Actions even though your repository resides on GitHub, however, for consistency you can keep them all under one umbrella.
- To have a complete end-to-end experience for your code quality scans on your pull requests, ensure you connect and import repositories from one unique Git organisation. The aforementioned features mainly work for that reason. Try not to mix and match repositories from different organisations (even though it's possible to do so).
- 1 GitHub organisation = 1 Sonar Cloud subscription
- 1 Azure DevOps organisation = 1 Sonar Cloud subscription
- Create long-living branches on Sonar Cloud if you're following Git flow technique of
developandmasterbranch. You may read up on their community post on how to achieve this. This will ensure that you are performing branch analysis on them alongside your pull request analysis. - Fine-tune your Quality Gate to ensure you get the best experience from it that matches your engineering teams needs
- Sonar Cloud supports monorepo projects!
I hope this 2-part series has been beneficial and helpful to your engineering needs. Sonar Cloud is a powerful code analysis tool. Please do explore their documentation to find out more or kindly reach out to me for any assistance.
Demo links to this article
References
This content originally appeared on DEV Community and was authored by Jeiman Jeya
Jeiman Jeya | Sciencx (2021-08-09T16:58:29+00:00) Part 2: Automating code quality scanning using Sonar Cloud and GitHub Actions. Retrieved from https://www.scien.cx/2021/08/09/part-2-automating-code-quality-scanning-using-sonar-cloud-and-github-actions/
Please log in to upload a file.
There are no updates yet.
Click the Upload button above to add an update.

