This content originally appeared on Bits and Pieces - Medium and was authored by Nathan Sebhastian
Learn how to speed up initial load time with Webpack’s code splitting feature (with examples using React)

The main purpose of Webpack is to prepare your JavaScript files so that they can be consumed by the browser.
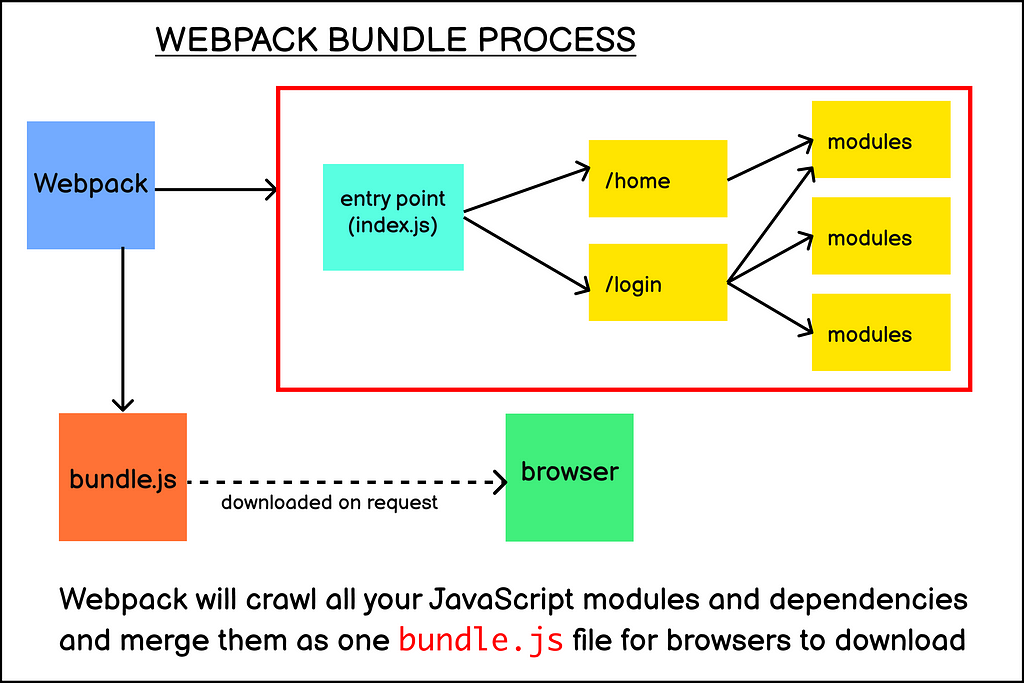
It does so by scanning your JavaScript code from an entry point (usually the index.js file) and then following the import statements that are written in that entry point.
Webpack will repeat the process until it has all the files and modules needed by your web application.
Once all the files are collected, Webpack will then merge them into one big JavaScript file. This process is also known as the “bundling” process because it commonly generates thebundle.js file that will be served to the browser.
Here’s a diagram to illustrate Webpack’s bundling process:

There are other features that Webpack offers for JavaScript developers, such as:
- Use a compiler (usually, Babel) to transform your modern JavaScript syntax (ES 6/7/8 and beyond) into a syntax that most browsers can understand (ES 5)
- Transform SASS into CSS so that browsers understand your styling rules
Still, bundling is the main reason you need to use Webpack for developing JavaScript applications.
Why code splitting is a great feature
As you develop your web application and add more JavaScript code, the total size of your source code will increase.
A big JavaScript bundle.js file can be a problem because the browser needs to fully download the file before executing the code inside it.
If your JavaScript bundle.js file amounts to 10 megabytes, then the execution of your JavaScript file happens after the 10 megabytes file has been downloaded by the client.
To solve the long load time caused by big JavaScript bundle files, the Webpack team has decided to introduce the code splitting feature.
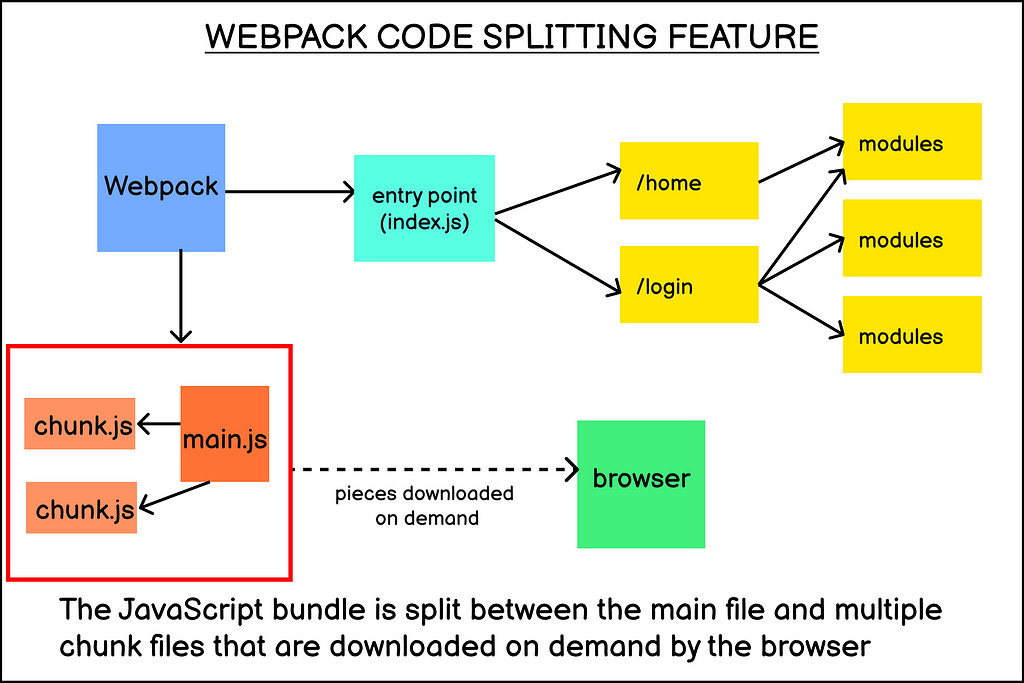
Code splitting allows you to split your JavaScript application into several bundle files that can be downloaded by the browser separately.
Generally, you will have one bundle as the main entry point and several supporting bundles (also known as chunk files) that are loaded only when the user action calls for that part of the code.
Even though the total size of your source code remains the same, the smaller main bundle size will speed up the initial load time and let your users interact with your application faster.

Although the implementation detail might vary between different front-end frameworks, the code splitting feature can be applied to any JavaScript application that uses webpack to bundle its modules.
Next, let’s see an example of code splitting in action using React.
Example of code splitting with React
In React, code splitting involves applying the dynamic import() syntax to your components so that webpack automatically split the imported component as a separate bundle.
If you bootstrap your React application with Create React App (CRA), then the webpack configuration generated by CRA already enables code splitting by default.
If you create your own webpack configuration from scratch, then you can follow this example as a template for your configuration.
To see the code splitting feature in action, you can clone a React code-splitting demo application that I’ve created for this tutorial:
GitHub - nsebhastian/webpack-code-splitting-feature
The React application for code splitting demo consists of two components:
- The Home component with a link to the Login component
- The Login component that uses Formik and Axios to receive user input and send a POST request.
The example application won’t actually send a POST request, so it’s only for adding some dependency to the application.
The code split for the example application happens inside the index.js file, where the components are imported dynamically when they are needed by React Router.
You’ll see the following code inside the index.js file:
import React, { Suspense, lazy } from "react";
import { BrowserRouter as Router, Route, Switch } from "react-router-dom";
const Home = lazy(() => import("./components/Home"));
const Login = lazy(() => import("./components/Login"));const App = () => (
<Router>
<Suspense fallback={<div>Loading...</div>}>
<Switch>
<Route exact path="/" component={Home} />
<Route path="/Login" component={Login} />
</Switch>
</Suspense>
</Router>
);
In the code above, the Home and Login components are first imported dynamically using the import() function, which returns a Promise object and starts an asynchronous task to load the component.
Then, the lazy() function from React library is called to let React know that the component is loaded dynamically. This function allows React to wait for the Promise from import() to be resolved and a module is returned
Finally, the Suspense component allows you to add a fallback component that will be rendered before the child component is ready.
Now that you know how code splitting is implemented in React, let’s run the build command to see the output generated by webpack.
From your Terminal, run the npm run build command:
Creating an optimized production build...
Compiled successfully.
File sizes after gzip:
1.19 KB   build/static/js/runtime-main.bb267bc3.js
451 B     build/static/js/main.20015095.chunk.js
290 B     build/static/css/main.899c8c77.chunk.css
15.4 KB   build/static/js/2.df805033.chunk.js
49.41 KB  build/static/js/3.6f1ca6de.chunk.js
236 B     build/static/js/4.2dd3ffe8.chunk.js
588 B     build/static/js/5.b17fde7d.chunk.js
The webpack configuration from CRA includes adding a hash to prevent the bundle from being cached by the browser when it has changed.
The explanation for the generated files above can be found on CRA documentation here. To put it short:
- the runtime-main.[hash].js file is a webpack runtime logic that will run your application.
- The main.[hash].chunk file is the main entry point of your application, which is the index.js file in our example.
- The [number].[hash].chunk.js files are for third-party libraries like the react, axios , and formik library code that is imported to the application.
- Code splitting technique will also create a chunk.js file, so you need to check the file and see if the chunk is for node_modules code or your application code.
- There’s also one chunk.css file which stores the CSS style used for the application.
By inspecting the code, you will see that the 2.chunk.js file keeps all the library code for the Login component, which includes axios and formik while the 5.chunk.js file contains the Login component code.
The code for React library is generated inside the 3.chunk.js file while the 4.chunk.js file contains the code for the Home component.
The generated build includes a map file for webpack runtime to know which chunk is needed for a particular part of your application, so you don’t need to know which file does what.
Let’s try to compare the result of the build command without the dynamic import.
Remove the import(), Suspense, and lazy() from index.js file as shown below:
import Home from "./components/Home";
import Login from "./components/Login";
import "./index.css";
const App = () => (
  <Router>
    <Switch>
      <Route exact path="/" component={Home} />
      <Route path="/Login" component={Login} />
    </Switch>
  </Router>
);
Then, you need to run the build command again from the Terminal. Here’s the resulting compilation from my computer:
Creating an optimized production build...
Compiled successfully.
File sizes after gzip:
776 B     build/static/js/runtime-main.aaee48c5.js
770 B     build/static/js/main.68588f39.chunk.js
290 B     build/static/css/main.899c8c77.chunk.css
64.33 KB  build/static/js/2.2328eeea.chunk.js
As you can see, three chunk.js files from the previous build are not present in the generated output above.
The 2.chunk.js file above contains the code for all your third-party libraries, while the application code resides inside main.chunk.js file.
While you won’t need both formik and axios libraries before you open the Login page, both libraries will be downloaded from the chunk file without implementing the code splitting feature.
This is why code splitting is such a powerful feature. It allows you to control and send only a part of your application required by the browser.
Conclusion
Modern JavaScript applications tend to have a big single bundle.js file as a result of webpack’s bundling process.
The bundle.js file is required by the browser to run your application, so the bigger the bundle size, the longer it takes to load your app on the user’s browser.
This problem can be mitigated by implementing webpack’s code splitting feature, which allows you to split your large single bundle file into several smaller bundles.
The smaller bundles can then be downloaded dynamically by the browser when they are actually needed.
By implementing code splitting, you will be able to significantly reduce the initial load time of your JavaScript application even though the total size of your application is just the same.
For more information on the code splitting feature, you can visit webpack code splitting documentation.
Understanding Webpack’s Code Splitting Feature was originally published in Bits and Pieces on Medium, where people are continuing the conversation by highlighting and responding to this story.
This content originally appeared on Bits and Pieces - Medium and was authored by Nathan Sebhastian
Nathan Sebhastian | Sciencx (2021-08-17T14:11:51+00:00) Understanding Webpack’s Code Splitting Feature. Retrieved from https://www.scien.cx/2021/08/17/understanding-webpacks-code-splitting-feature/
Please log in to upload a file.
There are no updates yet.
Click the Upload button above to add an update.
