
This content originally appeared on DEV Community and was authored by Maxine Meurer
The demo repository for this post can be found here.
Table Of Contents
Introduction
Have you ever seen a 3D object rendered on a web page? Of course, you have, and chances are it was made using Javascript. But creating 3D objects with pure JavaScript requires a large amount of code, and might now always work in React environments. Not to say it isn't possible! However, with the implementation of react-3d-cube, you can easily add the 3D cube animation into any of your React applications.
This tutorial was written to make you comfortable with react-3d-cube, but also to get you familiar with adjusting your code as needed.
Installation & Setup
Assuming you already have a React app made, install react-3d-cube<.code>.
npm i react-3d-cube
If it doesn't install on the first attempt, try adding on --legacy-peer-deps
npm i react-3d-cube --legacy-peer-deps
Then, create a new Cube folder, and inside add a Cube.js and Cube.css file.
mkdir Cube
cd Cube
touch Cube.js
touch Cube.css
Open up both of your new files.
open Cube.js
open Cube.css
Great job! Now it's time to fill those empty files with some code.
Code
Once you've opened up your Cube.js file, paste in the following template which can be found in the react-3d-cube documentation:
import * as React from 'react';
import './Cube.css'
import Cube from 'react-3d-cube';

class LogoCube extends React.Component {
  render() {
    return (
      <div>
        <center>
            <h1>react-3d-cube</h1>
            <h2>no children</h2>
            <div
            style={{
                width: 300,
                height: 300
            }}
            >
            <Cube size={300} index="front" />
            </div>
            <h2>set children</h2>
            <div
            style={{
                width: 300,
                height: 300
            }}
            >
            <Cube size={300} index="front">
                <div>front</div>
                <div>right</div>
                <div>back</div>
                <div>left</div>
                <div>top</div>
                <div>bottom</div>
            </Cube>
            </div>
        </center>
      </div>
    );
  }
}
export default LogoCube
Next, paste the following in your Cube.css file:
* { box-sizing: border-box; }

body {
font-family: sans-serif;
margin: 10rem;
}

.scene {
  width: 200px;
  height: 200px;
  border: 1px solid #CCC;
  margin: 80px;
  perspective: 400px;
}

.cube {
  width: 200px;
  height: 200px;
  position: relative;
  transform-style: preserve-3d;
  transform: translateZ(-100px);
  transition: transform 1s;
}

.cube.show-front  { transform: translateZ(-100px) rotateY(   0deg); }
.cube.show-right  { transform: translateZ(-100px) rotateY( -90deg); }
.cube.show-back   { transform: translateZ(-100px) rotateY(-180deg); }
.cube.show-left   { transform: translateZ(-100px) rotateY(  90deg); }
.cube.show-top    { transform: translateZ(-100px) rotateX( -90deg); }
.cube.show-bottom { transform: translateZ(-100px) rotateX(  90deg); }

.cube__face {
  position: absolute;
  width: 200px;
  height: 200px;
  border: 2px solid black;
  line-height: 200px;
  font-size: 40px;
  font-weight: bold;
  color: white;
  text-align: center;
}

.cube__face--front  { background: hsla(  0, 100%, 50%, 0.7); }
.cube__face--right  { background: hsla( 60, 100%, 50%, 0.7); }
.cube__face--back   { background: hsla(120, 100%, 50%, 0.7); }
.cube__face--left   { background: hsla(180, 100%, 50%, 0.7); }
.cube__face--top    { background: hsla(240, 100%, 50%, 0.7); }
.cube__face--bottom { background: hsla(300, 100%, 50%, 0.7); }

.cube__face--front  { transform: rotateY(  0deg) translateZ(100px); }
.cube__face--right  { transform: rotateY( 90deg) translateZ(100px); }
.cube__face--back   { transform: rotateY(180deg) translateZ(100px); }
.cube__face--left   { transform: rotateY(-90deg) translateZ(100px); }
.cube__face--top    { transform: rotateX( 90deg) translateZ(100px); }
.cube__face--bottom { transform: rotateX(-90deg) translateZ(100px); }

label { margin-right: 10px; }
After you've finished writing these two files, import the LogoCube.css file into your LogoCube.js script:
import './LogoCube.css'
You can then import LogoCube.js into where you would like it to render in your application.
For this tutorial, I made a demo page that renders the cube(s) to a blank page. If you would like to test out your cube more before rendering it to the page, I suggest using react-router-dom to create a "test" path that connects to a Testing component.
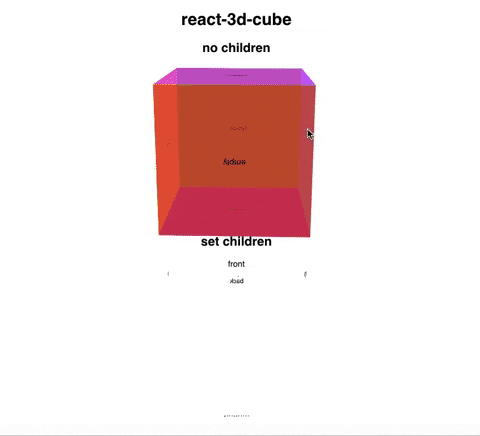
If you start up your react-app and navigate where LogoCube.js is rendering, you will notice two cubes. This is because the template shows how Cube is rendering with or without children. Also feel free to flip around your cube by dragging around on the sides!
Customization
While your cubes look pretty cool, they still need some work. For starters, decided if you need two and if you don't, let's decide which one to delete. If you're looking for a plain cube with nothing on it, the first one with "no children" was made for you! However, if you want to add custom images, buttons, links, and more, you'll want to use the second cube with "set children".
For this tutorial we will be moving forward with the "set children" cube, as the "no children" is more self-explanatory
Your code should be shortened to:
import * as React from 'react';
import './Cube.css'
import Cube from 'react-3d-cube';

class LogoCube extends React.Component {
  render() {
    return (
      <div>
        <center>
            <h1>react-3d-cube</h1>
            <h2>set children</h2>
            <div
            style={{
                width: 300,
                height: 300
            }}
            >
            <Cube size={300} index="front">
                <div>front</div>
                <div>right</div>
                <div>back</div>
                <div>left</div>
                <div>top</div>
                <div>bottom</div>
            </Cube>
            </div>
        </center>
      </div>
    );
  }
}
export default LogoCube
If you see only the transparent cube rendering, you did it correctly!
It's time to start customizing your cube! Let's say you want to make a cube made of cat images, simply add in img tags as children elements to your cube side div:
class LogoCube extends React.Component {
  render() {
    return (
    <center>
            <div>
                <div
                    style={{
                        width: 300,
                        height: 300
                    }}
                >
                <Cube size={300} index="front">
                    <div >
                        <img style={{width: '280px', height: '300px'}} src="https://cdn.sanity.io/images/0vv8moc6/dvm360/0efdfab43ab36c3432ced2ceb2d52daae6a93c96-500x500.jpg"></img>
                    </div>
                    <div >
                        <img src="https://sitterforyourcritter.com/wp-content/uploads/2019/09/female-cat-1.jpg"></img>
                    </div>
                    <div >
                        <img src="https://pawsitivepotential.com/wp-content/uploads/2016/05/Tongue-Kitten-500x500_t.jpg"></img>
                    </div>
                    <div >
                        <img src="https://9ed48207422fa7fc5013-a6297eb5ec0f30e883355c8680f3b2d6.ssl.cf2.rackcdn.com/Hunter_wubba-9294%20(1)-20180803203739-20180803203910-500x500.jpg"></img>
                    </div>
                    <div >
                        <img src="https://www.guildinsurance.com.au/images/librariesprovider3/breed-images/500x500/cat_russian-blue-tica.jpg?sfvrsn=d16600b_2"></img>
                    </div>
                    <div >
                        <img src="https://www.catmospherecafe.com/assets/chiangmai-3ede22d062b60dde4a501695a2e0bfc7451f44d412ed68bd01cb6b44216270e4.jpg"></img>
                    </div>
                </Cube>
                </div>
            </div>
        </center>
That code would render this cat-image cube:
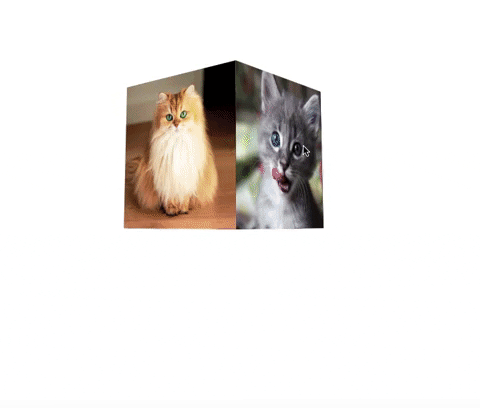
Wow, it's almost puuurfect! ?
If you watch the cube rotate, or do so yourself, you may notice some gaps in the images between the cube faces. While this could potentially create a cool effect if you were using all images with transparent backgrounds, right now it looks messy. Let's fill those gaps using some inline styling:
<Cube size={300} index="front">
                    <div style={{backgroundColor: 'black'}}>
                        <img style={{width: '280px', height: '300px'}} src="https://cdn.sanity.io/images/0vv8moc6/dvm360/0efdfab43ab36c3432ced2ceb2d52daae6a93c96-500x500.jpg"></img>
                    </div>
                    <div style={{backgroundColor: 'black'}}>
                        <img style={{width: '280px', height: '300px'}} src="https://sitterforyourcritter.com/wp-content/uploads/2019/09/female-cat-1.jpg"></img>
                    </div>
                    <div style={{backgroundColor: 'black'}}>
                        <img style={{width: '280px', height: '300px'}} src="https://pawsitivepotential.com/wp-content/uploads/2016/05/Tongue-Kitten-500x500_t.jpg"></img>
                    </div>
                    <div style={{backgroundColor: 'black'}}>
                    <img style={{width: '280px', height: '300px'}} src="https://9ed48207422fa7fc5013-a6297eb5ec0f30e883355c8680f3b2d6.ssl.cf2.rackcdn.com/Hunter_wubba-9294%20(1)-20180803203739-20180803203910-500x500.jpg"></img>
                    </div>
                    <div style={{backgroundColor: 'black'}}>
                    <img style={{width: '280px', height: '300px'}} src="https://www.guildinsurance.com.au/images/librariesprovider3/breed-images/500x500/cat_russian-blue-tica.jpg?sfvrsn=d16600b_2"></img>
                    </div>
                    <div style={{backgroundColor: 'black'}}>
                    <img style={{width: '280px', height: '300px'}} src="https://www.catmospherecafe.com/assets/chiangmai-3ede22d062b60dde4a501695a2e0bfc7451f44d412ed68bd01cb6b44216270e4.jpg"></img>
                    </div>
                </Cube>
The cube should now render like this:

? Pawsitively Amazing! Okay, I'm done now.
That's pretty much all there is to create a 3D cube in react. While this cube only displays images, you could also on buttons, links, and more. Be as creative as you want! I sincerely hope this article was helpful and would appreciate any feedback.
This content originally appeared on DEV Community and was authored by Maxine Meurer
Maxine Meurer | Sciencx (2021-08-19T19:14:49+00:00) How to Create a 3D Cube in ReactJS. Retrieved from https://www.scien.cx/2021/08/19/how-to-create-a-3d-cube-in-reactjs/
Please log in to upload a file.
There are no updates yet.
Click the Upload button above to add an update.