This content originally appeared on Level Up Coding - Medium and was authored by suhas murthy
The key to build any application is its architecture. Working on Node.js architecture has always been my pain area and that’s one of the main reasons why I started exploring the Nest.JS framework. In this article, I will try to share my thoughts and experience about learning the Nest.Js framework (Hint: If you are an Angular developer you will love Nest ?)

What is Nest (Documentation covers it all ?)
It’s a framework for building efficient, scalable Node.js server-side applications
Nest.JS supports TypeScript. It makes use of Express.JS under the hood, But also supports Fastify ??
More information can be found on their official website. So let's straight away dive into building the TODO app ???
Setting up our TODO app
We can get started by either using NEST CLI or by cloning through Github
In this example, we will be using CLI and I suggest you follow the same as we will see in future sections on how CLI helps us in generating files.
So first step is to install nest globally
npm i -g @nestjs/cli
After installing Nest CLI globally. Let's create our project
nest new todo-api

On successfully creating a project your application should look something similar to this on your IDE. Your initial setup is ready ???

Designing APIS
Alright every API sends a request to a server and the server responds with a response (Obviously right? ?)
But let's go one step further and try to understand what happens within the server ?
Let's assume we are requesting to get a list of todos for a given date
First step: The server should validate if the given date is valid say in our case it has to be current or future dates ✅✅
Second step: The server should ensure that the request is coming from authenticated user ??
Third step: We can define many functions but our server has to make sure it routes to required function ??
Fourth step: We may need to run some business logic with the server to fetch data from database ?️?️
Fifth step: Finally fetch the data from our database ??
Now let's map how the nest framework solves these problems
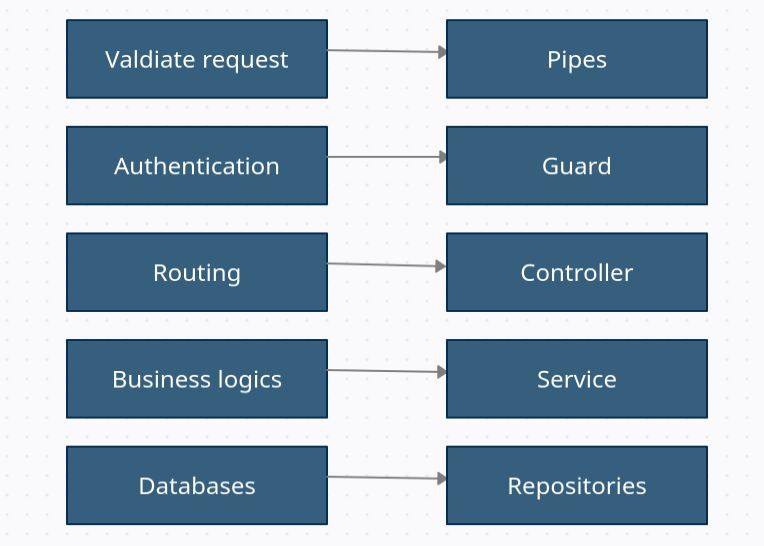
Ok Now, let's see how we can use these tools to build our todo app.
Modules
Let's set our data database. But before doing it we need to understand Nest uses modules. Class with module annotation represents Modules. The module helps us group our code ?.
Every application will have a root module. In our application, it's called AppModule.
Every functionality or module can have its own modules. We can already see a major advantage of using the nest framework. By grouping code, it becomes loosely coupled and easy to read our application ?
In this application, we will have three modules
- AppModule: Root of our application
- Todo: To include todo features
- Auth: To include authentication feature(Will be covered in part 2)
Database
For this example, we will be using the SQLite database and TypeOrmModule
Let's install the dependency packages
yarn add @nestjs/typeorm typeorm sqlite3
We need to import modules that exports providers which are required
To set up the database we need TypeORmModule. So let’s add TypeOrm to imports and provide options required to set up SQLite database
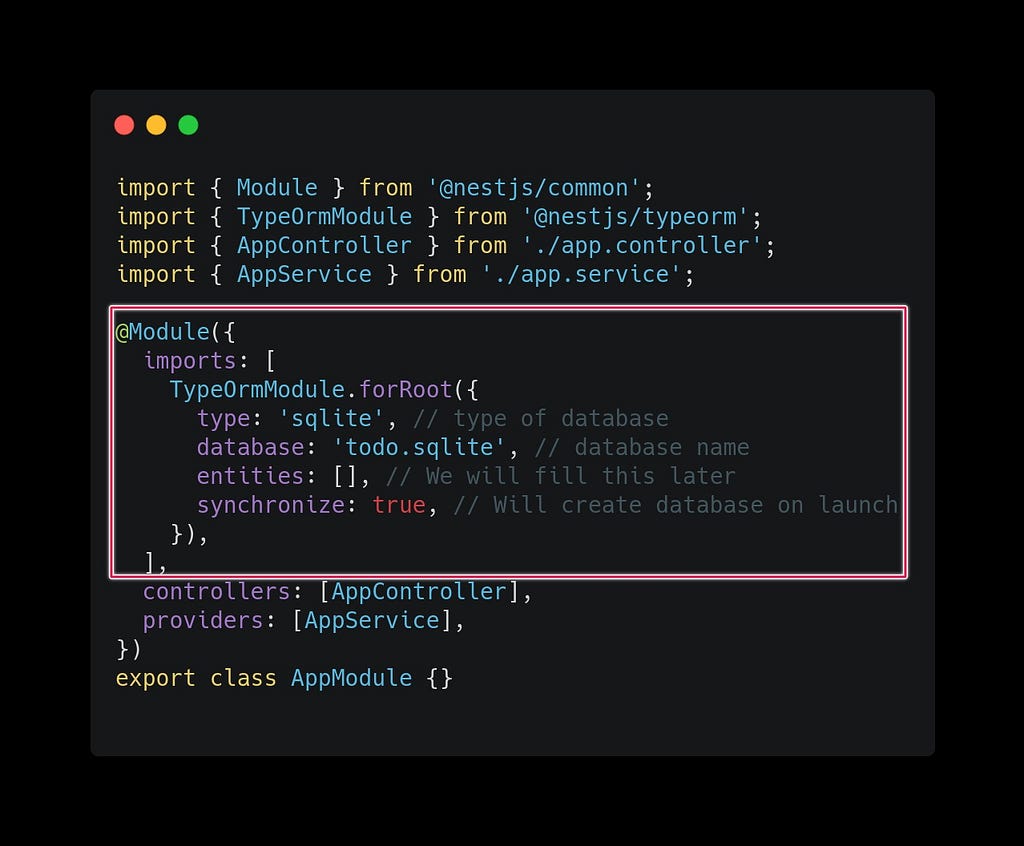
Basically what we are doing is importing a TypeOrm module for root by passing database configuration. Please note synchronize true has to be used only for development. For production, we need to handle migration.
This should create a database when we launch our application on the root directory. You can use this extension to view SQLite
yarn start:dev
You can find the source code for the initial setup here
Creating a module
Let's start with the Todo module ?.
As I mentioned earlier modules are nothing but a grouping of our code.
Todo module will have controllers, service, and repository (Refer to designing API section to know why we require these things). We will be using Nest CLI to create controllers and service
So to create a todo module open the terminal and type nest g module todos
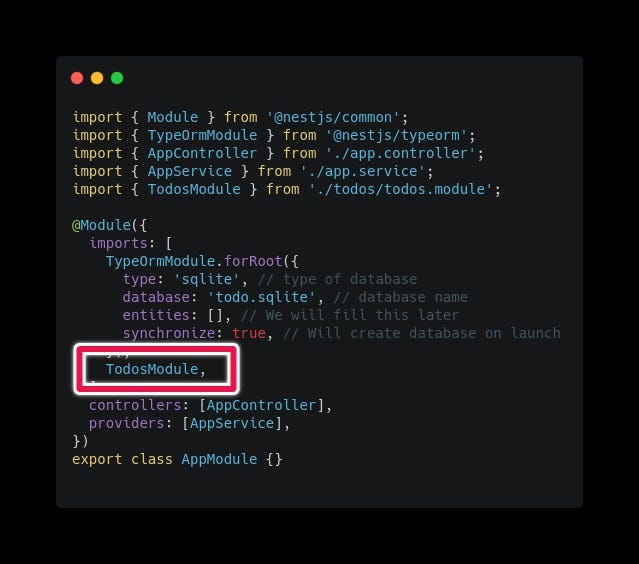
This will create a directory called todos and also create a file with boilerplate code. It also informs our root module that is AppModule by adding TodosModule to the imports array
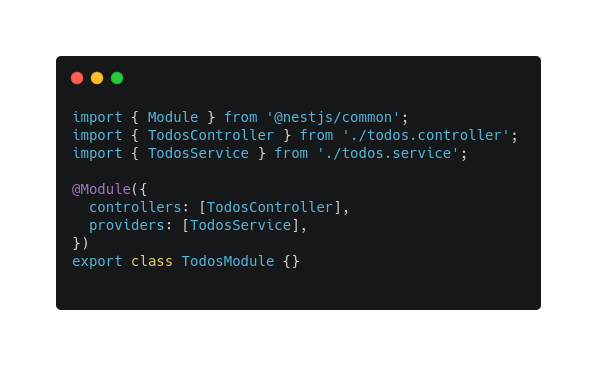
Now let’s create a controller and service. Open terminal and type nest g controller todos to create a controller and nest g service todos to create a service. This will also add a TodosController to the controller's array in the todos module and TodosService to the provider’s array
Code for this section can be downloaded here
Entity
An entity is very similar to creating modals in typescript or any other language. An entity will tell all the properties that should be present in a particular module in our case it's the Todos module. NestJS will internally create repositories for these entities.
Creating an Entity
First, let's create an entity file with all the properties required for the todos module. So let's create todos.entity.ts inside the todos folder.
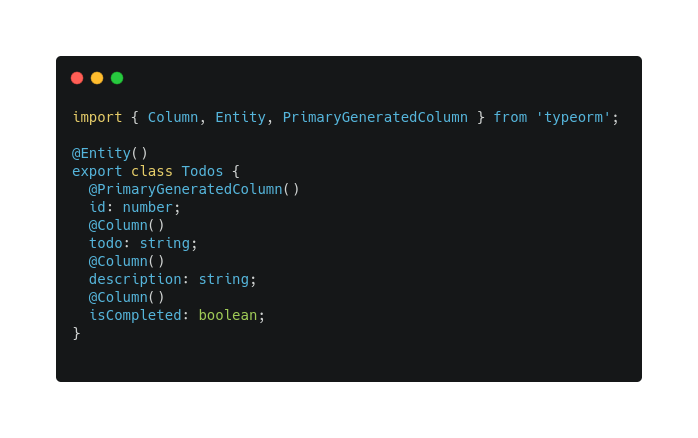
Now let's speak about the decorators used. The Entity decorator is to create the Database schema for all classes decorated with it, and Repository can be retrieved and used for it.
PrimaryGeneratedColumn is to tell that it's a primary key and it has to be auto-generated
The Column is to tell that it's a table column.
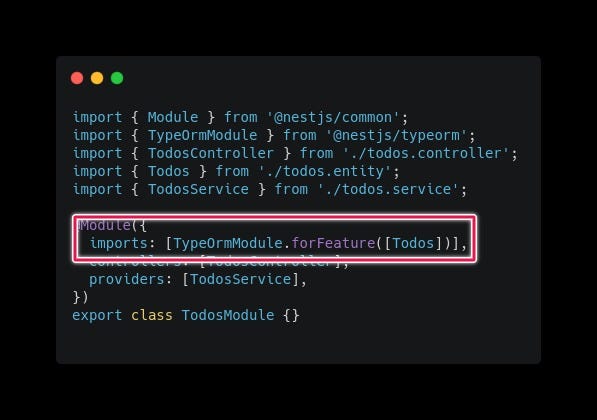
The next step is to connect our entity to the parent module. This will make Nest create a repository behind the scenes.
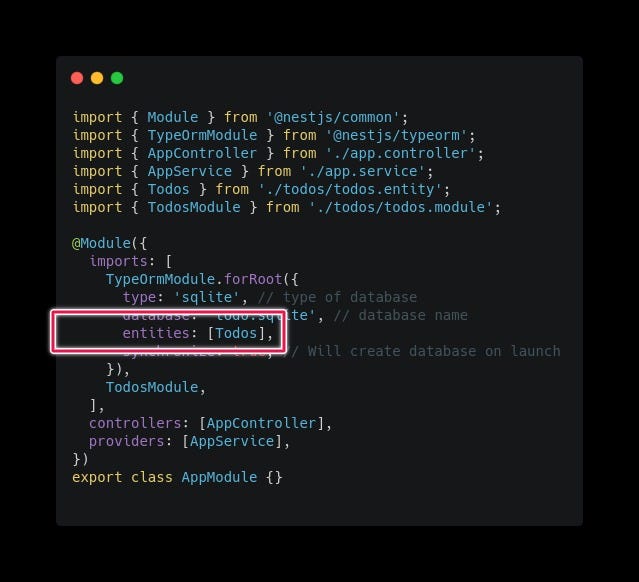
Now the final step is to connect it to the app module.
Code for this section can be downloaded here.
Routes
Now it's time to create routes. We create routes in the controller. For the todo module, we will have four routes
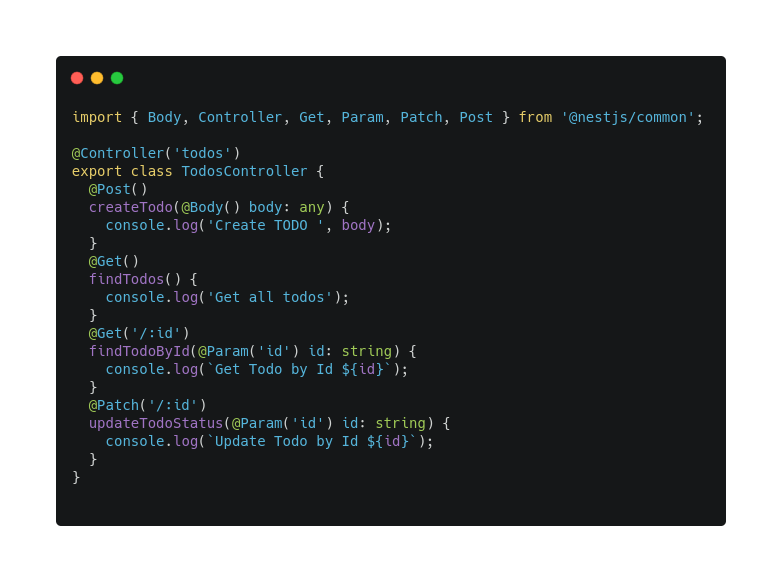
It's very simple to add routes. You can define method type using Get, Post, Put, Patch, or delete annotations.
You define the route name by passing a string value to Controller annotation. You can also have a specified path to each route by setting the value to its equivalent routes.
You can test these API using postman or Rest client extensions in VS Code. I personally prefer Rest client extension. You can todos.http file under api-requests folder
Note: We will get rid of any in our future section ??
Code for this section can be found here
Service
We are very close to see APIs in action. I promise ?
The first step is to add our todos repository to our todos service
We do that by injecting a repository in our todos.service.ts constructor
constructor(@InjectRepository(Todos) private repo: Repository<Todos>) {}By injecting the repository we can find entities, insert, update, delete, etc.?
Let's add service methods to the routes defined in the controller
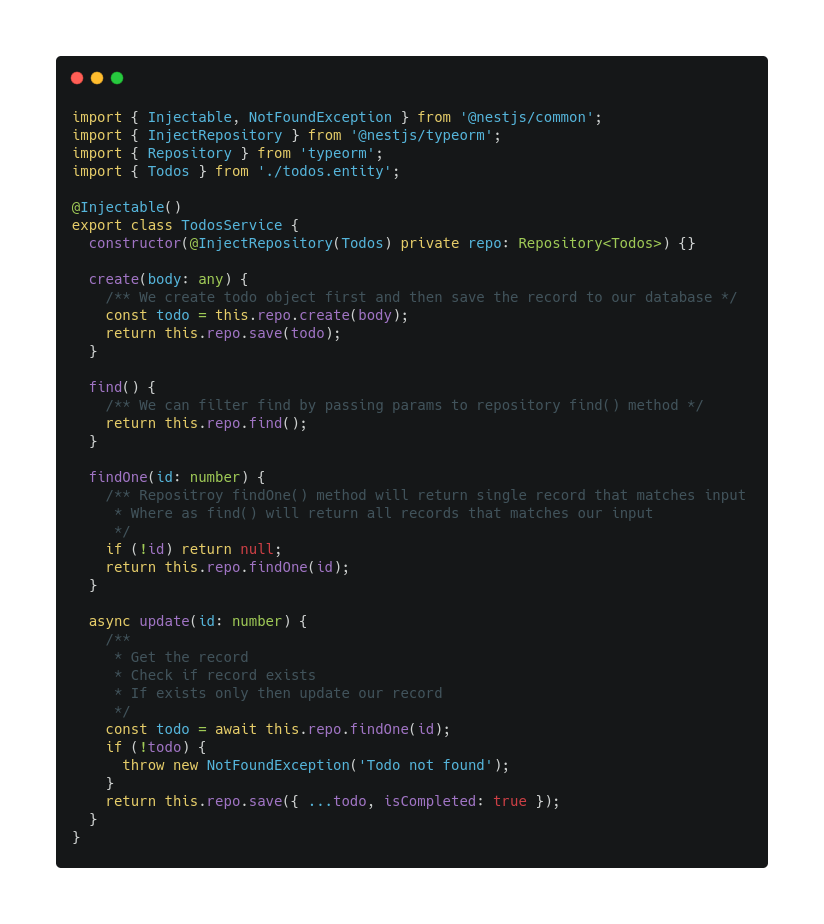
Hope the inline comments will help in understanding what each method does ?
Now let's connect methods defined in service to their respective routes in the controller
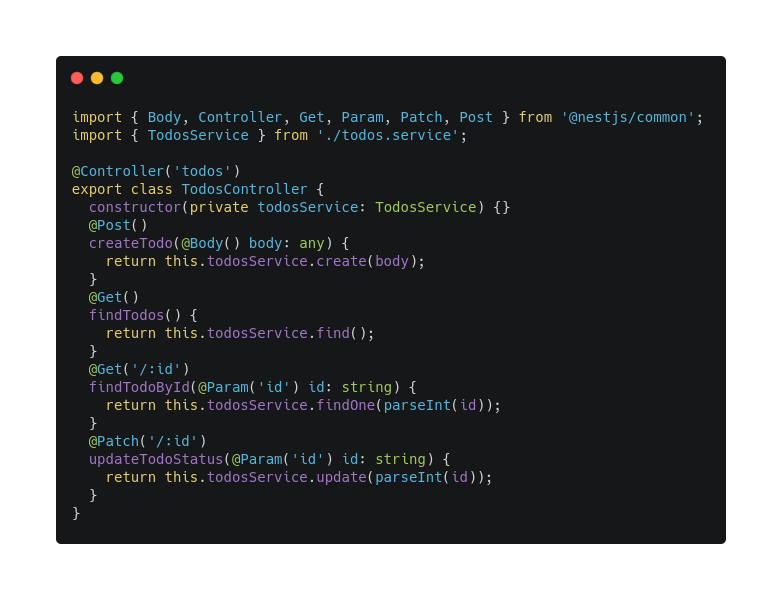
Note: Have added default value to isCompleted our todo entity. You can find updated code in the git repository ??
@Column({ default: false })isCompleted: boolean;
Now try creating todo using Rest client or postman
POST http://localhost:3000/todos
content-type: application/json
{"todo":"First todo",
"description":"First todo description"
}

Finally ?????. You can also test other API and it should work
You can download code for this section here
Everything looks great right? Let's add a final block to our todo module
Validation Pipes
Validating incoming requests is very important to any API as it will minimize the security risks as well as unwanted errors when we try to fetch data from the database
Let's start by installing dependency to create a validation pipe ✅
yarn add class-validator class-transformer
In Nest, we create data transfer objects (DTOs) and use a class validator to validate our incoming data
Let's start with create-todo.dto.ts under dtos folder inside todos module.
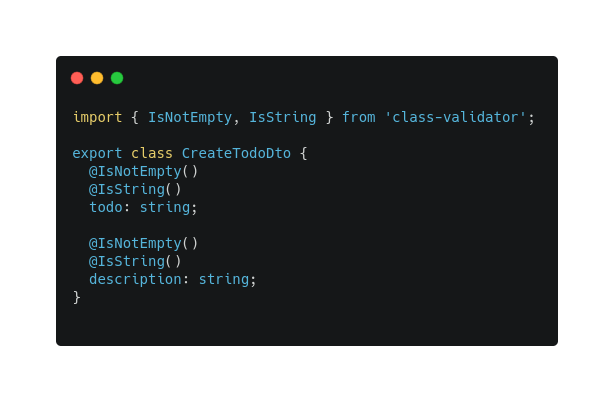
Now let's replace any from createTodo method body to use CreateTodoDto
@Post()
createTodo(@Body() body: CreateTodoDto) {return this.todosService.create(body);
}
Let's repeat the same for service as well
create(body: CreateTodoDto) {/** We create todo object first and then save the record to our database */
const todo = this.repo.create(body);
return this.repo.save(todo);
}
And finally, we need to register validation pipe globally in main.ts file
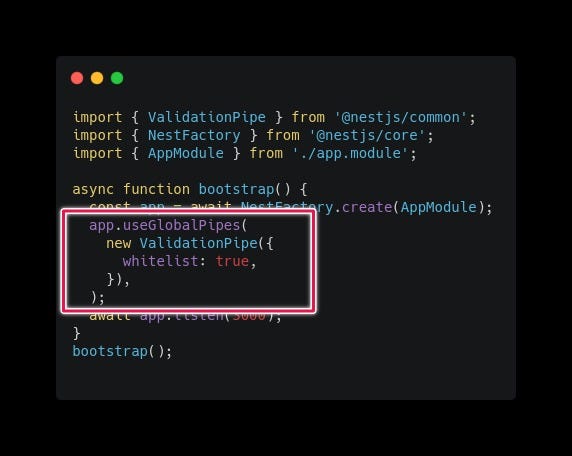
Now if we remove we send an invalid request we should get response code 400 with validation errors.
Code for this section can be found here
Conclusion
?????
This concludes the todo module. You can download the final code here
I will extend this codebase and add authentication in Part 2 ?.
I am enjoying learning NestJs and hope my experience will help you in some way. The framework really offers you so many features say for example handling errors. You need not have to define errors for every response code. NestJs does it for you. The Module structure makes it very easy to find any piece of code.
Of course like all frameworks, NestJs is challenging sometimes.??
Especially when you are using decorators or when you inject dependency injection. But once we understand core functionalities it helps you build maintainable enterprise apps.
Personally, I may not opt for Nest if I am building a small scale or some hobby application but I would definitely prefer the Nest framework if I am building an enterprise application that requires maintenance and scalability
Some of the features I am excited to explore and learn in near future are GraphQl support, Websockets, and my favorite Microservices. ???
Hope you enjoyed my explanation of how to work with the Nest framework.
Happy Coding!!! Cheers !!! ???
Build TODO APIs by learning Nest Framework was originally published in Level Up Coding on Medium, where people are continuing the conversation by highlighting and responding to this story.
This content originally appeared on Level Up Coding - Medium and was authored by suhas murthy
suhas murthy | Sciencx (2021-08-22T20:23:03+00:00) Build TODO APIs by learning Nest Framework. Retrieved from https://www.scien.cx/2021/08/22/build-todo-apis-by-learning-nest-framework/
Please log in to upload a file.
There are no updates yet.
Click the Upload button above to add an update.
