
This content originally appeared on Bits and Pieces - Medium and was authored by Yasas Sri Wickramasinghe
Write once and use everywhere by breaking down modern IaC into independent components
With Pulumi, you can write your Infrastructure as Code (IaC) with popular programming languages like JavaScript and TypeScript. In addition, it already supports a range of Cloud providers, including AWS, Azure, GCP.
This article will explain how I used Pulumi with Bit by creating modular components for Infrastructure in code.
You can find the Pulumi Component I’ve created with Bit Here. In addition, my sample IaC code consuming the Pulumi component can be found Here.
Why Pulumi with Bit?
If you have a simpler infrastructure with few modules, you can maintain it within a Pulumi stack. But when you are trying to structure a Pulumi code with hundreds of thousands of modules, you may probably need to think of a way to make your code modular, reusable, readable, and maintainable.
Besides, when you write code with Pulumi, you might feel that your code is getting bigger and lengthier, creating a monolith.
And, knowing the capabilities of Bit and Pulumi, I wanted to experiment, whether we can combine both to get the best out of both worlds.
Encapsulating Pulumi Code as an Independent Component
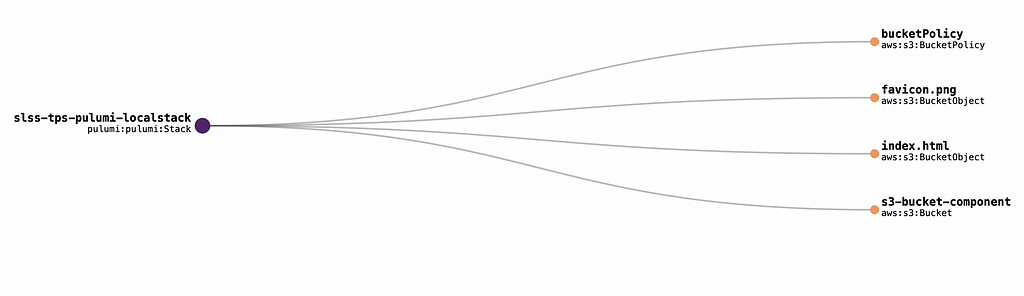
Here, I used a static website on an AWS S3 bucket. You can see that I have used Pulumi’s powerful IaC features to set up the AWS resources I need.
When I execute the pulumi up command in the terminal, it creates the below infrastructure on my AWS account and deploys my static website content as shown below.
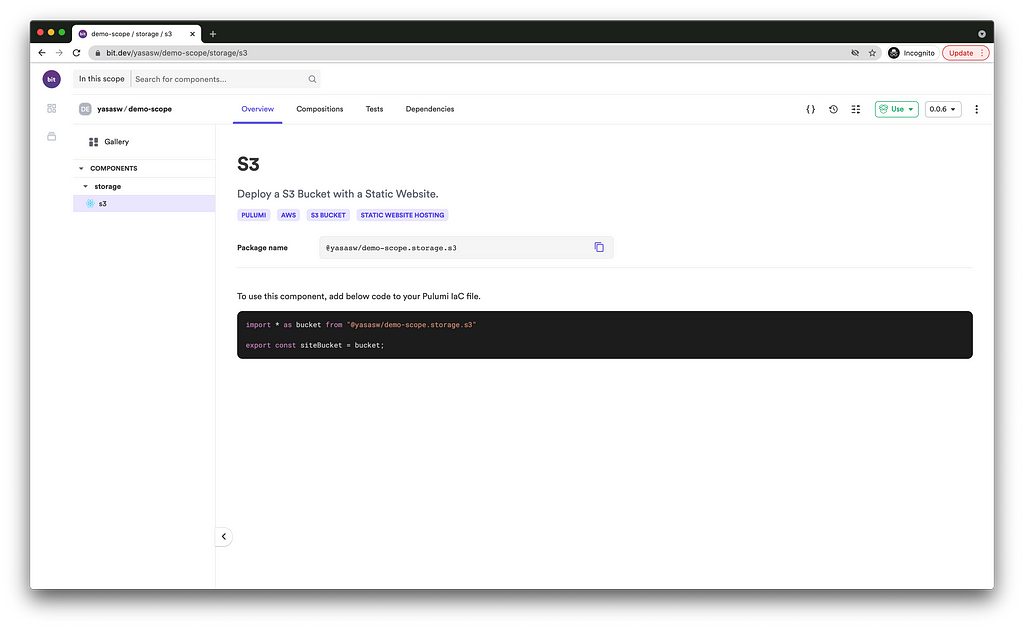
While preserving the same functionality, I moved the S3 bucket creation code into an independent component and exported it to a Bit Scope (@yasasw/demo-scope.storage.s3).
Then, inside my Pulumi stack, you could use it as follows;
Though this is a simple example, you can carry out the same for any complex Pulumi code block that you want to isolate from the rest of the components. Besides, you can use them across projects.
Step by Step Guide
I will explain the step-by-step process I followed to migrate my Pulumi code to Bit as a component.
Step 1: Install Bit on the local machine
I first used @teambit/bvm package to set up Bit on my machine, following the quick start guide.
Then I initialized a Bit workspace locally with the below terminal command.
bit new react-workspace <my-workspace-name>
Step 2: Create a component in a Bit workspace
Bit provides some ready-to-use templates like React buttons. However, I wanted to create a custom Bit component to migrate my existing Pulumi S3 bucket service code. So first, I created a dummy component using,
bit create react-component storage/s3
Then I added my Pulumi S3 bucket creation code to a new file as bucket.ts. Next, I moved my external resources (a favicon and an index.html).
After these steps, my local Bit folder structure was like below,
storage/s3
├── www (directory with external html resources)
├── index.ts
├── bucket.compositions.tsx
├── bucket.docs.md
└── bucket.ts
After that, I had to pack these files and export them to a Bit remote scope.
Step 3: Create a remote scope in Bit cloud
First, I’ve created an account in https://bit.dev. Then I‘ve created an organization (You can proceed without creating an organization as well).
After the initial account setup, I clicked on the “new button” to create a new scope on Bit to store my component. It was a pretty straightforward task, thanks to excellent documentation.
Creating a Remote Scope | Bit Docs
Note: After creating a Bit workspace, don’t forget to update the value of defaultScope at workspace.jsonc file with your newly created username/organization name and your scope value. And also, I manually changed my workspace into a Node environment following Bit documentation.
Step 4: Export component to Bit
The ability to version your Bit components with tags is another cool feature that you can enjoy. For example, I tagged my components using the below command before exporting the task.
bit tag --all --message "first version"
Next, I logged into Bit remote scope via my terminal to authenticate,
bit login
Finally, I used the below command to export my local independent component to my remote scope.
bit export
Exporting Components | Bit Docs
Hurrah! I could see my Pulumi component live on Bit cloud.
Note: Pulumi specific unit tests written in the “Mocha” and “Chai” frameworks are still not supported by the Bit. However, I got to know from the Bit community that the support will come soon.
The best part of breaking down Pulumi code into independent components
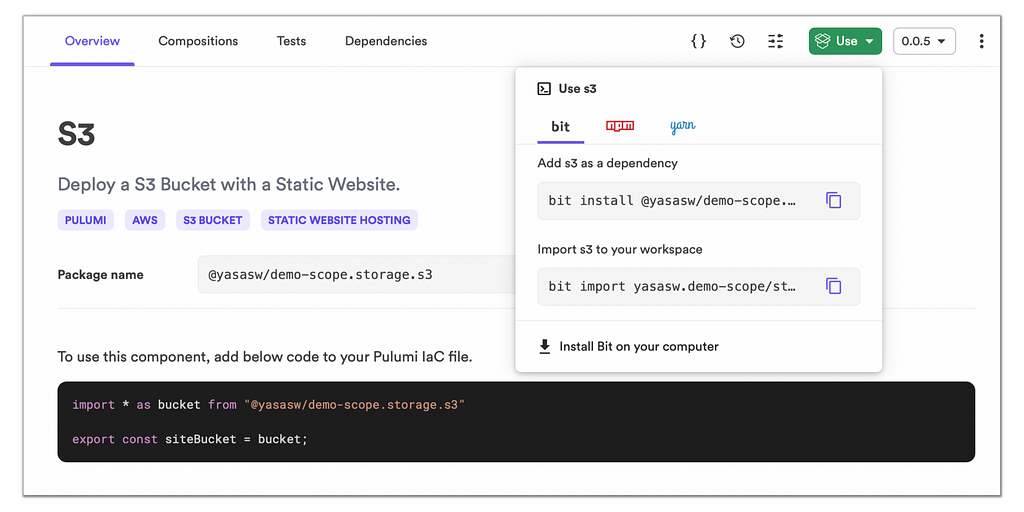
When your component is exported to Bit, you can keep it as a Public or Private component. In addition, Bit provides a dedicated page for your component, including interactive docs and different compositions of your component usage and more;
- Component Sharing — Share my components across other applications and among different developers.
- Dependency Management — All the dependencies are managed by Bit so that I do not need to worry about it.
- Component Versioning — Maintain different versions of the same component, including a changelog.
- Component Testing — Bit supports execution of unit tests in-house, ensuring the expected component functionality.
Final Thoughts
I wanted to share my experience of using Pulumi and Bit together, breaking monolithic code into a component-based architecture.
I hope this article inspired you to try out Pulumi and Bit, and I am super excited to hear your thoughts.
Thank you for reading!
Learn More
- Independent Components: The Web’s New Building Blocks
- How We Build Micro Frontends
- Building a Component Marketplace For Your Team
- Will Bit Replace npm?
Creating Infrastructure Components with Pulumi and Bit was originally published in Bits and Pieces on Medium, where people are continuing the conversation by highlighting and responding to this story.
This content originally appeared on Bits and Pieces - Medium and was authored by Yasas Sri Wickramasinghe
Yasas Sri Wickramasinghe | Sciencx (2021-09-01T20:39:53+00:00) Creating Infrastructure Components with Pulumi and Bit. Retrieved from https://www.scien.cx/2021/09/01/creating-infrastructure-components-with-pulumi-and-bit/
Please log in to upload a file.
There are no updates yet.
Click the Upload button above to add an update.