This content originally appeared on DEV Community and was authored by Kingsley Ubah
TABLE OF CONTENTS
1. What is the DOM?
2. DOM API
3. Our Project
4. Examining the Document Object
- console.dir(document)
- document.doctype
- document.URL
- document.lastModified
- document.head
- document.body
- document.forms
- document.all
5. Selecting Elements from the DOM
- document.getElementbyID()
- document.getElementsbyClassName()
- document.getElementsbyTagName()
- document.getElementsbyName()
6. Selecting Elements from the DOM
- document.getElementbyID()
- document.getElementsbyClassName()
- document.getElementsbyTagName()
- document.getElementsbyName()
7. Querying For Elements using CSS Selectors
- document.querySelector()
- document.queryselectorAll()
8. Working with Texts
- textContent
- innerText
- innerHTML
9. Working with styles
- style
10. Traversing the DOM
- parentElement
- children
- firstElementChild
- lastElementChild
- previousElementSibling
- nextElementSibling
11. Creating a newElement and setting attributes
- createElement()
- appendChild()
- insertBefore()
- createTextNode()
- setAttribute()
- getAttribute()
- className
What is the DOM?
One of my ways of explaining the DOM is with this short Alien Invasion story I made up:
A couple of aliens invaded Earth. The aliens bring some sort of writing to warn humans of an imminent apocalypse. However, the humans do not know what the writing says. So the aliens translates it into a human readable language and also makes it a model for translation, just in case they decide to come back in future.
Comparing this to the web: the alien language is the HTML, the translation is the DOM, and the human is JavaScript.
In simple terms, the Document Object Model (DOM) is a model for translating HTML elements into a form JavaScript can understand and interact with.
This is important because JavaScript needs to understand the web page in order to work on it. Another question is how does JavaScript actually access each of the elements in order to work on them? The answer is through the DOM API.
THE DOM API
The DOM API (Application Programming Interface) is essentially the gateway between your HTML document rendered on the web and your JavaScript.
The DOM API provides a set of properties and methods which makes it possible to access information about our document or specific elements inside our script, as well as change their state on the browser.
In other words, JavaScript interacts with the page through the DOM API.
OUR PROJECT
To learn about the DOM API and the various properties and methods available for working with the DOM, we will be using a simple project which I call My Bucket List
This is just a static bucket list page containing a list of things we want to experience in future, as well as a form input for adding a new item. The website is styled using Bootstrap classes.
You can get the full code from its GitHub repository . All properties and methods covered here will be in there as well.
Here is the markup for the web page.
<!DOCTYPE html>
<html lang="en">
<head>
  <meta charset="UTF-8">
  <meta name="viewport" content="width=device-width, initial-scale=1.0">
  <meta http-equiv="X-UA-Compatible" content="ie=edge">
  <title>My Bucket List</title>
  <link rel="stylesheet" href="https://maxcdn.bootstrapcdn.com/bootstrap/4.0.0/css/bootstrap.min.css" integrity="sha384-Gn5384xqQ1aoWXA+058RXPxPg6fy4IWvTNh0E263XmFcJlSAwiGgFAW/dAiS6JXm"
  crossorigin="anonymous">
</head>
<body>
  <div class="container">
      <header id="main-header" class="bg-info text-black p-4 m-4">
        <div class="container">
          <h1 id="header-title">My Bucket List</h1>
        </div>
      </header>

      <div class="container">
        <div class="card card-body">
          <h2 class="title">Add a new experience</h2>
          <form action="" class="form-inline m-3">
            <input type="text" class="form-control m-2">
            <input type="submit" class="btn btn-success" value="Include!">
          </form>
          <h2 class="title">Your List</h2>
          <ul id="items" class="list-group">
            <li class="list-group-item">Ride on a horse</li>
            <li class="list-group-item">Visit Rome</li>
            <li class="list-group-item">Climb mount everest</li>
            <li class="list-group-item">Travel to 50 Countries</li>
          </ul>
        </div>
      </div>
  </div>
  <script src="./domapi.js"/>
</body>
</html>
EXAMINING THE DOCUMENT OBJECT
Console.dir(document)
Console.dir(document) gives us an interactive representation of our document. Interactive because it becomes very easy to expand the document object and inspect the properties and methods inside the document object.
The document object contains a set of information pertaining to that document, such as its properties as well as methods to interact with it from our script. We can check for any property by using the document.property syntax. We can see a ton of attributes which the document object contains. Let’s take a look at some of the most popular properties.
Checking for the Document Type
console.log(document.doctype)
There have been various versions of HTML Markup since its invention in 1993. With the doctype property, we can get information about the type and version of the HTML Markup being used in the document.
Here is what is logged onto our console:
Getting the page's URL
console.log(document.URL)
This will log the URL for our web page onto the console. In our case, it will return the default "dummy" URL used by the local server for projects
Time of last modification
console.log(document.lastModified)
We can also check to see when last our document (HTML) was modified. The above code will log the information to the console:
View the head part of the HTML Document
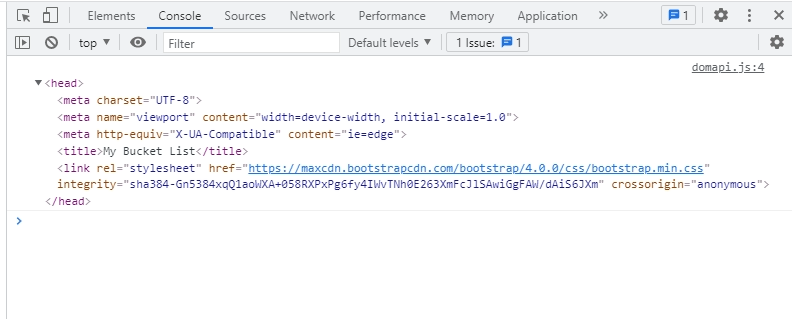
console.log(document.head)
This will log the HTML head tag as well as every other tags nested inside of it
Get the Body of the document
console.log(document.body)
This logs a HTML representation of the body tag and all nested tags, onto the browser console
Get the Form(s) within the document.
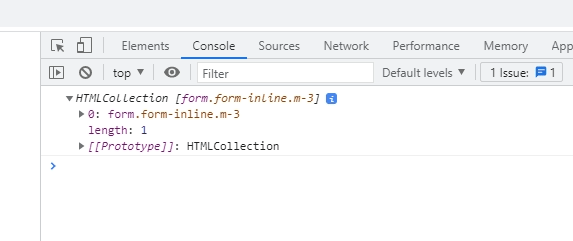
console.log(document.forms)
This will return a HTMLCollection (similar to an array) showing the number of forms (if any) present in the document as well as their index properties.
Get the entire HTML mark up
console.log(document.all)
This will log the entire markup within the HTML document onto the console. In our case, a HTMLCollection containing 25 items (HTML elements) will be shown on the console:
Technically, we can access a whole lot of other attributes on the document object. To see the full list of available properties, simply log the document object onto the console with:
console.dir(directory)
ACESSING ELEMENTS FROM THE DOM
HTML elements can be accessed or "selected" from the Document Object Model using a variety of ways.
You can choose any of them depending of what element you want to access, where the element is situated on the page, how many you want to access and so many other factors.
Here are the popular ways of accessing elements from the DOM
Get an Element by its unique ID
console.log(document.getElementById('items'))
The getElementById method enables us access a given element by its unique id attribute. This method can return only one single element since only one id attribute value can exist in a given document.
The above code will log element with an id of items (which is the ul) onto the browser console
Get a group of Elements by their common class name
console.log(document.getElementsByClassName('list-group-item)
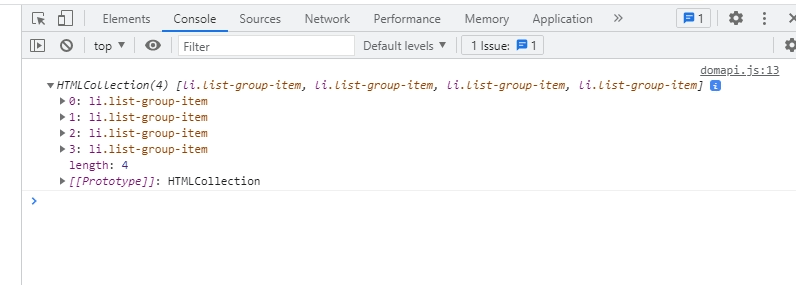
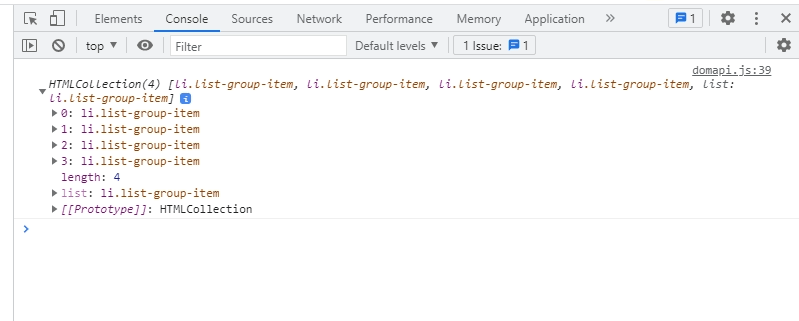
The getElementsByClassName method will retrieve a group of elements sharing the same class name into a HTMLCollection
Here is what our own code returns:
Get a group of Elements by their common tag names
console.log(`document.getElementsByTagName('li'))
This method is similar to getElementsByClassName. The main difference is that this one retrieves elements of similar tag names, not class names. It also returns a HTMLCollection.
The above code returns a collection containing all four list items (li) inside of our document
Get Elements By a Specified Name (Value of their name attributes)
console.log(document.getElementsByName('list'))
The getElementsById() method is also similar to the previous two examples mentioned. However, this method accesses the element(s) by the value of their name attribute.
For example, lets add the name attribute to all of our list items, passing in a common name attribute ('list')
<li class="list-group-item" name="list">Ride on a horse</li>
            <li class="list-group-item" name="list">Visit Rome</li>
            <li class="list-group-item" name="list">Climb mount everest</li>
            <li class="list-group-item" name="list">Travel to 50 Countries</li>
Running the code will log the following to the browser console
QUERYING FOR ELEMENTS WITH CSS SELECTORS
You can also select element(s) using any of the CSS selectors available. Your are not limited to a class or id selector.
Two methods are used for this:
querySelector()querySelectorAll()
Querying for the first match using a CSS selector
console.log(querySelector('list-group-item));
If you want to access only the first instance of a query, based on a defined CSS selector, use the querySelector() method.
For example, despite having four list items with an id attribute of "list-group-item", the above code will log only the first match found
- It returns only the first out of the four total list items
We can also change the query to use an id selector
console.log(querySelector('#header-title));
This should log the header title to the console
Querying for all matches using a CSS selector
console.log(querySelector('.list-group-item));
If you however want to access all instances which matches agive CSS query, use querySelectorAll() instead.
The console.log statement will log a NodeList conatining all matches onto the console
You can also use the class selector, or any other CSS selector you wish to use.
WORKING WITH TEXTS
When working texts in the DOM, there are three properties you will frequently come across:
- textContent
- innerText
- innerHTML
How to use textContent to read and write text into an element
let firstItem = document.querySelector('.list-group-item').textContent;
console.log(firstItem);
The textContent property gets the inner text of a HTML element. For example, the above code will log the following text to the console
Just as we can access the text, we can also change the text inside of the element, from our script
document.querySelector('.list-group-item').textContent = "Ride on a Camel instead, sorry Horse!"
This will alter the text inside of the first list item.
innerText works very similarly to textContent, bar some minor difference.
Adding an inner HTML element to another element with innerHTML
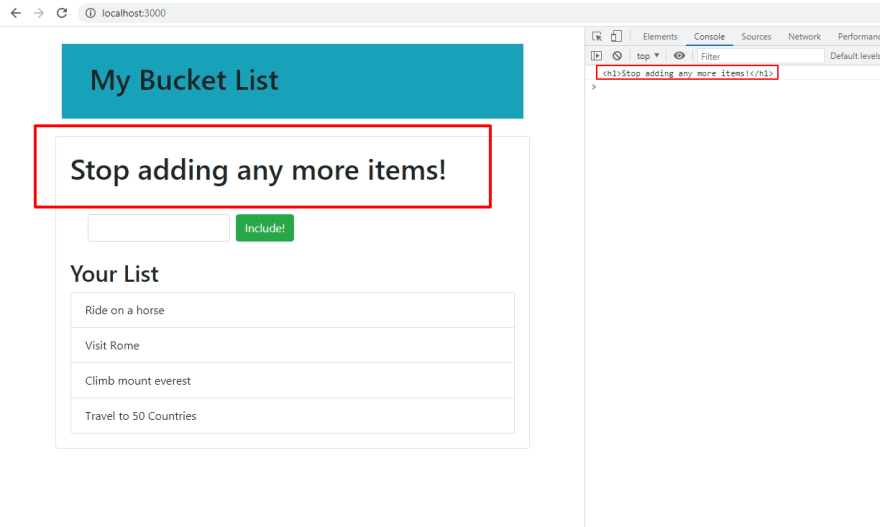
let formTitle = document.querySelector('.title').innerHTML = '<h1>Stop adding any more items!</h1>';
console.log(formTitle);
While you could only alter texts with textContent and innerText, you can pass in an entire element into a target element inside the DOM with the innerHTML property.
For example, the above code will insert the h1 title into the h2 (target) title
Here is how the markup will look like in the HTML Elements tab:
- The h2 was not replaced. Instead, the h1 was inserted inside of it
WORKING WITH STYLES
let firstItem = document.querySelector('.list-group-item');
let boldItem = firstItem.style.backgroundColor = 'red';
Texts are not the only thing you can change. The DOM API also offers the style property, which is a way of accessing and applying styles on your DOM elements right from your script.
In the above code, we are accessing the first list item and changing its backgroung color to red. Here is the result:
DOM TRAVERSAL
This section will cover a few properties and methods useful for traversing the DOM, DOM traversal simply means moving up and down the DOM, checking for an element to match.
Here are some important methods for traversing the DOM
- parentElement
- children
- firstElementChild
- lastElementChild
- previousElementSibling
- nextElementSibling
Accessing the parent node element with parentElement method
let items = document.querySelector('#items');
console.log(items.parentElement);
If you want to access the actual element in which a particular child is nested in (aka its parent), you can use the parentElement method.
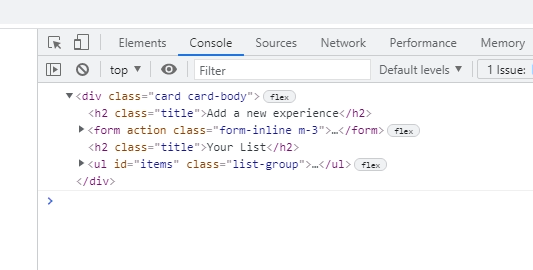
The above code will return the parent element of our unordered list (ul), which is the div
Accessing all the children elements within a parent with children
let items = document.querySelector('#items');
console.log(items.children);
All elements nested inside of a particluar parent can also be retrieved using the children property.
For example, the above code will retrieve all four list items (li), which are the children of the unordered list (ul)
Accessing the first child of a parent element using firstElementChild
let items = document.querySelector('#items');
console.log(items.firstElementChild)
The first child element of a particular parent can be accessed using the firstElementChild property
For example, the above code will retrieve the first list item inside the unordered list
Accessing the last child of a parent element using lastElementChild
let items = document.querySelector('#items');
console.log(items.lastElementChild)
The last child element of a particular parent can be accessed using the lastElementChild property
For example, the above code will retrieve the last list item inside the unordered list
Accessing the next sibling element using nextElementSibling
form = document.querySelector('.form-inline');
console.log(form.nextElementSibling);
The immediate sibling element next to (downwards) a particular parent can be accessed using the nextElementSibling property.
For example, the above code will retirive the next sibling to the form, which is the level two heading (h2)
Accessing the previous sibling element using previousElementSibling
form = document.querySelector('.form-inline');
console.log(form.nextElementSibling);
The immediate sibling element behind (upwards) a particular parent can be accessed using the prevousElementSibling property.
For example, the above code will retrieve the previous sibling to the level two heading, which is the form
CREATING A NEW ELEMENT AND SETTING ATTRIBUTES
In this section, we are going to be looking at how we can create and insert a new element into the DOM as well as adding attributes on any of them.
Some of the most important methods for this are:
- createElement()
- appendChild()
- insertBefore()
- createTextNode()
- setAttribute()
- getAttribute()
- className()
Creating a new element using createElement and appending text using appendChild
let newH2 = document.createElement('h2');
let warning = document.createTextNode('Must not exceed five items!')

// add text to h2
newH2.appendChild(warning);

console.log(newH2);
In the above code, we create a new element (a level two header tag) as well as an inner text for it. We then append the text into h2 using the appendChild method.
Logging the new element to the console will show the following
Setting attributes on our new element using setAttribute and className
// setting a class on it
newH2.className = 'warning-btn'

// setting an attribute on it
newH2.setAttribute('title', 'warning text')

console.log(newH2);
Inserting our new Element to the DOM
// Inserting into the DOM
let cardBody = document.querySelector('.card');
let list = document.querySelector('#items');

cardBody.insertBefore(newH2, list);
At this point, our element only exists as an object inside our JavaScript. To see it in our web page, we will have to insert into the DOM.
In the above code, we do the following things:
Query for the parent div where we want to insert our new element into, using it's classname
Query for the unordered list, because we will be inserting our new element right before (on top of) it
We finally insert our new H2 inside the DOM. We put it before the list, inside of the card
This is how our page now looks like:
WRAPPING UP
This is it!
In this tutorial, we have covered most of the important DOM manipulation propeties and methods in JavaScript.
I hope you got something valuable from this piece. Next up, we will be taking a deep look at the event object as well as the DOM event handler methods.
The entire properties and methods covered here can be obtained from this projects GitHub repository. Have any suggestions? Reach out to me on Twitter!
Stay blessed!
This content originally appeared on DEV Community and was authored by Kingsley Ubah
Kingsley Ubah | Sciencx (2021-09-01T13:51:09+00:00) The Ultimate Tutorial on JavaScript DOM – JS DOM with Examples. Retrieved from https://www.scien.cx/2021/09/01/the-ultimate-tutorial-on-javascript-dom-js-dom-with-examples/
Please log in to upload a file.
There are no updates yet.
Click the Upload button above to add an update.


