This content originally appeared on DEV Community and was authored by Joy
This article is part 2 of the series 'A hands-on introduction to deep reinforcement learning using Unity ML-Agents'. It's also suitable for anyone new to Unity interested in using ML-Agents for their own reinforcement learning project.
Recap and overview
In my previous post, I went over how to set up ML-Agents and train an agent.
In this article, I'll walk through how to build a 3D physics-based volleyball environment in Unity. We'll use this environment later to train agents that can successfully play volleyball using deep reinforcement learning.
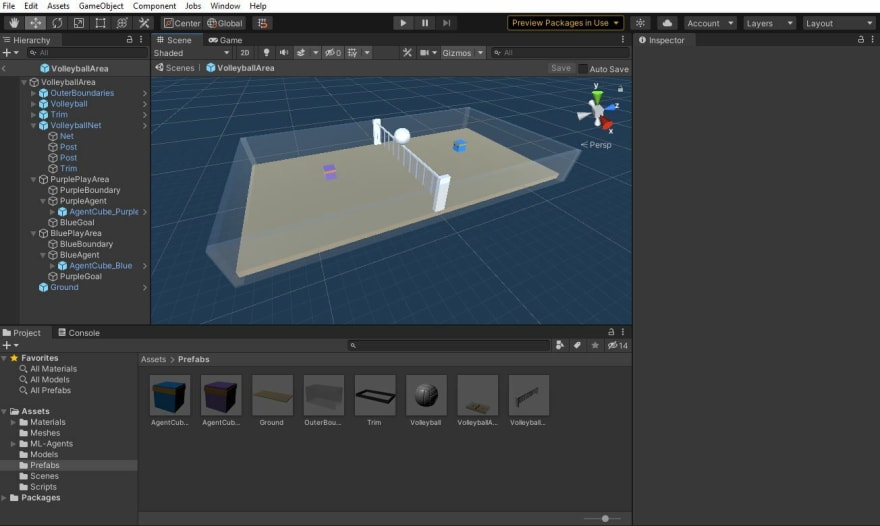
Setting up the court
- Download or clone the starter project from this repo.
- Open Unity Hub and go to Projects > Add.
- Select the 'ultimate-volleyball-starter' project folder. You might see some warning messages in the Console but they are safe to ignore for now.
- From the Project tab in Unity, navigate to Assets > Scenes.
- Load the
Volleyball.unityscene. - In the Project tab go to Assets > Prefabs and drag the
VolleyballArea.prefabobject into the scene. - Save the project.
If you click Play ▶️ above the Scene viewer you'll notice some weird things happening because we haven't added any physics or logic to define how the game objects should interact yet. We'll do that in the next section.
Setting up the environment
⚠ Before we start, open the VolleyballArea prefab (Project panel > Assets > Prefabs). We'll make our edits to the base prefab, so that they are reflected in all instances of this prefab. This will come in handy later when we duplicate our environment multiple times for parallel training.
Volleyball
Make our volleyball subject to Unity's physics engine:
- In the Hierarchy panel, expand the VolleyballArea object and select the Volleyball.
- From the Inspector panel, set the tag to
ball. - Click Add Component > RigidBody.
- Set mass = 3, drag = 1 and angular drag = 1. Feel free to play around with default values. A heavier ball will make the environment 'harder'.
Add 'bounciness' to our ball:
- Add a Sphere Collider component.
- Set Radius to 0.15.
- From the Project panel, go to Assets > Materials > Physic Materials.
- Drag
Bouncy.physicMaterialinto the 'Material' slot. - You can double-click
Bouncy.physicMaterialto change the 'bounciness'.
Both blue and purple agent cubes have already been set up for you in a similar way to the Volleyball.
Ground
- Select the Ground game object
- From the Inspector panel, set the tag to
walkableSurface. This is used later to check whether or not the agent is 'grounded' for its jump action. - Add a Box Collider component. This is used to register collisions with other game objects containing Rigid Body components. Without it, they will just fall through the ground.
Goals
Goals are represented by a thin layer on top of the ground.
- Expand the BluePlayArea and PurplePlayArea parent objects.
- Add a Box Collider to both the BlueGoal and PurpleGoal game objects.
- Check the 'Is Trigger' box for both goals.
When a game object is set as a trigger, it no longer registers any physics-based collisions. Even though the goals are placed above the ground layer, technically the agents are moving on the Ground layer collider we created earlier.
Setting triggers allows us to use the OnTriggerEnter method later which will detect when a ball has hit the collider.
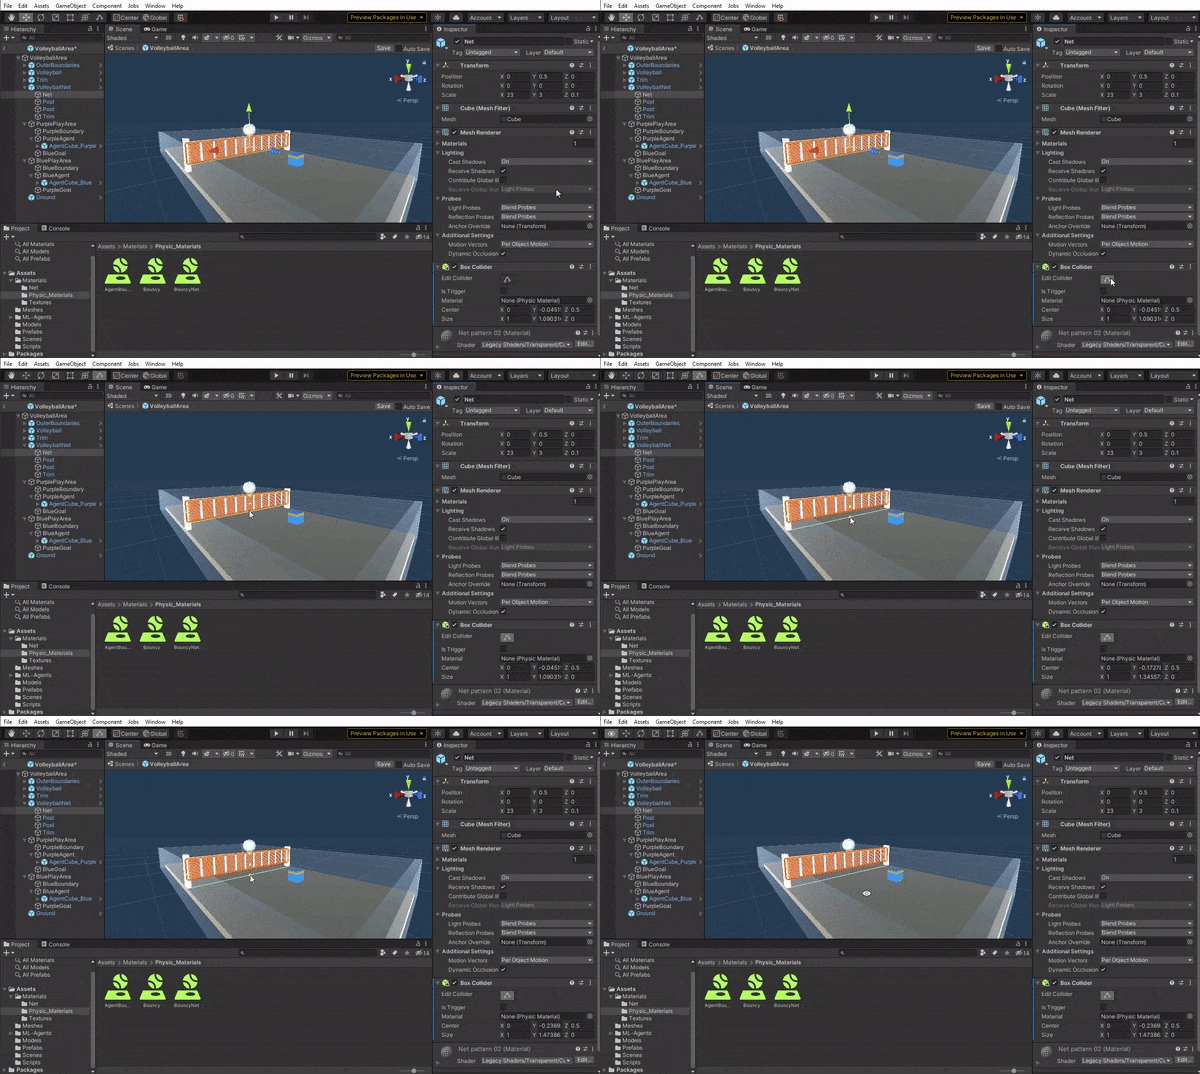
Net
- Select the Net game object within VolleyballNet.
- Add a Box Collider.
- Click the 'Edit Collider' icon.
- Click and drag the bottom node of the green collider so that it covers the entire height of the net. Feel free to play around with the thickness. The intention here is to create a physical 'blocker' that will prevent the ball from going under or around the net.
? Some shortcuts: Alt+click to rotate, middle-click to pan, middle mouse wheel to zoom in/out.
Boundaries
There are three invisible boundaries:
- OuterBoundaries (checks for ball going out of bounds)
- BlueBoundary (checks for ball going into the blue side of court)
- PurpleBoundary (checks for ball going into the purple side of court)
Colliders, tags, and triggers for these boundaries have already been set up for you.
Scripting the environment
In this section, we'll add scripts that define the environment behavior (e.g. what happens when the ball hits the floor or when the episode starts).
VolleyballSettings.cs
Our first script will simply hold some constants that we'll reuse throughout the project.
- Go back to the Volleyball Scene and select the VolleyballSettings game object.
- In the Inspector, you'll see a Script component attached. Double click the VolleyballSettings script to open it in your IDE of choice.
- You should see the following:
public float agentRunSpeed = 1.5f;
public float agentJumpHeight = 2.75f;
public float agentJumpVelocity = 777;
public float agentJumpVelocityMaxChange = 10;

// Slows down strafe & backward movement
public float speedReductionFactor = 0.75f;

public Material blueGoalMaterial;
public Material purpleGoalMaterial;
public Material defaultMaterial;

// This is a downward force applied when falling to make jumps look less floaty
public float fallingForce = 150;
Note: there is also a ProjectSettingsOverride.cs script provided. This contains additional default settings related to time-stepping and resolving physics.
Go back to the Unity editor and select the VolleyballSettings game object. You should see that these variables are available in the Inspector panel.
VolleyballController.cs
This script is attached to the Volleyball game object and lets us detect when the ball has hit our boundary or goal trigger.
- Open the
VolleyballController.csscript attached to the Volleyball. - At the start of our
VolleyballController : MonoBehaviourclass (above theStart()method), declare the variables:
[HideInInspector]
public VolleyballEnvController envController;

public GameObject purpleGoal;
public GameObject blueGoal;
Collider purpleGoalCollider;
Collider blueGoalCollider;
- Save the script.
- In the Unity editor, click the Volleyball game object.
- Drag the PurpleGoal game object into the Purple Goal slot in the Inspector.
- Drag the BlueGoal game object into the Blue Goal slot in the Inspector.
This will allow us to access their child objects later.
Start()
This method is called when the environment is first rendered. It will:
- Fetch the PurpleGoal & BlueGoal Colliders themselves (the components that register physics-based collisions) using the
GetComponent<Collider>method:
purpleGoalCollider = purpleGoal.GetComponent<Collider>();
blueGoalCollider = blueGoal.GetComponent<Collider>();
- Assign the parent VolleyballArea game object to a variable 'envController' for easier reference later.
envController = GetComponentInParent<VolleyballEnvController>();
Copy these statements into the Start() method:
void Start()
{
    envController = GetComponentInParent<VolleyballEnvController>();
    purpleGoalCollider = purpleGoal.GetComponent<Collider>();
    blueGoalCollider = blueGoal.GetComponent<Collider>();
}
OnTriggerEnter(Collider other)
This method is called when the ball hits a collider.
Some scenarios to detect are:
- Ball hits the floor/goals
- Ball goes out of bounds
- Ball is hit over the net (to encourage volleying for training later)
This method will detect each scenario and pass this information to envController (which we'll add in the next section). Copy the following block into this method:
if (other.gameObject.CompareTag("boundary"))
{
    // ball went out of bounds
    envController.ResolveEvent(Event.HitOutOfBounds);
}
else if (other.gameObject.CompareTag("blueBoundary"))
{
    // ball hit into blue side
    envController.ResolveEvent(Event.HitIntoBlueArea);
}
else if (other.gameObject.CompareTag("purpleBoundary"))
{
    // ball hit into purple side
    envController.ResolveEvent(Event.HitIntoPurpleArea);
}
else if (other.gameObject.CompareTag("purpleGoal"))
{
    // ball hit purple goal (blue side court)
    envController.ResolveEvent(Event.HitPurpleGoal);
}
else if (other.gameObject.CompareTag("blueGoal"))
{
    // ball hit blue goal (purple side court)
    envController.ResolveEvent(Event.HitBlueGoal);
}
VolleyballEnvController.cs
This script holds all the main logic for the environment: the max steps it should run for, how the ball and agents should spawn, when the episode should end, how rewards should be assigned, etc.
In the sample skeleton script, some variables and helper methods are already provided:
-
Start()— fetch the components and objects we'll need for later -
UpdateLastHitter()— keeps track of which agent was last in control of the ball -
GoalScoredSwapGroundMaterial()— changes the color of the ground (helps us visualise which agent scored)
FixedUpdate()
This is called by the Unity engine each time there is a frame update (which is set to every FixedDeltaTime=0.02 seconds in ProjectSettingsOverride.cs).
This will control the max number of updates (i.e. 'steps') the environment takes before we interrupt the episode (e.g. if the ball gets stuck somewhere).
Add the following to void FixedUpdate():
/// <summary>
/// Called every step. Control max env steps.
/// </summary>
void FixedUpdate()
{
    resetTimer += 1;
    if (resetTimer >= MaxEnvironmentSteps && MaxEnvironmentSteps > 0)
    {
        blueAgent.EpisodeInterrupted();
        purpleAgent.EpisodeInterrupted();
        ResetScene();
    }
}
ResetScene()
This controls the starting spawn behavior.
Our goal is to learn a model that allows our agent to return the ball from its side of the court no matter where the ball is sent. To help with training, we'll randomise the starting conditions of the agents and ball within some reasonable boundaries:
/// <summary>
/// Reset agent and ball spawn conditions.
/// </summary>
public void ResetScene()
{
    resetTimer = 0;

    lastHitter = Team.Default; // reset last hitter

    foreach (var agent in AgentsList)
    {
        // randomise starting positions and rotations
        var randomPosX = Random.Range(-2f, 2f);
        var randomPosZ = Random.Range(-2f, 2f);
        var randomPosY = Random.Range(0.5f, 3.75f); // depends on jump height
        var randomRot = Random.Range(-45f, 45f);

        agent.transform.localPosition = new Vector3(randomPosX, randomPosY, randomPosZ);
        agent.transform.eulerAngles = new Vector3(0, randomRot, 0);

        agent.GetComponent<Rigidbody>().velocity = default(Vector3);
    }

    // reset ball to starting conditions
    ResetBall();
}
/// <summary>
/// Reset ball spawn conditions
/// </summary>
void ResetBall()
{
    var randomPosX = Random.Range(-2f, 2f);
    var randomPosZ = Random.Range(6f, 10f);
    var randomPosY = Random.Range(6f, 8f);

    // alternate ball spawn side
    // -1 = spawn blue side, 1 = spawn purple side
    ballSpawnSide = -1 * ballSpawnSide;

    if (ballSpawnSide == -1)
    {
        ball.transform.localPosition = new Vector3(randomPosX, randomPosY, randomPosZ);
    }
    else if (ballSpawnSide == 1)
    {
        ball.transform.localPosition = new Vector3(randomPosX, randomPosY, -1 * randomPosZ);
    }

    ballRb.angularVelocity = Vector3.zero;
    ballRb.velocity = Vector3.zero;
}
ResolveEvent()
This method will resolve the scenarios we defined earlier in VolleyballController.cs.
We can use this method to assign rewards in different ways to encourage different types of behavior. In general, it's good practise to keep rewards within [-1,1].
To keep it simple, our goal for now is to train agents that can bounce the ball back and forth and keep the ball in play. We'll assign a reward of +1 each time an agent hits the ball over the net using the AddReward(1f) method in the corresponding scenario:
case Event.HitIntoBlueArea:
    if (lastHitter == Team.Purple)
    {
        purpleAgent.AddReward(1);
    }
    break;

case Event.HitIntoPurpleArea:
    if (lastHitter == Team.Blue)
    {
        blueAgent.AddReward(1);
    }
    break;
We won't assign any rewards for now if a goal is scored or the ball is hit out of bounds. If either of these scenarios happen, we'll just end the episode. Add the following code block to the sections indicated by the // end episode comment.
blueAgent.EndEpisode();
purpleAgent.EndEpisode();
ResetScene();
Here's what ResolveEvent should look like:
/// <summary>
/// Resolves scenarios when ball enters a trigger and assigns rewards
/// </summary>
public void ResolveEvent(Event triggerEvent)
{
    switch (triggerEvent)
    {
        case Event.HitOutOfBounds:
            if (lastHitter == Team.Blue)
            {
                // apply penalty to blue agent
            }
            else if (lastHitter == Team.Purple)
            {
                // apply penalty to purple agent
            }

            // end episode
            blueAgent.EndEpisode();
            purpleAgent.EndEpisode();
            ResetScene();
            break;

        case Event.HitBlueGoal:
            // blue wins

            // turn floor blue
            StartCoroutine(GoalScoredSwapGroundMaterial(volleyballSettings.blueGoalMaterial, RenderersList, .5f));

            // end episode
            blueAgent.EndEpisode();
            purpleAgent.EndEpisode();
            ResetScene();
            break;

        case Event.HitPurpleGoal:
            // purple wins

            // turn floor purple
            StartCoroutine(GoalScoredSwapGroundMaterial(volleyballSettings.purpleGoalMaterial, RenderersList, .5f));

            // end episode
            blueAgent.EndEpisode();
            purpleAgent.EndEpisode();
            ResetScene();
            break;

                case Event.HitIntoBlueArea:
                    if (lastHitter == Team.Purple)
                    {
                        purpleAgent.AddReward(1);
                    }
                    break;

                case Event.HitIntoPurpleArea:
                    if (lastHitter == Team.Blue)
                    {
                        blueAgent.AddReward(1);
                    }
                    break;
                    }
}
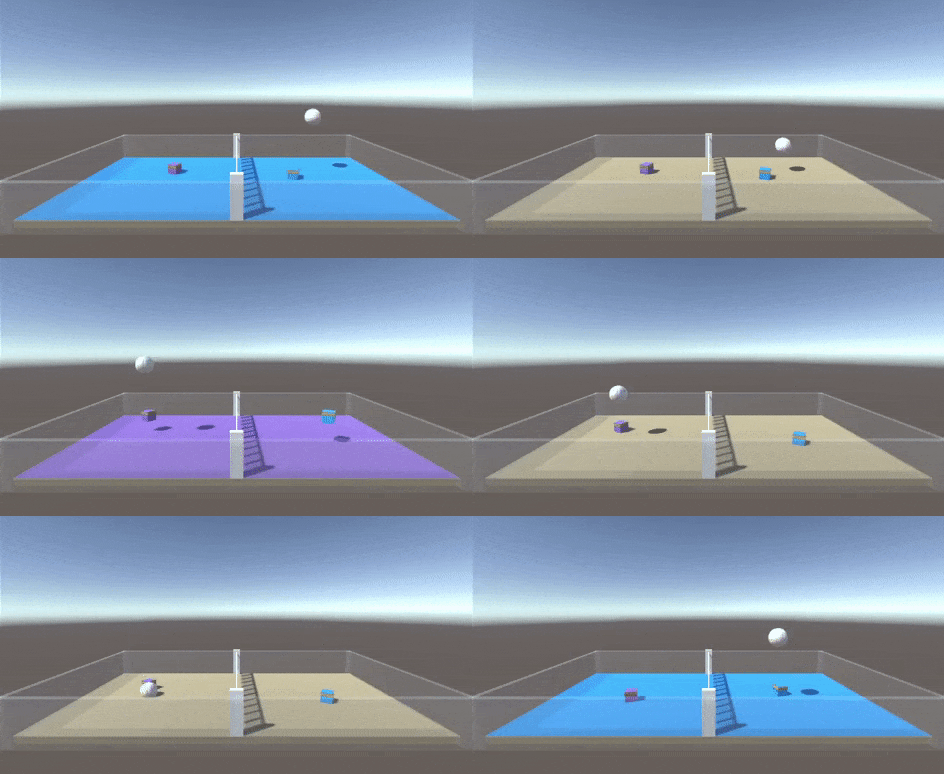
Now when you click Play ▶️ you should see the environment working correctly: the ball is affected by gravity, the agents can stand on the ground, and the episode resets when the ball hits the floor.
Wrap-up
You should now have a volleyball environment ready for our agents to train in. It will assign our agents rewards to encourage a certain type of behavior (volleying the ball back and forth).
In the next section, we'll design our agents and give it actions to choose from and a way to observe its environment.
If you have any feedback or questions, please let me know!
This content originally appeared on DEV Community and was authored by Joy
Joy | Sciencx (2021-09-02T01:16:57+00:00) Build a reinforcement learning environment using Unity ML-Agents. Retrieved from https://www.scien.cx/2021/09/02/build-a-reinforcement-learning-environment-using-unity-ml-agents/
Please log in to upload a file.
There are no updates yet.
Click the Upload button above to add an update.


