This content originally appeared on Level Up Coding - Medium and was authored by Supritha Ravishankar
How to Create a Pull Request on GitHub using VS Code

Introduction
In this blog, you will be given a walkthrough on how to make a PR (Pull Request) on GitHub using the editor Visual Studio Code and Git VCS. This is absolutely beginner-friendly, so hang tight, let’s make some Open Source contributions!
First things first!
What you will be needing before we start :
- VS code or any editor of your choice (this blog will be based on VS code).
- Have an account on GitHub.
- Git installed and set up on your Computer / Laptop.
- An issue that you have been assigned to on GitHub OR a code feature that you want to add to a repository.
Step 1— Fork the repository.
What is forking?
Forking a repository on GitHub simply means — to make a copy of someone else’s repository. Once you’ve forked a repository, a copy is made into your own account which gives you the liberty to work on the copied version of the codebase and not the original repository that someone owns.
Click “Fork” on the top right corner.
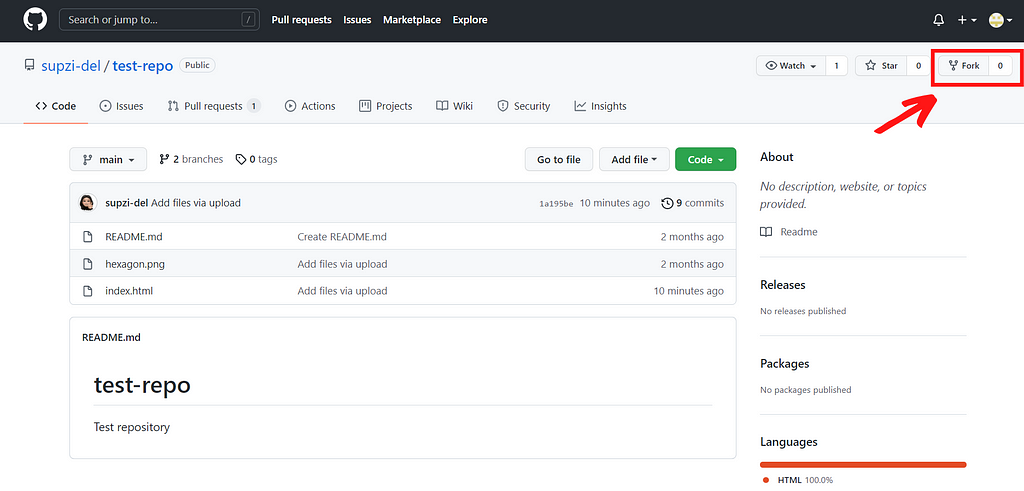
Once you’ve forked, you should see a copied repository something like this!

Step 2 — Clone the repository.
What is Cloning?
According to GitHub Docs, “Cloning a repository pulls down a full copy of all the repository data that GitHub has at that point in time.”
Copy the link.
Click on the green button that says Code and click on the clipboard icon to copy the link.
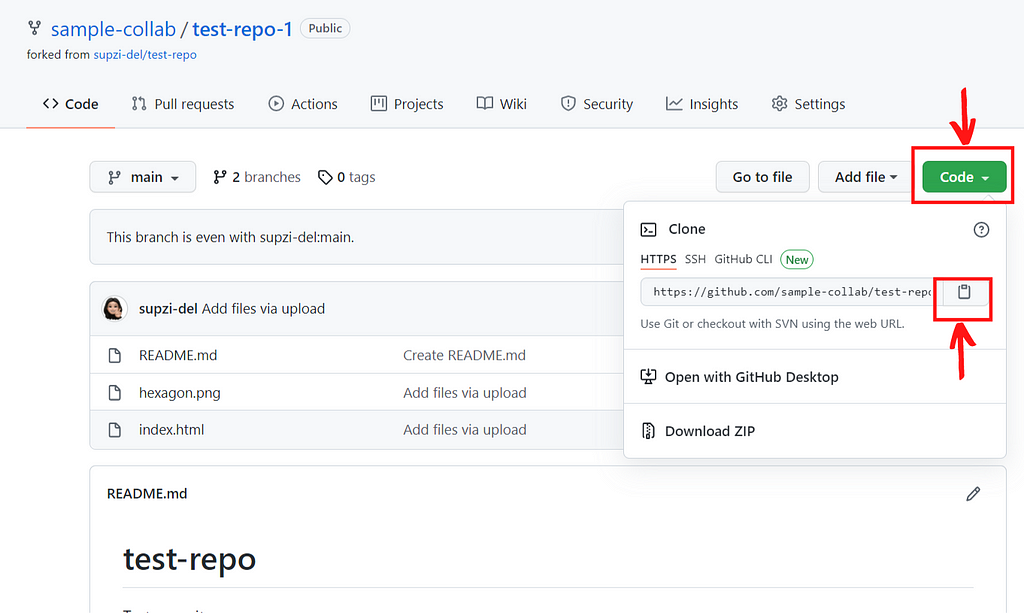
Launch Git Bash on your PC.
- Decide where on your computer you want to store the cloned project. For example:
cd /c/project
OR
cd "C:\project"
2. Run the command below to paste the link copied in the earlier step and click Enter.
git clone link
Yay! the project is stored in your system to be used locally!
Step 3 — Open Cloned project in VS Code.
1. Add desired code into the file and Ctrl + S to save changes.
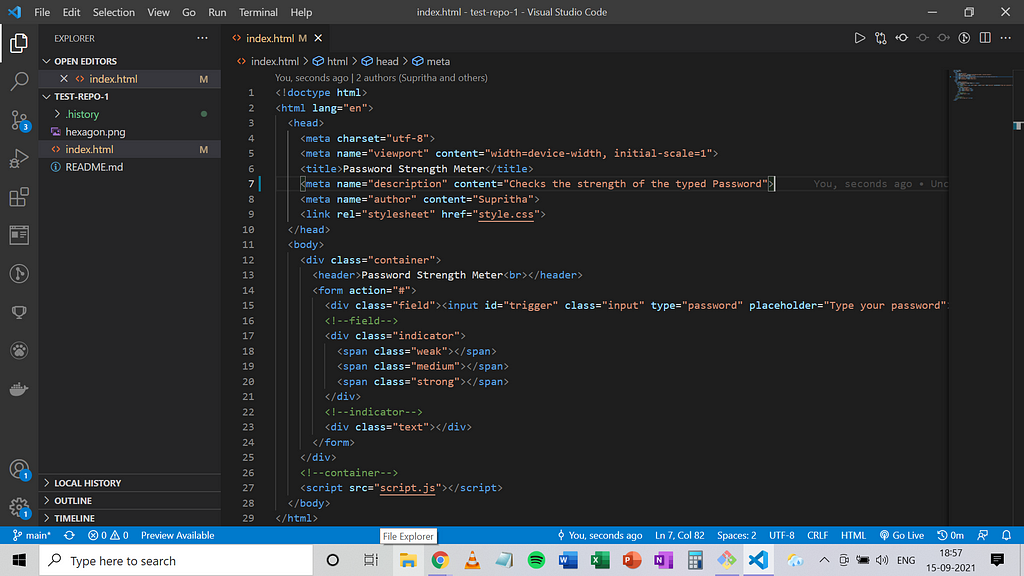
TIP!
You can create a branch or change to another branch by clicking on the source control icon followed by “main” in the bottom-left corner.
Working with branches allows you to have a new working directory where new commits are recorded in the history for the current branch.

2. Stage the changes.
Click on the Source Control icon as shown.
Select the file in which you have made the changes and click the ‘+’ icon to stage the changes.
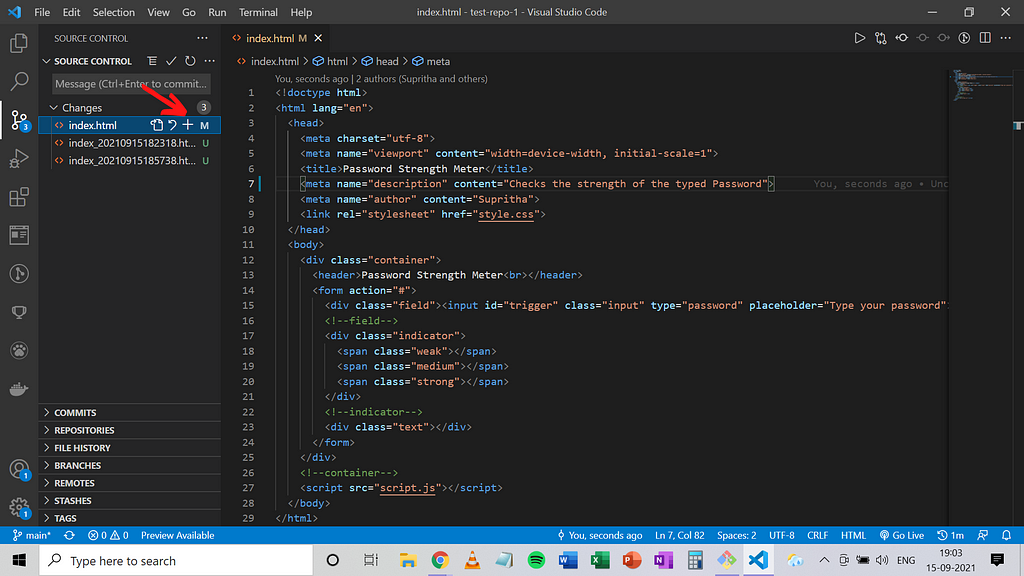
3. Add a commit message.
Commit messages will describe the commit which is helpful for the reviewer. Check out this article “The Importance of Good Commit Messages”.
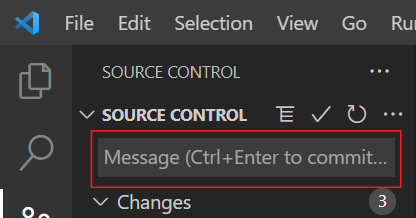
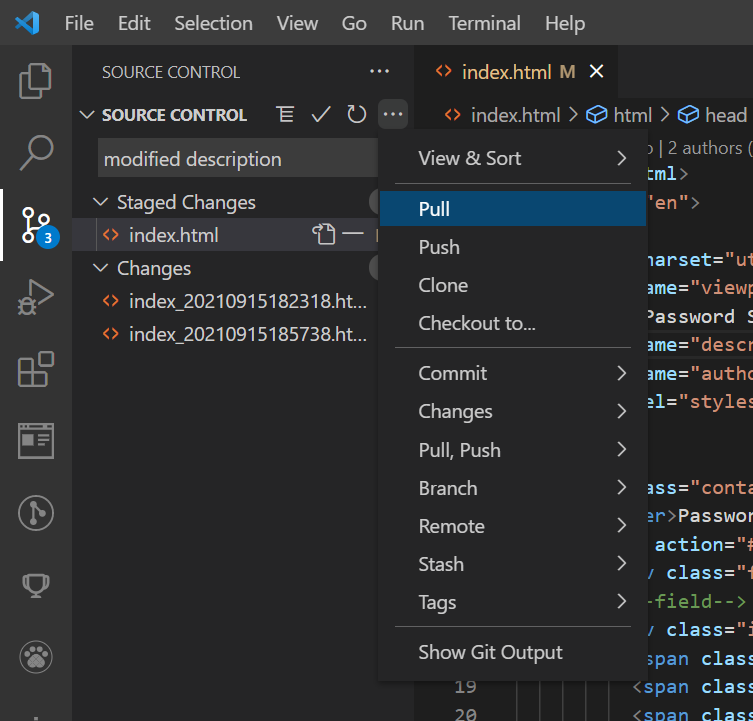
4. Don’t forget to Pull before Pushing.
Click on the three dots and then Pull which will avoid merge conflicts as it fetches and merges updates to your local branch.
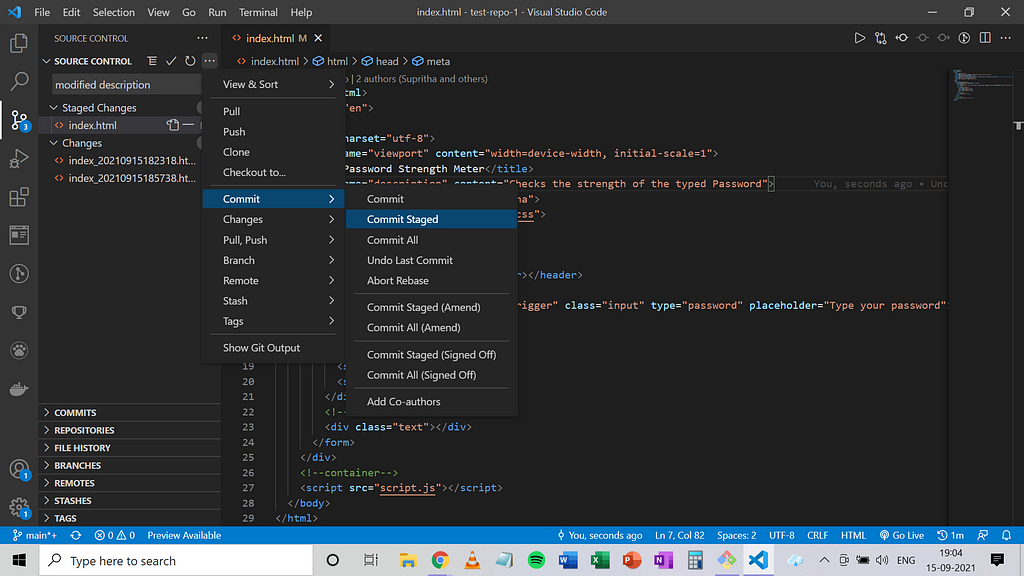
5. Commit staged changes.
After staging and adding the commit message, let’s finally commit the changes.
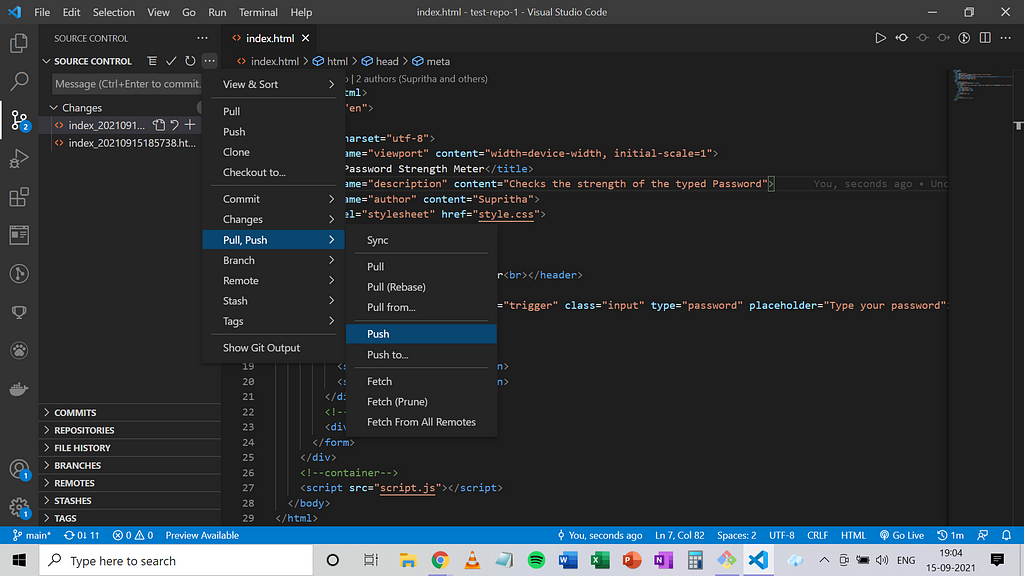
6. Push changes.
Pushing will upload local repository content to a remote repository.
Step 4 — Create Pull Request.
1. Head over to GitHub to create your PR!
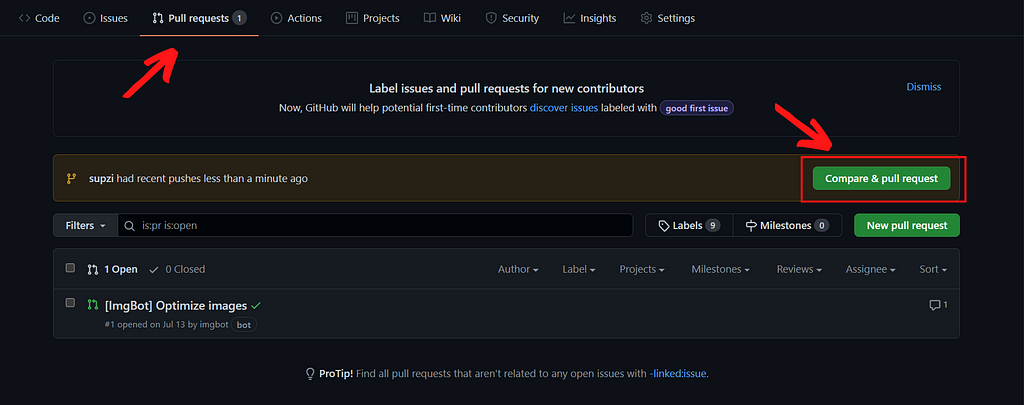
Go to the Pull requests section in the repository and click on the Compare & pull request button.
2. Open a pull request.
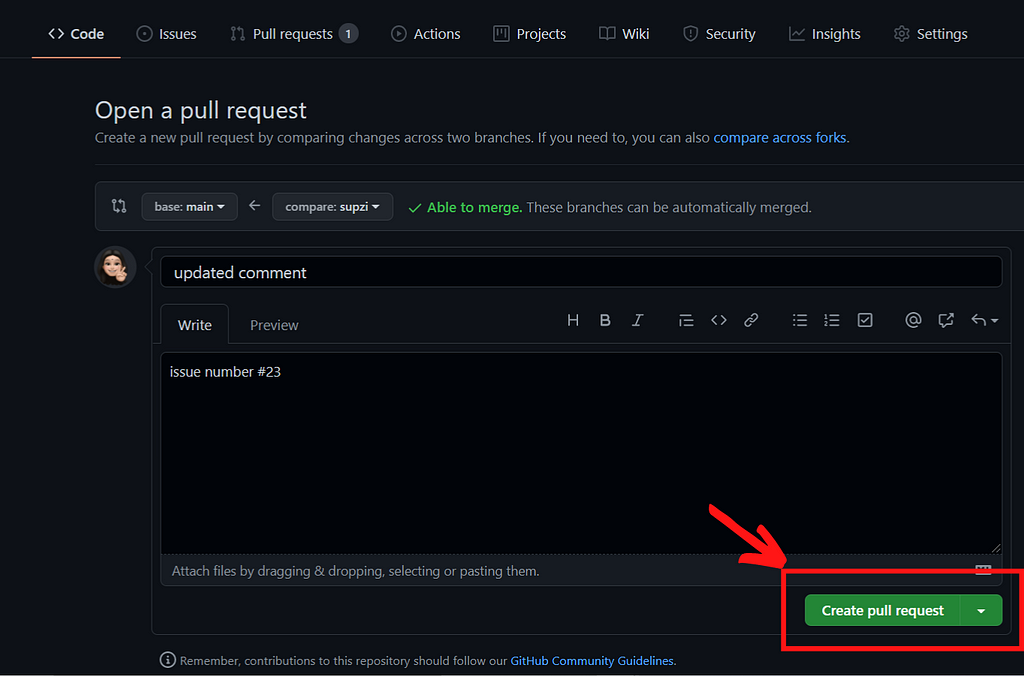
Before clicking on Create Pull request, it is a good practice to write the title and description about your PR (issue number, changes made etc.).
Step 5 — Be proud of yourself!
Voila! You successfully made a Pull request.?
Thank you for reading!
You can connect with me on—
LinkedIn| GitHub | Twitter | Medium | Dev.to
How to create a Pull Request on GitHub using VS Code ? was originally published in Level Up Coding on Medium, where people are continuing the conversation by highlighting and responding to this story.
This content originally appeared on Level Up Coding - Medium and was authored by Supritha Ravishankar
Supritha Ravishankar | Sciencx (2021-09-16T12:47:54+00:00) How to create a Pull Request on GitHub using VS Code ?. Retrieved from https://www.scien.cx/2021/09/16/how-to-create-a-pull-request-on-github-using-vs-code/
Please log in to upload a file.
There are no updates yet.
Click the Upload button above to add an update.
