This content originally appeared on DEV Community and was authored by Curious Paul
What is temporality ?
The temporality feature in Fauna is a feature that allows users to see how the data in their database has changed over time. The temporality feature involves two unique and interesting functions:
In this article, I’ll be showing you how to use the temporality features provided by Fauna to create a simple “versioning” tool that can help you manage different versions of your data across their lifetime in the database — don’t worry it’ll make sense as you proceed.
Creating and configuring the database
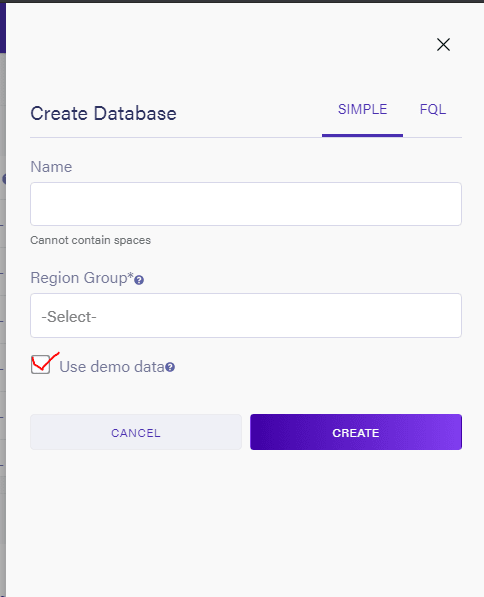
The first thing you must do is to create a Fauna database instance and add some data to it. To do this head over to your Fauna dashboard and click on the create database button on the dashboard.
This brings up a prompt where you can type in a name for your database, and add other config options. Add a name for the database and make sure to check the “use demo data” option so Fauna can pre-populate the database with dummy data, as well as indexes that you can use for test purposes.
Fetching an API key
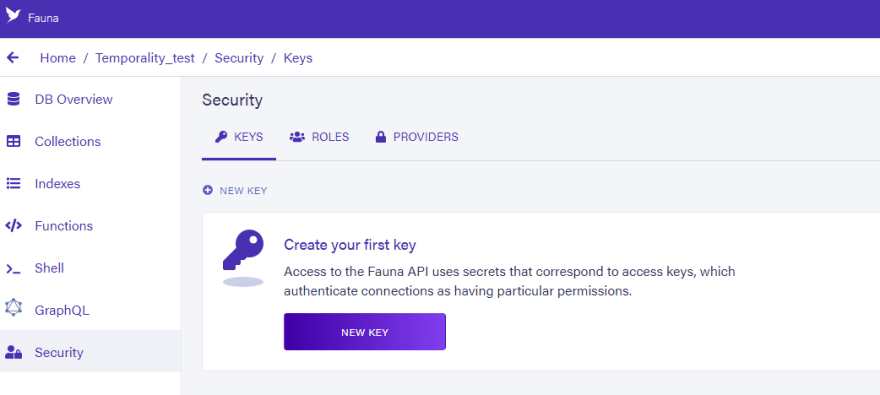
Next you’ll head over to the Security tab and select the new key option to generate a new API key, so you can communicate with Fauna securely from your application. Clicking on the “new key” option should prompt you to enter details about this new key, most of which have already been pre-filled.
The default options are just good for the purposes of this tutorial, so you can leave them as they are and click “save” to generate the key.
Copy the key you get and save it in a secure location. I’ll be saving mine in an environment variable called “Fauna-secret” and I’ll be using it for the rest of this article, to reference the key.
Building the “versioning” middle-ware
Pre-Requisites
For the purposes of this tutorial you will be needing the following :
- Python3
- Faunadb python package: this can be installed from the command line or terminal using pip as follows:
pip install faunadb
The “At” Command
The first temporality tool that Fauna offers is the At command, which takes in a timestamp and allows you to see the state of a collection at that point in time.
Fauna automatically adds a timestamp upon creation of the database, and as well as when new data is added to a collection. If more than one document is added to a collection at a time, then they’ll share the same timestamp.
We can run a simple query to see all “customers” data from the database and observe the timestamp on each document in the response. To do this create a file called main.py and add the following lines of code to it.
from faunadb.client import FaunaClient
from faunadb.errors import FaunaError, HttpError
from faunadb import query as q
from dotenv import load_dotenv
from typing import Optional
import os

load_dotenv()

client = FaunaClient(secret=os.getenv('Fauna-secret'))

# reviewing customer data
customers = client.query(
    q.map_(
        lambda x: q.get(x),
        q.paginate(
            q.document(q.collection('customers'))
        )
    )
)

print(customers)
The result from this query should look like the image below:
Observe how the documents have the same timestamp in the response, since they were created at the same time. Copy this timestamp so you can use it to see what the “customer” collection was like at this time after we’ve added new data to the collection - by passing it to the At function.
Let’s add some new documents to the “customer” collection and then use the timestamp from before to see what the table looked like at that time.
From your dashboard on Fauna, head over to the “customers” collection and use the New Document option to add two new customer documents, with whatever info you choose.
Do this one more time so you have two new customers. Once this is done, comment out the code in main.py and add the following lines of code to the file in order to see the documents that were in the customer collections at the timestamp you copied earlier.
from faunadb.client import FaunaClient
from faunadb.errors import FaunaError, HttpError
from faunadb import query as q
from dotenv import load_dotenv
from typing import Optional
import os

load_dotenv()

client = FaunaClient(secret=os.getenv('Fauna-secret'))

# # reviewing customer data
# customers = client.query(
#     q.map_(
#         lambda x: q.get(x),
#         q.paginate(
#             q.document(q.collection('customers'))
#         )
#     )
# )

# print(customers)

data = client.query(
    q.at(
        1632242211590000,
        q.paginate(
            q.documents(q.collection('customers'))
        )
    )
)

print(data)
Running this would give us the following result:
This is obviously not the latest version of our customer table, since we’ve added two new documents to it. This is instead a snapshot of what the collection was like at that timestamp. So with the At function we can peek at the data stored in the database at any given point recorded.
The “Event” Command
This is the second temporality feature that Fauna offers, and it allows you to see the different versions of a document over its lifetime in the database. This is possible because Fauna creates a copy each time an update is made to the document, as opposed to re-writing the document itself.
In order to test this, let’s update one of the customer’s data, comment the previous lines of code and add the following to update the user with id of “101”
from faunadb.client import FaunaClient
from faunadb.errors import FaunaError, HttpError
from faunadb import query as q
from dotenv import load_dotenv
from typing import Optional
import os

load_dotenv()

client = FaunaClient(secret=os.getenv('Fauna-secret'))

# # reviewing customer data
# customers = client.query(
#     q.map_(
#         lambda x: q.get(x),
#         q.paginate(
#             q.document(q.collection('customers'))
#         )
#     )
# )

# print(customers)

# data = client.query(
#     q.at(
#         1632242211590000,
#         q.paginate(
#             q.documents(q.collection('customers'))
#         )
#     )
# )

# print(data)

# update name
client.query(
    q.update(
        q.ref(
            q.collection('customers'),
            "101"
        ),
        {'data': {'firstName':'Boyle', 'lastName':'Johnson'}}
    )
)

# update contact details
client.query(
    q.update(
        q.ref(
            q.collection('customers'),
            "101"
        ),
        {'data': {'telephone': '854-456-3982'}}
    )
)
The code above will update the user twice, that way you can see how it’s changed over the course of two updates. Now let’s use the event command to see the versions of this document. Comment out these lines of code as with the previous ones and add the following instead.
from faunadb.client import FaunaClient
from faunadb.errors import FaunaError, HttpError
from faunadb import query as q
from dotenv import load_dotenv
from typing import Optional
import os

load_dotenv()

client = FaunaClient(secret=os.getenv('Fauna-secret'))

# ...
# ..

# update name
# client.query(
#     q.update(
#         q.ref(
#             q.collection('customers'),
#             "101"
#         ),
#         {'data': {'firstName':'Boyle', 'lastName':'Johnson'}}
#     )
# )

# # update contact details
# client.query(
#     q.update(
#         q.ref(
#             q.collection('customers'),
#             "101"
#         ),
#         {'data': {'telephone': '854-456-3982'}}
#     )
# )
results = client.query(
    q.paginate(
        q.events(
            q.ref(
                q.collection('customers'), "101"
            )
        )
    )
)
for resp in results['data']:
    print(resp, end="\n\n")
Running the main.py file this time gives us the following results, containing the different versions of the file and what operation was performed on them each time, as well their corresponding timestamps.
These two functions At and Events are what you’ll be using to create the “versioning” tool.
The versioning tool
Now that you already know what At and Event are, we can begin to build a versioning tool that can help us revert from the current state of our document to a previous state, when we need to. To begin, clear out the code in main.py except of course the imports and the Fauna client instance. We’ll start by writing a function called downgrade that will let us jump backward in time. So add the following lines of code to main.py
from faunadb.client import FaunaClient
from faunadb.errors import FaunaError, HttpError
from faunadb import query as q
from dotenv import load_dotenv
from typing import Optional
import os

load_dotenv()

client = FaunaClient(secret=os.getenv('Fauna-secret'))


def introspect(ref_id: str):
    events_ = client.query(
        q.paginate(
            q.events(
                q.ref(
                    q.collection('customers'), ref_id
                )
            )
        )
    )
    return events_


def downgrade(ref_id: str, steps: Optional[int] = -2):
    events_ = introspect(ref_id)
    # fetch previous state and update document with it instead
    try:
        client.query(
            q.update(
                q.ref(
                    q.collection("customers"), ref_id
                ),
                {
                    'data': events_['data'][steps]['data']
                }
            )
        )
    except FaunaError as e:
        return "An error occurred while trying to update object, try again."
    return "downgraded object successfully"

print(introspect("102")) # inspect the history of the document before running the downgrade
print(downgrade("102"))
Here I’ve added two functions, one of which is called introspect and the other downgrade. The introspect function allows us to inspect the different versions of the document so we can determine which one we want to jump to. The list of items in the introspect function is in ascending order, meaning the latest version of the document is in the last place — which is why in the downgrade function we use negative index to reference it.
Both functions take in the ref_id as an argument, so you need to know the id of the document you want to edit. The downgrade function takes one extra optional parameter however, called steps. This is used to specify which of the versions is to be jumped back to, and it's set to -2 by default meaning it's a step up from the last (or latest version of the document), or the immediate previous version of the document. If you don’t specify a step, it assumes you want that, however if you do then it uses the value you provide instead.
Note: For each downgrade the function creates a new update with the info gotten from the introspect function. So in essence, the history of the document continues to lengthen and so does the latest version. For optimum experience you may want to introspect and pick a specific version then jump there, if it's not the immediate previous version of the latest one.
Conclusion
In this tutorial, I have shown you how to create and pre-populate your database from your Fauna dashboard. I have also explained in detail the temporality features provided by Fauna, and further went on to show you how you might build a simple versioning script that could help improve your experience working with Fauna. The workings of the temporality features are not bounded by what I covered in this article, there’s a lot more you could accomplish by using these features, you could possibly even want to extend my implementation by building a class instead and adding more features to help your development process.
You can find the code on github via this link:
https://github.com/Curiouspaul1/fauna-temporality-demo
Written in connection with the Write with Fauna Program.
This content originally appeared on DEV Community and was authored by Curious Paul
Curious Paul | Sciencx (2021-09-22T22:28:32+00:00) How to Create Simple Versioning In your Database Using Fauna’s Temporality Feature. Retrieved from https://www.scien.cx/2021/09/22/how-to-create-simple-versioning-in-your-database-using-faunas-temporality-feature/
Please log in to upload a file.
There are no updates yet.
Click the Upload button above to add an update.


