This content originally appeared on Level Up Coding - Medium and was authored by Guilherme Müller
In 2020, Azure DevOps started to support generic webhooks that allow other applications to automatically start pipelines on your repository. In this article, we’ll take a look on how to make this happen.

Imagine that you need a secure and responsible way to host your application and a static app would be perfect. Here comes JAMStack. JAMStack is an architectural model that splits content management from the front end through API calls and static pre-building of websites.
You build your website using a static generator, like Gatsby, Next.JS, or even Jekyll (check the full list here). Your content can be fetched from local files, through web API calls to headless CMS services (full list here) or other sources. Then, the static site generator merges the content and creates all the static files (js, html, css, json and other files) that can be served by a webserver, or a storage bucket like AWS 3S Bucket or Azure Blob.
All cool and fancy, but how do we make so that, when the end user edits content on the headless CMS, a build and deploy pipeline can be triggered on Azure DevOps? Webhooks to the rescue! Using webhooks, we can create a listener on Azure Devops, which will be called by our headless CMS when it’s time to build and deploy a new version of our website.
So, the main goal is to build a workflow that allows the end user to control when to build a new version of the website, based on the new content, should be created and deployed, without any technical knowledge.

Creating a webhook listener (Azure DevOps side)
You can follow the steps for setting up the webhook on Azure DevOps here. This material sums up everything you’ll need to do at Azure DevOps, so no need to repeat it here.
Creating a webhook “caller” (your application)
After creating your webhook at Azure DevOps, you’ll think “Do I need to use a HTTP Header and Secret or can I just enable it without it?”, the short answer is “Yes, you need it”. Otherwise, anyone on the internet will be able to ping your webhook endpoint and countless builds might be triggered. Knowing this, let’s implement a secure request method using C#.
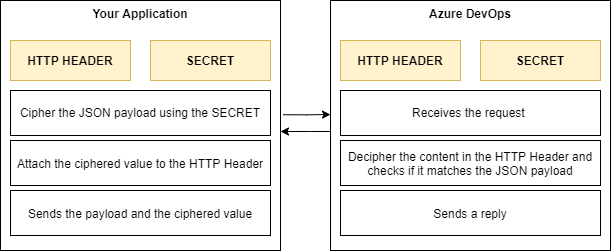
The deal is pretty simple. You take your JSON content cipher it using a HMACSHA1 algorithm (same that Azure DevOps uses to decipher and validate the content), adds this ciphered content to your HTTP Header and send it into the request. The Azure DevOps service will receive the request, decipher it and check if it’s valid. Since only the receiver and emitter know the HTTP Header and the Secret, only authorized applications and requests will trigger the hook.

Here’s a simple implementation of a method to do this.
Finishing touches
After this, setup up your CI/CD process inside Azure DevOps allowing that new builds to be deployed to your environments and you should be good. Whenever a user need to update content inside your JAMStack website, they can trigger a new build and in a few minutes, your static content will be published.
A few resources that might help with setting up your CI/CD process inside Azure DevOps:
- Create your first pipeline — Azure Pipelines | Microsoft Docs
- Customize your pipeline — Azure Pipelines | Microsoft Docs
- Azure DevOps Build & Release with YAML Templates ? | by Kyler Mintah | FAUN Publication
- Azure DevOps — How to do a fully automated release (Part 3) — European SharePoint, Office 365 & Azure Conference, 2021 (sharepointeurope.com)
Using Azure DevOps webhooks to build JAMStack websites was originally published in Level Up Coding on Medium, where people are continuing the conversation by highlighting and responding to this story.
This content originally appeared on Level Up Coding - Medium and was authored by Guilherme Müller
Guilherme Müller | Sciencx (2021-09-23T16:07:15+00:00) Using Azure DevOps webhooks to build JAMStack websites. Retrieved from https://www.scien.cx/2021/09/23/using-azure-devops-webhooks-to-build-jamstack-websites/
Please log in to upload a file.
There are no updates yet.
Click the Upload button above to add an update.
