This content originally appeared on DEV Community and was authored by Deepak Porwal
Tagging Docker Images
Docker tags convey useful information about a specific image version/variant.
They are aliases to the ID of your image which often look like this: 8f5487c8b942
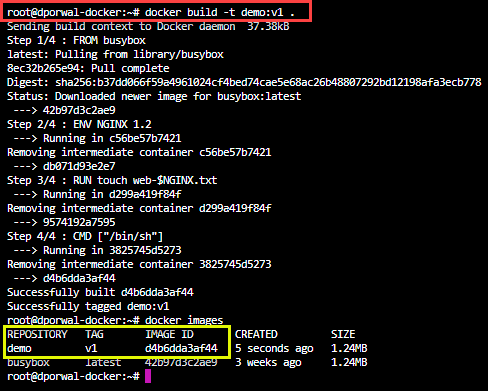
Assigning tag while building image
docker build -t demo:v1 .
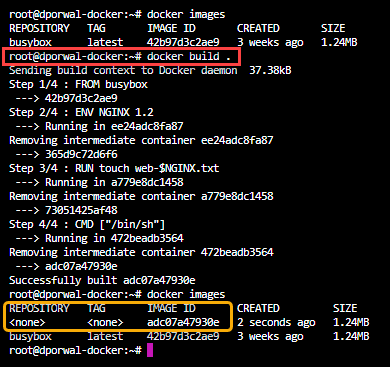
Assigning tag if no tag default
Lets build a image without tag.
docker build .
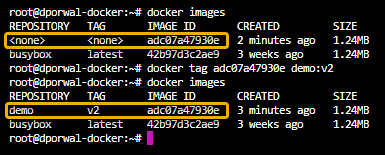
Now lets assign tag to the existing image without tag.
docker tag adc07a47930e demo:v2
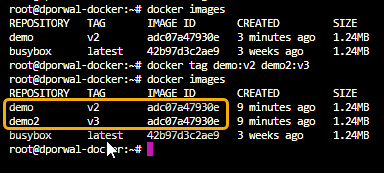
tag for existing tag of the image
This will create another image with the same IMAGE ID.
docker tag demo:v2 demo2:v3
Docker Commit
Whenever you make changes inside the container, it can be useful to commit a container’s file changes or settings into a new image.
By default, the container being committed and its processes will be paused while the image is committed.
Syntax:
docker container commit CONTAINER-ID myimage01
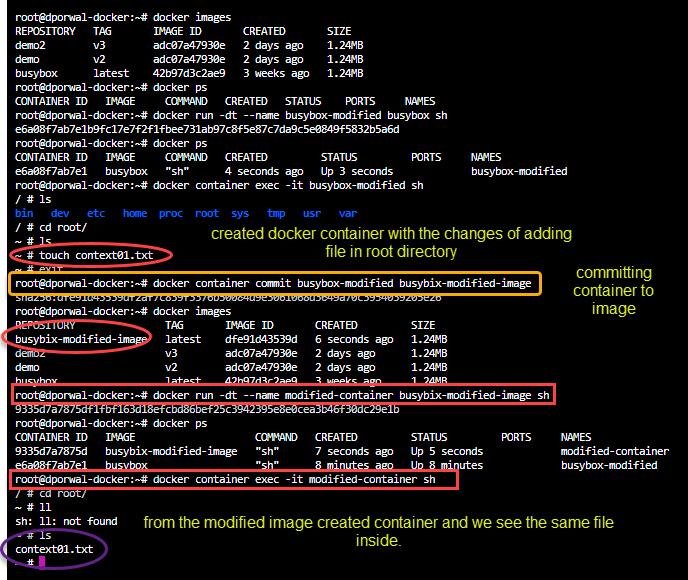
Created a container containing context01.txt file in root directory.
Then committed the container to the images and then creating another container from the same image, where we can see the same file/changes made present.
We can also define the Commands while committing the images from the containers.
The --change option will apply Dockerfile instructions to the image that is created.
Supported Dockerfile instructions:
- CMD | ENTRYPOINT | ENV | EXPOSE
- LABEL | ONBUILD | USER | VOLUME | WORKDIR
command
docker container commit --change='CMD ["ash"]' modified-container
Docker Image Layers
A Docker image is built up from a series of layers.
Each layer represents an instruction in the image’s Dockerfile.
Here is the best resource I found for the presentation.
As, the container have the R/W layer a top layer which is connected with the base image.
OR we can say that one base image is connected to different containers by Writable layer.
Lets, see some scenarios. Will build a docker image using dockerfile and will check the layers.
Dockerfile:
FROM ubuntu
RUN dd if=/dev/zero of=/root/file1.txt bs=1M count=100
RUN dd if=/dev/zero of=/root/file2.txt bs=1M count=100
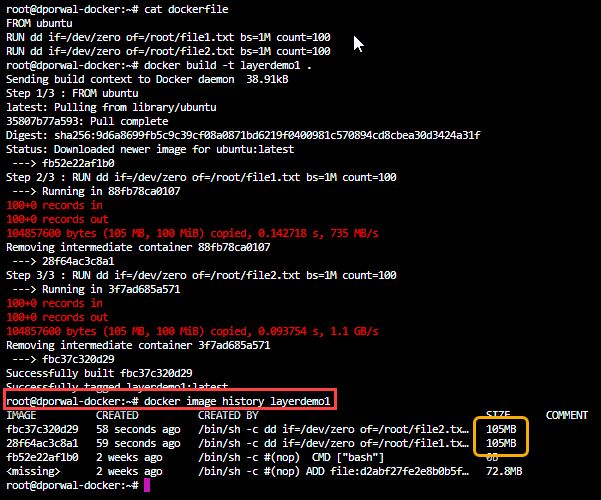
Command to check the layers of the image, where layerdemo01 is the image name.
docker image history layerdemo1
Below Screenshot clearly shows how 2 layers are of same volume, as they are not adding the volume of previous layer. Every layer has its separate size according to the command or the changes.
Now, lets try to remove these files and I found that 2 layers were created with 0B but the image still contains the same 282MB.
So, Basically here we have 5 layers.
Layer1 -> FROM Ubuntu
Layer2 -> RUN dd if=/dev/zero of=/root/file1.txt bs=1M count=100
Layer3 -> RUN dd if=/dev/zero of=/root/file2.txt bs=1M count=100
Layer4 -> RUN rm -f /root/file1.txt
Layer5 -> RUN rm -f /root/file2.txt
Here Only Layer4 and Layer5 is dealing with the removing of those files, but the file are still there in Layer3 and Layer2.
That is the reason image still have the same volume.
Dockerfile:
FROM ubuntu
RUN dd if=/dev/zero of=/root/file1.txt bs=1M count=100
RUN dd if=/dev/zero of=/root/file2.txt bs=1M count=100
RUN rm -f /root/file1.txt
RUN rm -f /root/file2.txt
For the requirement where we need to remove the files after creation, we can use && to run both the command at one-go.
This will conserve the volume of the image
FROM ubuntu
RUN dd if=/dev/zero of=/root/file1.txt bs=1M count=100 && rm -f /root/file1.txt
RUN dd if=/dev/zero of=/root/file2.txt bs=1M count=100 && rm -f /root/file2.txt
Managing Images using CLI
So basically the best practice of using the command for images is
docker image <command>
- docker pull ubuntu == docker image pull ubuntu
- docker images == docker image ls
- docker image build
- docker image history
- docker image import
- docker image inspect
- docker image load
- docker image prune
- docker image push
Inspecting Docker Images
A Docker Image contains lots of information, some of these include:
- Creation Date
- Command
- Environment Variables
- Architecture
- OS
- Size
docker image inspect command allows us to see all the information associated with a docker image.
Suppose we need to get the particular field from the inspect data.
e.g Hostname
we can use
docker image inspect ubuntu | grep 'Hostname'
docker image inspect ubuntu --format='{{.Id}}'
There are certain things that have parent child details. Like, ContainerConfig have Hostname, Domainname etc.
But, this will only gives the values not the key.
docker image inspect ubuntu --format='{{.ContainerConfig}}'
If you want the key and value both.
docker image inspect ubuntu --format='{{json .ContainerConfig}}'
If you just want the hostname value you can use below caommand to filter out the information from the inspect data.
docker image inspect ubuntu --format='{{.ContainerConfig.Hostname}}'
Docker Image prune
Docker image prune command allows us to clean up unused images.
By default, the below command will only clean up dangling images.
Dangling Images = Image without Tags and Image not referenced by any container
To prune all the images that has no container refrenced, we can use below commands.
docker image prune -a
If you want to remove all the images only which don't have tag associated, you can use below commands.
docker image prune
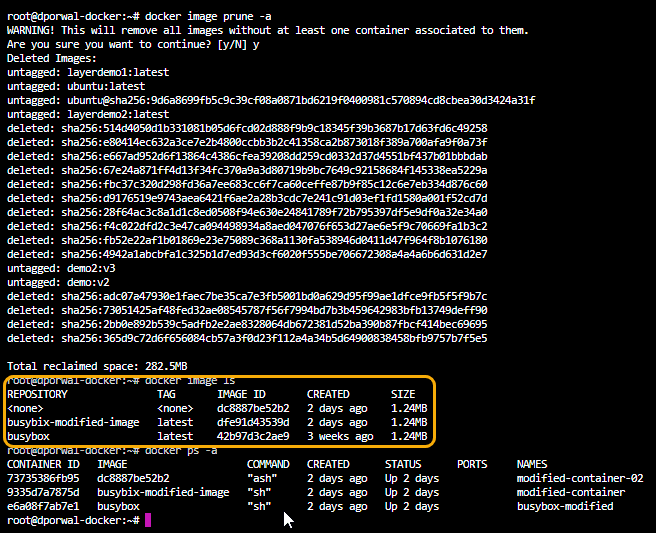
Before Prune we had these many images.
After running prune command.
Those images got removed which were not referenced to the container.
Here is the below command the image without the tag ( ) tag which is a Dangling image, but it can't be prune because it has containers associated.
Flattening Docker Images
Modifying Image in a single Layer or specific Layer.
As we know ubuntu has many layers. So, to merge all layers to the single layer. There is one approach that to,
Import and Export to a container
Commands:
docker export myubuntu > myubuntudemo.tar
cat myubuntudemo.tar | docker import - myubuntu:latest
Building Docker Registry
A Registry a stateless, highly scalable server-side application that stores and lets you distribute Docker images.
Docker Hub is the simplest example that all of us must have used.
There are various types of registry available, which includes:
Docker Registry
Docker Trusted Registry
Private Repository (AWS ECR)
Docker Hub
To push the image to a central registry like DockerHub, there are three steps:
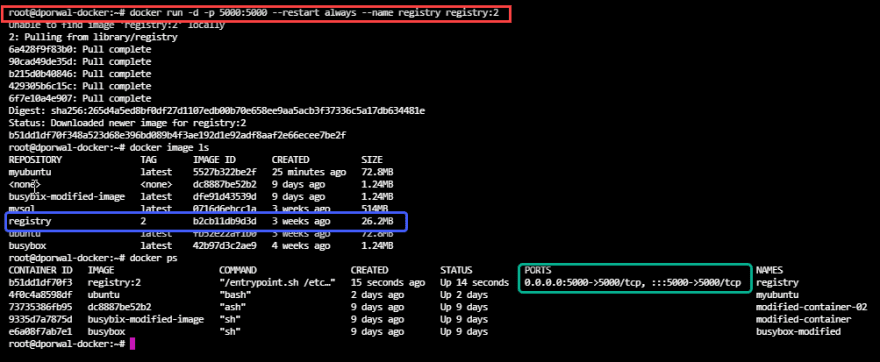
- Authenticate your Docker client to the Docker Registry Refrence for setting up Docker Registry https://hub.docker.com/_/registry/
docker run -d -p 5000:5000 --restart always --name registry registry:2
- Tag Docker Image with Registry Repository and optional image tag.
docker tag myubuntu:latest localhost:5000/myubuntu
- Push Image using docker push command To push the docker image to the AWS ECR. Refrence: https://docs.aws.amazon.com/AmazonECR/latest/userguide/docker-push-ecr-image.html
docker push localhost:5000/myubuntu
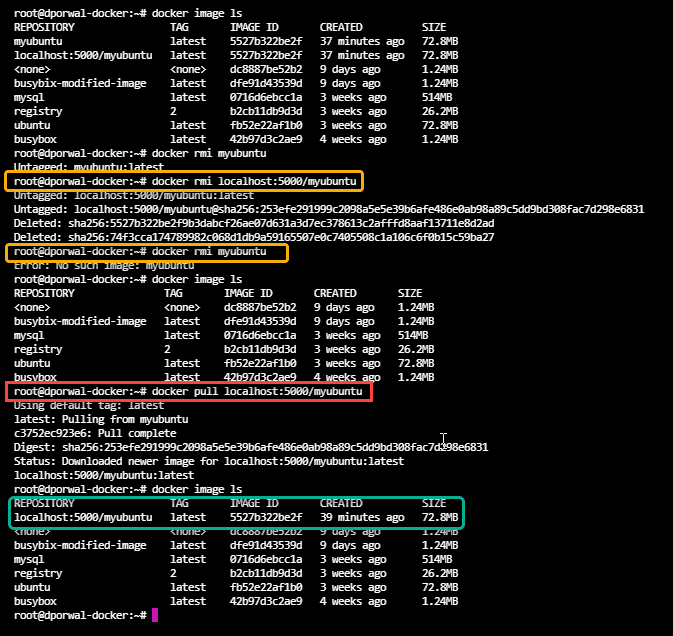
Now, lets pull the image from the registry. For that first we need to untag the registy located image and then delete the image.
docker pull localhost:5000/myubuntu
Pushing Docker Image to Docker Hub
I have my account on Docker Hub and created had 1 repository.
So, first we will login to the docker hub by CLI and then create the tag and push it. Then before pulling the image I have removed the tag to the image and removed all the containers associated to that container and then pull the image from the Docker Hub Repository.
docker login
docker tag busybox deepakporwal95/mydemo:v1
docker push deepakporwal95/mydemo:v1
docker pull deepakporwal95/mydemo:v1
Pushing out custom image to docker hub.
Pulling the image from Docker Hub.
Searcing and Filtering Images from Docker Hub
| Description | Command |
|---|---|
| Search for Busybox image | docker search busybox |
| Search for Busybox image with Max Result of 5 | docker search busybox --limit 5 |
| Filter only official images | docker search --filter is-official=true nginx |
On searching nginx images.
We will limit the number of results.
On searching images from Docker Hub we get many results. We can filter those results by three filter supporters.
- stars
- is-automated
- is-official This will bring to us specific required result only.
Moving Images Across Hosts
Suppose we want to send docker image to other hosts or instances from admin box or master server. In this case we save the image as a zip and then transfer that image to host and at last will load that image in the host.
Cache in Docker
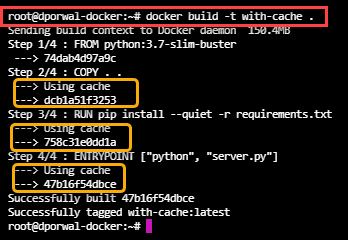
While building a container or image it uses the cache of each layer which has been already been there.
Here is the Dockerfile and requirements.txt details that we will be using for this usecase.
Dockerfile
FROM python:3.7-slim-buster
COPY . .
RUN pip install --quiet -r requirements.txt
ENTRYPOINT ["python", "server.py"]
requirements.txt
certifi==2018.8.24
chardet==3.0.4
Click==7.0
cycler==0.10.0
decorator==4.3.0
defusedxml==0.5.0
Here are the commands that will be using to build the images.
docker build -t without-cache .
docker build -t with-cache .
without cache
with cache
References:
Official Docker
Udemy Course
Credit:
Zeal Vora
Prev: Image Creation, Management, and Registry(Part 1)
This content originally appeared on DEV Community and was authored by Deepak Porwal
Deepak Porwal | Sciencx (2021-09-24T12:20:03+00:00) Image Creation, Management, and Registry(Part 2). Retrieved from https://www.scien.cx/2021/09/24/image-creation-management-and-registrypart-2/
Please log in to upload a file.
There are no updates yet.
Click the Upload button above to add an update.

