This content originally appeared on DEV Community and was authored by Goran Kortjie

Today we are going to copy 'someone else's' repository on our GitHub account and learn how to clone it to our local computer. We will be looking at Forking and Cloning in GitHub.
Those two options allow us to get access to any open source repositories which are available on GitHub, it allows us to work on them, make some changes, update files and contribute those updates to the original maintainers/owner of the project.
Here we will cover:
- Forking
- Cloning
- Contribute to the original project
Forking
To follow along you will need to create a second account on GitHub.
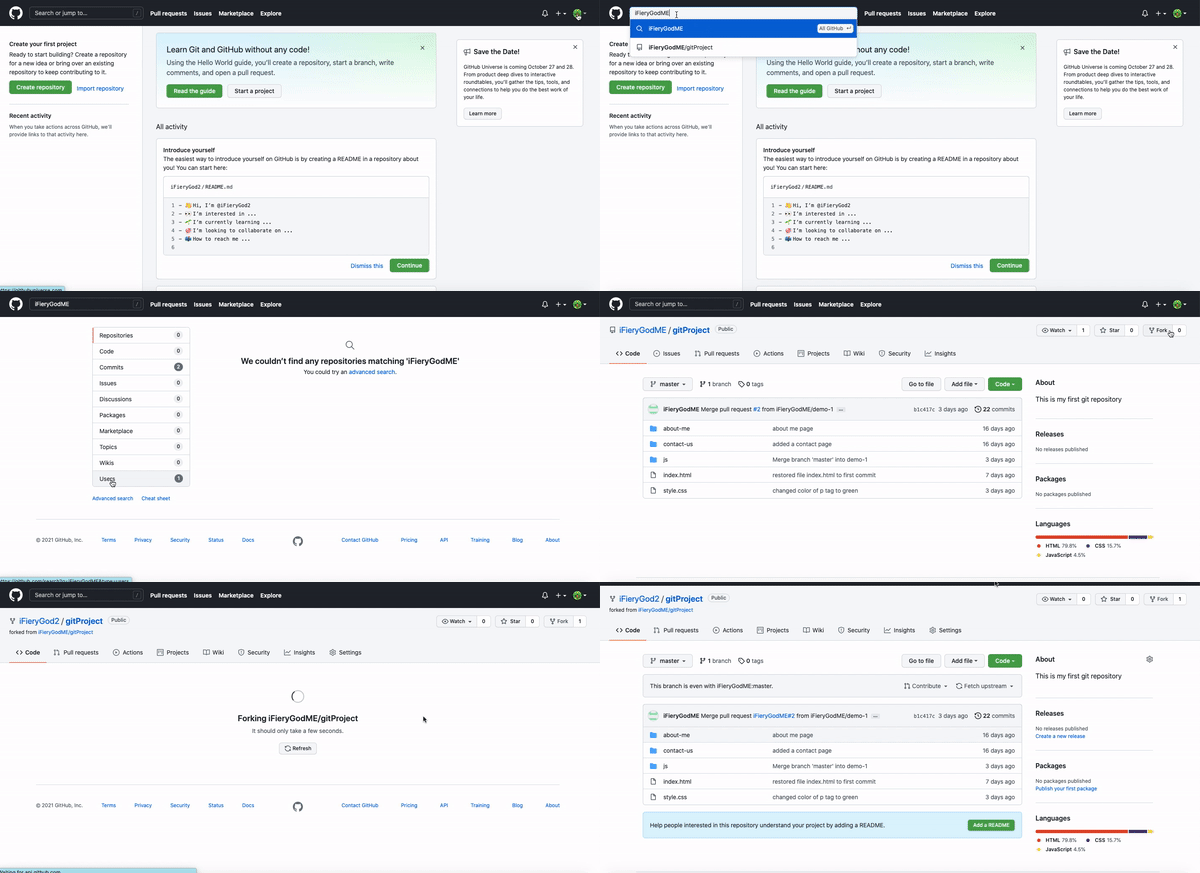
Once we have a new account we need to search for the project we've been working on so far, i.e our first account
In general we can search and use any of the open source repositories available on GitHub.
We need to search for the username of the previous account because if we just search for the name of the project which in this case is gitProject, we will get tons of results.
To search for the username of the previous project we type:
iFieryGodME
My username is iFieryGodME but yours will be different!
Once we run the search, we should come across a list. At the bottom of the list is a tab called Users, when we click on that we should see our username of the previous account.
When we click on the account, we are taken to the overview of the account where we will see the repository we've been working on as well as some other things specific to our account.
We click on the repository and at the very top-right, we should see the button that says fork. We click this fork button to begin the forking process.
It will take a few seconds for the process to complete and once it is done, we will see the entire repository has been copied to our new account.?
Now we have the exact same copy of the original repo, all the source files are here as well as all the commits which have been made so far. The fork option in GitHub allows us to copy the original repository to our account.
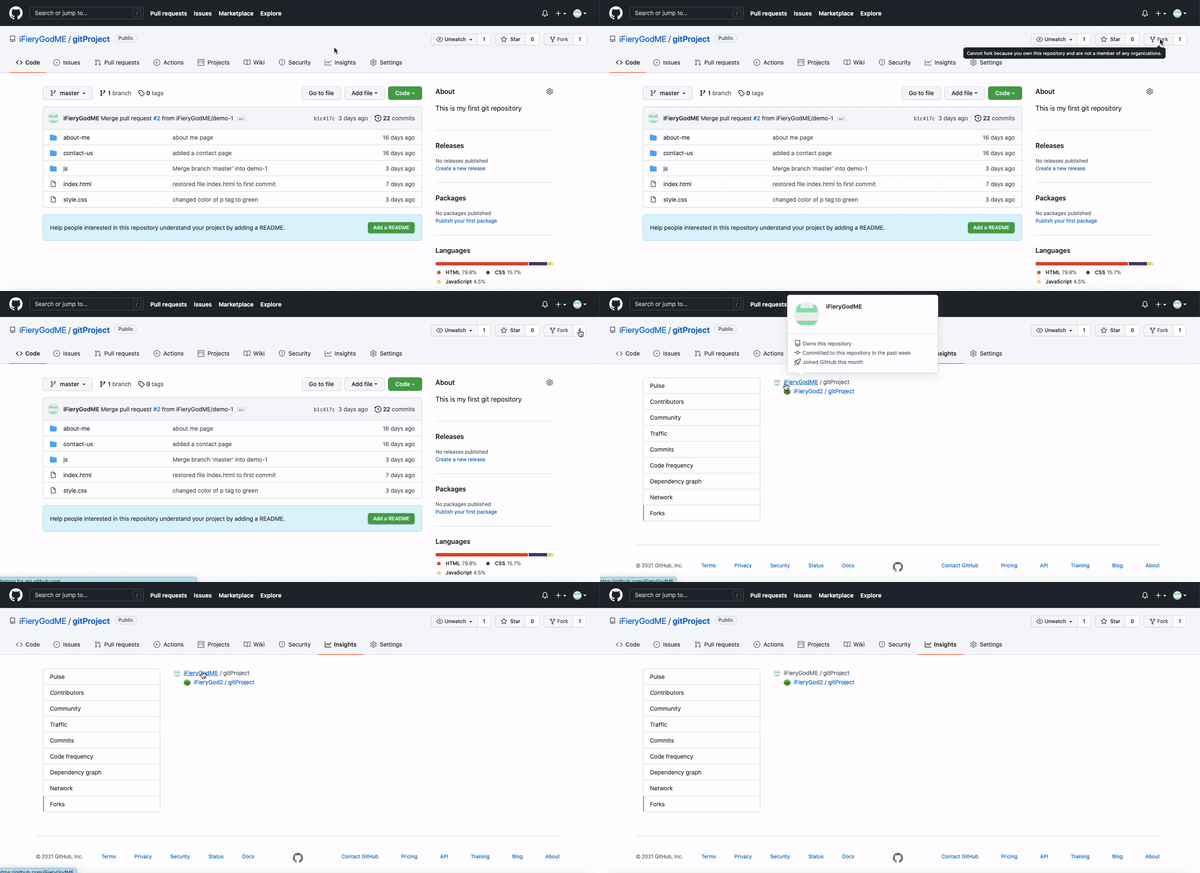
If we go back to the original repo, at the top-right, right after the fork button we will see the number of forks. If we click on the number we will see the owner of the original repo and the username who forked the repo.
Cloning
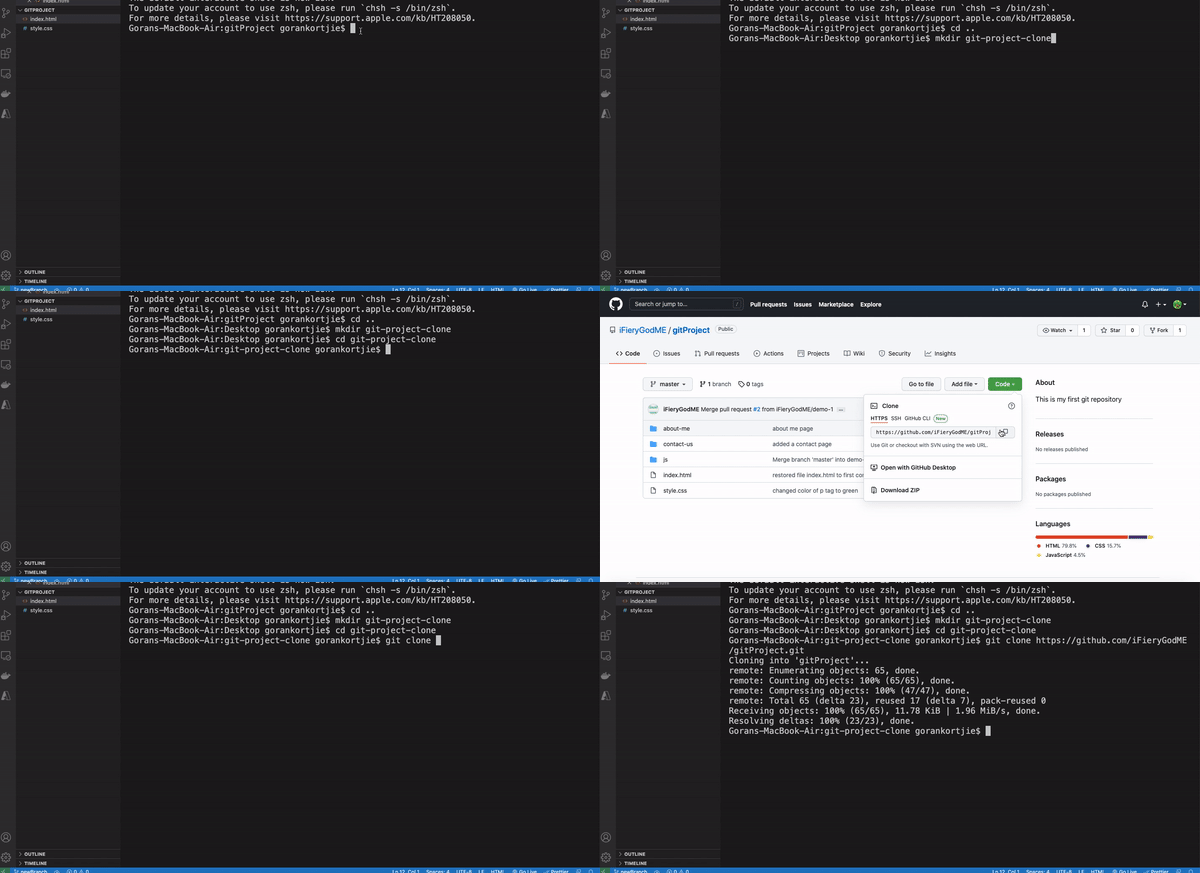
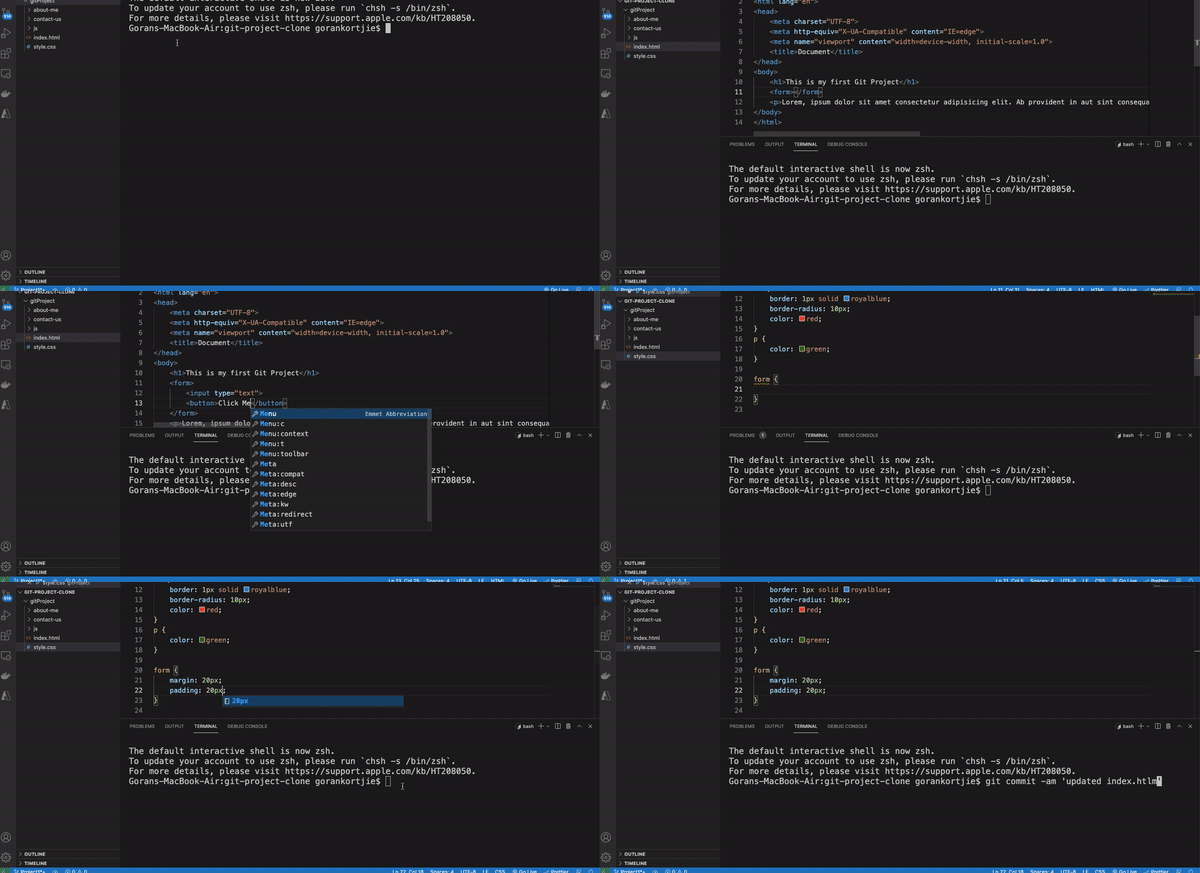
To start with cloning lets go to the terminal in VS-CODE and create a new folder on the desktop directory.
Since we are in the project directory currently, we need to go up one directory by running the command:
cd ..
Then we need to create the folder and call it git-project-clone by running the command:
mkdir git-project-clone
After the folder is created we can enter into it by running the command:
cd git-project-clone
Awesome we done here for now!?
We now have to go back to GitHub account with our original project and click on the green button that reads Code, a dropdown will appear and we see a link, we copy the link by clicking on the copy icon to the right of the link.
Once the link is copied, go back to the terminal and run the following command:
git clone
This command is followed by the link we copied on GitHub. For example:
git clone https://github.com/iFieryGodME/gitProject.git
Your link will be different to mine since it will have a different account name or username.
Awesome job, we just cloned the remote repo to our local folder we created.?
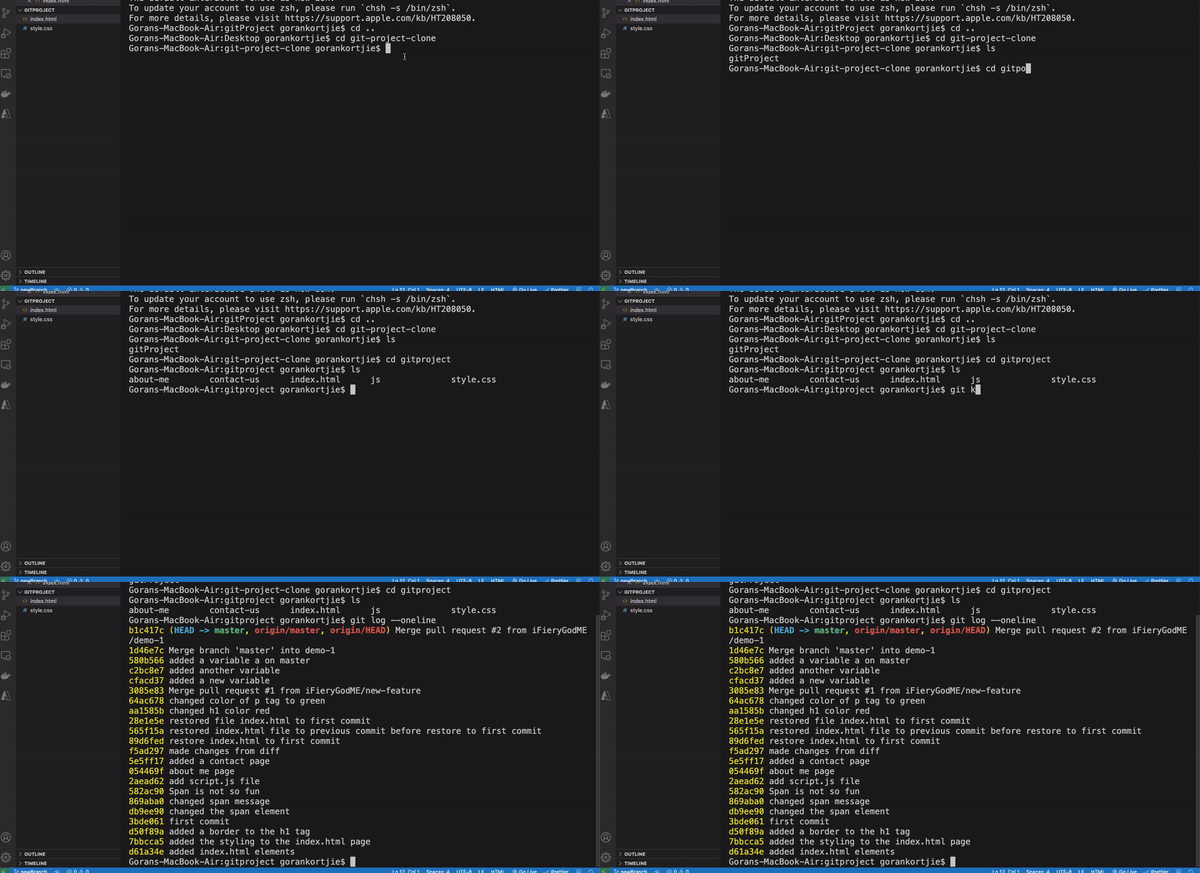
We can check this by running the command:
ls
This command will display to us the files and folders inside of our directory.
We will see a folder with the name of our original project and if we go into it and show its contents, we will see all the source files. Also if we run the history we will see all the commits that we ran on the original repo.
Contribute to the original project
Let us consider how we can contribute to an open source repository. Nowadays there are tons of open source projects on Github, which many different developers are working on. They copy the repo's, update them and then send pull requests to the owners.
On the other side of things, the owners receive pull requests from the contributors, they consider the changes and if they are happy, they merge the updates with original repository.
This process is called Contributing, and this is the way different libraries and frameworks are updating today.
We are going to simulate the scenario of contributing.
We are starting from the directory git-project-clone, where we have cloned the original repo.
We now can update this repository by making changes to the index.html file and the style.css file.
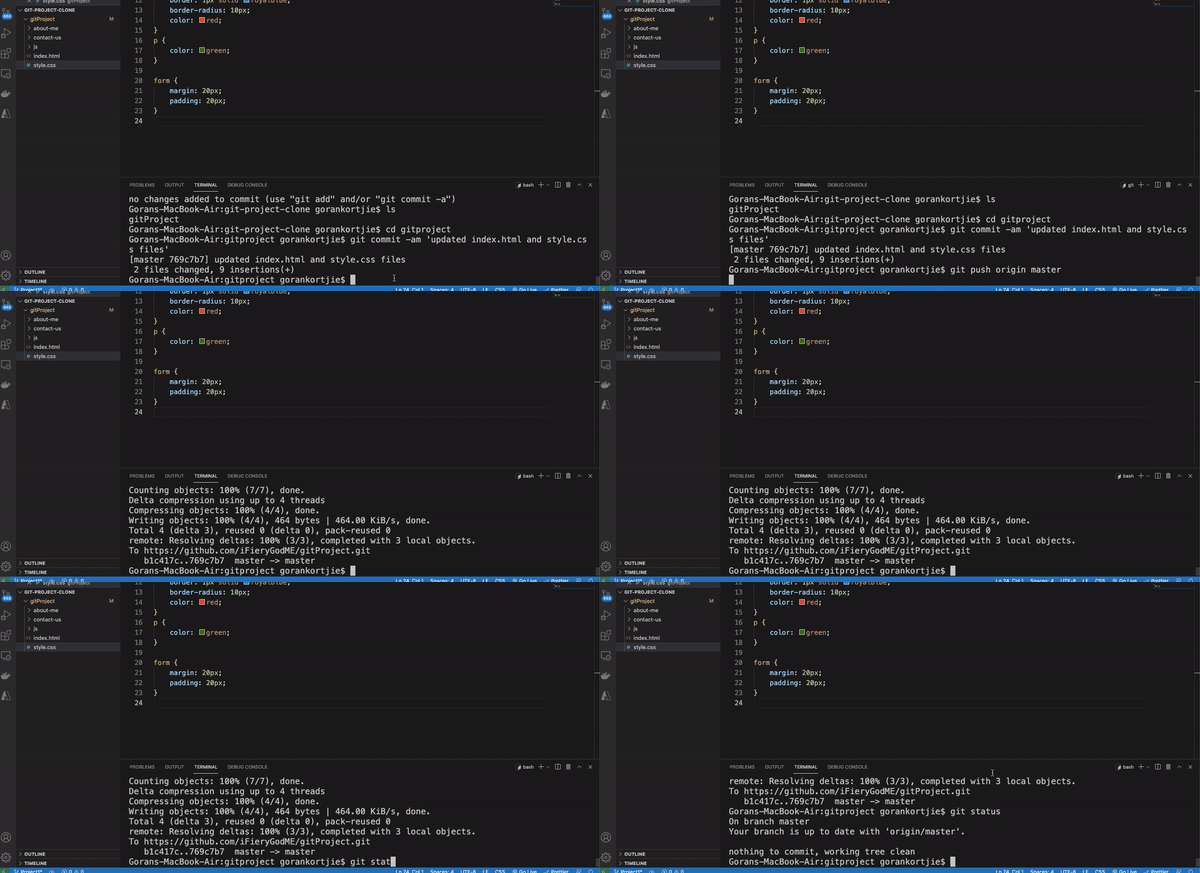
Once we make the changes we save and commit them to history as usual.
We should be familiar with this process now, since we have done it many times during the chapters.
After we have committed the files to history we need to push the changes to the master branch, i.e the new GitHub account we created.
You might encounter a problem trying to push the changes to the new account, remember we setup the Git and GitHub credentials previously. We need permission to push the changes through to our new account.
There are many ways of doing this type of thing depending on whether you are working on Windows or Mac.
On Mac, in the terminal run the command to remove the remote the current origin:
git remote rm origin
Then you need to add a new origin, we need to have an SSH key to run this command. If you do not have one or you are not sure whether you have generated one, you can run the following command in the terminal to find out:
ls -al ~/.ssh
If you get a response that says no such file exists, then you need to generate an SSH key. To do this you need to run the following command, substituting the email with your own:
ssh-keygen -t ed25519 -C "your_email@example.com"
You will get the following message:> Generating public/private ed25519 key pair.
Next you will be prompted to "Enter a file in which to save the key," just press Enter. Then at the prompt, type a secure passphrase and confirm it again.
Awesome stuff?
Now you need to copy your public key to your clipboard, you can do this by running the command.
pbcopy < ~/.ssh/id_ed25519.pub
If your id_ed25519 is different then you need to specify that id, you can find the id by running cd ~/.ssh, then show the contents of the folder with an ls.
Now go to your GitHub account and go to the settings menu, in the dropdown click the SSH and GPG Keys. Give your key a title and in the key field you paste the public key, then click add ssh key button.
You will be prompted to confirm your GitHub account password.
Once complete, go back to your project in GitHub and click on the green button that reads Code. Choose the SSH option and now you will see an SSH key available, click on the far right side to copy the SSH Key to your clipboard.
Now back in the terminal run the command:
git remote add origin
This command is followed by your SSH key, after you run this command you are able to push your changes to the new GitHub account.
If you still run into issues you can go to the official GitHub docs for instruction. GitHub Docs
If you are on Windows you can change your GitHub login details by clicking
manage windows credentialsin the Credential Manager and then find the GitHub link. If you run into any issues feel free to ask.
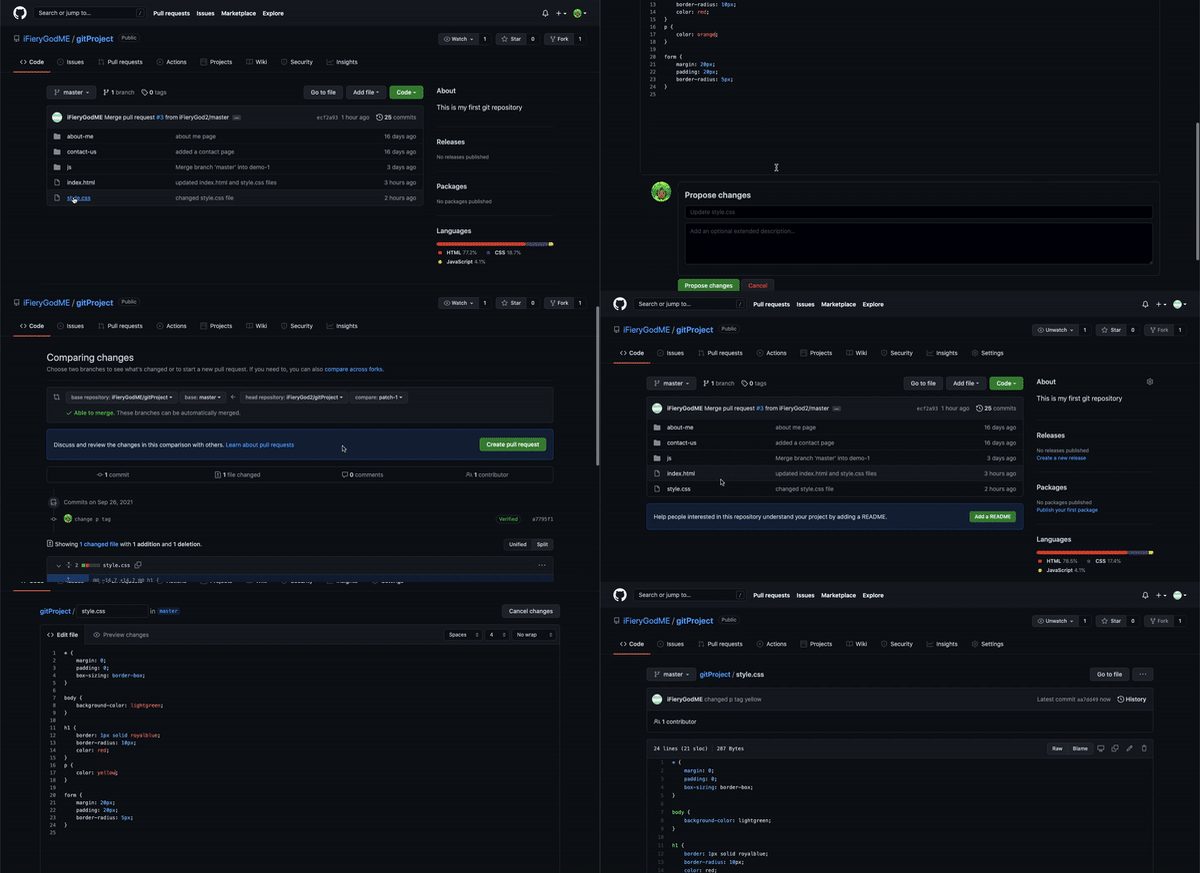
Back to contributing...When we go back to our new GitHub account then we should see our commits we just made from our local repo.
To send these changes to the original owner we need to create a new pull request.
As you can see when we create a new pull request, GitHub compares the owner origin/master with the our new account origin/master. In our case we have no merging conflicts.
Next we need to give a description. In the real world you want to give the owner a clear and thorough explanation of the changes you made in the description. Then we click the green button marked create pull request.
Next GitHub will check if we can merge with the owner's repo. Notice that we cannot perform the merge on our side, this is because it is up to the owner whether they want to accept the merge.
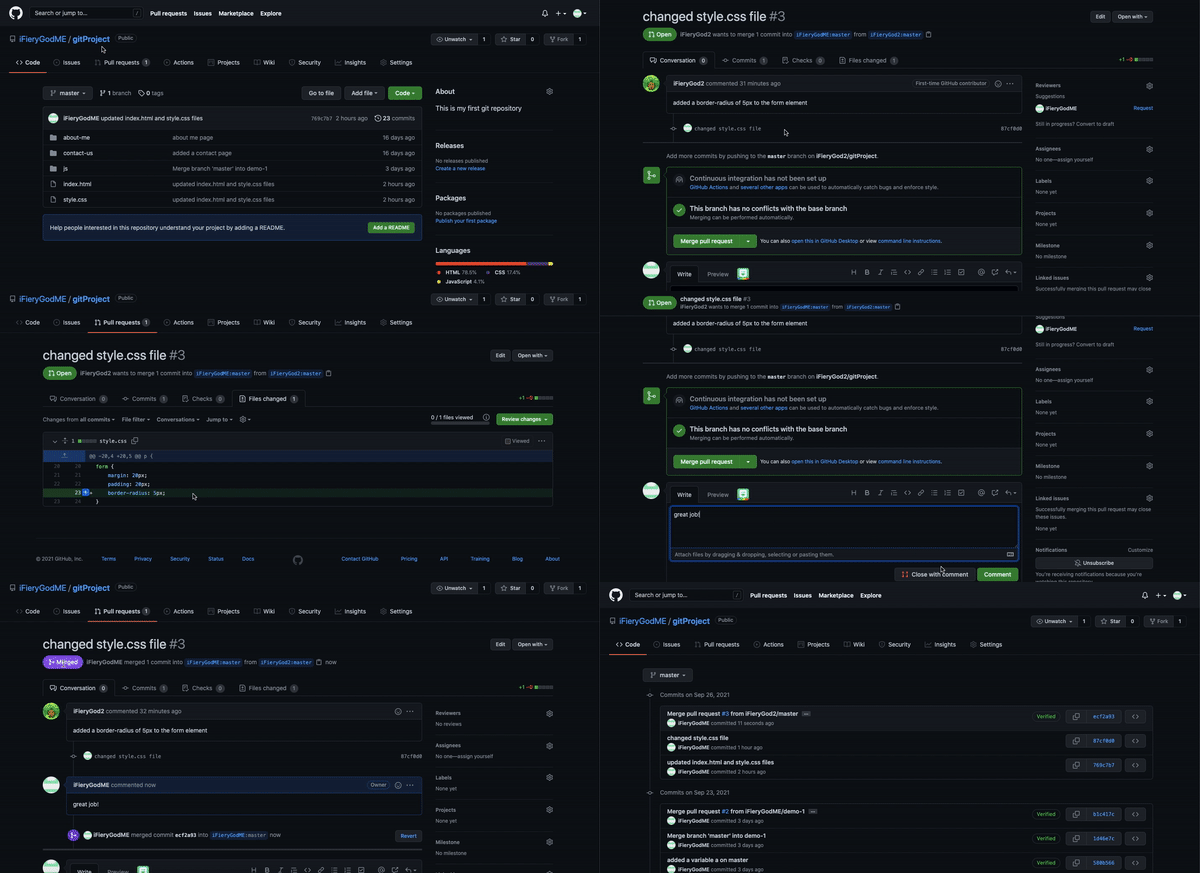
Now we go to the owners GitHub account of the original project. You will notice that there is 1 pull request on the owners repo. We can click on it.
Here you will see the pull request from the second account with its commits and the changes, we can review the commits made by the other user as well as the changes that were made to the project. The green background indicates the changes that were added.
If we are happy with the changes we can merge the branches. Also we can write a comment to the contributor.
Once we click the merge pull request green button. The branches will merge and the changes will be reflected on the owners repo.
That is the way we can contribute to an open source project on GitHub.
Let’s consider what might happen if we encounter a merge conflict this way.
As usual a merge conflict will occur when both parties try to edit the same line of the same file. In this case we can simulate a scenario where we as the contributor try to modify the style.css file and before we create a pull request, the owner is busy editing on the same line of the same file.
When we commit our changes and create the pull request, we will see that there is a merge conflict, however you are still able to create the pull request.
Here we can choose to resolve the conflict ourselves or we can allow the owner to resolve the conflict, because there is a conflict with the repo's the pull request has been sent to the owner already.
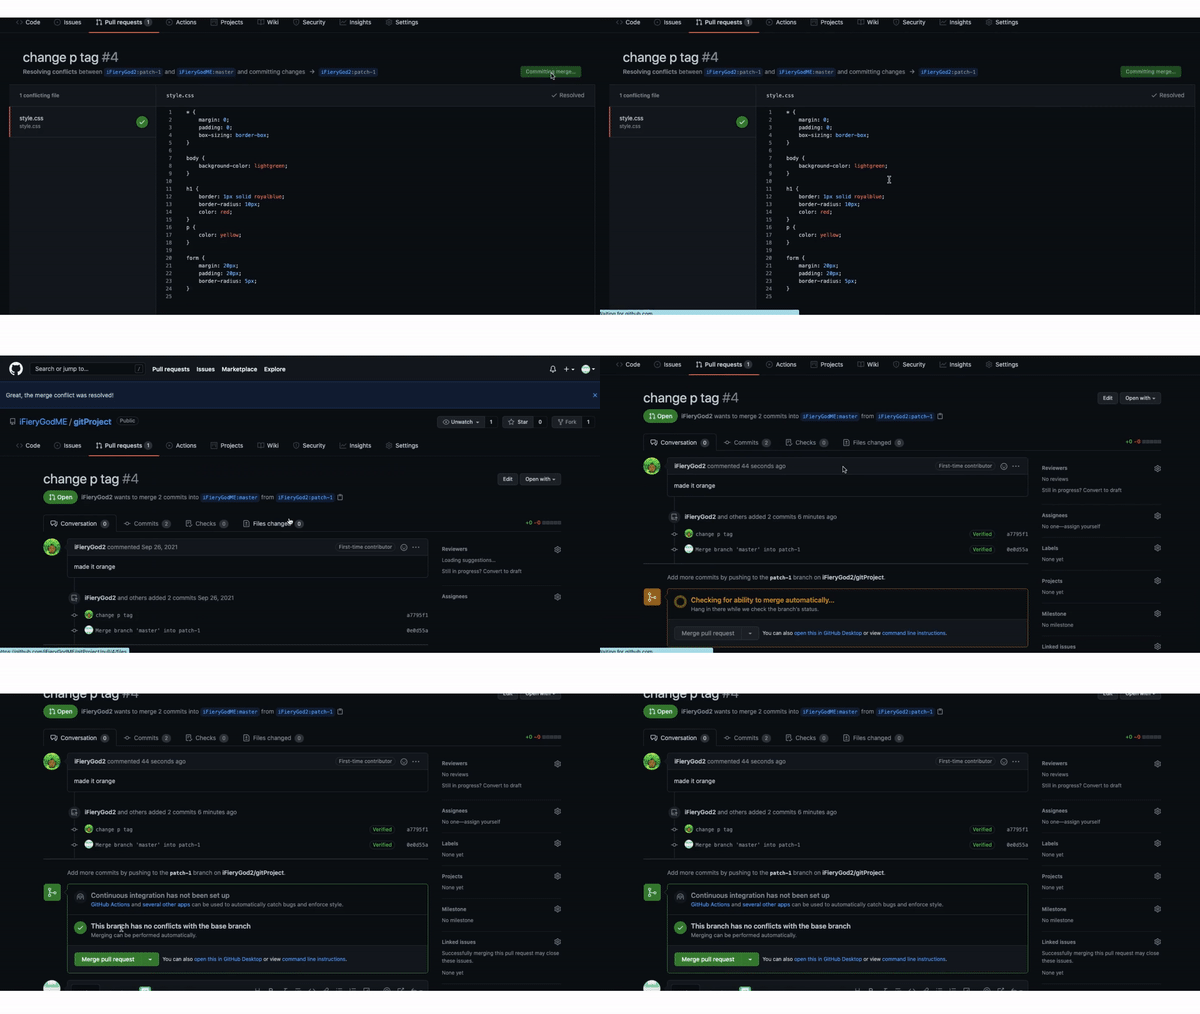
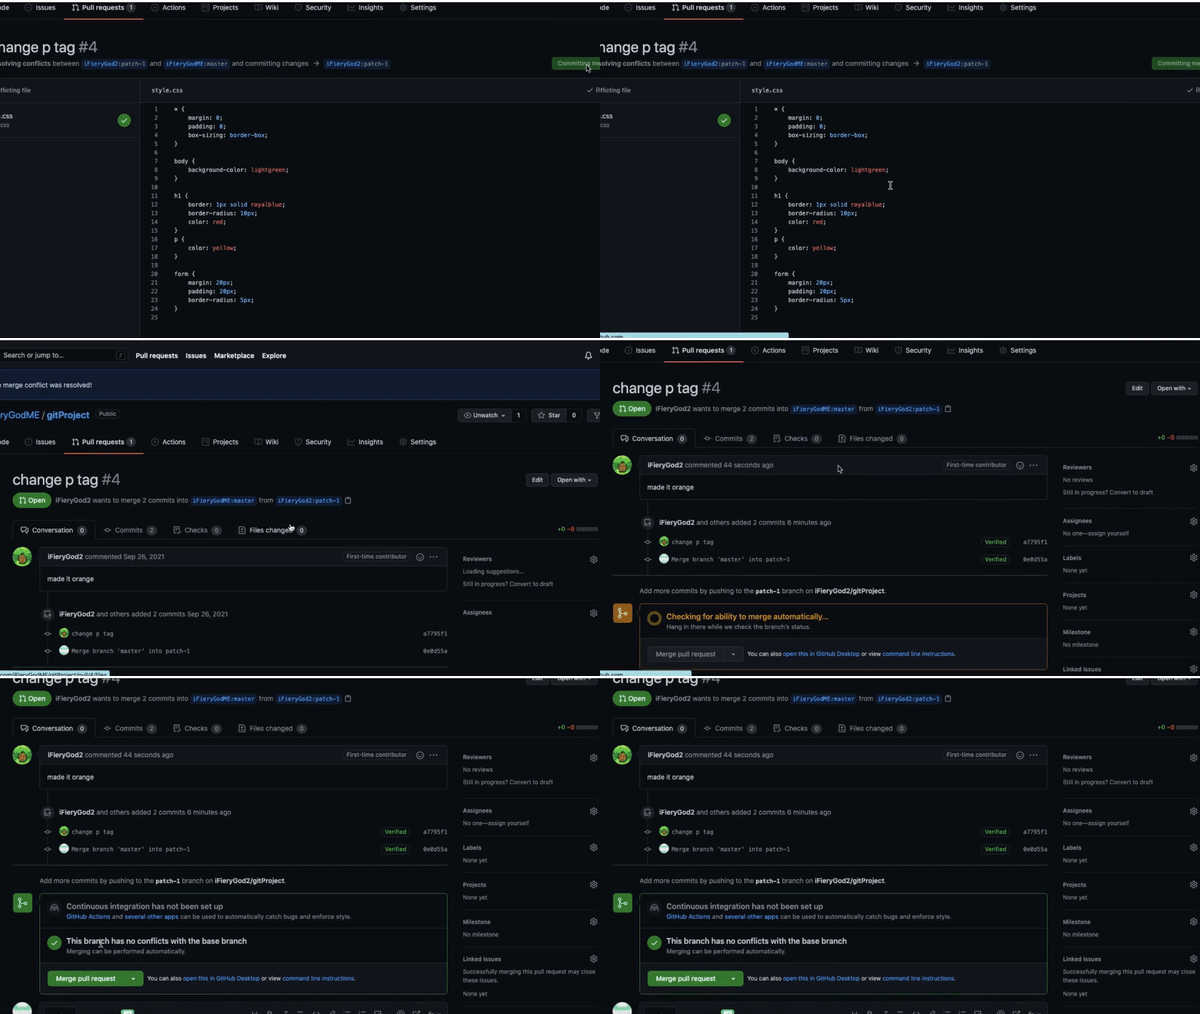
When you go to the owner account, you will see 1 pull request, and this pull request has a conflict. We as the owner can resolve this issue by deciding which code we want to keep.
Once we are happy we can click marked as resolve, then click commit merge, you will see GitHub warns us that this will commit to master. We confirm that we understand.
Finally we merge the pull request with our master branch. If we look at the commits history, we will see all the commits of both accounts as well as the merge commits.
That is it about contributing to the original open source repository, I really hope this made sense to you. Lets all move on to the next and final chapter...
This content originally appeared on DEV Community and was authored by Goran Kortjie
Goran Kortjie | Sciencx (2021-09-26T22:17:15+00:00) Git and GitHub: The Complete Guides – Chapter 7: Forking and Cloning. Retrieved from https://www.scien.cx/2021/09/26/git-and-github-the-complete-guides-chapter-7-forking-and-cloning/
Please log in to upload a file.
There are no updates yet.
Click the Upload button above to add an update.


