This content originally appeared on DEV Community and was authored by Siddhu
Laravel Sanctum with Socialite
Earlier I have written, How to use Laravel Sanctum and user authentication using API
Now, I'm going to add social logins using via API.
In this example, I'll show you how to integrate Laravel Sanctum authentication with social networks via Facebook, Google and GitHub.
Make sure, you have already installed Laravel Sanctum if not follow this article and then come here.
Laravel Socialite Configuration
STEP1: Install socialite package
composer require laravel/socialite
STEP2: Config socialite
You need to add all social config details to config\services.php file. As I shown below
'github' => [
    'client_id' => env('GITHUB_CLIENT_ID'),
    'client_secret' => env('GITHUB_CLIENT_SECRET'),
    'redirect' => 'GITHUB_REDIRECT_URI',
],
'facebook' => [
    'client_id' => env('FACEBOOK_CLIENT_ID'),
    'client_secret' => env('FACEBOOK_CLIENT_SECRET'),
    'redirect' => 'FACEBOOK_REDIRECT_URI',
],
'google' => [
    'client_id' => env('GOOGLE_CLIENT_ID'),
    'client_secret' => env('GOOGLE_CLIENT_SECRET'),
    'redirect' => 'GOOGLE_REDIRECT_URI',
],
STEP3: Get config details from OAuth services providers
Now, You need to get CLIENT_ID and CLIENT_SECRET from respective social developer accounts, Here I provided the following links
GitHub https://github.com/settings/developers
Google https://console.developers.google.com/apis/dashboard
Facebook https://developers.facebook.com/apps/
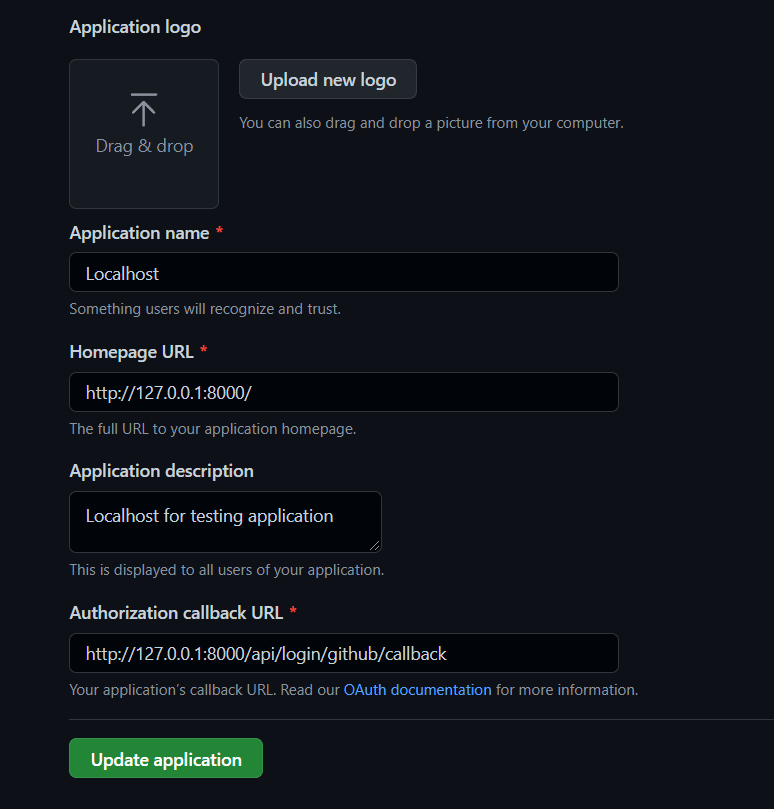
It is easy to setup developer account in all social networks, where you can get the CLIENT_ID and CLIENT_SECRET keys. Finally, you need to set call-back URL. After successfully authentication it will send token to that URL.
STEP4: Set config details on your application
You have all CLIENT_ID and CLIENT_SECRET keys, Now add those keys into .env file
GITHUB_CLIENT_ID=XXXXXXXXX
GITHUB_CLIENT_SECRET=XXXXXXX
GITHUB_REDIRECT_URI=http://127.0.0.1:8000/api/login/github/callback
Similarly add all other OAuth service providers
STEP5: Make password nullable
When you authenticate user with OAuth services, you will receive token not password. So, in our database the password field must be nullable.
Modify password field as nullable in users_table migration file.
public function up()
    {
        Schema::create('users', function (Blueprint $table) {
            $table->id();
            $table->string('name');
            $table->string('email')->unique();
            $table->timestamp('email_verified_at')->nullable();
            $table->string('password')->nullable();
            $table->rememberToken();
            $table->timestamps();
        });
    }
STEP6: Create providers table
Now, you have to create another table for providers
php artisan make:migration create_providers_table
In the providers migration file, add this fields
    public function up()
    {
        Schema::create('providers', function (Blueprint $table) {
            $table->bigIncrements('id');
            $table->string('provider');
            $table->string('provider_id');
            $table->bigInteger('user_id')->unsigned();
            $table->string('avatar')->nullable();
            $table->timestamps();

            $table->foreign('user_id')->references('id')->on('users')->onDelete('cascade');
        });
    }
STEP7: Create Provider table
Make Provider model
php artisan make:model Provider
open Provider model
<?php

namespace App\Models;

use Illuminate\Database\Eloquent\Factories\HasFactory;
use Illuminate\Database\Eloquent\Model;

class Provider extends Model
{
    use HasFactory;

    protected $fillable = ['provider','provider_id','user_id','avatar'];
    protected $hidden = ['created_at','updated_at'];
}
STEP8: Add provider relation to user table
Here I have created Providers function on user model
<?php

namespace App\Models;

use Illuminate\Contracts\Auth\MustVerifyEmail;
use Illuminate\Database\Eloquent\Factories\HasFactory;
use Illuminate\Foundation\Auth\User as Authenticatable;
use Illuminate\Notifications\Notifiable;
use Laravel\Sanctum\HasApiTokens;


class User extends Authenticatable
{
    use HasApiTokens, HasFactory, Notifiable;

    /**
     * The attributes that are mass assignable.
     *
     * @var string[]
     */
    protected $fillable = [
        'name',
        'email',
        'password',
    ];

    /**
     * The attributes that should be hidden for serialization.
     *
     * @var array
     */
    protected $hidden = [
        'password',
        'remember_token',
    ];

    /**
     * The attributes that should be cast.
     *
     * @var array
     */
    protected $casts = [
        'email_verified_at' => 'datetime',
    ];


    public function providers()
    {
        return $this->hasMany(Provider::class,'user_id','id');
    }
}
STEP9: Add the Routes
Open routes/api.php file add route URL's
Route::get('/login/{provider}', [AuthController::class,'redirectToProvider']);
Route::get('/login/{provider}/callback', [AuthController::class,'handleProviderCallback']);
Add above functions on your controller
<?php

namespace App\Http\Controllers;

use Illuminate\Http\Request;
use Illuminate\Http\Response;
use Illuminate\Support\Facades\Hash;
use GuzzleHttp\Exception\ClientException;
use Illuminate\Http\JsonResponse;
use Laravel\Socialite\Facades\Socialite;
use App\Models\User;

class Authcontroller extends Controller
{


    /**
     * Redirect the user to the Provider authentication page.
     *
     * @param $provider
     * @return JsonResponse
     */
    public function redirectToProvider($provider)
    {
        $validated = $this->validateProvider($provider);
        if (!is_null($validated)) {
            return $validated;
        }

        return Socialite::driver($provider)->stateless()->redirect();
    }

    /**
     * Obtain the user information from Provider.
     *
     * @param $provider
     * @return JsonResponse
     */
    public function handleProviderCallback($provider)
    {
        $validated = $this->validateProvider($provider);
        if (!is_null($validated)) {
            return $validated;
        }
        try {
            $user = Socialite::driver($provider)->stateless()->user();
        } catch (ClientException $exception) {
            return response()->json(['error' => 'Invalid credentials provided.'], 422);
        }

        $userCreated = User::firstOrCreate(
            [
                'email' => $user->getEmail()
            ],
            [
                'email_verified_at' => now(),
                'name' => $user->getName(),
                'status' => true,
            ]
        );
        $userCreated->providers()->updateOrCreate(
            [
                'provider' => $provider,
                'provider_id' => $user->getId(),
            ],
            [
                'avatar' => $user->getAvatar()
            ]
        );
        $token = $userCreated->createToken('token-name')->plainTextToken;

        return response()->json($userCreated, 200, ['Access-Token' => $token]);
    }

    /**
     * @param $provider
     * @return JsonResponse
     */
    protected function validateProvider($provider)
    {
        if (!in_array($provider, ['facebook', 'github', 'google'])) {
            return response()->json(['error' => 'Please login using facebook, github or google'], 422);
        }
    }

}
STEP10: Final step, Call the OAuth services URL
In my case I setup everything in my local, open
http://127.0.0.1:8000/api/login/github
After successfully login you will receive
Please feel free to ask me anything on this topic!
This content originally appeared on DEV Community and was authored by Siddhu
Siddhu | Sciencx (2021-10-16T16:01:04+00:00) API Authentication via Social Networks in Laravel 8 using Sanctum with Socialite. Retrieved from https://www.scien.cx/2021/10/16/api-authentication-via-social-networks-in-laravel-8-using-sanctum-with-socialite/
Please log in to upload a file.
There are no updates yet.
Click the Upload button above to add an update.


