This content originally appeared on DEV Community and was authored by Demola Malomo
Image editing is the art of altering digital photographs, traditional photo-chemical photographs, or illustrations to make them look more like what you saw with your eyes. The constant demand for image editing has brought about the invention of new software, jobs, and specialized personnel to help improve the quality of images.
In this post, we will discuss how to build a personalized image editor using Cloudinary, Auth0, and Next.js. We can think of this as a lighter version photoshop or afinity photo. At the end of this tutorial, we would have learnt how to add image editing functionality using Cloudinary Media Editor and secure the web application using Auth0.
By way of introduction, Cloudinary is a platform on which you can quickly and easily upload, store, manage, transform, and deliver images and videos for websites and apps. The platform also offers a vast collection of SDKs for frontend frameworks and libraries.
Auth0 is a platform that offers systems to rapidly integrate authentication and authorization for web, mobile, and legacy applications.
Next.js is a React-based front-end development framework that enables functionalities like server-side rendering, static site generation, file-system routing (with no need to manually configure react-router-dom), and API endpoints for backend features.
Source code
You can find the source code of this project here.
Prerequisites
The next steps in this post require JavaScript and React.js experience. Experience with Next.js isn’t a requirement, but it’s nice to have.
We also need the following:
- A Cloudinary account for file hosting. Signup is completely free.
- An Auth0 account for authentication. Signup is completely free.
Getting Started
We need to create a Next.js starter project by navigating to the desired directory and running the command below in our terminal
npx create-next-app media_editor && cd media_editor
This command creates a Next.js project called media_editor and navigates into the project directory.
We proceed to install the required dependencies with:
npm install react-helmet @auth0/nextjs-auth0
react-helmet is a library that takes plain HTML tags and outputs plain HTML tags. It will help us avoid the Reference error: Window is not Defined error when using client-side only packages in Next.js.
@auth0/nextjs-auth0 is a library for implementing user authentication in Next.js applications.
Image editing with Cloudinary
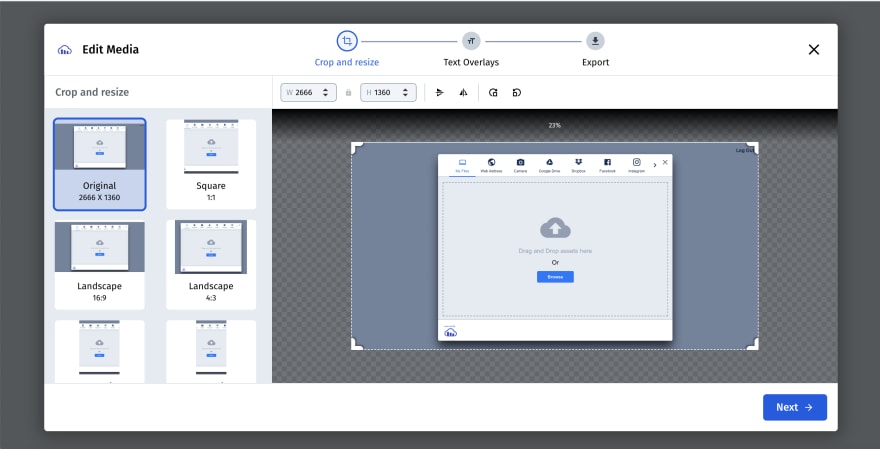
Cloudinary provides an interactive user interface providing a set of everyday image editing actions that we can use on our website or application. The editor helps us scale internal operations by reducing dependency on designers by allowing us to manually review/fix media assets when needed. To add a media editor to our application, we need to follow these steps:
- Upload image to Cloudinary using Cloudinary Upload Widget.
- Pass the returned uploaded image
publicIdto Cloudinary Media Editor. - Specify image editing steps:
-
resizeAndCropto resize and crop images -
textOverlaysadd text overlay on images -
exportto download edited images
-
Integrating Cloudinary
With the project dependencies installed, we can leverage Next.js CSS Module support to style our page by replacing the content in Home.module.css in the styles folder with the gist below:
Home.module.css
With that done, we can update the index.js file in the pages folder by importing the styles created, configure Cloudinary Upload Widget and Cloudinary Media Editor to upload files to Cloudinary and edit uploaded images, respectively. We also include states to handle returned image publicId and editing state.
    import styles from '../styles/Home.module.css';
    import { Helmet } from 'react-helmet';
    import { useState } from 'react';

    export default function Home() {
      const [id, setId] = useState(null);
      const [editing, setEditing] = useState(false);
      const openUpload = () => {
        window.cloudinary
          .createUploadWidget(
            {
              cloudName: 'dtgbzmpca',
              uploadPreset: 'tca2j0ee',
            },
            (error, result) => {
              if (!error && result && result.event === 'success') {
                setId(result.info.public_id);
                setEditing(true);
              }
            }
          )
          .open();
      };
      const openEditor = () => {
        const myEditor = cloudinary.mediaEditor();
        myEditor.update({
          publicIds: [id],
          cloudName: 'dtgbzmpca',
          image: {
            steps: ['resizeAndCrop', 'textOverlays', 'export'],
          },
        });
        myEditor.show();
        myEditor.on('export', function (data) {
          console.log(data);
          setEditing(false);
        });
      };
      return (
        <div>
          <Helmet>
            <script src='https://media-editor.cloudinary.com/all.js' />
            <script src='https://upload-widget.cloudinary.com/global/all.js' />
          </Helmet>
          <main className={styles.files}>
            {/* remaining JSX comes here */}
          </main>
        </div>
      );
    }
The Cloudinary Upload Widget and Cloudinary Media Widget also configures cloudName, uploadPreset, and publicIds , cloudName, image, respectively. Finally, we used react-helmet to add Cloudinary Upload Widget and Cloudinary Media Widget CDNs to the application.
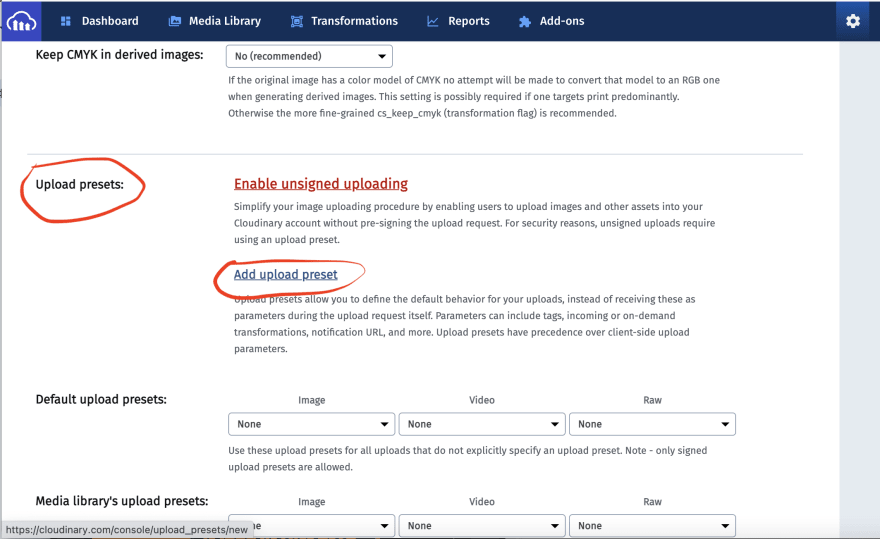
To create a new upload preset, click on the Settings Icon, select the Upload tab, navigate to the Upload presets section, click on the Add Upload preset.
Find out more about Cloudinary Upload Widget here and Cloudinary Media Widget here.
Next, we need to include our markup to upload and edit image.
    //imports here

    export default function Home() {
      //states here

      const openUpload = () => {
        //upload widget code
      };

      const openEditor = () => {
        //media widget code
      };

      return (
        <div>
          <Helmet>
            <script src='https://media-editor.cloudinary.com/all.js' />
            <script src='https://upload-widget.cloudinary.com/global/all.js' />
          </Helmet>
          <main className={styles.files}>
            <header className={styles.header}>
              <a className={styles.logout}>
                Log Out
              </a>
            </header>
            <p className={styles.name}>Hi {user.name}</p>
            <div className={styles.container}>
              <div className={styles.buttonwrapper}>
                {!editing && (
                  <button className={styles.button} onClick={() => openUpload()}>
                    Upload Image
                  </button>
                )}
                {editing && (
                  <>
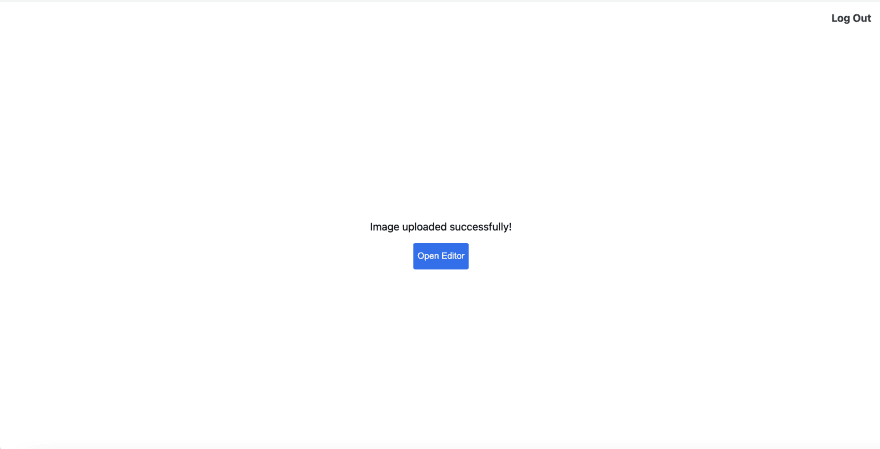
                    <p>Image uploaded successfully!</p>
                    <button className={styles.button} onClick={() => openEditor()}>
                      Open Editor
                    </button>
                  </>
                )}
              </div>
            </div>
          </main>
        </div>
      );
    }
Finally, we can start a development server and test our application:
npm run dev
Adding Authentication with Auth0
Setup a Developer Account
To get started, we need to log into our Auth0 dashboard. Click on Applications
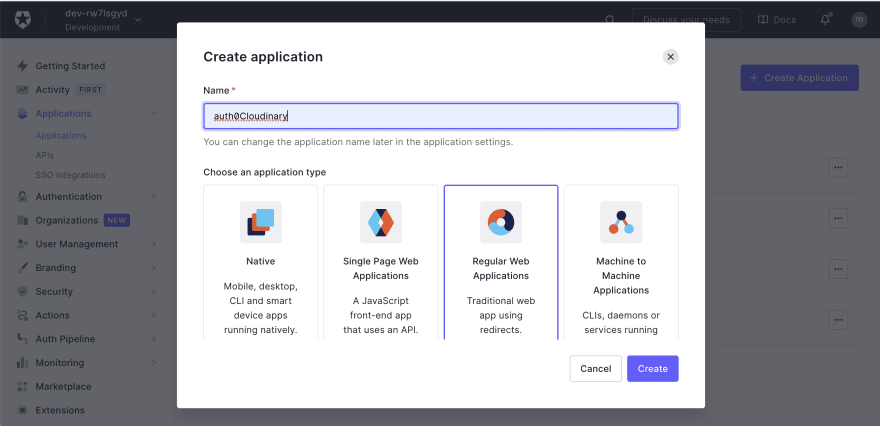
In the application page, click on the Create Application button, input application name auth0Cloudinary in our case, select Regular Web Application as the application type and Create
Click on the Settings tab and copy the Domain, Client ID, and Client Secret.
Then scroll down to the Applications URIs section and fill in the details below for Allowed Callback URLs and Allowed Logout URLs, respectively.
- Allowed Callback URLs
http://localhost:3000/api/auth/callback
- Allowed Logout URLs
-
http://localhost:3000/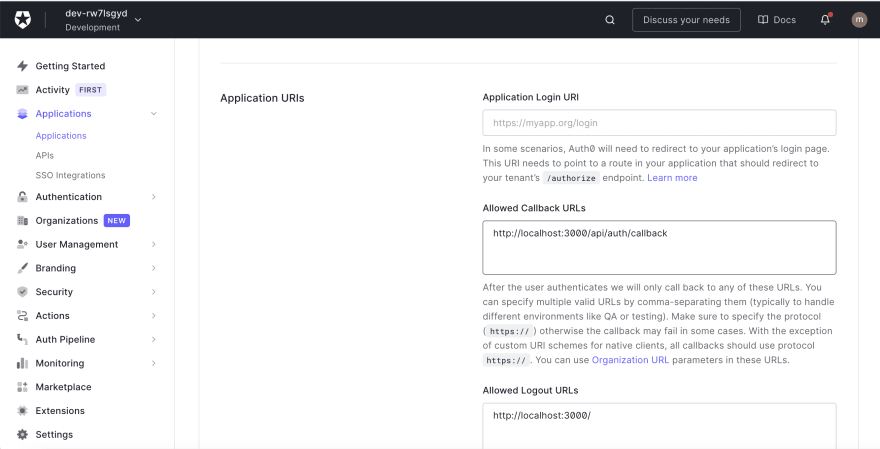
-
Then scroll down to the bottom of the page and click on the Save Changes button*.*
Integrating Auth0 with Next.js
To integrate Auth0 in our application, we need to create an .env.local file in our root directory and fill in the required parameters(Domain, Client ID and Client Secret) as shown below:
AUTH0_SECRET='LONG_RANDOM_VALUE'
AUTH0_BASE_URL='http://localhost:3000'
AUTH0_ISSUER_BASE_URL='https://YOUR_AUTH0_DOMAIN.auth0.com'
AUTH0_CLIENT_ID='YOUR_AUTH0_CLIENT_ID'
AUTH0_CLIENT_SECRET='YOUR_AUTH0_CLIENT_SECRET'
We can run the snippet below on our terminal to generate a random secret for the AUTH0_SECRET
node -e "console.log(crypto.randomBytes(32).toString('hex'))"
Next, we need to create a dynamic route file for our APIs. We need to navigate to the pages folder, inside this folder, navigate to the api folder, in the folder, create an auth folder, and inside this folder, create an […auth0].js file and add the snippet below:
    import { handleAuth } from '@auth0/nextjs-auth0';
    export default handleAuth();
The handleAuth() function will generate APIs for:
- Login
/api/auth/login
- Logout
/api/auth/logout
- Fetch user data
/api/auth/me
- Redirect user on successful login.
/api/auth/callback
Next, we need to update _app.js file inside the pages folder as shown below:
    import { UserProvider } from '@auth0/nextjs-auth0';
    export default function App({ Component, pageProps }) {
      return (
        <UserProvider>
          <Component {...pageProps} />
        </UserProvider>
      );
    }
Finally, we need to update index.js as shown below
    //other imports here
    import { withPageAuthRequired } from '@auth0/nextjs-auth0';

    export default function Home({ user }) { //update this with destructure props
      //state goes here

      //functions goes here

      return (
        <div>
          <Helmet>
            <script src='https://upload-widget.cloudinary.com/global/all.js' />
          </Helmet>
          <main className={styles.files}>
            <header className={styles.header}>
              <a href='/api/auth/logout' className={styles.logout}> {/* add href to this*/}
                Log Out
              </a>
            </header>
            <p className={styles.name}>Hi {user.name}</p> {/*add this*/}
            {/*remaining code snippet goes here*/}
          </main>
        </div>
      );
    }
    export const getServerSideProps = withPageAuthRequired({
      returnTo: '/',
    });
In the snippet above, we imported withPageAuthRequired and also modified the log out link. We used Next.js inbuilt method getServerSideProps to call the withPageAuthRequired method, specified the URL to redirect to after login, accessed the user props it returned and then displayed the user’s name.
Complete index.js
Conclusion
This post discussed how to build and secure an application that supports uploading, editing, and downloading images.
You may find these resources useful:
Content created for the Hackmamba Jamstack Content Hackathon.
This content originally appeared on DEV Community and was authored by Demola Malomo
Demola Malomo | Sciencx (2021-10-17T11:51:45+00:00) Build a personalized Image Editor with Cloudinary + Auth0. Retrieved from https://www.scien.cx/2021/10/17/build-a-personalized-image-editor-with-cloudinary-auth0/
Please log in to upload a file.
There are no updates yet.
Click the Upload button above to add an update.


