This content originally appeared on DEV Community and was authored by Pramit Marattha
REST API using node, express and Harper DB
This is the third part of the node series; if you're unfamiliar with node, don't worry; we covered everything in the first series, which you can find it here => dev.to/aviyel/node-js-from-beginners-to-advance and also we created REST API using MongoDB, node and express in the second part series, which you can find it here => dev.to/aviyel/nodejs-from-beginners-to-advance-rest-api-using-node-express-and-mongodb-c3i
So, without further ado, let's get this party started.
So, what exactly is HarperDB?
Harper DB is a Nodejs-based schema-less single model enterprise-class database that greatly simplifies Big Data architectures. It's proven difficult and expensive to combine structured and unstructured data tasks. Harper DB has created a database that combines SQL and NoSQL into a single model with a simple REST API. Harper DB separates data into distinct indexes, with each feature maintained individually, allowing for full indexing without requiring additional storage capacity. Programmers and developers can use parallel computing to conduct complex multi-table SQL queries or JSON searches on a unified model. Harper DB reassembles these exploded indices into single object arrays, allowing developers to conduct structured queries on unstructured data in real-time without the need for transformation.
Harper DB is written in node, has a multi-core architecture, and can scale to fit the hardware of the user. It avoids row locking and collisions while retaining ACID compliance. It also prevents the use of vast amounts of RAM and disk storage by eliminating the need to duplicate data. Harper DB is also highly portable thanks to the Nodejs framework, which has a small service-oriented architecture and a small runtime footprint . Developers and programmers can focus on their code rather than DevOps by leveraging technologies and interfaces with tools in use such as ANSI SQL and REST. Harper DB is written in node, has a multi-core architecture, and can scale to fit the hardware of the user. It avoids row locking and collisions while retaining ACID compliance. It also prevents the use of vast amounts of RAM and disk storage by eliminating the need to duplicate data. Harper DB is also highly portable thanks to the Nodejs framework, which has a small service-oriented architecture and a small runtime footprint. Developers and programmers can focus on their code rather than DevOps by leveraging technologies and interfaces with tools in use such as ANSI SQL and REST.
HarperDB is built to handle a wide range of use cases, including edge computing, running an application database, data warehousing, and transactional and document stores, making it ideal for running directly on a microcomputing edge device in the cloud or at a data center.
Let's get started and create some CRUD REST API.
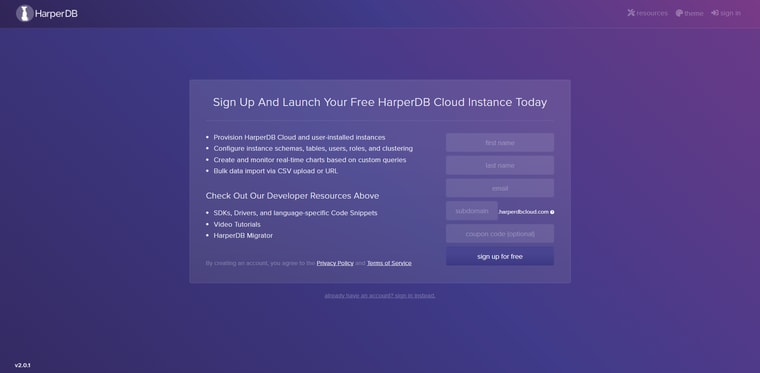
https://studio.harperdb.io/sign-up
Now, create a Free instance of Harper DB by clicking on “Create new HarperDB cloud Instance”
After that, a popup will appear.Click on “Create HarperDB cloud Instance”
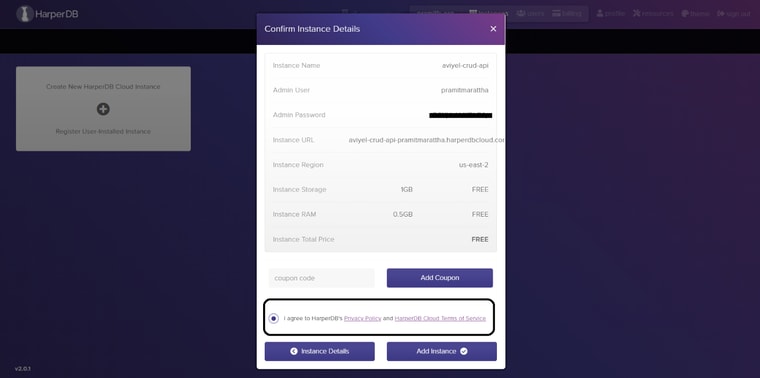
Now, add username, password and Instance name like shown below.
Leave the default-free Instance ram and storage size and choose your preferred Instance Region.
Click on “I agree” and proceed to add an instance.
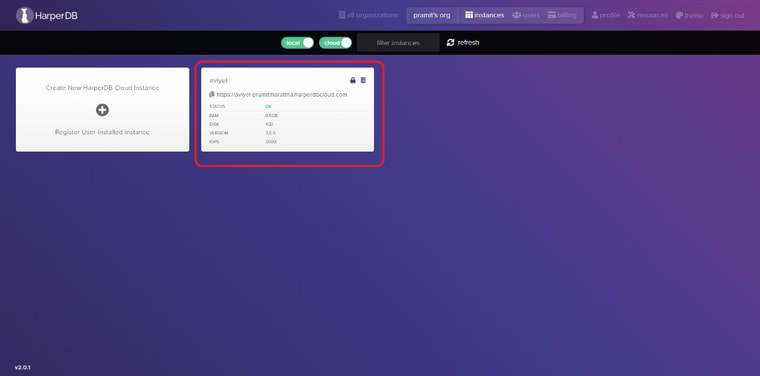
Click on the instance and Please keep in mind that we do not need to enter all of the column values here; they will be added automatically when needed.
Step-by-step instructions for crafting our API.
1 . Create a project folder.
mkdir crud-api
cd crud-api
2 . Initialize Node application inside that project folder.
{
  "name": "rest-harper",
  "version": "1.0.0",
  "description": "",
  "main": "index.js",
  "scripts": {
    "start": "nodemon index.js"
  },
  "keywords": [],
  "author": "",
  "license": "ISC",
  "dependencies": {
    "cors": "^2.8.5",
    "dotenv": "^10.0.0",
    "express": "^4.17.1",
    "harperive": "^2.0.1",
    "nodemon": "^2.0.13"
  }
}
3 . Install four dependencies – express, nodemon, harperive & dotenv
npm install express harperive nodemon dotenv
4 . Create ”controllers”, ”routes” and “util” folders.
const express = require("express");
const app = express();
app.use(express.json());
b . Import express, initialize it & set headers.
const express = require("express");
const app = express();
require("dotenv").config();

app.use(express.json());

const PORT = process.env.PORT || 5000;

app.use((req, res, next) => {
  res.setHeader("Access-Control-Allow-Origin", "*");
  res.setHeader(
    "Access-Control-Allow-Methods",
    "GET, POST, OPTIONS, PUT, PATCH, DELETE"
  );
  res.setHeader(
    "Access-Control-Allow-Headers",
    "X-Requested-With,content-type"
  );
  res.setHeader("Access-Control-Allow-Credentials", true);
  next();
});
c . Setup two routes. One for testing purposes and another one for actual implementation.
app.use("/testing", require("./routes/testing.routes.js"));

app.use("/students", require("./routes/students.routes.js"));

app.listen(process.env.PORT, () => {
  console.log(`App is currently running at http://localhost:${PORT}`);

});
d . Create db.js inside util folder and create a connection for HarperDB.
// create connection for Harper DB
const harperive = require("harperive");
const configuration = {
  username: process.env.HARPER_INSTANCE_USERNAME,
  password: process.env.HARPER_INSTANCE_PASSWORD,
  schema: process.env.HARPER_INSTANCE_SCHEMA,
  harperHost: process.env.HARPER_HOST_INSTANCE_URL,
};
const db = new harperive.Client(configuration);
module.exports = db;
e . Create testing.routes.js file inside routes folder. It is just a test endpoint to test whether the application is working or not.
const controller = require("../controllers/testing.controllers.js");
const router = require("express").Router();
router.get("/appinfo", controller.getAppInfo);
module.exports = router;
f . Create a students.routes.js file inside the routes folder and add references to your API endpoint.
const router = require("express").Router();
const controller = require("../controllers/" + "students" + ".controllers");
router
  .get("/", controller.getAllStudent)
  .get("/:id", controller.getOneStudent)
  .post("/", controller.createOneStudent)
  .put("/:id", controller.updateOneStudent)
  .delete("/:id", controller.deleteOneStudent);
module.exports = router;
g . Create testing.controllers.js file inside controllers folder. This will be used for testing purposes only, to test whether the app / DB instances are running or not.
exports.getAppInfo = (req, res, next) => {
  return res.status(200).json({ "Aviyel CRUD API Testing": "v1.0.0" });
};
h . Create a students.controllers.js file inside the controller’s folder and add the following code.
- Import and add client, schema and table name.
const client = require("../util/db");
const DB_SCHEMA = process.env.HARPER_INSTANCE_SCHEMA;
const TABLE = "students";
- getAllStudent method fetches all the student info.
/Get all the student
exports.getAllStudent = async (req, res, next) => {
  try {
    const qry = `SELECT * FROM ${DB_SCHEMA}.${TABLE}`;
    const students = await client.query(qry);
    res.json(students);
  } catch (error) {
    console.error("ERROR while fetching all student " + "Student:", error);
    return res.status(500).json(error)}};
- getOneStudent method fetches only one student info by their id.
//Get only one student
exports.getOneStudent = async (req, res, next) => {
  try {
    const qry = `SELECT * FROM ${DB_SCHEMA}.${TABLE} WHERE id="${req.params.id}"`;
    const student = await client.query(qry);
    res.json(student);
  } catch (error) {
    console.error("ERROR while fetching student " + "Student:", error);
    return res.status(500).json(error);
  }
};
- createOneStudent method add/insert only one student.
//create new student
exports.createOneStudent = async (req, res, next) => {
  try {
    const user = await client.insert({
      table: TABLE,
      records: [
        {
          username: req.body.username,
          password: req.body.password,
          rollNumber: req.body.rollNumber,
        },
      ],
    });
    res.json(user);
  } catch (error) {
    res.json(error);
  }};
Full article available here => https://aviyel.com/post/1151
Follow @aviyelHQ or sign-up on Aviyel for early access if you are a project maintainer, contributor, or just an Open Source enthusiast.
Join Aviyel's Discord => Aviyel's world
Twitter =>[https://twitter.com/AviyelHq]
This content originally appeared on DEV Community and was authored by Pramit Marattha
Pramit Marattha | Sciencx (2021-10-18T05:23:13+00:00) Node.js from Beginners to Advance: Part – 3. Retrieved from https://www.scien.cx/2021/10/18/node-js-from-beginners-to-advance-part-3/
Please log in to upload a file.
There are no updates yet.
Click the Upload button above to add an update.


