This content originally appeared on DEV Community and was authored by Hollow Man
CSDN link: https://blog.csdn.net/qq_18572023/article/details/118487988
Blog link: https://hollowmansblog.wordpress.com/2021/08/21/customize-ibus-user-guide/
GNOME Desktop
First, make sure you have installed the GNOME Shell Extension: Customize IBus https://extensions.gnome.org/extension/4112/customize-ibus/
Installation
You can refer to here: https://itsfoss.com/gnome-shell-extensions/ to install the GNOME Shell Extension from a web browser.
or
git clone https://github.com/openSUSE/Customize-IBus.git
cd Customize-IBus && make install
.
If you want to install Customize IBus as a system extension for all users:
- For Arch based:
yay -S gnome-shell-extension-customize-ibus
- For Fedora:
wget https://github.com/openSUSE/Customize-IBus/raw/package-repo/customize-ibus-rpm.repo
sudo mv customize-ibus-rpm.repo /etc/yum.repos.d/
sudo dnf update
sudo dnf install gnome-shell-extension-customize-ibus
- For OpenSUSE:
wget https://github.com/openSUSE/Customize-IBus/raw/package-repo/customize-ibus-rpm.repo
sudo mv customize-ibus-rpm.repo /etc/zypp/repos.d/
sudo zypper refresh
sudo zypper install gnome-shell-extension-customize-ibus
Or install directly through the ymp file.
- For Debian based (Ubuntu):
echo "deb http://opensuse.github.io/Customize-IBus/deb/ /" | sudo tee -a /etc/apt/sources.list.d/customize-ibus-deb.list > /dev/null
wget -q -O - http://opensuse.github.io/Customize-IBus/hollowman.pgp | sudo apt-key add -
sudo apt update
sudo apt install gnome-shell-extension-customize-ibus
You can also download the software packages through OpenSUSE OBS for all distributions of Linux.
After installation, you will find that there is an additional entry Customize IBus in the IBus input source indicator menu. Click it, and you will open the Customize IBus preferences. If there is no such menu entry, you can press Alt+F2 to restart the GNOME shell, or log out and log in again. If that still doesn't work, please make sure you have installed the latest version of the extension and have enabled the extension.
You can also click the configuration icon of the Customize IBus extension in https://extensions.gnome.org/local/ to open the preferences.
General
At item Candidates orientation, select the check box on the left to enable the configuration of the IBus candidate box direction. Click on the right side to select, it can be set to vertical or horizontal.
At item Candidates popup animation, select the check box on the left to enable the configuration of the IBus animation. Click on the right side to select, support setting to no animation, slide, fade, and both.
Example to turn on the sliding animation:

At item Candidate box right click, select the check box on the left to enable the configuration of right-click the candidate box to perform related operations when using the IBus. Click on the right to make a selection, and you can set to open the tray menu or switch the input source.
At item Candidates scroll, select the check box on the left to enable the configuration of actions performed when scrolling using the IBus. Click on the right to select, and you can set to switch the current candidate word or page.
At item Fix candidate box, select the check box on the left to enable a fixed candidate box. Click on the right to select. You can set the candidate box position with 9 options. Recommend to enable Drag to reposition candidate box at the same time so that you can rearrange the position at any time. Will remember candidate position forever after reposition if you set to Remember last position, and restore at next login.
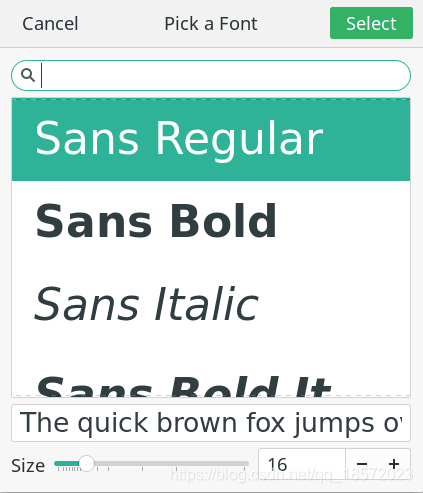
At item Use custom font, select the check box on the left to enable configuration of the font and size of the text in the IBus candidate box. Click on the right to open the font selector. In the pop-up dialog box, you can select the font you want in the upper part and the font size in the lower part. Click Select to confirm the modification.

At item Auto switch ASCII mode, select the check box on the left to enable configuration of switching ASCII mode when switching windows, Click on the far right to select. It supports setting to make ASCII mode on and off, or just keep to remain current mode. You can also set to remember input state or not on the near right. If you have set to Remember Input State, every opened APP's input mode will be remembered if you have switched the input source manually in the APP's window, and the newly-opened APP will follow the configuration. APP's Input State will be remembered forever.
At item Candidate box opacity, select the check box on the left to enable configuration of the opacity in the IBus candidate box. Slide the right button to configure opacity ranging from 0 to 255 step 1.
At item Fix IME list order, click the switch on the right to turn this feature on or off.
If you use multiple input methods in your system, when you use the keyboard shortcut to switch input methods (usually Win + Space), the input method displayed by default on the screen will be sorted by the most recently used input method. Turn on this feature to modify the order of input methods as fixed.
At item Enable drag to reposition candidate box, click the switch on the right to turn this feature on or off.
Example of turning on drag to reposition candidate box:

At item Candidate box page buttons, click the switch on the right to show or hide the candidate page buttons.
Tray
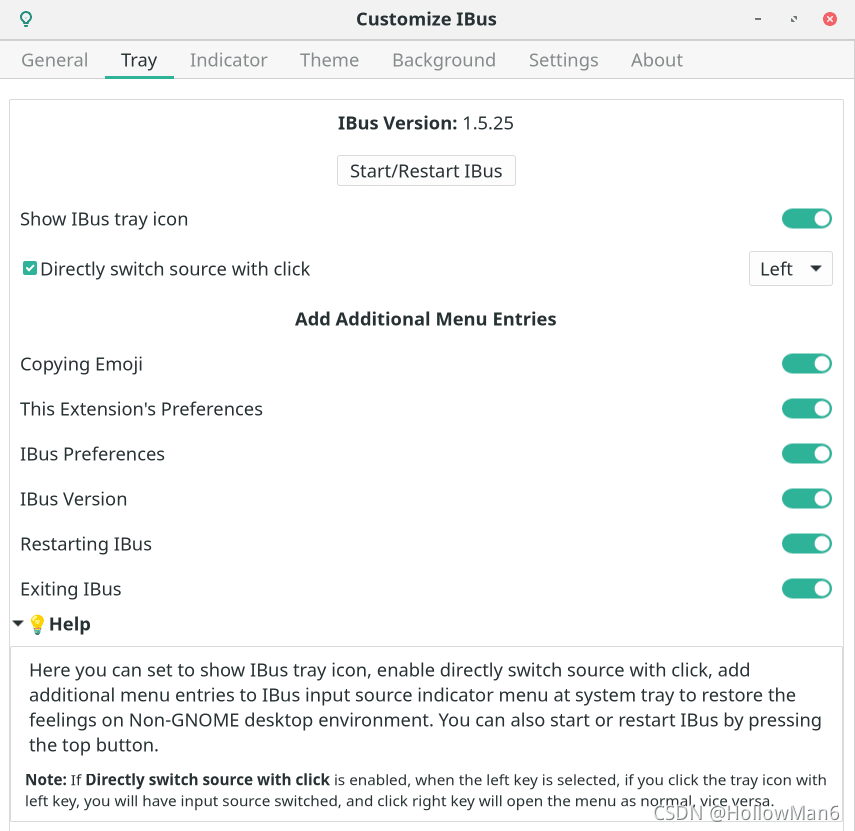
Here you can set to show IBus tray icon, enable directly switch source with click, add additional menu entries to IBus input source indicator menu at system tray to restore the feelings on Non-GNOME desktop environment.
You can also start or restart IBus by pressing the top button:

Indicator
Here you can set to Use input source indicator, default is to show indicator every time you type, move caret or switch input source. You can set to Indicate only when switching input source by clicking the switch on the right. You can also set to Indicate only when using ASCII mode, Right click to close indicator, Scroll to switch input source, Indicator popup animation supporting None, Slide, Fade, All. Also support to Use custom font, Enable indicator left click to switch input source or drag to move indicator, set Indicator opacity supporting range of 0 to 255, and the setting step is 1, Enable indicator auto-hide timeout (unit: seconds) and auto-hide timeout (in "
"seconds) supporting to set the hidden delay in the range of 1 second to 5 seconds, and the setting step is 1.
Theme
Same as the general part, select the check box on the left to enable the configuration, and click on the right to select the IBus theme style sheet.
If you have selected a style sheet, click the icon on the far right to directly open it to view the style sheet. You can also click the clear icon to make it follow system theme.
Supports importing style sheets generated by the IBus Theme Tools or provided by the IBus Theme Hub.
When light theme and dark theme are turned on at the same time, the IBus theme will automatically follow GNOME Night Light mode, use light theme when off, and use dark theme when on. When only the light theme or dark theme is turned on, the IBus theme will always use the theme that is turned on.
If not for debugging, please DO NOT add any classes that's not started with .candidate-* into IBus stylesheet to prevent from corrupting system themes.
If your IBus style sheet has changed after application, please close and reopen the corresponding Starting from v69, now this extension support stylesheets hot reload, CSS changes will reflect in real-time.custom IME theme to make it effective.
You can download more GNOME Shell themes from this website: https://www.pling.com/s/Gnome/browse/cat/134/order/latest/, then put it under the $HOME/.themes/ directory to complete the installation.
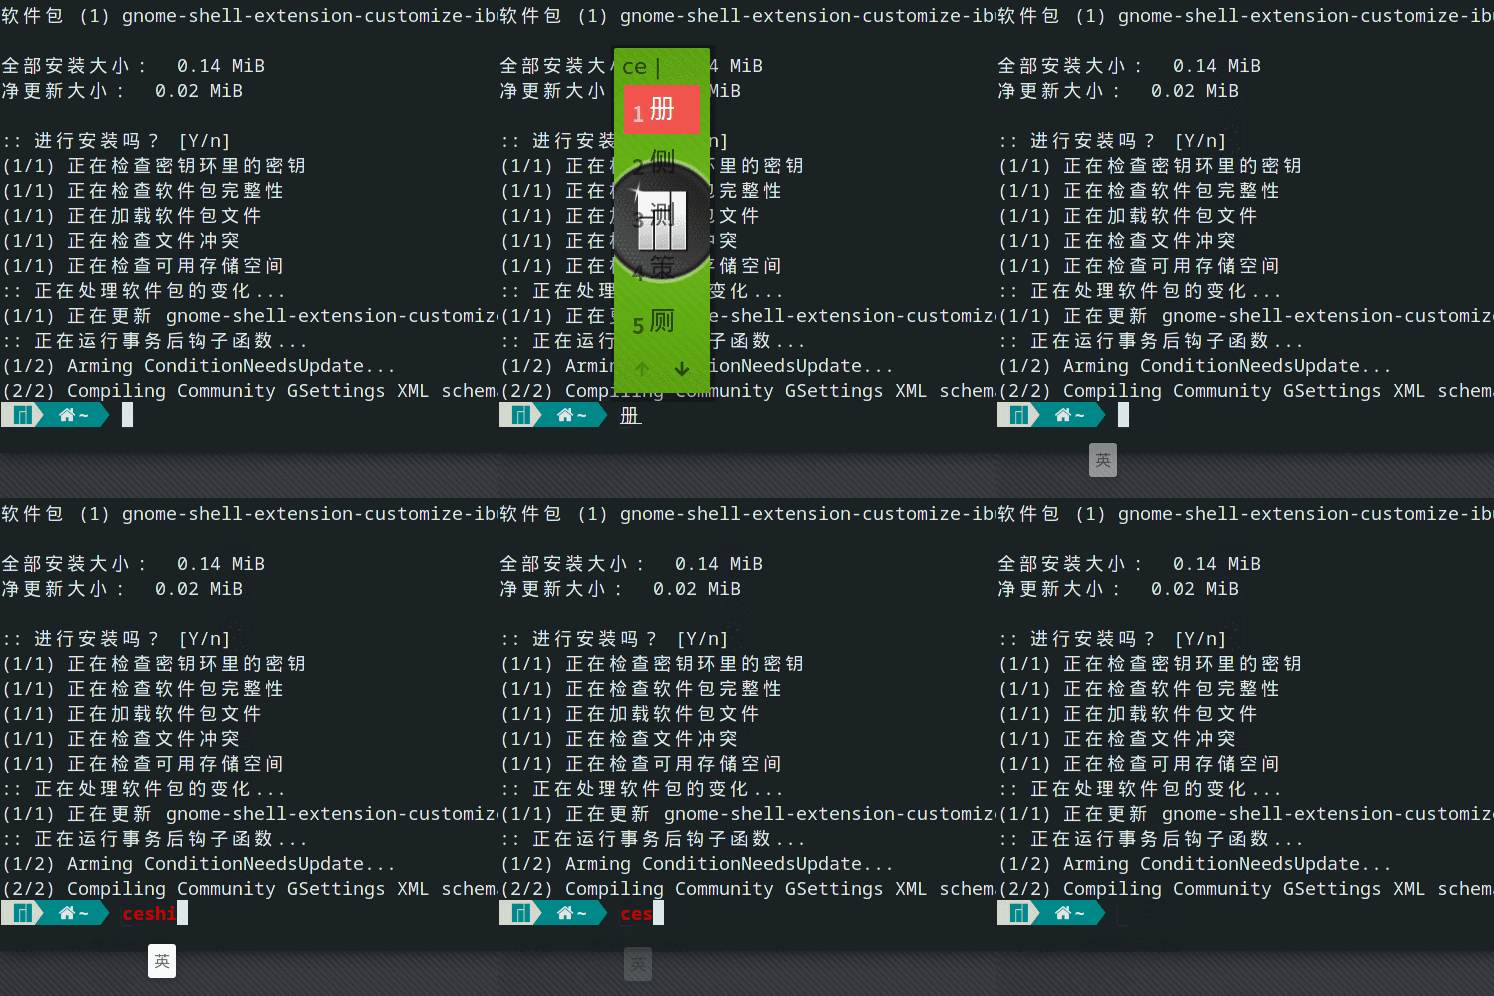
The IBus theme tool style sheet generation uses the GNOME Shell theme that has been installed on the computer to extract the IBus style. The extraction steps are as follows:
Refer to the following part:
Non-GNOME Desktop->Customize IBus Themesteps 1-2 to run the program.Enter the number of the IBus-related GNOME Shell theme style you want to export, and press
Enter.

Enter the location of the GNOME Shell theme style sheet exported related to IBus that you want to store, and press
Enter. Empty selection will be the default, that is in the current directoryexportedIBusTheme.cssfile. If there is no error message, it will be successfully exported to the specified location.

Example export file:
/*
 Generated by IBus Theme Tools
 Tool Author: Hollow Man <hollowman@hollowman.ml>
 Tool Source Code: https://github.com/openSUSE/IBus-Theme-Tools
 Tool Licence: GPLv3
 CSS Source File: /usr/share/gnome-shell/theme/gnome-classic-high-contrast.css

 Recommend to use Customize IBus GNOME Shell Extension:
 https://extensions.gnome.org/extension/4112/customize-ibus/
 to change IBus theme by selecting this file.

 If you make any changes to this content after applying this file in above extension,
 for Customize IBus Extension before v68, please disable and then enable 'custom IME theme'
 again to make the changes take effect.

 Starting from v69, support stylesheets hot reload, CSS changes reflecting in real-time.
*/

/*
 Imported from CSS Source File: /usr/share/gnome-shell/theme/gnome-classic.css
*/

.candidate-page-button:focus {
  color: #2e3436;
  text-shadow: 0 1px rgba(255, 255, 255, 0.3);
  icon-shadow: 0 1px rgba(255, 255, 255, 0.3);
  box-shadow: inset 0 0 0 2px rgba(53, 132, 228, 0.6);
}

.candidate-page-button:hover {
  color: #2e3436;
  background-color: white;
  border-color: #d6d1cd;
  box-shadow: 0 1px 1px 0 rgba(0, 0, 0, 0.1);
  text-shadow: 0 1px rgba(255, 255, 255, 0.3);
  icon-shadow: 0 1px rgba(255, 255, 255, 0.3);
}

.candidate-page-button:insensitive {
  color: #929595;
  border-color: #e1ddda;
  background-color: #faf9f8;
  box-shadow: none;
  text-shadow: none;
  icon-shadow: none;
}

.candidate-page-button:active {
  color: #2e3436;
  background-color: #efedec;
  border-color: #cdc7c2;
  text-shadow: none;
  icon-shadow: none;
  box-shadow: none;
}

.candidate-index {
  padding: 0 0.5em 0 0;
  color: #17191a;
}

.candidate-box:selected,
.candidate-box:hover {
  background-color: #3584e4;
  color: #fff;
}

.candidate-page-button-box {
  height: 2em;
}

.vertical .candidate-page-button-box {
  padding-top: 0.5em;
}

.horizontal .candidate-page-button-box {
  padding-left: 0.5em;
}

.candidate-page-button-previous {
  border-radius: 5px 0px 0px 5px;
  border-right-width: 0;
}

.candidate-page-button-next {
  border-radius: 0px 5px 5px 0px;
}

.candidate-page-button-icon {
  icon-size: 1em;
}

.candidate-box {
  padding: 0.3em 0.5em 0.3em 0.5em;
  border-radius: 5px; /* Fix candidate color */
  color: #2e3436;
}

.candidate-popup-content {
  padding: 0.5em;
  spacing: 0.3em; /* Fix system IBus theme background inherited in replaced theme */
  background: transparent;
  /* Fix system IBus theme candidate window border inherited in replaced theme */
  border: transparent;
  /* Fix system IBus theme candidate box shadow inherited in replaced theme */
  box-shadow: none;
  /* Fix candidate color */
  color: #2e3436;
}

.candidate-popup-boxpointer {
  -arrow-border-radius: 9px;
  -arrow-background-color: #f6f5f4;
  -arrow-border-width: 1px;
  -arrow-border-color: #cdc7c2;
  -arrow-base: 24px;
  -arrow-rise: 12px;
  -arrow-box-shadow: 0 1px 3px rgba(0, 0, 0, 0.5); /* Fix black border at pointer when system theme is black */
  border-image: none;
}

/* Unify system page button and IBus style page button */
.candidate-page-button {
  border-style: solid;
  border-width: 1px;
  min-height: 22px;
  padding: 3px 24px;
  color: #2e3436;
  background-color: #fdfdfc;
  border-color: #cdc7c2;
  box-shadow: 0 1px 1px 0 rgba(0, 0, 0, 0.1);
  text-shadow: 0 1px rgba(255, 255, 255, 0.3);
  icon-shadow: 0 1px rgba(255, 255, 255, 0.3); /* IBus style page button */
  padding: 4px;
}

/* EOF */
You can also go directly to the IBus Theme Hub and download specialized made IBus theme style sheet file. Here are the IBus theme style sheet files with Microsoft IME style: https://github.com/openSUSE/IBus-Theme-Hub/tree/main/%E4%BB%BF%E5%BE%AE%E8%BD%AFMicrosoft
Background
Support customizing your IBus Input window background with a picture. It has a higher priority than the theme-defined background.
If you have selected a picture, click the icon on the far right to directly open and view the picture. You can also click the clear icon to make it follow theme background.
When light background and dark background are turned on at the same time, the IBus background will automatically follow GNOME Night Light mode, use light background when off, and use dark background when on. When only the light background or dark background is turned on, the IBus background will always use the background that is turned on.
Please make sure your background picture can always be visited. If your pictures are stored in the removable device and the system doesn't mount it by default, please disable and then enable the corresponding Use custom background again to make it effective after manually mounting.
Same as the general part, select the check box on the left to enable the configuration, and click on the right to select the background image of the IBus input candidate box.
You can also set the background picture display mode, you can set whether the background picture is displayed repeatedly, or the display mode Centered, Full or Zoom.
Examples of various picture display modes (using 128x128 compressed pictures: https://github.com/openSUSE/Customize-IBus/blob/main/customize-ibus%40hollowman.ml/img/logo.png ):
Settings
Here you can reset the settings of this extension to default. You can also export current settings to an ini file for backup, and then import it when you need restore. For your information, you may also open the official IBus customization settings for customizations you can't find in this extension.
Click Restore Default Settings, after confirming, you can re-initialize the extension.
Click Export Current Settings, you can choose to export the current settings as a *.inifile. The default file name is Customize_IBus_Settings_[Current Time].ini:

Example settings export file content:
[/]
candidate-box-position={'x': uint32 0, 'y': 0}
candidate-opacity=uint32 210
candidate-orientation=uint32 0
candidate-scroll-mode=uint32 0
custom-bg='/home/hollowman/图片/light.jpg'
custom-bg-dark='/home/hollowman/图片/dark.jpg'
custom-bg-mode=uint32 2
custom-bg-repeat-mode=uint32 1
custom-font='Sans 16'
custom-theme='/home/hollowman/stylesheet.css'
custom-theme-dark='/home/hollowman/stylesheet-dark.css'
enable-custom-theme=true
enable-custom-theme-dark=true
enable-orientation=true
fix-ime-list=true
ibus-restart-time='1625063857427'
indicator-custom-font='Sans Bold 16'
indicator-left-click-func=uint32 0
indicator-opacity=uint32 210
input-indicator-hide-time=uint32 2
input-indicator-right-close=true
input-indicator-use-scroll=true
input-mode-list={'undefined': true, '': false, 'gjs': false, 'org.gnome.nautilus': false, 'google-chrome-beta': false, 'gedit': false, 'gnome-terminal': true, 'code': false, 'org.gnome.shell.extensions': true}
input-mode-remember=uint32 0
menu-ibus-emoji=true
menu-ibus-exit=true
menu-ibus-preference=true
menu-ibus-restart=true
menu-ibus-version=true
use-candidate-box-right-click=true
use-candidate-buttons=false
use-candidate-opacity=true
use-candidate-reposition=true
use-candidate-scroll=true
use-candidate-still=false
use-custom-bg=true
use-custom-bg-dark=true
use-custom-font=true
use-indicator-auto-hide=true
use-indicator-custom-font=true
use-indicator-left-click=true
use-indicator-opacity=true
use-indicator-reposition=true
use-input-indicator=true
use-popup-animation=true
use-tray=true
use-tray-click-source-switch=true
Click Import Settings from File, you can choose to import the settings file you just saved:

About
At any time, you can click on the icon in the upper left corner to open this guide:

Non-GNOME desktop
Customize IBus theme
In non-GNOME Shell desktop environment, the display effect of IBus is determined by the current GTK theme.
You can download more GTK3/4 themes from this website: https://www.gnome-look.org/browse/cat/135/, then put them in the $HOME/.themes/ directory to complete the installation.
The following steps can change the GTK theme of IBus:
- First, Install ibus-theme-tools:
Recommend to use pip to install:
pip install ibus-theme-tools
You can also install manually:
git clone https://github.com/openSUSE/IBus-Theme-Tools.git
cd IBus-Theme-Tools && python3 setup.py install
If you use Arch Linux, you can also use AUR to install as a system extension:
yay -S ibus-theme-tools
Then run
ibus-theme-toolsin the terminal.Enter
1, choose to extract an IBus-related GTK theme, and pressEnter.

Enter the IBus GTK theme you want to extract, and then press
Enter. (Note that the theme name ends with:darkis the dark mode of the theme)

Select whether to add a customized background image for IBus panel, if you need press
2and then pressEnter.

Then choose repeat and sizing modes, and set background border radius (unit:
px).

If there is no error message, the setting action should be successful. Then you can choose the GTK theme that just generated in the system theme settings to apply the previous choices.

Customize IBus font size
Recommend to directly change the font and font size settings in the IBus preferences (ibus-setup).
Or:
$HOME/.config/gtk-3.0/settings.ini defines the current GTK3 theme and font size.
Example of the content of the file is as follows:
[Settings]
gtk-theme-name=Materia-light
gtk-font-name=更纱黑体 SC 12
In the above content, gtk-theme-name specifies that the current GTK theme is material-light, gtk-font-name specifies that the current font is 更纱黑体 SC and the font size is `12 '.
The IBus font and font size can be changed by modifying the above documents.
Customize IBus colors (Create a GTK theme)
Create a GTK3 theme called ibus-custom-theme by running:
bash

mkdir -p $HOME/.themes/ibus-custom-theme/gtk-3.0

$EDITOR $HOME/.themes/ibus-custom-theme/gtk-3.0/gtk.css
then edit the file content. An example can be:
`css
- {
color: #0b141a; /* Font Color /
background-color: #ffffff; / Background Color /
-gtk-secondary-caret-color: #d4d4d4; / Highlight Background Color */
}
`
After that, referring to the actions of the Customize IBus theme part, please select the theme ibus-custom-theme which you just created.
This content originally appeared on DEV Community and was authored by Hollow Man
Hollow Man | Sciencx (2021-10-20T08:21:13+00:00) Customize IBus User Guide. Retrieved from https://www.scien.cx/2021/10/20/customize-ibus-user-guide/
Please log in to upload a file.
There are no updates yet.
Click the Upload button above to add an update.


