This content originally appeared on DEV Community and was authored by Mahendran
Testing in Android has been a pain from the beginning and there is no standard architecture setup to execute the frictionless test. As you know there is no silver bullet for all the snags. This piece of article covers how do you fake dependencies to your hilt-viewmodel and assert the same from fragment using espresso.
What do we achieve here?
- Decoupled UI from navigation and real data source
- Feed fake data to our viewmodel
- A less flaky test since we control the data
-or- Explained in a single picture
Thanks: Mr. Bean - Art disaster
...
Contents
- Testing strategy
- Dependency overview
- Test runner setup
- Shared test fakes
- Writing integration test
- Instrumentation or UI tests
- Wrapup
- Resources
...
Testing strategy
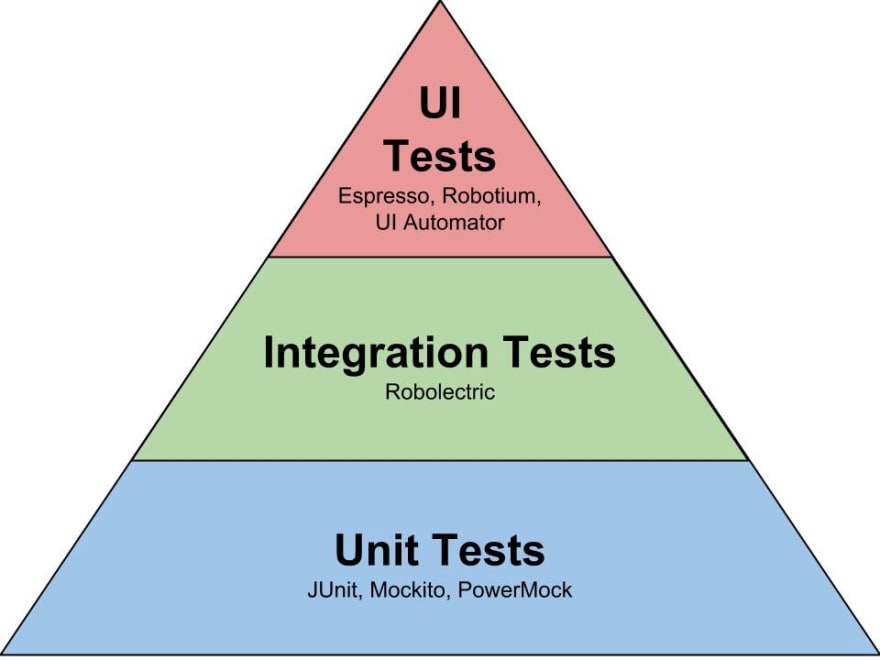
100% code coverage is a myth and the more you squeeze towards it, you end up with flaky tests. Provided the content is dynamic and involves latency due to API calls, it is simply hard to achieve. So, to what degree we should write tests?
credits: medium
- Unit tests: Small & fast. Even with a large number of tests, there won't be much impact on execution time.
- Integration tests: Covers how a system integrates with others. ex. How viewmodel works with the data source. Cover the touchpoints. Runs on JVM – reliable.
- UI tests: Tests that cover UI interactions. In android, this means launching an emulator and running tests in it. Slow! dead slow!! So, write tests to assert fixed UI states. Wrapup at the end of the article should give a rough idea of execution time.
Here we cover how to write the integration and UI tests using hilt. Before the actual implementation, take a minute to read on test doubles (literally a very short article!). We'll be using Fakes in our tests. Keep in mind while coding:
- Hilt resolves a dependency by its type. So, our code should refer to the *Fake*able dependency as interface.
- Provide your dependency in module. So that the whole module can be faked along with dependencies. More on this is covered in faking modules section
...
Dependency overview
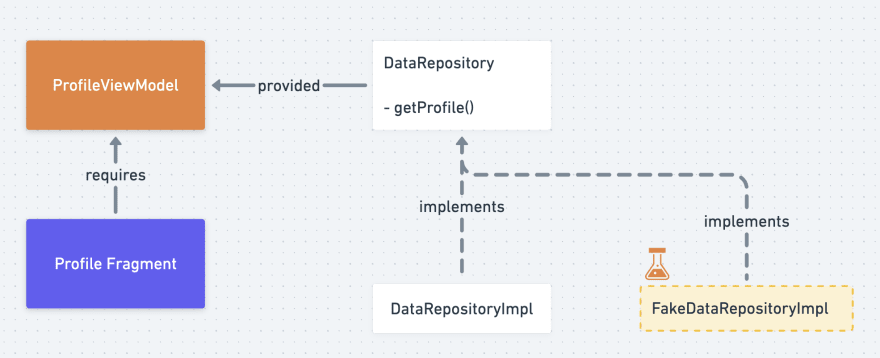
To recap from previous article, we have a fragment that requires a Profile (POJO) object which is provided through a ViewModel. DataRepository acts as a source of truth here and returns a profile. ProfileViewModel is unaware of the implementation of DataRepository and Hilt resolves it at compile time.
Adding to the existing implementation, we'll bring in our Fake data source FakeDataRepoImpl for tests. So, the rest of the post is about instructing Hilt to use FakeDataRepoImpl instead of DataRepositoryImpl.
Test runner setup
Add test dependencies to app level gradle file. This brings a HiltTestApplication and annotation processor to the project now. As we've seen in the scope section, HiltTestApplication will hold singleton component.
// File: app/build.gradle

dependencies {
    // Hilt - testing
    androidTestImplementation 'com.google.dagger:hilt-android-testing:2.38.1'
    kaptAndroidTest 'com.google.dagger:hilt-android-compiler:2.38.1'
}
Although HiltTestApplication is present in our app, it is not used in tests yet. This hookup is done by defining a CustomTestRunner. It points to the test application when instantiating the application class for instrument tests.
// File: app/src/androidTest/java/com/ex2/hiltespresso/CustomTestRunner.kt

import androidx.test.runner.AndroidJUnitRunner
import dagger.hilt.android.testing.HiltTestApplication

class CustomTestRunner : AndroidJUnitRunner() {

    override fun newApplication(
        cl: ClassLoader?,
        className: String?,
        context: Context?
    ): Application {
        return super.newApplication(cl, HiltTestApplication::class.java.name, context)
    }
}
And the final step is to declare the test runner in app/gradle file.
// File: app/build.gradle

android {

    defaultConfig {
    //  testInstrumentationRunner "androidx.test.runner.AndroidJUnitRunner"
        testInstrumentationRunner "com.ex2.hiltespresso.CustomTestRunner"
    }
Shared test fakes
In android, there are Unit and Instrumentation tests. Although both identify as tests, they cannot share resources between them. Here, few places where tests will lookup for classes.
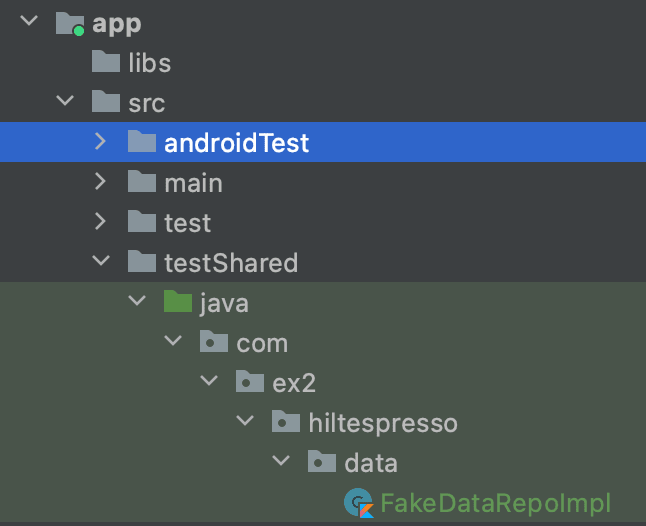
mainsource set - here we place the production code. Fakes have no place heretestSharedsource set - This is the recommended way to share resources. Create the below directory structure and place theFakeDataRepoImplthere.
// File: app/src/testShared/java/com/ex2/hiltespresso/data/FakeDataRepoImpl.kt

class FakeDataRepoImpl @Inject constructor() : DataRepository {

    override fun getProfile() = Profile(name = "Fake Name", age = 47)
}
The next step is to add this to test and androidTest source sets. In app level gradle file, include testShared source set to test sources.
// File: app/build.gradle

android {
        sourceSets {
        test {
            java.srcDirs += "$projectDir/src/testShared"
        }
        androidTest {
            java.srcDirs += "$projectDir/src/testShared"
        }
    }
}
Writing integration test
In the integration test, we'll verify data source and viewmodel coupling is proper. As seen in the testing strategy section, tests run faster if the emulator is not involved. Here, ViewModel can be tested without UI. All it needs is the DataRepository. In the last section, we placed the FakeDataRepoImpl in the shared source set. Let's manually inject it and assert the data.
// File: app/src/test/java/com/ex2/hiltespresso/ui/profile/ProfileViewModelTest.kt

@RunWith(JUnit4::class)
class ProfileViewModelTest {

    lateinit var SUT: ProfileViewModel

    @Before
    fun init() {
        SUT = ProfileViewModel(FakeDataRepoImpl())
    }

    @Test
    fun `Profile fetched from repository`() {
        assertThat("Name consumed from data source", SUT.getProfile().name, `is`("Fake Name"))
    }
}
💡 Why ProfileViewModel is instantiated manually instead of using Hilt?
This is the piece of HiltViewModelFactory which instantiates ProfileViewModel. The SavedStateRegistryOwner, defaultArgs are coming from Activity/Fragment that is marked with @AndroidEntryPoint. So, instantiating the viewmodel with hilt also brings in the complexity of launching the activity and testing the viewmodel from there. This will result in a slower test whereas viewmodel test can run on JVM like we did above.
public HiltViewModelFactory(
      @NonNull SavedStateRegistryOwner owner,
      @Nullable Bundle defaultArgs,
      @NonNull Set<String> hiltViewModelKeys,
      @NonNull ViewModelProvider.Factory delegateFactory,
      @NonNull ViewModelComponentBuilder viewModelComponentBuilder)
Instrumentation or UI tests
Instrumentation/UI tests run on emulator. For this project we'll assert whether the name in UI matches the one in (fake) data source.
In a real-world application, the data source is dynamic and mostly involves a web service. This means UI tests tend to get flaky. So, the ideal approach is to bring down the UI to have finite-states and map it to the ViewModel and fake it.
Example UI states :
- UI when the network response has failed
- UI when there are N items in the list vs the empty state.
Kotlin sealed classes are a good fit to design an FSM. The aforementioned use-cases are not covered here!! (and won't fall into a straight line to write an article). So, here is the blueprint on how do we inject our fake for ViewModel.
…
Faking modules
For instrument tests (androidTest), hilt is responsible for instantiating the ViewModel. So, we need someone who speaks Hilt's language. Create a fake module that will provide our FakeDataRepoImpl to the viewmodel.
// File: app/src/androidTest/java/com/ex2/hiltespresso/di/FakeProfileModule.kt

import dagger.hilt.android.components.ViewModelComponent
import dagger.hilt.testing.TestInstallIn

// Hey Hilt!! Forget about the ProfileModule - use me instead
@TestInstallIn(
    components = [ViewModelComponent::class],
    replaces = [ProfileModule::class]
)
@Module
class FakeProfileModule {

    @Provides
    fun getProfileSource(): DataRepository = FakeDataRepoImpl()

}
Notice the TestInstallIn annotation. Defining the replaces array will make the original ProfileModule replaced with FakeProfileModule. While building the component, hilt will replace the original module (and thus dependencies) and instantiate the ViewModel with the fake repo. Our UI will use the viewmodel and tests will assert the same.
…
The HiltAndroidTest
The final piece is to write a test that uses the faked component. All it needs is a couple of test rules and annotation from Hilt. Rest is generated!!
// File: app/src/androidTest/java/com/ex2/hiltespresso/MainActivityHiltTest.kt

@RunWith(AndroidJUnit4::class)
@HiltAndroidTest
class MainActivityHiltTest {

    @get:Rule(order = 0)
    var hiltRule = HiltAndroidRule(this)

    @get:Rule(order = 1)
    var activityRule: ActivityScenarioRule<MainActivity> =
        ActivityScenarioRule(MainActivity::class.java)

    @Test
    fun test_name_matches_data_source() {
        // Inject the dependencies to the test (if there is any @Inject field in the test)
        hiltRule.inject()
        Espresso.onView(ViewMatchers.withId(R.id.name_label))
            .check(
                ViewAssertions.matches(
                    Matchers.allOf(
                        ViewMatchers.isDisplayed(),
                        ViewMatchers.withText("Fake Name")
                    )
                )
            ))
    }
}
The rules are executed first before running the test. It ensures the activity has dependencies resolved before test execution.
-
HiltAndroidRule(order = 0) : First create components (singleton, activity, fragment, viewmodel) and obey thereplacecontract mentioned in previous step. -
ActivityScenarioRule(order = 1): Launch the activity mentioned before each test
The espresso & hamcrest matchers are descriptive. In the view tree, it lookup for a view and assert whether it's visible and carries the text defined in fake data repo.
Wrapup
This article gave a blueprint for organizing the code in order to achieve component links in isolation. Apart from the hilt-related setup, this practice could benefit even the code that was built with manual injection. Just follow these key takeaways.
- Always define the data source as interface. So that it can be faked/mocked for tests.
- Make
fragment / activity's UI controlled by the viewmodel. You don't have to fake the link here. - A viewmodel should emit finite states to the UI at any point of time. This state may be dictated by the data source or a reaction to user input in UI (eg. enabling a button based on content length)
…
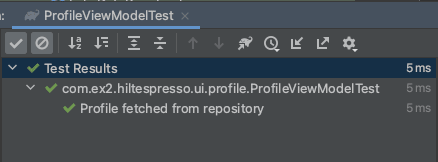
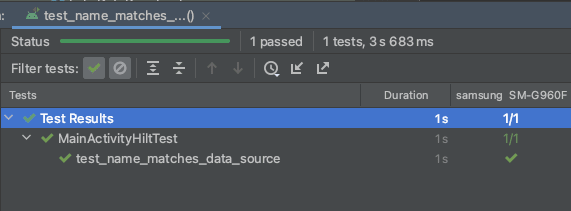
In case you wonder about the execution time, here it is: 5ms vs 3.5 sec
…
Resources
This content originally appeared on DEV Community and was authored by Mahendran
Mahendran | Sciencx (2021-10-21T16:30:32+00:00) Android — Instrumentation test with hilt. Retrieved from https://www.scien.cx/2021/10/21/android-instrumentation-test-with-hilt/
Please log in to upload a file.
There are no updates yet.
Click the Upload button above to add an update.


