This content originally appeared on Telerik Blogs and was authored by Dobrinka Yordanova
Quickly and easily add, edit and remove images and more with Telerik UI for Xamarin RichTextEditor control.
With the R3 2021 official release of Telerik UI for Xamarin, we introduced a new feature in our RichTextEditor control. This feature gives you the option to work with images. You can quickly and easily add, edit and remove images in your mobile and desktop apps. In addition, these options come with built-in toolbar items.
This blog post will get you familiar with all the built-in tools you can use to make your work with images in the document easier. You can work with the following image formats: PNG, JPEG, SVG, GIF, WebP.
Toolbar Items for Editing Images

Let’s review the power of the built-in toolbar items for working with images. Of course, we have prepared a sample demo for you!
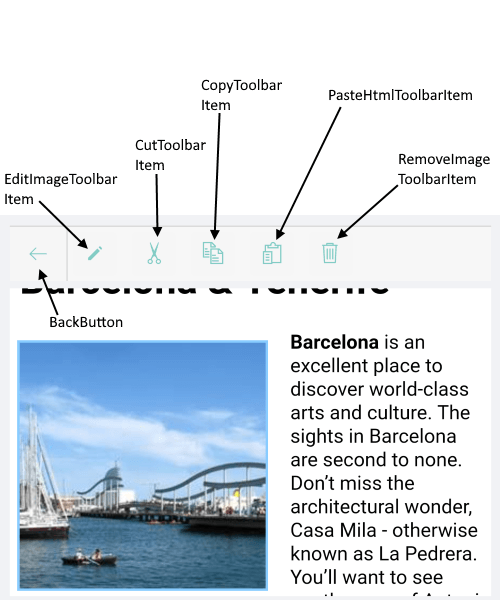
The built-in Toolbar items for working with images are:
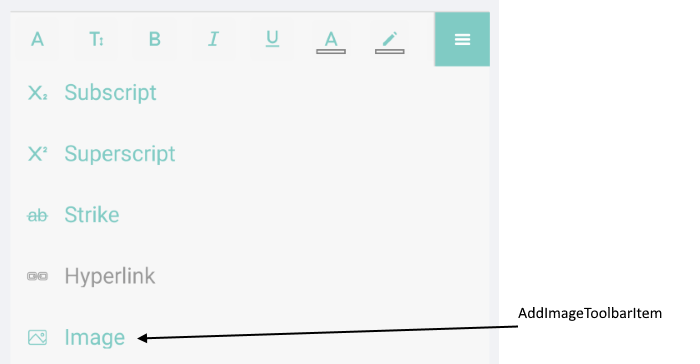
- AddImageToolbarItem – add an image.
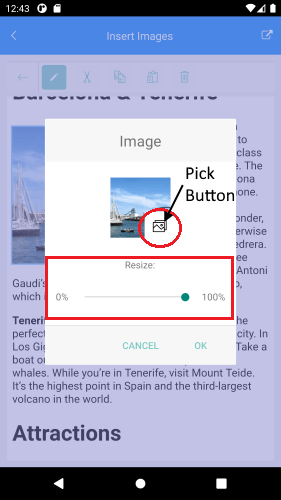
- EditImageToolbarItem – resize the image. Additional dialog is visualized when the toolbar item is tapped/clicked. You can also add images from the dialog.
- CutToolbarItem – cut the selected HTML/image to the clipboard.
- CopyToolbarItem – copy the selected HTML/image to the clipboard.
- PasteHtmlToolbarItem – paste HTML/image from the clipboard.
- RemoveImageToolbarItem – remove the currently selected image from the document.
- ImagePickerToolbarItem – additional toolbar item for inserting images from a collection of pre-defined images.
AddImageToolbarItem

When the AddImageToolbarItem is tapped/clicked, a PickImage event is fired. If you want to work with images from the device gallery, then you have to grant permissions. You need to manually implement the logic for selecting an image inside the PickImage event handler. The steps needed for permissions are described in our help article.
A sample demo with permissions can be found in our SDK Browser Application and Telerik UI for Xamarin Samples Application.
EditImageToolbarItem
Mainly the EditImageToolbarItem helps you to resize the current selected image. If you haven’t selected one, the toolbar allows you to pick an image (the RichTextEditor.PickImage event is fired) using the PickButton.

The edit image dialog is highly customizable. For more details visit our help topic.
CutToolbarItem, CopyToolbarItem, PasteHtmlToolbarItem and RemoveImageToolbarItem work in the scenario when there is a selected image. You can cut, copy, paste or remove the currently selected image.
Demo
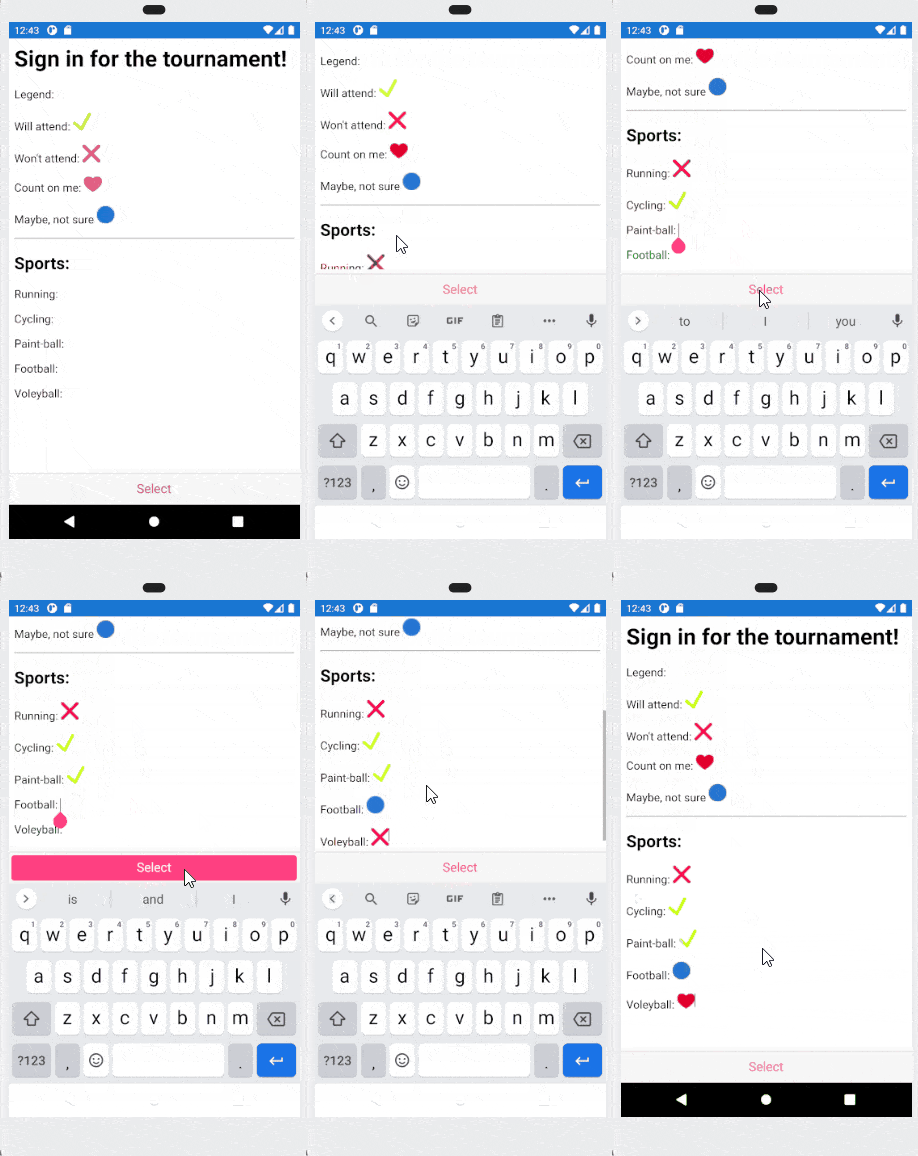
For the demo I will use the ImagePickerToolbarItem. As I shared, this toolbar item can be populated with predefined images.
Here are the RichTextEditor and the RichTextEditor Toolbar definitions in XAML:
<Grid RowDefinitions="*,Auto"> <telerikRichTextEditor:RadRichTextEditor x:Name="richTextEditor"/> <telerikRichTextEditor:RadRichTextEditorToolbar x:Name="richTextToolbar" Grid.Row="1" RichTextEditor="{x:Reference richTextEditor}" AutoGenerateItems="False"> <telerikRichTextEditor:ImagePickerToolbarItem x:Name="imagePicker" Text="Select"/> </telerikRichTextEditor:RadRichTextEditorToolbar></Grid>Our HTML document:
<html><head /><body> <h1>Sign in for the tournament!</h1> <p>Legend:</p> <p>Will attend: <img src="data:image/png;base64,iVBORw0KGgoAAAANSUhEUgAAABkAAAAZCAYAAADE6YVjAAAAAXNSR0IArs4c6QAAAARnQU1BAACxjwv8YQUAAAAJcEhZcwAADdYAAA3WAZBveZwAAAAYdEVYdFNvZnR3YXJlAHBhaW50Lm5ldCA0LjEuMWMqnEsAAAHvSURBVEhLtVTPK0RRGP1E+ZEfSdmwsRDZECU7xR9gI0uxUVYWFpaTkrK1tZSS7PwoG1YzzE9GgzRqshBNmoWkjHzXueOje98808y8ceqrd+853zn3vnffpf9ARNFMmOkxxJSMMY3KdOVwytQN82xYkdKF5zuhKgfsYPsnQELSQlUGUUVDMGVHyIrQlQEMj8wA7OoZ36dFaO84YxqzAlBBpkWhvUMpqsKqQ2YAdnUfYKoXiXcgYNIM0BVlmhXaO04U1SDk1gzALq6wu2qReEdI0ZwZkCumCaG9AyenAat+MAMwDuhvJBLvwIqXzAAJcb9GIB7U5E4J7/FSUSv6MlYI077QNmDuM0THONttQhUE+tYcAZ/4V/qFtgGxtRqMk6geoV1xztQB0zezD+NNofMBMmaJvxsyOOfjIskDFrFh6jF+v2DqEjofuO/7YJoym6Qxi/l5kf3Cr6gX8x8O7brQf8PP1I7GgNloGugfTqR657uWhulF9wtdGClFdTDcsgykMH9ww9QEw2E8W1c5DsqyWBQH/RPBxOc0yhVTAvPWbjFO40Q1S3tpiDBNwdQ+PS4F3YK0lAcYjCDoyc1cF3aROmSqFXn5wKvoRFDcLQTz0yLzjoSiRqx6zxEQL+UKKgraEMarqFfUdVDRgFBFgOgLiDAiqWaRTWAAAAAASUVORK5CYII=" /></p> <p>Won't attend: <img src="data:image/png;base64,iVBORw0KGgoAAAANSUhEUgAAABkAAAAZCAYAAADE6YVjAAAAAXNSR0IArs4c6QAAAARnQU1BAACxjwv8YQUAAAAJcEhZcwAADdYAAA3WAZBveZwAAAAYdEVYdFNvZnR3YXJlAHBhaW50Lm5ldCA0LjEuMWMqnEsAAADqSURBVEhLvdbBDcIwDAVQj9Z70jV64cCBuXroPh2AKVLsJl9IoSaxS/mSUUmCHxBQQxuFIVFYuZ4bjRP9INJH+klf6U/5Im4ofn4va12R11f9VhnkT/AeLBMuqAZKr6d8XVM9USZN0BGQK+QtSBRvXKlekGh87Asa0YCPN+qFugHECpkBpBdyA0gLOg0gOhSXeiyPGwFEg+pyA0gLOg0gjMzHQFzKknPRNhnV+4dV0wJQbkgDeHw+2iMz9AXYN1n7MXRDLQBxQ70AYoasANINeQGkCf3lzsiT19/j+eH604qci+SC66JzVxhet9WBr/JOEy0AAAAASUVORK5CYII=" /></p> <p>Count on me: <img src="data:image/png;base64,iVBORw0KGgoAAAANSUhEUgAAABkAAAAVCAYAAACzK0UYAAAABGdBTUEAALGPC/xhBQAAAAlwSFlzAAAN1QAADdUBPdZY8QAAABh0RVh0U29mdHdhcmUAcGFpbnQubmV0IDQuMS4xYyqcSwAAAg9JREFUSEutVU1PU0EUPbAxiBGCK1ckFdrXmQcaSIh/gPgD1IV/AYyR31OUDWzcuHAD7CQmJsCKsJACfV99NDGYuKkNLaWc+zpNaDKAbd9NTua9d889982duTPoWAWzoz5yr32orwF0JYCq8Tni8xc+vz3F/JihJnaOhcf0vxG/4dUkTuIj6hxCPTLUtp0iM+Yhv34Gt1bGTCuE2woIGWO+l+HWI6gtD1lH+CXkcky8WYaui/8mX+JFx0d+w8PkeJIgxMsRH/oz/6IpxLsQQhdDqHccj2z+buhmBL0m+pyFs8iXqp3YDT8Zdb093g/OtFqCfoUA+UJsIaSBtq5aBUt13Klp2hBd6heZRP2zEdICk1RZLvXX5kwLHvQfWZMfkcWZBrj1ORP1HR6cFS7QlY00KNgvbAv9ESfITzPjiY00KKh7zCTP0AKG2J0f2GANG7F/6EsPakX0k66/wtSDEs8cqaE9oDe0ddS3GE8fJgk6FmA6U4H7c9CekXjq7PL4mTLS3RbCcaV5+k1kmu8Xy/TCSNothjMXQ+/1uq2lRGfQ+z7jjdTdJlPl3+z0MiP2ww4P26yR+D/jpTPBRAUmurgtmXwXP3fSpzKcJya0Nyty13GdlngV/LYlke8sz7LwTEh/xn0+HCE7yxJuc60asla8Jxp83wqRmxG/oQ5uHp6PU/g9a3/Axl2SK9u47jHgGrx8LucFX4aOAAAAAElFTkSuQmCC" /></p> <p>Maybe, not sure <img src="data:image/png;base64,iVBORw0KGgoAAAANSUhEUgAAABkAAAAZCAYAAADE6YVjAAAABGdBTUEAALGPC/xhBQAAAAlwSFlzAAAN1QAADdUBPdZY8QAAABh0RVh0U29mdHdhcmUAcGFpbnQubmV0IDQuMS4xYyqcSwAAAuFJREFUSEu1Vs1u00AQdiPgAu0FIU4k9a6jlsCNp2iKuPECHDigpk28doJQIfAibbn15wFatc2dA4q9azdOOUJJJWguERARVTLfbtyiUKM0aTLSKFl7Z8bz981osVQuJzJP/RspU8xSS+R0i2/ozBWEuU3K+C+d8aZuco/YYpMwsZgy67PyvpSLNPShcphIsmqGML4M3oESH78NYrotGOng/6n67Z4b0fsdkhevkzk/I+UjTfF0l7k3SaGapRZfgfAXo1gL06V6aBQPQsP2Q8MSf1me8bz7vhbi/hFlYpUURDbzwr8VqeylmWfBZIpV5/BVu9SuddLFIFLIe5Vf4Og97tNi0EE49/S8mL9tB5OR6ojK4TUiDVieMmBY3j+KLsueMkSYt5tifE7qjSyEEwZygOSuGKV6e3gDEdueDGFbN901laMwnNC05x+vo1JegY+ky7GCA7IMtSoKU5RV1SWZj0oS2xTJixMYhlEACFstxIdXaN55oMk+ICY/MEqHuNAvyZdl6EHVwZu6zpwFjZpiCzXfMGyUaazAkIzyxscfI0rrGuLm49C6csIvsCeNtHQmhAaXmvDkd/zFq7HUi7470ZCknzB0Orp8nDFHAbin8ObH+D2x+DcY4ciJO76cmC5yYokthOzr2Kqr4G7AE7GIA/oEaDrqPjFFnRbEgnYPHYky21ZwHiswOMuOl/APPKyQRfehwi7CnGXkpTFS7EKoACvvMmVgF3A+YQAtKVBzJCgM+XTpsI0R/V7iYheFQY+UN1wOrD1qB6OYJ3spW2RllJSBMzJyH6aQm3llqDj4ZFT31WQU+9Mmf2LkPk1FqntJzvgkc+Yp81ZR2p/VjH85wIy3xBr64vGd/834c8K2kVry7gMJ3lDm7MOzAHwsGwvPOlgyom1FniXKegE1nQpy8FZuOX23lXOSexeqYnopmIH7C7rlrKP6OCDiu8I6i5+oPQz7GEZFTu5nqopiDWjaH+xTATZqdUK4AAAAAElFTkSuQmCC" /></p> <hr> <h2>Your options:</h2> <p style="font-size:16px">Running: </p> <p style="font-size:16px">Cycling: </p> <p style="font-size:16px">Paint-ball: </p> <p style="font-size:16px">Football: </p> <p style="font-size:16px">Voleyball: </p></body></html>And here is the code I used to populate the ImagePickerToolbarItem with images:
private void InitializeImages(){ var resourceNames = this.currentAssembly.GetManifestResourceNames(); var imageSources = new List<RichTextImageSource>(); foreach (var resourceName in resourceNames) { if (resourceName.Contains("sign")) { var imageSource = RichTextImageSource.FromStream(() => this.currentAssembly.GetManifestResourceStream(resourceName), RichTextImageType.Png); imageSources.Add(imageSource); } } this.imagePicker.ItemsSource = imageSources;}Then Inside the Page’s Constructor, call the InitializeImages() method, then load the HTML document from a stream and assign the result to the Source property of the RichTextEditor. All this after the InitializeComponent():
InitializeComponent();InitializeImages();Func<CancellationToken, Task<Stream>> streamFunc = ct => Task.Run(() =>{ string fileName = this.currentAssembly.GetManifestResourceNames().FirstOrDefault(n => n.Contains("pick-image-demo.html")); Stream stream = this.currentAssembly.GetManifestResourceStream(fileName); return stream;});this.richTextEditor.Source = RichTextSource.FromStream(streamFunc);This is the result:

Share Your Feedback
We would love to hear what you think, so should you have any questions and/or comments, please share them in our Telerik UI for Xamarin Feedback Portal.
If you are new to Telerik UI for Xamarin, you can learn more about it via the product page. It comes with a 30-day free trial, giving you some time to explore the toolkit and consider using it for your current or upcoming Xamarin development.
More From the World of Cross-Platform Application Development: Telerik UI for .NET MAUI
Still in a preview stage, our library of UI components for .NET MAUI is growing. We have added new controls and support for macOS. Now your desktop and mobile applications can target Android, iOS, macOS and Windows.
Check out the Telerik UI for .NET MAUI product page and official documentation.
Happy coding with our controls!
This content originally appeared on Telerik Blogs and was authored by Dobrinka Yordanova
Dobrinka Yordanova | Sciencx (2021-11-12T10:30:01+00:00) Working With Images in Telerik RichTextEditor for Xamarin—More Than Easy!. Retrieved from https://www.scien.cx/2021/11/12/working-with-images-in-telerik-richtexteditor-for-xamarin-more-than-easy/
Please log in to upload a file.
There are no updates yet.
Click the Upload button above to add an update.
