This content originally appeared on DEV Community and was authored by Unclebigbay
This full package tutorial is initially posted on Aviyel, an open source community, you can continue reading from the site to support their open source community. Click here to read on Aviyel
Hello, my gorgeous friend on the internet 👋,
If you're here and want to know how to build APIs, then you're most welcome, because, in this article, I'll show you the very importance of an API and how to create your first CRUD restful API using Node.JS, Express.js, and Hoppscotch.
Hey buddy, this is a project-based article, so ensure to stick till the end 😉.
What we will build
Straight to the point, we are building a Todo List Backend together!!!
The reason for this is that todo list is a popular web development project that you might be familiar with, and there's a good chance you’ve used one before or built a todo list interface with HTML, CSS, and JavaScript.
So in this article, we'll build a backend API for the popular Todo List project, and at the end of this article, you'll have a basic understanding of how API works and how to build your own APIs.
Prerequisites
But before we get started buddy, let's quickly address the following questions:
- Do we really need APIs in our software?
- Why are we making use of Node JS?
- Why HoppScotch.io?
- What are the CRUD operations?
1. Do we really need APIs in our Software?
Yes, my friend! We do; an API is a software communication and data exchange interface that allows two applications to communicate and exchange data. For example, a frontend application such as a todo list interface written in React.js, Vue.js, Angular, or Plain HTML, CSS, and JavaScript, can connect and exchange data (such as user information and logic) with a backend application API written in C#, Python, or Node.js.
One of my favorite importance of using an API for software development is that you can have multiple frontend interfaces for your project backends, such as a Web Version and a Mobile Version while making use of the same API and you don’t actually need to tamper with the frontend codebase when modifying the backend codebase or vice versa.
In this tutorial, we'll focus on building the backend of our todo list application, where we'll make use of Node JS to provide a todo list functionality to any frontend technology and all this will be tested using Hoppscotch while Harperdb will serve as our todo list database.
2. Why are we making use of Node JS?
You must have been using the console.log() and doing DOM manipulations in your JavaScript code like everyone else in the frontend on your browser, that's okay, that process is called the client-side, but you should know now that the backend application or our APIs does not run on the browser, it runs on the server-side, the question now is how do we execute JavaScript outside of the browser?
Node to the rescue!!!
Node or Node.js is an open-source JavaScript backend run-time environment that works outside a web browser, this means that with Node we can write and execute our JavaScript backend code on the server-side, and we can view our console.log on the Node environment.
Don’t be confused, I had demonstrated it somewhere in this article.
3. Why Hoppscotch?
While building a backend API, we sometimes need to test them in a simple way as possible without any frontend interface, this also allows us to catch bugs as early as possible before pushing to production, this also allows the developers which is us to work independently on the APIs until the frontend guys are ready to consume them.
But how do we achieve this? Through what is known as API testing tools, these tools are applications that allow us to test if our APIs functionalities are performing as expected before pushing them to production, and one of the good testing tools for API is the HOPPSCOTCH.
HOPPSCOTCH formally known as the POSTWOMAN is a free super light-weight, web-based, and a progressive web application that allows us to test our API endpoints at any time and from anywhere without any complex configurations.
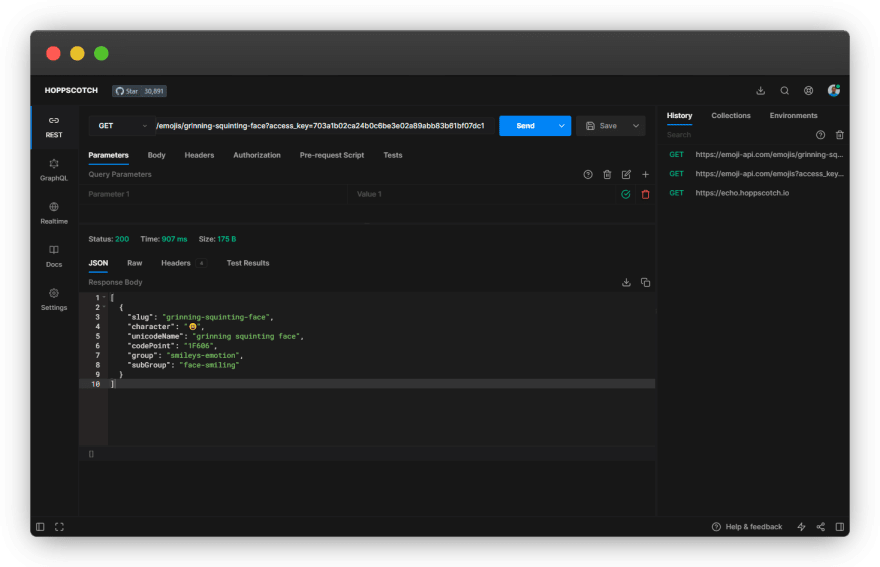
HOPPSCOTCH is our official testing tool for this tutorial and we will be using it to test our Todo List APIs throughout this article, you can proceed to checkout how Hoppscotch works by pasting the emoji endpoint below in the Hoppscotch URL box and sending a GET request to the emoji-api endpoint or click here for a prefilled URL.
Cool 😎 isn’t it?
We got a response of a grinning-squinting-face 😆 from the emoji-API endpoint, Hoppscotch has just saved us the stress of writing JavaScript fetch() or axios() method.
Well-done buddy, you’ve now come a very long way already, let’s proceed to check out what the CRUD operation is all about, let’s go there🏃♀️!!!
Before you continue, Aviyel is partnering with Hoppscotch to scale open source projects within communities. You can consider continuing this article on Aviyel official website, to support their community. Click here to continue reading on Aviyel
4. What is the CRUD operations
The CRUD acronym stands for the four main types of SQL commands which are the Create, Read, Update, and Delete commands. These are considered important for the development of a continuous storage application.
This implies that the CRUD commands allows us to perform some basic operation that enables us to carry out help us to manipulate data in the database, these operation includes the following:
- Creation of new records - Add To-do item
- Reading of existing records - View all To-do items
- Updating of an existing record - Update To-do item
- Deletion of an existing record - Delete Completed To-do item
Hey buddy, now that we know about these technologies and what we’re going to build with them, tighten your seat belt as we’re going to implement the above operations in our todo list backend, Now!!!
Setting up your Node environment
In this section, we will be setting up the JavaScript runtime environment earlier on our computer, and to start with kindly ensure to have Node.js installed before you proceed with this section, you can get it installed quickly from here while I wait for you.
Note: You can also run node --version to check if you have the updated version installed already.
Welcome back, now that you’ve installed Node.js on your computer, follow the instructions below to get your Node.js project started.
- Create a new folder and name it
todo-list-backend, - Open your
cmdorgit bash, - Run
npm install --global yarn - Then run
yarn init - Ignore or provide answers to the questions in the command prompt like below

Note: You can choose to ignore the questions next time by running yarn init -y
Yarn is a faster alternative to NPM which is a package manager, that allows us to download packages through our cmd or git bash
Setting up the Server
Now that you have the runtime environment setup on your computer, let’s proceed to install a few more packages on our computer that will help get our server running
1. Install Express
Express is a Node.js framework that provides us with lots of fast features, if Angular is a JavaScript framework, then express is a node.js framework.
Run yarn add express to install express in your project.
2. Install Nodemon
Nodemon is a simple script monitoring package that helps us to automatically restart the runtime environment whenever there is a change in our project file, this is like an auto-refresh on a web browser.
Run yarn add nodemon to install nodemon in your project.
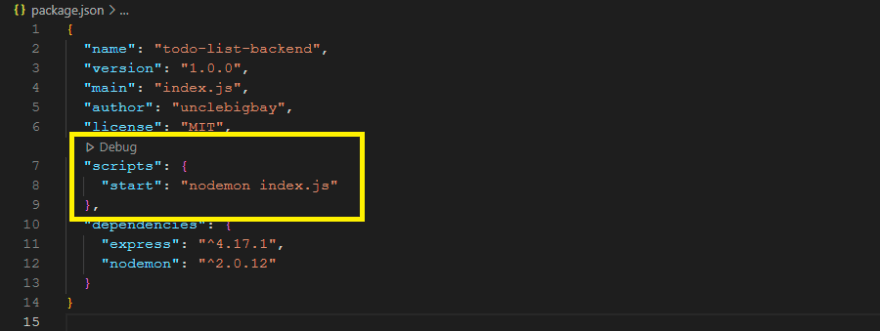
Open your package.json and add the following code to enable nodemon in your project.
"scripts": {
  "start": "nodemon index.js"
}
Your package.js should look something like below
3. Install Cors
Because API aids sharing of resources between two applications, we need to set up a mechanism called cors which allows sharing of resources from two different domains.
Run yarn add cors to install cors in your application
Hello, World Response
Welcome to the interesting part, to this point we are good to write our first endpoint and to test our setup, we will write an endpoint that responds with the popular Hello, world text to the caller.
Create an index.js file and copy-paste the code below inside.
// import express
const express = require("express");
const app = express();
// set your preferred server port
const port = 3000;
// root endpoint response
app.get("/", (req, res) => {
res.send("Hello, World!");
});
app.listen(port, () => {
console.log(`Your server ⚡ is running 🏃♂️ on http://localhost:${port}`);
});
Run yarn start and If all goes well, visit or click http://localhost:3000/ and you should have the console message in your terminal and Hello, World displayed on your browser screen like below.
And if you encounter any error, trace your steps back to this point to figure out what you missed.
If all works well you can proceed to play around with the code by changing the text response, I will wait for you 😉.
We need a Database
Yes, we need a database to keep the todo items, and for this tutorial, we will be making use of the Harperdb cloud instance for our todo list application database.
Follow the instruction below to set up your own Harperdb database
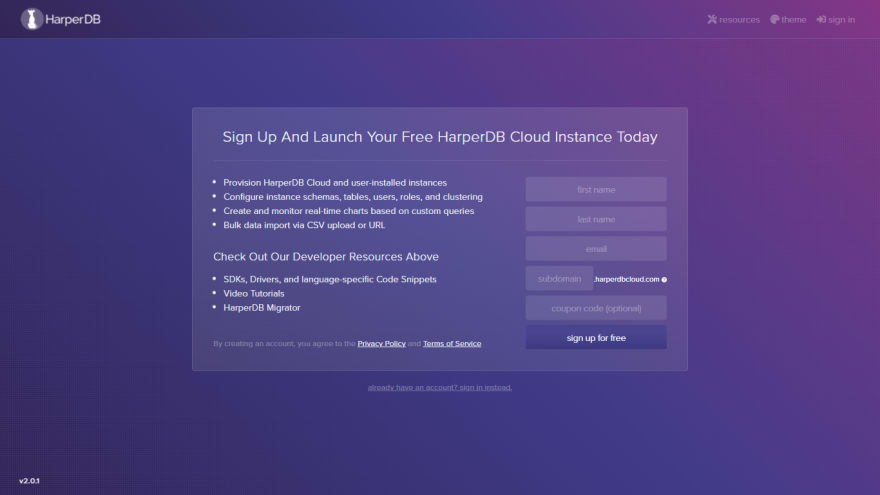
Head to https://studio.harperdb.io/sign-up to create a free account
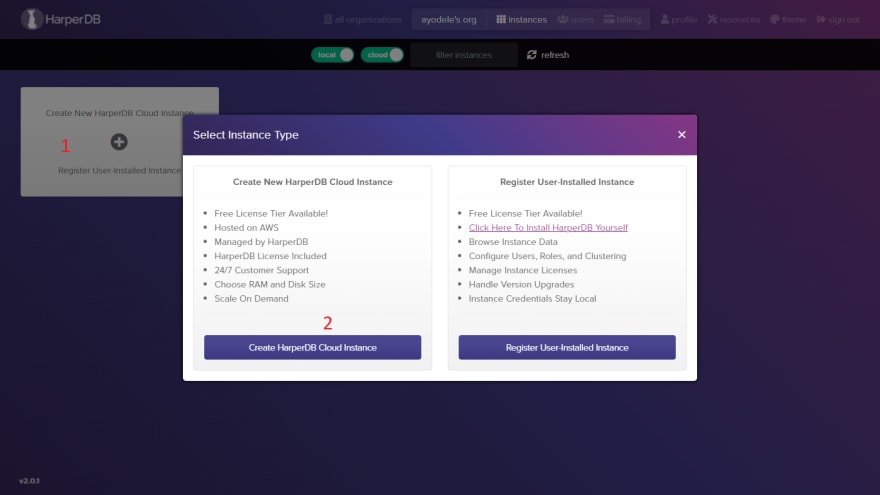
On your dashboard click on create new Harperdb cloud instance card
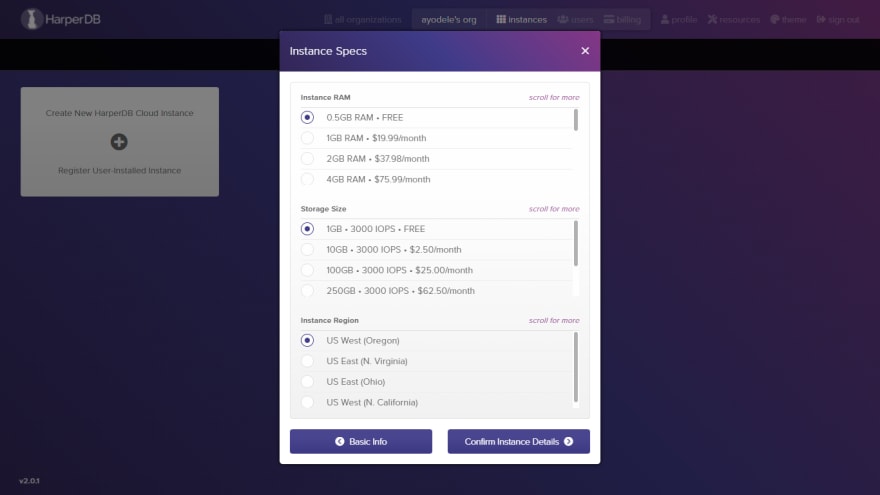
Fill the instance information form and ensure to keep them safe

Click on instance details except you want to upgrade your database
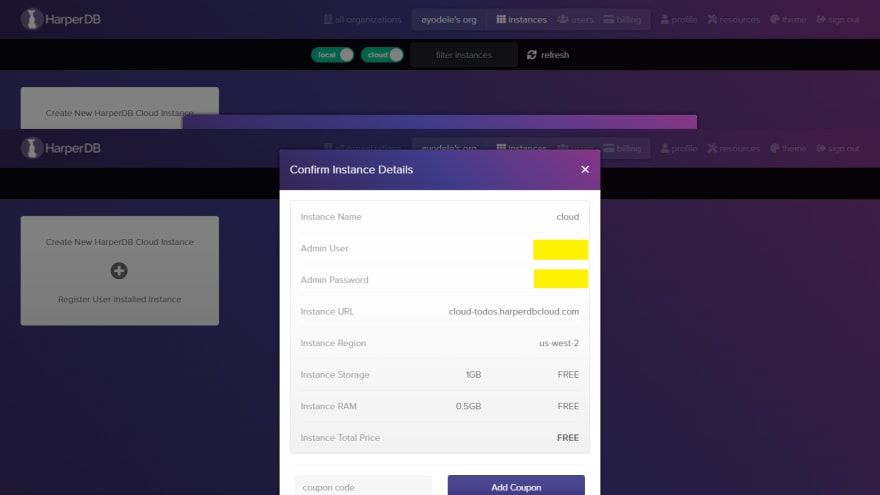
Confirm that your instance details are correct and proceed to click on the add instance button below the add coupon button.
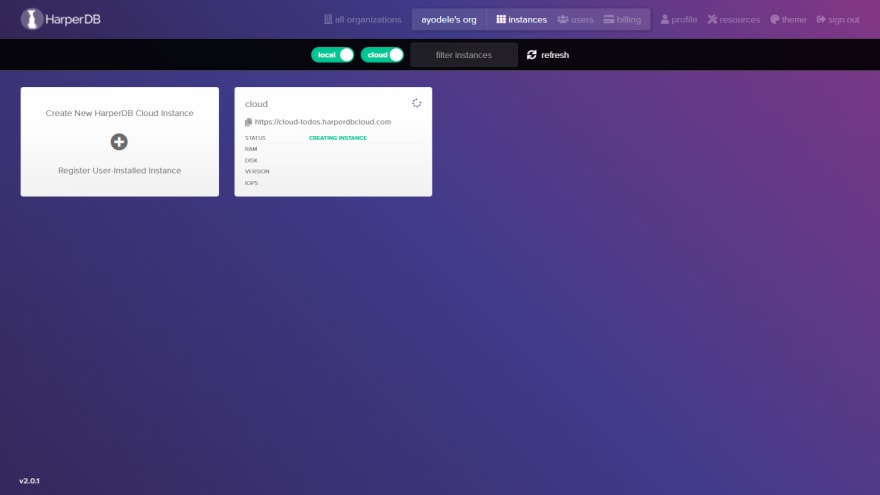
Wait for Harperdb to fully create your new instance, it’s okay if it takes more than 10 minutes even after refreshing, just sip your coffee ☕.
Once it’s all done, click on the instance card and create a new schema named
todos
Note: A schema is a collection of tables that is also similar to a database in SQL

Now create a table named
itemswith a hash attribute of id
Note: hash attribute is the unique identifier of each item of todos we will be creating
Connecting to Harperdb Cloud Database:
At this point your Harperdb instance is ready for use, the next thing to do is to install the Node.js Client harperive package which will allow you to communicate to your Harperdb cloud database from your Node.js application.
Run yarn add harperive to install the package in your project.
Now that you’ve successfully installed harperive , the next step is to set up Harperdb authentication in your Node.js application, do you remember the instance URL, the admin username, and the admin password you set up while creating your Harperdb instance? That’s exactly what we need.
Securing your project sensitive details
Because of how sensitive these details are, you need to keep the instance URL, username, and password in a secure environment that cannot be accessible by unauthorized people when you push your code to GitHub, the .env file will serve as a secure environment and the package which will grant you access to this secure details from the Node.js application is the dotenv package.
Run yarn add dotenv to install the package in your project.
With all this setup, I can now show you how to connect your Node.js application to your Harperdb cloud instance.
The first thing to do is to create a .env file and paste the following snippet inside
INSTANCE_URL=YOUR_INSTANCE_URL
INSTANCE_USERNAME=YOUR_INSTANCE_USERNAME
INSTANCE_PASSWORD=YOUR_INSTANCE_PASSWORD
INSTANCE_SCHEMA=YOUR_INSTANCE_SCHEMA (todo)
You can get your instance URL from the config section on your dashboard, the instance schema is the collection of tables you created earlier, where the instance username and password are the credentials you used while creating your database instance.
Create a file name dbconfig.js and paste the code below into it
require('dotenv').config();
const harperive = require('harperive');
const DB_CONFIG = {
  harperHost: process.env.INSTANCE_URL,
  username: process.env.INSTANCE_USERNAME,
  password: process.env.INSTANCE_PASSWORD,
  schema: process.env.INSTANCE_SCHEMA,
};

const Client = harperive.Client;
const db = new Client(DB_CONFIG);
module.exports = db;
Since you have dotenv installed then we can make use of process.env to have access to the variables in the .env files and also use the harperive package to connect to our Harperdb cloud instance, which you can use to communicate to the database anywhere in your application using the exported db, I will show you how it’s done shortly.
Proceed to import all the packages you have installed in your index.js, it should look something like this.
   // import express
const express = require("express");
const app = express();

//Parse URL-encoded bodies - Allows us to retrieve data from submitted data
app.use(express.urlencoded({ extended: true }));

// import cors
var cors = require("cors");
app.use(cors());

// import the harperdb instance
const db = require("./dbconfig");

// your preferred server port
const port = 3000;
Building the todo list Create Operation
Welcome, this section is where you will learn how to develop the CRUD endpoints (routes) that will allow anyone to create a new todo item in your application.
Let’s break this down; in order to achieve this, a user must submit an item through a form, and our todo list will have the following property
- todo: this is what the user wants to do i.e. “buy bread in the evening”
- status: this is the completion status of a todo item and it is pending by default
What we need to achieve this
- Create a POST route, that the frontend can send data to, through a form,
- Find a way to retrieve the todo from the form,
- Validate the form submission,
- Prepare the todo and its completion status into a new object,
- Ensure to catch any errors and use asynchronous JavaScript,
- Send the new todo to the Harperdb cloud instance,
- And finally notify the frontend with success or error message
Now let’s write some code:
// 1. create your post route that handles creating new todo item
app.post("/add", async (req, res) => {
// 2. retrieve the todo from req.body
// 3. Validate the todo to nsure the user does not submit an empty form
if (!req.body.todo || req.body.todo === "") {
res.status(400).send("Todo is required");
} else {
// 4. prepare the todo in an object
const option = {
todo: req.body.todo,
status: "pending",
};
// 5. ensure to catch the error using try/catch
try {
// 6. if the todo is not empty
const response = await db.insert({
table: "items",
records: [option],
});
// 7. notify the frontend or sender with the success response
res.status(200).send(response);
} catch (error) {
// 7. notify the frontend or sender with the error response
res.status(500).send(error);
}
}
});
// just a notification in the console
app.listen(port, () => {
console.log(`Your server ⚡ is running 🏃♂️ on http://localhost:${port}`);
});
Building the todo list Read Operation
The READ operation is used to retrieve data from the database, and for our todo application, we are going to make use of it to retrieve all the available todo items that have been added from the Create operation endpoint.
In order to retrieve all the todo items in our Harperdb cloud instance, we need to follow the steps below:
- Create a GET route
- Ensure to catch any errors and use asynchronous JavaScript
- Use the query method to select every data from a table
- And finally notify the frontend with success or error message
// 1. route to retrieve all todos in the database
app.get("/todos", async (req, res) => {
  // 2. use try/catch to control errors
  try {
    // 3. user query method to get all todo from the database table
    const response = await db.query("SELECT * FROM todos.items");
    // 4. send success message to the frontend
    res.status(200).send(response);
  } catch (error) {
    // 4. send error message to the frontend
    res.status(500).send("something went wrong");
  }
});
Building the todo list Update Operation
The UPDATE operation is used to modify or edit data in the database and for our todo list application, a user can decide to change their entry for a todo or update the status of any todo items say from pending to completed or as the case might be in the frontend design.
In order to implement the update operation in our application, the following must be put into check:
- Create a POST route,
- Setup the new todo details in an object (the hash attribute is required),
- Ensure to catch the errors and use async/await,
- Send the new todo to the backend using the update method,
- And finally notify the frontend with success or error message.
// 1. route to update a todo
app.post("/edit", async (req, res) => {
  // 2. set the updated todo and specify the todo identifier - hash attribute
  const option = {
    id: req.body.id,
    todo: req.body.todo,
    status: req.body.status,
  };
  // 3. use try/catch to control errors
  try {
    // 4. send the updated todo
    const response = await db.update({
      table: "items",
      records: [option],
    });
    // 5. send success message to the frontend
    res.status(200).send(response);
  } catch (error) {
    // 5. send error message to the frontend
    res.status(500).send(error);
  }
});
Building the todo list Delete Operation
The DELETE operation allows users to remove unwanted data, and in our todo application, a user should be able to delete/remove completed items from their todo.
Follow the instructions below to add a delete operation to your backend application:
- Create a POST route that expects a parameter in its URL,
- Get the parameter from the URL parameter,
- Ensure to catch errors and use async/await,
- Use the Harperdb delete method to remove the todo from the database,
- And finally notify the frontend with success or error message.
// 1. route to delete a todo using its id
app.post("/delete/:todo_id", async (req, res) => {
  // 2. get the id from the url parameter
  const { todo_id } = req.params;
  // 3. use try/catch to control errors
  try {
    // 4. Send a delete request to the database
    const response = await db.delete({
      table: "items",
      hashValues: [todo_id],
    });
    // 5. send success message to the frontend
    res.status(200).send(response);
  } catch (error) {
    // 5. send error message to the frontend
    res.status(500).send(error);
  }
});
Testing Our Application With HoppScotch.io
Congratulations on getting to the API testing section, you should be proud of yourself, I have created a GitHub git for the complete code of our todo list backend application HERE
In this section, we will be testing our backend application using hoppscotch.io, head to hoppscotch.io, and follow the instruction below to test along.
Testing the Add Todo Route Endpoint
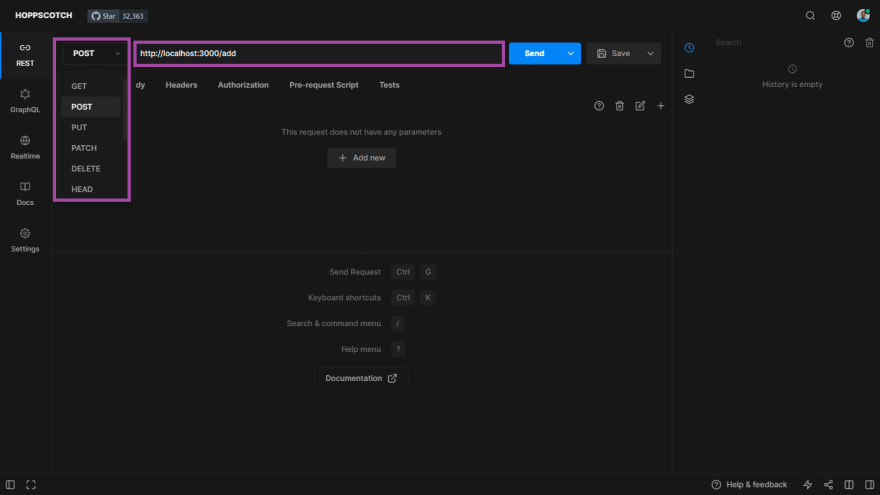
To ensure that a new todo item sent from the frontend to our backend application will be stored successfully in the database, we need to test the endpoint URL first by pasting the add todo URL http://localhost:3000/add in the Hoppscotch URL bar as shown below. You can visit here to launch Hoppscotch
The add endpoint is a post request, select the POST method from the dropdown.
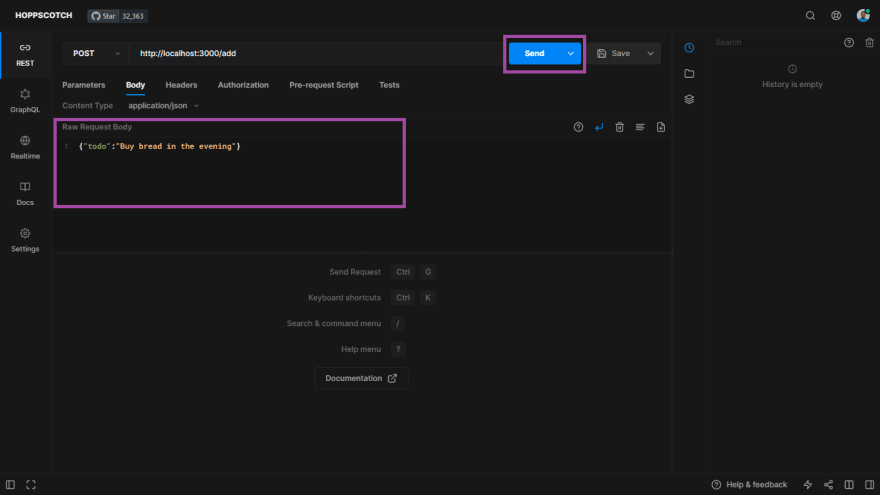
In order to add a new todo, select the body menu and select application/json from the dropdown menu.
The application/json allows us to send data to the Node.js application from Hoppscotch, which can be retrieved through req.body.
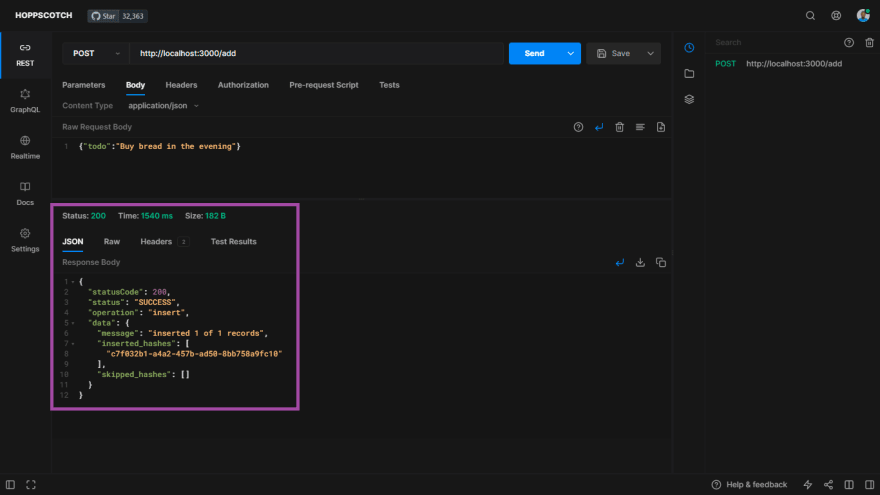
You can post a new todo item by writing an object of the todo item in the Raw Request Body and clicking on the Send button to make your request to the server as shown below.
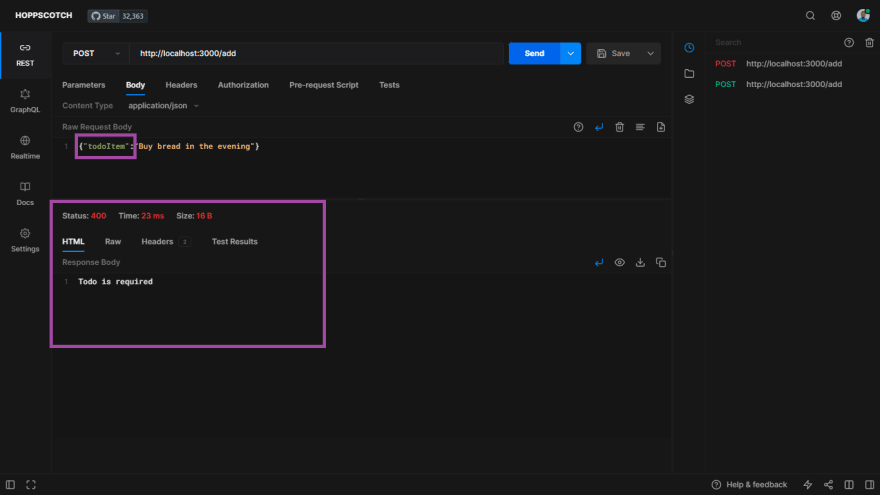
Ensure to add quotes around your object properties "todo" and "Buy bread in the evening", else your test would fail.
If all goes well, you should get a success response from the server like this, this shows that our application is able to receive new data posted through the http://localhost:3000/add endpoint.
Try to add as many todo items as you want, but ensure that the object key is "todo" or else you will get a 404 response, which is coming from our Node.js validation logic.
Testing the Get/Read Todo Route Endpoint
In this section, I will show you how to retrieve the todo items that are stored in the database. The endpoint URL to get all todo items from the database is http://localhost:3000/todos.
Paste the URL in the Hoppscotch URL bar and send a GET request to the server.
You will get a success response with an array of all the todo items that you have added previously, you should also notice that our todo application has more properties than we added initially during the POST request to the server.
The status property is set for new todo items in our Node.js /add route while the id, __createdtime__ and the __updatedtime__ are added by the Harperdb database, these are useful when you need to know when an item is been created or last updated, we will be using the id property in the coming sections
NOTE: If you encounter any error in this section, it is probably because you’re not sending a GET request to the server.
Testing the Update/Edit Route Endpoint
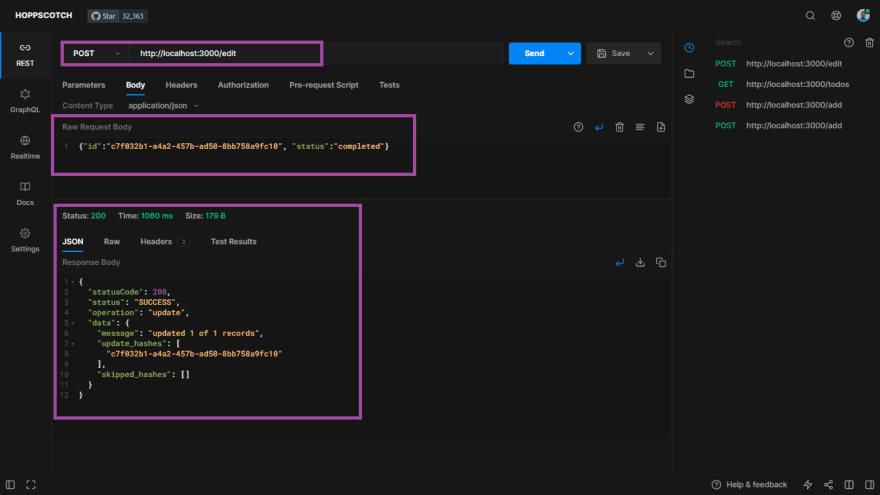
In this section, I will show you how to update the record of an item from the database, the URL that we can use to update a todo item on our server is http://localhost:3000/edit and it only accepts a POST request.
We can update the todo or its status and to achieve updating a todo item record in the database, we need to specify in the Raw Request Body the id of the todo item and which property we want to update.
You can send a GET request to the server and copy the id of the todo you wish to update in the database.
I will be updating the status property of the todo item to completed as shown below.
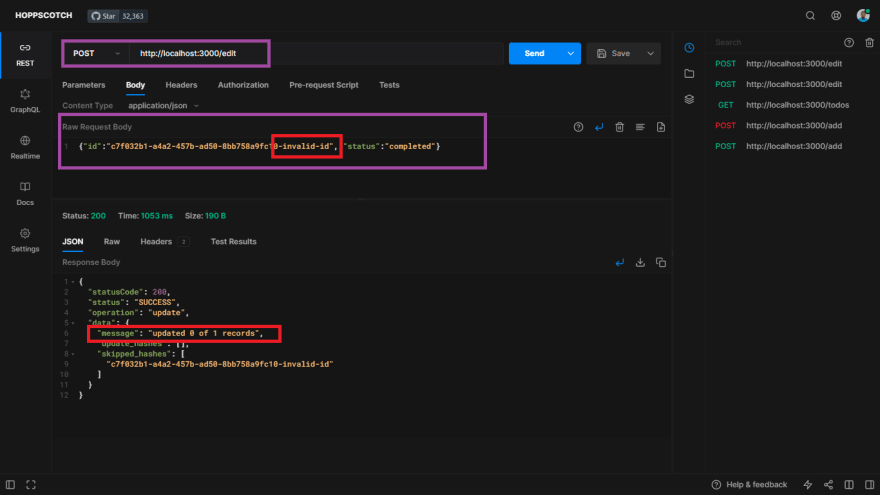
Ensure to send a valid id, else nothing will be updated as shown below.
Proceed to send a GET request on your own and see if the data is updated, if the todo item is not updated as expected, you should retrace your steps.
Testing the Delete Route Endpoint
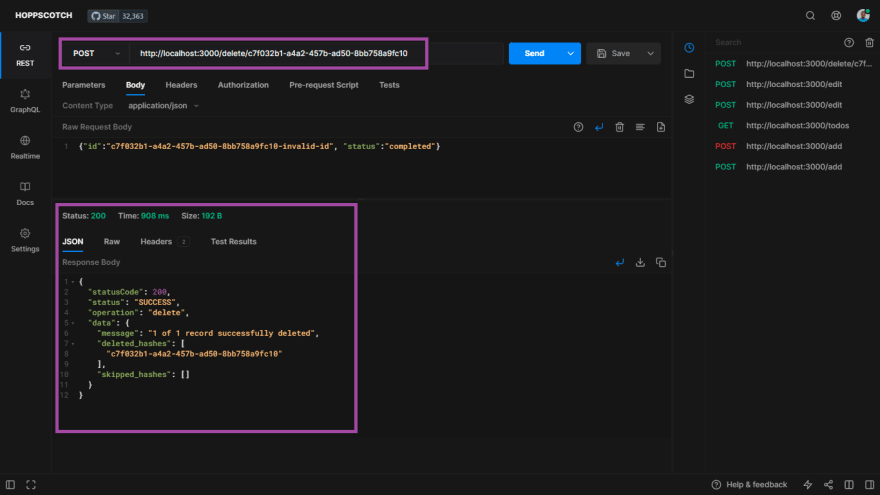
In this section, I will show you how to remove an item from the database, and the URL to achieve this is http://localhost:3000/delete/:id, this URL is quite different from other routes, it takes in a parameter called id, which is the id of the todo item you wish to delete.
The parameters in the route URL are retrieved in the Node.js routes with req.params, your URL should look something like this
http://localhost:3000/delete/c7f032b1-a4a2-457b-ad50-8bb758a9fc10, paste the URL in the Hoppscotch URL bar and send a POST request to the server.
The server will ignore the Raw Request Body as it only retrieves data sent through the URL parameter and the todo item with the specified id will be deleted from the database.
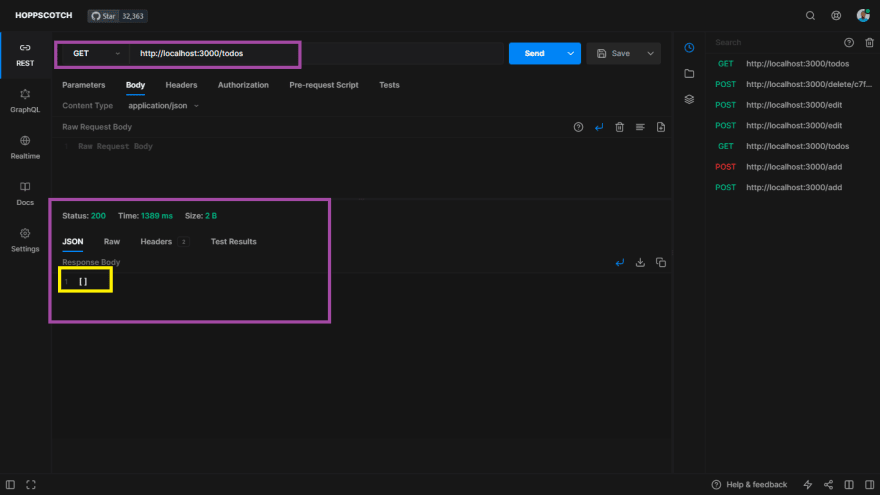
Send a GET request to fetch the todo items in our database and check the updated items.
I will receive an empty array in my case because I only have a single todo item which I have also deleted, you will receive other todo items if you have more than two.
Conclusion
In this article, you have learned how to set up a Node.js backend project, connect it to a database, write your backend CRUD logic and test it using Hoppscotch an API testing tool, with this knowledge you’ve gained from this reading, you are good to go to kickstart your personal project and also apply it in any other backend project.
Thanks for reading, I hope to see your comments and the cool things you will build going forward.
Cheers,
What we installed for this project
- express - Node.js fast framework
- harperive - Helps us to connect our Node.js to Harperdb
- nodemon - Helps us to restart our Node.js server when there’s a change
- dontenv - Allows us to have access to variables in the
dot.envfile - cors - Allows two origins to share resources
This content originally appeared on DEV Community and was authored by Unclebigbay
Unclebigbay | Sciencx (2021-11-20T08:13:57+00:00) Creating your First CRUD Restful API with Node.JS and Hoppscotch. Retrieved from https://www.scien.cx/2021/11/20/creating-your-first-crud-restful-api-with-node-js-and-hoppscotch/
Please log in to upload a file.
There are no updates yet.
Click the Upload button above to add an update.

