This content originally appeared on DEV Community and was authored by Shada
If you are an avid reader, you might have a News Aggregator app installed on your device. Wouldn't it be awesome to create your own News Aggregator app that you can control and customize according to your needs?
This is what you'll be doing today by creating a News Aggregator app using Strapi and Nuxt.js.
Strapi is a headless CMS (Content Management System) based on Node.js and builds APIs. Strapi provides a UI where you can develop your collection types and subsequent APIs to fetch the data from Strapi using REST or GraphQL API. The best thing about Strapi is that it is completely open-source and self-hosted.
Nuxt.js is a framework for building Vue.js apps that are universal. It means the code written in Nuxt.js can run on both client and server, offering Client Side Rendering and Server Side Rendering simultaneously.
Goal
This tutorial aims to learn about Strapi and Nuxt.js by building a News Aggregator app with Strapi and Nuxt.js. In this app, you'll:
- Learn to set up Strapi Collection types
- Learn to set up Frontend app using Nuxt.js
- Use CRON jobs to fetch news items automatically
- Add Search capabilities
- Register subscribers
The source code for this project is available on GitHub: https://github.com/ravgeetdhillon/strapi-nuxtjs-news-app.
Setting Up the Environment
Here is what you’ll need to get started.
Prerequisites
- Node.js - This tutorial uses Node v14.18.x
- Strapi - This tutorial uses Strapi v3.6.x
- Nuxt.js - This tutorial uses Nuxt.js v2.15.x
The entire source code for this tutorial is available in this GitHub repository.
Setting Up Project
You'll need a master directory that holds the code for both the frontend (Nuxt.js) and backend (Strapi). Open your terminal, navigate to a path of your choice, and create a project directory by running the following command:
mkdir strapi-nuxtjs-news-app
In the strapi-nuxtjs-news-app directory, you’ll install both Strapi and Nuxt.js projects.
Setting Up Strapi
In your terminal, execute the following command to create the Strapi project:
npx create-strapi-app backend --quickstart
This command will create a Strapi project with quickstart settings in the backend directory.
Once the execution completes for the above command, your Strapi project will start on port 1337 and open up localhost:1337/admin/auth/register-admin in your browser. At this point, set up your administrative user:
Enter your details and click the Let's Start button, and you'll be taken to the Strapi dashboard.
Creating Feed Sources Collection Type
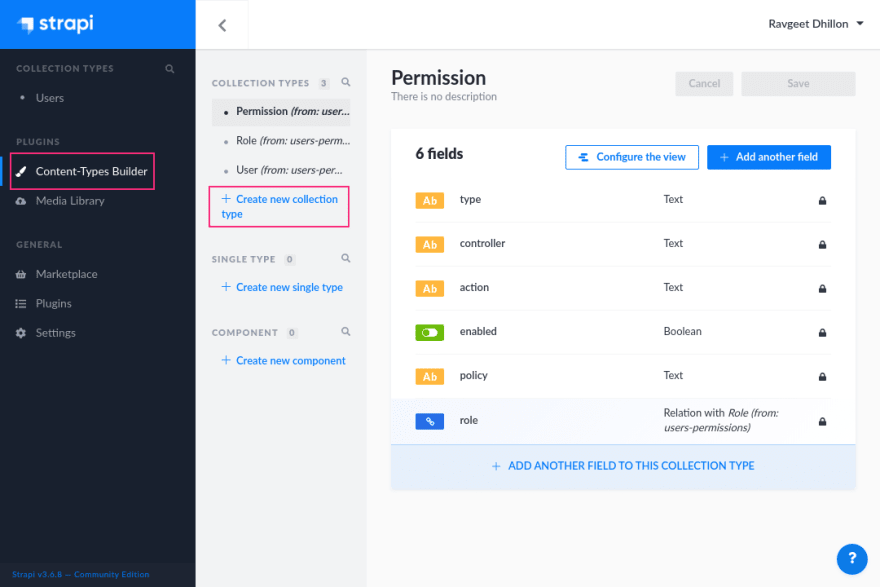
Under the Plugins header in the left sidebar, click the Content-Types Builder tab and then click Create new collection type to create a new Strapi collection.
Create a new collection type with Display name - feedsources and click Continue in the modal that appears.
Next, create two fields for this collection type:
- link - Text field with Short text type
- enabled - Boolean field
Once you have added all these fields, click the Finish button and save your collection type by clicking the Save button.
Creating News Items Collection Type
In the same way, as you created the Feedsources collection type, create a collection type for storing news items.
In the modal that appears, create a new collection type with Display name - newsitems and click Continue.
Next, create the following fields for your collection type:
- title - Text field with Short text type
- preview - Text field with Short text type
- link - Text field with Short text type
- creator - Text field with Short text type
- sponsored - Boolean field
Once you have added all these fields, click the Finish button and save your collection type by clicking the Save button.
Creating Subscribers Collection Type
Finally, you need to create a collection type for registering subscribers.
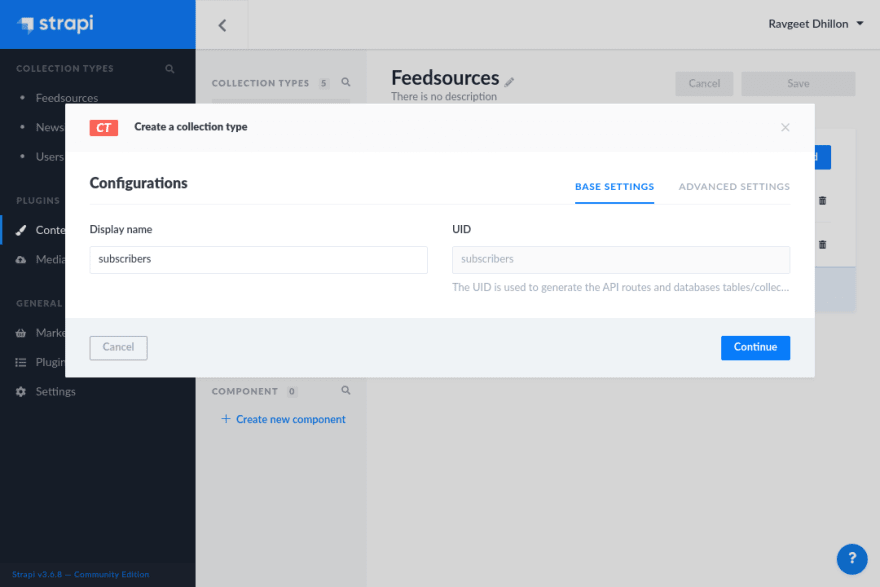
Create a new collection type with Display name - subscribers and click Continue in the modal that appears.
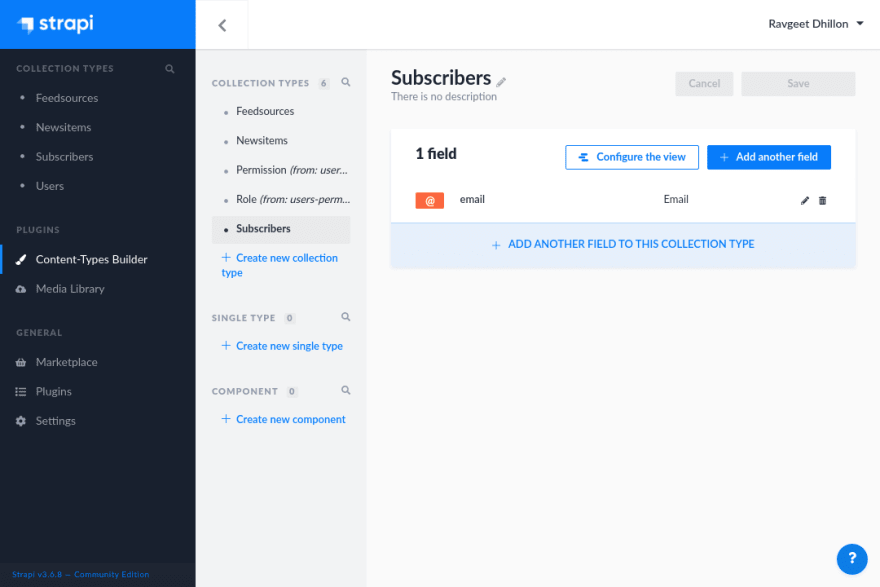
For the Subscribers Collection type, add the following field to your collection type:
- email - Email field
Once you have added this field, click the Finish button and save your collection type by clicking the Save button.
At this point, all of your collection types are set up, and the next thing you need to do is add some data to the Feedsources collection type.
You can add RSS feed URLs according to your choice, but to follow along with this tutorial, add the following URLs and enable them as well:
- https://blog.logrocket.com/feed/
- https://www.freecodecamp.org/news/rss/
-
https://www.twilio.com/blog/feed

At this point, you have enough data in your Feedsources collection type to fetch the news items from these feeds.
Automating News Fetching from Feed URLs
To automate the fetching of news items from the feed URLs, you can take advantage of CRON jobs in Strapi, which allows you to run tasks regularly or at a particular time. For this app, it would be better to check for the new news items and then add them to the Newsitems collection type every day at a specific time.
You can use the RSS-parser NPM package to parse the RSS feeds and get the metadata about the items from the blog. To install this package, open your terminal and run the following commands:
    cd backend
    npm install rss-parser --save
Next, you need to write a script to fetch the news items from the feeds and add them to the Newsitems collection type.
In the config directory, create a feedUpdater.js file and add the following code to it:
    'use strict';

    const Parser = require('rss-parser');

    // 1
    function diffInDays(date1, date2) {
      const difference = Math.floor(date1) - Math.floor(date2);
      return Math.floor(difference / 60 / 60 / 24);
    }

    // 2
    async function getNewFeedItemsFrom(feedUrl) {
      const parser = new Parser();
      const rss = await parser.parseURL(feedUrl);
      const todaysDate = new Date().getTime() / 1000;
      return rss.items.filter((item) => {
        const blogPublishedDate = new Date(item.pubDate).getTime() / 1000;
        return diffInDays(todaysDate, blogPublishedDate) === 0;
      });
    }

    // 3
    async function getFeedUrls() {
      return await strapi.services.feedsources.find({
        enabled: true,
      });
    }

    // 4
    async function getNewFeedItems() {
      let allNewFeedItems = [];

      const feeds = await getFeedUrls();

      for (let i = 0; i < feeds.length; i++) {
        const { link } = feeds[i];
        const feedItems = await getNewFeedItemsFrom(link);
        allNewFeedItems = [...allNewFeedItems, ...feedItems];
      }

      return allNewFeedItems;
    }

    // 5
    async function main() {
      const feedItems = await getNewFeedItems();

      for (let i = 0; i < feedItems.length; i++) {
        const item = feedItems[i];

        const newsItem = {
          title: item.title,
          preview: item.contentSnippet,
          link: item.link,
          creator: item.creator,
          sponsored: false,
        };

        await strapi.services.newsitems.create(newsItem);
      }
    }

    // 6
    module.exports = {
      main,
    };
In the above code:
- You declare a
diffInDaysfunction to calculate the number of days between the two given dates. This function is used in thegetNewFeedItemsFromfunction. - In the
getNewFeedItemsFromfunction, you parse the feed (feedUrl) using theRSS-parserNPM package. Then you filter out the feed items that were created in the last 24 hours (diffInDays === 0). - In the
getFeedUrlsfunction, you use the Strapi service (strapi.services) to get (find) all the enabled ({enabled: true}) feed URLs from the Feed Sources (feedsources) collection type. - The
getNewFeedItemsfunction calls thegetFeedURLsto get feed URLs then and loops over the feed URLs array (feeds) to fetch the new feed items (feedItems) using thegetNewFeedItemsFromfunction. Finally, the function returns all the new feed items (allNewFeedItems). - In the main function, you loop over the
feeditemsarray (feedItems) and construct anewsItemobject used to create a new news item in the NewItems Collection type. - At last, the
mainfunction is exported by thefeedUpdater.jsfile
It is a good idea to export all of your tasks from a single file. So, create a tasks.js file in the config directory and add the following code to it:
    'use strict';

    async function updateFeed() {
      return await strapi.config.feedUpdater.main();
    }

    module.exports = {
      updateFeed,
    };
In the functions directory, update the cron.js file by adding the following code to it:
    'use strict';

    module.exports = {
      // 1
      '* * * * *': {
        // 2
        task: async () => {
          await strapi.config.tasks.updateFeed();
        },
        // 3
        options: {
          tz: 'Asia/Kolkata',
        },
      },
    };
In the above code:
- You use the CRON syntax (
* * * *) to define when the specifiedtaskneeds to be run. In this case, it will run every minute. But this setting is only for testing purposes. Once you have verified that the CRON job works successfully, replace the* * * * *with0 12 * * *, which makes the CRON job run at 12:00 every day following the time zone specified. For more info about CRON syntax, you can try https://crontab.guru/. - The
taskkey is provided with theupdateFeedfunction. - The
options.tzis used to specify the time zone for the CRON job to run in.
Finally, to enable the CRON jobs in Strapi, add the following config settings in the config/server.js file:
    module.exports = ({ env }) => ({
      ...
      cron: {
        enabled: true,
      },
    })
At this point, shut down the Strapi development server by pressing Control-C and restart it by running the following command:
npm run develop
Wait for a minute, and you'll see that the CRON job will execute and update the Newsitems collection type:
Once you are happy with the result, shut down the Strapi development server and change the replace the * * * * * with 0 12 * * * in the functions/cron.js file.
Setting Up API Permissions
At this point, you have enough data in your Strapi CMS to test the API.
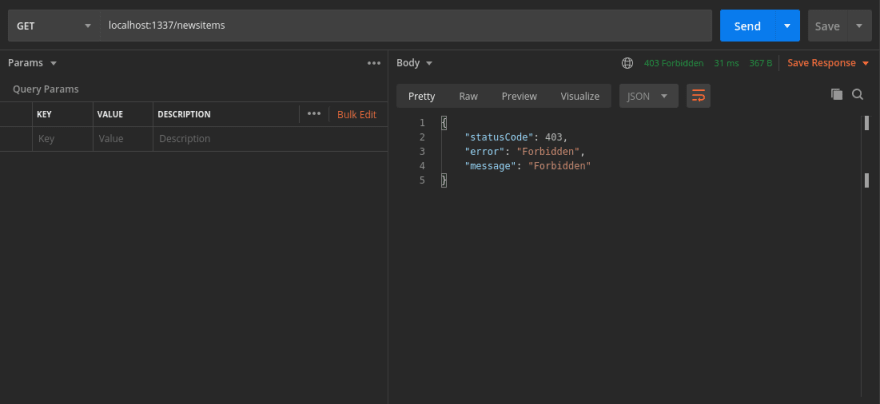
Open Postman and send a GET request to the Newsitems API endpoint - localhost:1337/newsitems. You will not be able to access the endpoint as you have not allowed public access to it.
Since you want to allow public access to your Newsitems collection type, so you need to configure the permissions related to the Public role. So to configure the permissions for your news items endpoint, click on the Settings tab under the General header and select Roles under the Users & Permissions Plugin. Click the Edit icon to the right of the Public Role.
Scroll down to find the Permissions tab and check the find and findone permissions for the Newsitems collection type. For the Subscribers collection type, check the create permission to allow users to signup as subscribers. Once done, save the updated permissions by clicking the Save button.
Go back to Postman, send a GET request to the localhost:1337/newsitems, and you'll get the list of news items from the Strapi.
Next, send a GET request to, for example, localhost:1337/newsitems/7, to fetch an individual news item from the Strapi, and you'll get the individual news item with ID 7 as a response from the Strapi.
That's it for the Strapi part of the project. Next, you need to set up a Nuxt.js app and connect it with the Strapi backend.
Setting Up Nuxt.js
Now that you have completely set up your Strapi project, it's time to build the Nuxt.js frontend app.
Since your current terminal window is serving the Strapi project, open another terminal window and execute the following command from the project's root directory (strapi-nuxtjs-news-app) to create a Nuxt.js project:
npx create-nuxt-app frontend
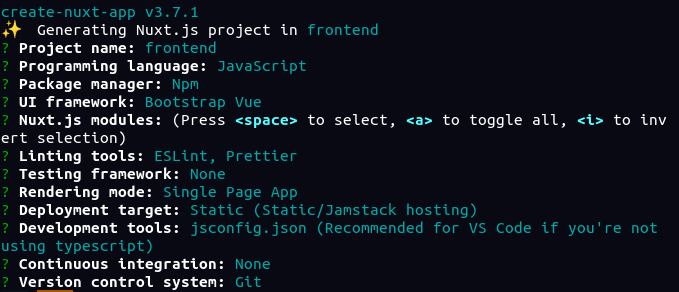
On the terminal, you'll be asked some questions about your Nuxt.js project. For this tutorial, choose the options highlighted below:
Once you have answered all the questions, it will install all the dependencies.
After the installation is complete, navigate into the frontend directory and start the Nuxt.js development server by running the following commands:
    cd frontend
    npm run dev
This will start the development server on port 3000 and take you to localhost:3000. The first view of the Nuxt.js website will look like this:
Installing @nuxtjs/strapi Module
@nuxt/strapi is the Nuxt module for integrating Strapi with Nuxt.js.
Shut down the Nuxt.js development server by pressing Control-C in your terminal and execute the following command to install the module for your Nuxt.js app:
npm install @nuxtjs/strapi --save
Once the installation is complete, open the nuxt.config.js file and add the following properties to the default object exported by nuxt.config.js:
    export default {
      ...

      // 1
      modules: [
        ...
        '@nuxtjs/strapi',
      ],

      // 2
      strapi: {
        url: '<http://localhost:1337>',
        entities: ['newsitems', 'subscribers'],
      },
    }
In the above config:
- You added the
@nuxtjs/strapimodule to themodulesarray so that Nuxt.js loads this package whenever the Nuxt.js app is initialized. - You declare the
strapiconfig variable.urlcorresponds to the URL of the Strapi server. In theentitiesarray, you can specify the collection types present in your API. This will help you to access them using the$strapiobject, for example -$strapi.$newsitems. For more options, you can refer to this official documentation.
Designing a Layout Page
Before you start designing the core pages of the app, you can create a default layout that contains the styles that are applied to all the pages using the default layout.
At the root of the Nuxt.js project (frontend), create a layouts directory. Then in the layouts directory, create a default.vue file and add the following code to it:
    <template>
      <Nuxt />
    </template>

    <style>
    html,
    body {
      font-family: 'Inter';
    }

    .one-liner {
      text-overflow: ellipsis;
      overflow: hidden;
      white-space: nowrap;
    }
    </style>
In the above layout, you have defined the Inter font for your Nuxt.js app and created a .one-liner CSS class which you'll be using later in the core pages to restrict the multiline paragraph to a single line for better UI across the app.
Designing News Pages
Now that you have set up the necessary packages for developing your Nuxt.js website, you need to design the news pages.
Designing All News Page
This page will fetch all of your news items from Strapi CMS and display them in the UI.
In the pages directory, open the index.vue file and replace all the existing code with the following code:
    <template>
      <section class="py-5">
        <b-container>
          <b-row>
            <b-col lg="7">
              <!-- 3 -->
              <div v-if="!newsItems">Loading...</div>
              <!-- 4 -->
              <div v-else>
                <h1 class="mb-5 border-bottom">News</h1>
                <nuxt-link to="/search">Search</nuxt-link>
                <br /><br />
                <div
                  v-for="(newsItem, index) in newsItems"
                  :key="index"
                  class="mb-5"
                >
                  <news-item :item="newsItem"></news-item>
                </div>
              </div>
            </b-col>
          </b-row>
        </b-container>
      </section>
    </template>

    <script>
    export default {
      layout: 'default',
      data() {
        return {
          // 1
          newsItems: null,
        };
      },
      // 2
      async created() {
        this.newsItems = await this.$strapi.$newsitems.find();
      },
    };
    </script>
In the above code:
- You set the
newsItemsasnullin thedataobject which is passed to the<template>. - In the
createdlifecycle hook, you fetch (find()) all the news items ($newsitems) from the Strapi ($strapi) and assign the response to thenewsItemsdata variable. - In the
<template>, you check if thenewsItemsvariable is Falsy, then you render aLoading...message. - Once the
newsItemsvariable evaluates to a Truthy, you loop (v-for) over it and render thenews-itemcomponent by passing the currentnewsItemto theitemprop.
In the components directory, create a new file, NewsItem.vue and add the following code to it:
    <template>
      <div>
        <b-badge v-if="item.sponsored" variant="info" class="mb-2">
          Sponsored
        </b-badge>
        <nuxt-link :to="`/newsitems/${item.id}`" class="text-dark">
          <h2 class="h4">{{ item.title }}</h2>
        </nuxt-link>
        <p
          class="mb-1 one-liner text-muted"
          v-html="sanitizeHtml(item.preview)"
        ></p>
      </div>
    </template>

    <script>
    export default {
      props: {
        item: {
          type: Object,
          default: () => ({}),
        },
      },
    };
    </script>
Since you will parse the HTML from external sources, it makes your app vulnerable to XSS attacks. You first need to sanitize the HTML and then pass it to the v-HTML prop to mitigate this problem.
You can use the DOMPurify library to sanitize the HTML and prevent XSS attacks. In your terminal, run the following command to install this package:
npm install dompurify --save
Sanitization is used across various places in an app. So to respect the DRY (Don't Repeat Yourself) principle, it is often a good idea to create mixins to make these functions available across your app without having to write the same code again and again.
In the plugins directory, create an index.js file and add the following code to it:
    import Vue from 'vue';
    import DOMPurify from 'dompurify';

    Vue.mixin({
      methods: {
        sanitizeHtml(value) {
          return DOMPurify.sanitize(value);
        },
      },
    });
Add the above plugin to the plugins array in the nuxt.config.js file as it allows the Nuxt.js to execute these plugins before rendering a page as in the code below:
    export default {
      ...
      plugins: ['~/plugins/index.js'],
    };
At this point, save your progress and start your Nuxt.js development server by running:
npm run dev
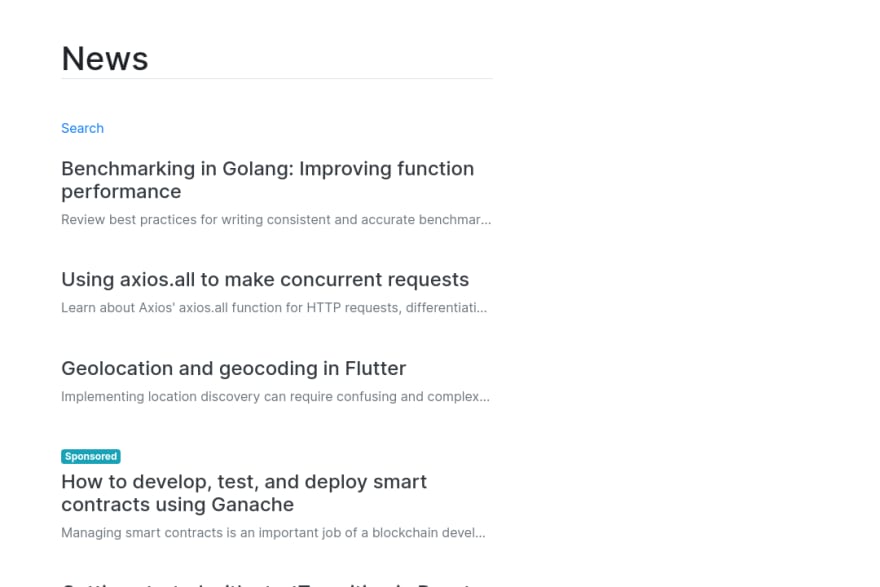
Visit localhost:3000 and you’ll see your news page rendered by Nuxt.js:
Designing a Single News Item Page
The next step is to design a single news item page that needs to be dynamic. You can fetch a single news item from endpoint - localhost:1337/newsitems/:id.
In the pages directory, create a sub-directory, newsitems. Then in the newsitems directory, create a _id.vue file and add the following code to it:
    <template>
      <section class="py-5">
        <b-container>
          <b-row>
            <b-col lg="7" class="mx-lg-auto">
              <!-- 3 -->
              <div v-if="!newsItem">Loading...</div>
              <!-- 4 -->
              <div v-else>
                <nuxt-link to="/">Back</nuxt-link>
                <br /><br />
                <b-alert v-if="newsItem.sponsored" variant="info" show>
                  This is a Sponsored post.
                </b-alert>
                <h1 class="mb-4">{{ newsItem.title }}</h1>
                <div class="small mb-4">
                  <span v-if="newsItem.creator.trim().length > 0">
                    Written by <b>{{ newsItem.creator }}</b>
                    <br />
                  </span>
                  <span>
                    Published on
                    {{ new Date(newsItem.published_at).toLocaleDateString() }}
                  </span>
                </div>
                <p v-html="sanitizeHtml(newsItem.preview)"></p>
                <a :href="newsItem.link" target="_blank">
                  Read on Original Blog
                  <!-- 5 -->
                  <ExternalIcon />
                </a>
              </div>
            </b-col>
          </b-row>
        </b-container>
      </section>
    </template>

    <script>
    export default {
      layout: 'default',
      data() {
        return {
          // 1
          newsItem: null,
        };
      },
      // 2
      async created() {
        const { id } = this.$route.params;
        this.newsItem = await this.$strapi.$newsitems.findOne(id);
      },
    };
    </script>
In the above code:
- You set the
newsItemasnullin thedataobject which is passed to the<template>. - In the
createdlifecycle hook, first, you destructure theidof the dynamic route fromthis.$route.paramsobject. Then, you use the$strapiobject to fetch (findOne()) the news item with id (id) and assign the response to thenewsItemdata variable. - In the
<template>, you check if thenewsItemvariable is Falsy, then you render aLoading...message. - Once the
newsItemvariable evaluates to a Truthy, you use Vue template variables to render the UI for it. - You can see that you have referenced an
<ExternalIcon />component so next, you need to create one.
In the components directory, create an ExternalIcon.vue file and add the following code to it:
    <template>
      <svg width="12px" height="12px" viewBox="0 0 24 24">
        <g
          stroke-width="2.1"
          stroke="currentColor"
          fill="none"
          stroke-linecap="round"
          stroke-linejoin="round"
        >
          <polyline points="17 13.5 17 19.5 5 19.5 5 7.5 11 7.5"></polyline>
          <path d="M14,4.5 L20,4.5 L20,10.5 M20,4.5 L11,13.5"></path>
        </g>
      </svg>
    </template>
Save your progress and wait for the server to Hot Reload. Click on any news item on the index page to open the single news item page and the page will render as follows:
Adding Search Functionality
Now that you have created a podcasts page, the next step is to design a single podcast page that needs to be dynamic and allow the user to listen to the podcast. You can fetch your podcast from endpoint - localhost:1337/podcasts/:id.
In the pages directory, create a search.vue file and add the following code to it:
    <template>
      <section class="py-5">
        <b-container>
          <b-row>
            <b-col lg="7" class="mx-lg-auto">
              <nuxt-link to="/">Back</nuxt-link>
              <br /><br />
              <h1 class="mb-5 border-bottom">Search News</h1>
              <div class="d-flex mb-5">
                <!-- 3 -->
                <b-form-input
                  v-model="searchQuery"
                  type="search"
                  placeholder="Search"
                  class="mr-3"
                ></b-form-input>
                <!-- 4 -->
                <b-btn @click="searchItems">Search</b-btn>
              </div>
              <div v-if="!newsItems">Nothing Found</div>
              <div
                v-for="(newsItem, index) in newsItems"
                v-else
                :key="index"
                class="mb-5"
              >
                <news-item :item="newsItem"></news-item>
              </div>
            </b-col>
          </b-row>
        </b-container>
      </section>
    </template>

    <script>
    export default {
      layout: 'default',
      // 1
      data() {
        return {
          newsItems: null,
          searchQuery: null,
        };
      },
      // 2
      methods: {
        async searchItems() {
          this.newsItems = await this.$strapi.$newsitems.find({
            _q: this.searchQuery,
          });
        },
      },
    };
    </script>
In the above code:
- You set the
newsItemsandsearchQueryasnullin thedataobject which is passed to the<template>. - You declare the
searchItems()method which is used to search the NewsItems ($strapi.$newsitems) collection type by providing thesearchQuerydata variable as the query parameter (_q). - The text field (
b-form-input) is bound to thesearchQuerydata variable using thev-model. - You have added a button (
b-btn) that runs thesearchItemsfunction on button click (@click).
Save your progress and wait for the server to Hot Reload. Go to the localhost:3000/search and try searching for a news item:
Registering Subscribers
The final step to complete your News Aggregator app is to allow users to signup as subscribers.
In the components directory, create a SubscribeBox.vue file and add the following code to it:
    <template>
      <div class="bg-light">
        <div class="p-3">
          <p class="lead font-weight-normal mb-0">Subscribe to our newsletter</p>
          <p class="text-muted">
            Get daily updates about things happening in the world of tech and
            business.
          </p>
          <div class="d-flex flex-column">
            <!-- 3 -->
            <b-form-input
              v-model="email"
              type="email"
              placeholder="Your Email"
              class="mb-2"
            ></b-form-input>
            <!-- 4 -->
            <b-btn @click="addSubscriber">Subscribe</b-btn>
            <!-- 5 -->
            <p v-if="message" class="mt-3 mb-0">{{ message }}</p>
          </div>
        </div>
      </div>
    </template>

    <script>
    export default {
      // 1
      data() {
        return {
          email: null,
          message: null,
        };
      },
      // 2
      methods: {
        async addSubscriber() {
          const response = await this.$strapi.$subscribers.create({
            email: this.email,
          });
          if (response) {
            this.message = 'Thanks for subscribing!';
          }
        },
      },
    };
    </script>
In the above code:
- You set the
emailandmessageasnullin thedataobject which is passed to the<template>. - You declare the
addSubscribermethod which is used to create (create({email: this.email})) a new subscriber in Subscribers Collection type ($strapi.$subscribers). - The
emaildata variable is bound to the Form Text input (b-form-input) using thev-model. - You have added a button (
b-btn) that runs thesearchItemsfunction on the button click (@click). - If the
messageevaluates to a Truthy, you render the message telling the user that they have been successfully subscribed.
At this moment SubscribeBox is just a component, so you need to render it in a page. Open the pages/index.vue file and update the <template> by adding the following code:
    <template>
      <section class="py-5">
        <b-container>
          <b-row>
            <b-col lg="7">
              <!--  -->
            </b-col>
            <b-col lg="1"></b-col>
            <b-col lg="4">
              <SubscribeBox />
            </b-col>
          </b-row>
        </b-container>
      </section>
    </template>
Save your progress and wait for the server to Hot Reload. Go to the localhost:3000 and the SubscribeBox component will render as follows:
Test the Subscription form by adding a valid email and click Subscribe button. Once you get a thanks message, check out the Subscribers collection type in your Strapi CMS for the newly registered email:
That's it. Your app is complete and below is a complete overview of the app in action:
Conclusion
That's it! You have successfully set up a News Aggregator app using Nuxt.js as a frontend and Strapi as a backend. You learned about API Permissions in Strapi, CRON jobs in Strapi, implementing views in Nuxt.js, and more. The next step would be to deploy the app. You can deploy the Strapi CMS on DigitalOcean and the Nuxt.js app on Netlify.
The entire source code for this tutorial is available in this GitHub repository.
This content originally appeared on DEV Community and was authored by Shada
Shada | Sciencx (2021-11-25T10:30:18+00:00) How to Build a News Aggregator App using Strapi and Nuxtjs. Retrieved from https://www.scien.cx/2021/11/25/how-to-build-a-news-aggregator-app-using-strapi-and-nuxtjs/
Please log in to upload a file.
There are no updates yet.
Click the Upload button above to add an update.


