How to Build a Note Taking Command Line Application With Rust: Part 1

Miner with a rusty pickaxe finds gold nugget circa 2021 — Bonus internet points if you can identify the location

Last week I wrote about my first Rust application. After making it through some of the initial syntax hurdles, I’m feeling good about the language. This post is the first of a series of posts that will cover how to build a note taking application with Rust.

The ultimate goal is to give readers enough knowledge to build their own note-taking application similar to engram.

The content expects the reader to have some existing programming knowledge, but can be completely new to Rust. Each part of the series will result in a functional and useful application that will be built upon in future posts.

I strongly recommend typing out the code that you see, rather than just copying and pasting the entire block. This is one of the most effective ways to get a better understanding.

Getting Started

Install rust with the command below found from their Getting started page

Install Rust

curl --proto '=https' --tlsv1.2 -sSf https://sh.rustup.rs | sh

Create New Rust Project

cargo new notes

cargo is the Rust package manager. There are several commands that it supports and this article will introduce a couple of them. cargo new creates a new project (and folder) named notes (or whatever else you specify) in your current directory.

src/main.rs includes a dead simple “Hello World” application.

Cargo.toml is called the manifest. See The Cargo Book for an in depth look at what is supported here. We only need to make one small tweak here to add a dependency, so don’t worry too much about understanding everything.

.gitignore conveniently ignores the target folder by default from git.

Run the hello world application

cargo run

The cargo run command builds and runs the current package. After making changes in this tutorial you will use it to run and test those changes. After running it once, you will see a couple more files and folders appear.

Cargo.lock This is an autogenerated file that specifies exactly what versions of libraries are being used. For more details about Cargo.toml vs. Cargo.lock refer to The Cargo Book.

target This folder is where all the built files get stored. You can pretty much ignore this as the cargo tool deals with it as needed.

The default rust workspace open in VS Code

Preparing the Data Model

Creating an sqlite3 Database

A database is the centerpiece of pretty much any application. Most new functionality requires storing some new piece of data or retrieving existing information in some way. For these reasons, this is often the first thing you should be thinking about when building something new. Particuarly, what is the “schema” of what I am trying to build.

For the purposes of this tutorial, our schema is very simple. We want a notes table that has an id column and a body column. id stores a unique identifier for the specific note. This is a required field by most databases as it allows you to directly reference an existing item. The body column will store the content of the note that we are saving. You’re welcome to choose some other term here that feels better to you. Some possible alternatives: content, message, text, or title. It is certainly possible to change this after the fact, but it become increasingly difficult as time moves along and more code references these specific terms, so try to pick one you can live with and stick to it.

Most tutorials I see nowadays are primarily concerned with storing data on a server and syncing it via some kind of API. This series will eventually get there, but it is beyond important that a notes application like the one we are building works offline. Placing this restriction early on allows us to build with offline in mind — rather than attempting to bolt it on to an existing cloud application.

sqlite3 is a popular database library that stores the database in a single file on the filesystem. This keeps things simple for the user as they don’t need to run a separate database server and the database file can be passed along to other systems if needed.

Creating a notes Table

The first step is to create a table that will house our applications data. We will use the rusqlite library to handle our connection to the sqlite database. You can install it by modifying your Cargo.toml.

Cargo.toml

[package]
name = "notes"
version = "0.1.0"
edition = "2021"
# See more keys and their definitions at https://doc.rust-lang.org/cargo/reference/manifest.html
[dependencies.rusqlite]
version = "0.26.1"
features = ["bundled"]

This adds rusqlite as a dependency that will be installed the next time you attempt to build. features = [“bundled”] tells the package to compile SQLite . This is particularly useful on Windows where finding system libraries is surprisingly difficult.

Once that has been added you can now access the rusqlite in your main.rs replace the existing code with the following:

use rusqlite::{Connection, Result};
fn main() -> Result<(), Box<dyn std::error::Error>> {
let conn = Connection::open("notes.db")?;
conn.execute(
"create table if not exists notes (
id integer primary key,
body text not null unique
)",
[],
)?;

Ok(())
}

Now you can run cargo run and once it builds the notes program will run and immediately exit. You should then see a file in your current directory called notes.db. If you installed the DB Browser, you can open up this file and see that a notes table exists with an id and body column.

If you run the program again, nothing should happen. The SQL command we are running:

create table if not exists notes (
id integer primary key,
body text not null unique
)

Specifies to only create the table if it doesn’t already exist. When we open the connection with let conn = Connection::open(“notes.db”)?; we point the rusqlite library to the same database file and it is able to determine that this table has already been created.

[Optional] Install DB Browser for SQLite

I find it helpful to be able to visually confirm that things are working as intended. At this point, you can download a database browser that allows you to see the contents of the newly create notes.db file.

You can download the DB Browser for SQLite. Once installed open it and click Open Database .

notes.db open inside DB Browser for SQLite

Now that we have a table created and our schema set up, we can proceed with adding our first note.

CRUD — Create, Read, Update, Delete

When developing new functionality in any program, I typically work on each component of the CRUD acronym independently. The order that makes the most sense to me to build is:

  1. Create
  2. Read
  3. Delete
  4. Update

This portion of the tutorial will only cover the create aspect. The next one will go over the others.

Create

Create comes first because without it none of the others make sense. In a lot of scenarios, your application becomes functional as soon as creating is possible. You obviously would like the ability to do the others, but their absence does not impair you from creating new items. In our notes example, you’ll see that even if you just added the create functionality, you still have a program that correctly stores notes to a local database. If that’s all you were able to accomplish, you could still open the sqlite3 databse using something like DB Browser for SQLite and browse old notes there.

In our small example here, there’s not much to the rest of CRUD, but when building a larger graphical user interface, it can be useful to demo and test just the create functionality. You might realize that you want it to work or look differently and catching this here will save you time.

Requirements

For the creation of notes, I simply want to be able to type my note into the terminal and hit enter. In order to gather input from the command line we will use the built in std::io package.

use std::io;
use rusqlite::{Connection, Result};
fn main() -> Result<(), Box<dyn std::error::Error>> {
let conn = Connection::open("notes.db")?;
conn.execute(
"create table if not exists notes (
id integer primary key,
body text not null unique
)",
[],
)?;
  let mut buffer = String::new();
io::stdin().read_line(&mut buffer)?;
conn.execute("INSERT INTO notes (body) values (?1)", [buffer])?;
  Ok(())
}

We can again run our application with cargo run and you should now see that it doesn’t immediately exit. You can type in any message you like, but “hello world” is the standard “is this thing working” message. Once you hit enter, the program should exit.

Sample output after submitting first note

If you installed DB Browser above, you can now click Browse Data and you’ll see a single row with id: 1 and body: “hello world” (or whatever you just typed).

DB Browser Showing “hello world” note

This is pretty good, but the purpose of the program is to allow us to quickly capture many notes. We need some way to make it so the program doesn’t exit right away after the first note is submitted.

To accomplish this, we will use a loop — specifically a while loop.

use std::io;
use rusqlite::{Connection, Result};
fn main() -> Result<(), Box<dyn std::error::Error>> {
let conn = Connection::open("notes.db")?;
conn.execute(
"create table if not exists notes (
id integer primary key,
body text not null unique
)",
[],
)?;
  let mut running = true;
while running == true {
let mut buffer = String::new();
io::stdin().read_line(&mut buffer)?;
let trimmed_body = buffer.trim();
if trimmed_body == "" {
running = false;
} else {
conn.execute("INSERT INTO notes (body) values (?1)", [trimmed_body])?;
}
}
  Ok(())
}

To accomplish this, we introduce a boolean variable called running. When we start the program we want to continue accepting input so we initialize it to true.

The let trimmed_body = buffer.trim(); removes any whitespace at the end of the input line. This is necessary because the read_line returns the string with the new line character \n. This is invisible in most places you might view it, but is needed to make the trimmed_body == “” equality check work. As an additional benefit, the .trim() ensures that any trailing white space gets removed before we store to the databse.

We can now run again with cargo run and you should now be able to enter note after note without the program exiting. Once you have finished writing notes you can press enter with a blank line and the program will exit.

Multiple notes created during a single run

Wrapping Things Up

As mentioned at the start, this post is the beginning of a longer series that will cover how to build and design a notes application for the command line using Rust. Over the last year, I have used a simple notes application as the project I use to experiment with new technology. So far, I have built note apps (affectionately called engram) using Swift iOS, React Native for Android, React, and Vanilla JavaScript using a similar methodology described above.

I’m now documenting this process as it has proven to be very successful in getting me to learn what I need to know.

If you run in to any issues with any part of this tutorial, please leave a comment and I can update the content to be more clear. If you like where this is going, make sure to follow me here on medium or on Twitter to get notified when future parts are released.


How to Build a Note Taking Command Line Application With Rust: Part 1 was originally published in Level Up Coding on Medium, where people are continuing the conversation by highlighting and responding to this story.


This content originally appeared on Level Up Coding - Medium and was authored by Adam Berg

Miner with a rusty pickaxe finds gold nugget circa 2021 — Bonus internet points if you can identify the location

Last week I wrote about my first Rust application. After making it through some of the initial syntax hurdles, I’m feeling good about the language. This post is the first of a series of posts that will cover how to build a note taking application with Rust.

The ultimate goal is to give readers enough knowledge to build their own note-taking application similar to engram.

The content expects the reader to have some existing programming knowledge, but can be completely new to Rust. Each part of the series will result in a functional and useful application that will be built upon in future posts.

I strongly recommend typing out the code that you see, rather than just copying and pasting the entire block. This is one of the most effective ways to get a better understanding.

Getting Started

Install rust with the command below found from their Getting started page

Install Rust

curl --proto '=https' --tlsv1.2 -sSf https://sh.rustup.rs | sh

Create New Rust Project

cargo new notes

cargo is the Rust package manager. There are several commands that it supports and this article will introduce a couple of them. cargo new creates a new project (and folder) named notes (or whatever else you specify) in your current directory.

src/main.rs includes a dead simple “Hello World” application.

Cargo.toml is called the manifest. See The Cargo Book for an in depth look at what is supported here. We only need to make one small tweak here to add a dependency, so don’t worry too much about understanding everything.

.gitignore conveniently ignores the target folder by default from git.

Run the hello world application

cargo run

The cargo run command builds and runs the current package. After making changes in this tutorial you will use it to run and test those changes. After running it once, you will see a couple more files and folders appear.

Cargo.lock This is an autogenerated file that specifies exactly what versions of libraries are being used. For more details about Cargo.toml vs. Cargo.lock refer to The Cargo Book.

target This folder is where all the built files get stored. You can pretty much ignore this as the cargo tool deals with it as needed.
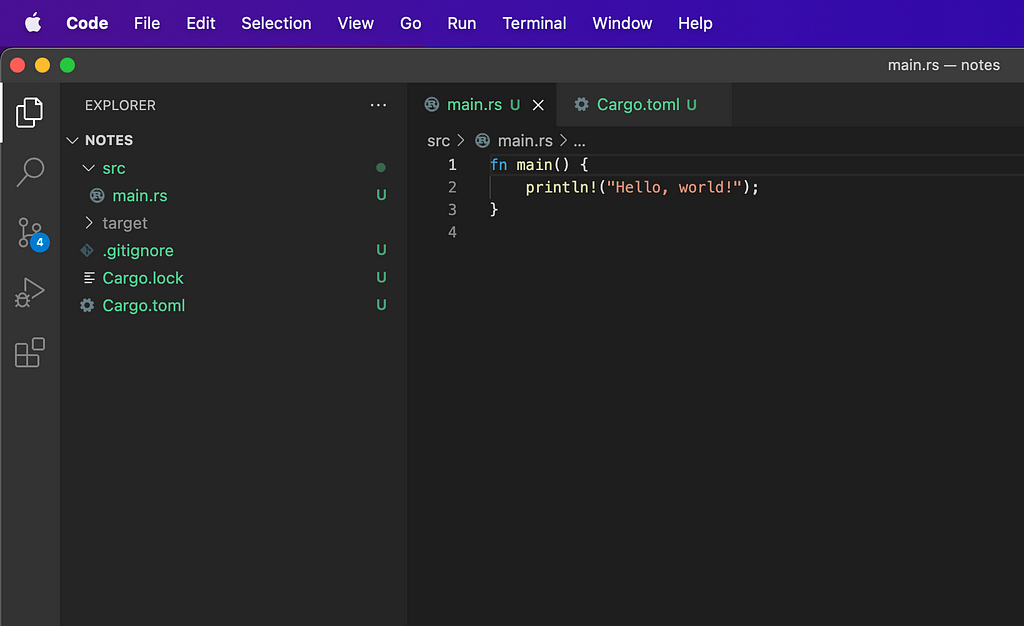
The default rust workspace open in VS Code

Preparing the Data Model

Creating an sqlite3 Database

A database is the centerpiece of pretty much any application. Most new functionality requires storing some new piece of data or retrieving existing information in some way. For these reasons, this is often the first thing you should be thinking about when building something new. Particuarly, what is the “schema” of what I am trying to build.

For the purposes of this tutorial, our schema is very simple. We want a notes table that has an id column and a body column. id stores a unique identifier for the specific note. This is a required field by most databases as it allows you to directly reference an existing item. The body column will store the content of the note that we are saving. You’re welcome to choose some other term here that feels better to you. Some possible alternatives: content, message, text, or title. It is certainly possible to change this after the fact, but it become increasingly difficult as time moves along and more code references these specific terms, so try to pick one you can live with and stick to it.

Most tutorials I see nowadays are primarily concerned with storing data on a server and syncing it via some kind of API. This series will eventually get there, but it is beyond important that a notes application like the one we are building works offline. Placing this restriction early on allows us to build with offline in mind — rather than attempting to bolt it on to an existing cloud application.

sqlite3 is a popular database library that stores the database in a single file on the filesystem. This keeps things simple for the user as they don’t need to run a separate database server and the database file can be passed along to other systems if needed.

Creating a notes Table

The first step is to create a table that will house our applications data. We will use the rusqlite library to handle our connection to the sqlite database. You can install it by modifying your Cargo.toml.

Cargo.toml

[package]
name = "notes"
version = "0.1.0"
edition = "2021"
# See more keys and their definitions at https://doc.rust-lang.org/cargo/reference/manifest.html
[dependencies.rusqlite]
version = "0.26.1"
features = ["bundled"]

This adds rusqlite as a dependency that will be installed the next time you attempt to build. features = [“bundled”] tells the package to compile SQLite . This is particularly useful on Windows where finding system libraries is surprisingly difficult.

Once that has been added you can now access the rusqlite in your main.rs replace the existing code with the following:

use rusqlite::{Connection, Result};
fn main() -> Result<(), Box<dyn std::error::Error>> {
let conn = Connection::open("notes.db")?;
conn.execute(
"create table if not exists notes (
id integer primary key,
body text not null unique
)",
[],
)?;

Ok(())
}

Now you can run cargo run and once it builds the notes program will run and immediately exit. You should then see a file in your current directory called notes.db. If you installed the DB Browser, you can open up this file and see that a notes table exists with an id and body column.

If you run the program again, nothing should happen. The SQL command we are running:

create table if not exists notes (
id integer primary key,
body text not null unique
)

Specifies to only create the table if it doesn’t already exist. When we open the connection with let conn = Connection::open(“notes.db”)?; we point the rusqlite library to the same database file and it is able to determine that this table has already been created.

[Optional] Install DB Browser for SQLite

I find it helpful to be able to visually confirm that things are working as intended. At this point, you can download a database browser that allows you to see the contents of the newly create notes.db file.

You can download the DB Browser for SQLite. Once installed open it and click Open Database .
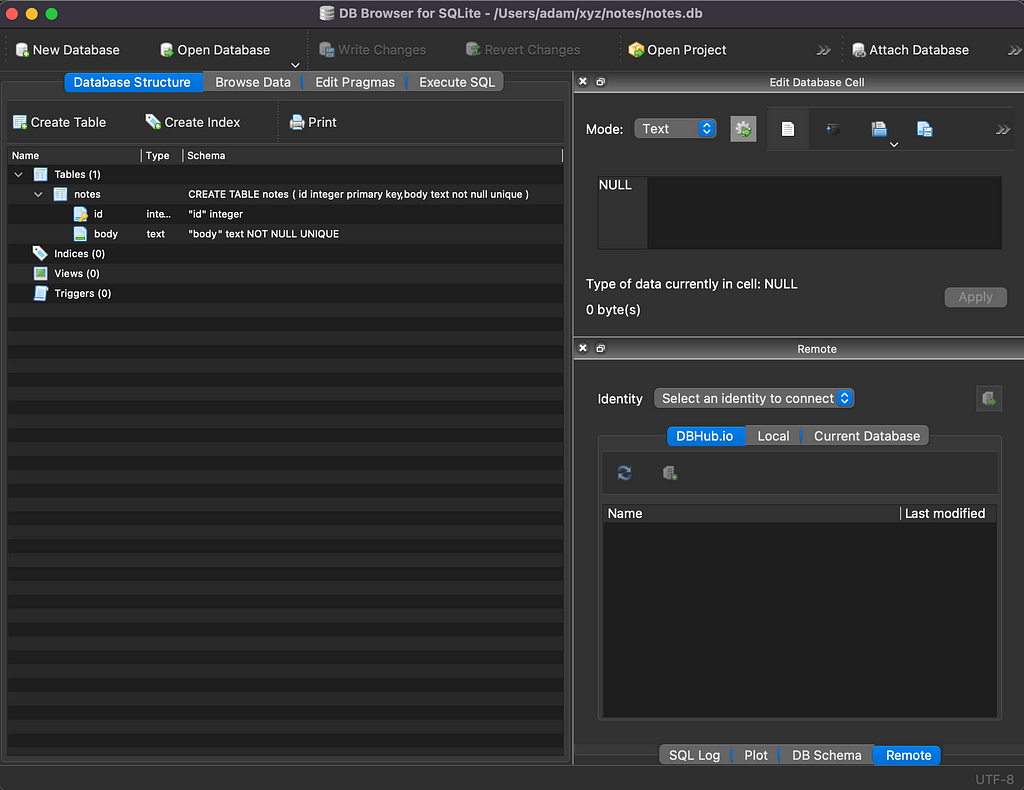
notes.db open inside DB Browser for SQLite

Now that we have a table created and our schema set up, we can proceed with adding our first note.

CRUD — Create, Read, Update, Delete

When developing new functionality in any program, I typically work on each component of the CRUD acronym independently. The order that makes the most sense to me to build is:

  1. Create
  2. Read
  3. Delete
  4. Update

This portion of the tutorial will only cover the create aspect. The next one will go over the others.

Create

Create comes first because without it none of the others make sense. In a lot of scenarios, your application becomes functional as soon as creating is possible. You obviously would like the ability to do the others, but their absence does not impair you from creating new items. In our notes example, you’ll see that even if you just added the create functionality, you still have a program that correctly stores notes to a local database. If that’s all you were able to accomplish, you could still open the sqlite3 databse using something like DB Browser for SQLite and browse old notes there.

In our small example here, there’s not much to the rest of CRUD, but when building a larger graphical user interface, it can be useful to demo and test just the create functionality. You might realize that you want it to work or look differently and catching this here will save you time.

Requirements

For the creation of notes, I simply want to be able to type my note into the terminal and hit enter. In order to gather input from the command line we will use the built in std::io package.

use std::io;
use rusqlite::{Connection, Result};
fn main() -> Result<(), Box<dyn std::error::Error>> {
let conn = Connection::open("notes.db")?;
conn.execute(
"create table if not exists notes (
id integer primary key,
body text not null unique
)",
[],
)?;
  let mut buffer = String::new();
io::stdin().read_line(&mut buffer)?;
conn.execute("INSERT INTO notes (body) values (?1)", [buffer])?;
  Ok(())
}

We can again run our application with cargo run and you should now see that it doesn’t immediately exit. You can type in any message you like, but “hello world” is the standard “is this thing working” message. Once you hit enter, the program should exit.
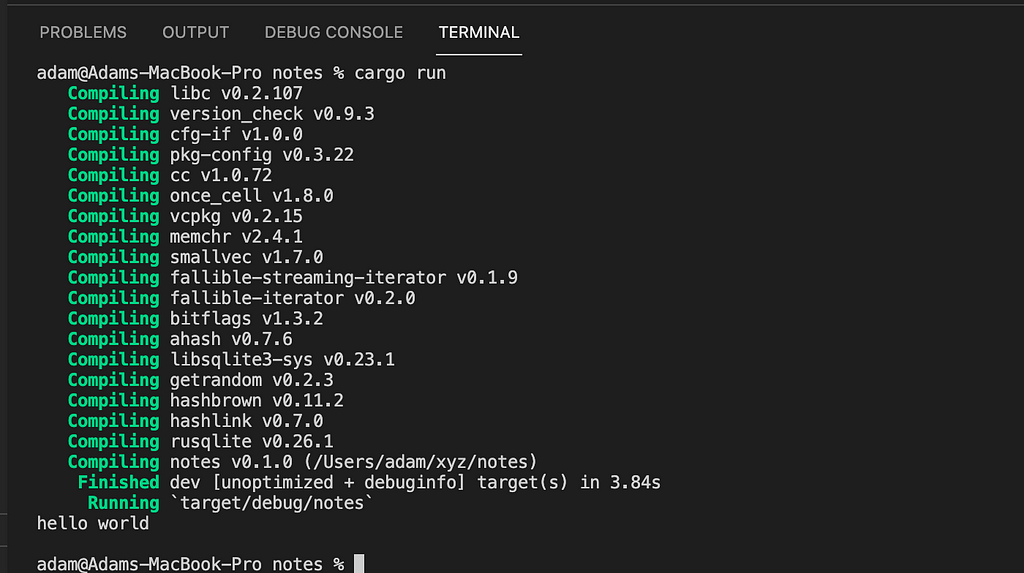
Sample output after submitting first note

If you installed DB Browser above, you can now click Browse Data and you’ll see a single row with id: 1 and body: “hello world” (or whatever you just typed).
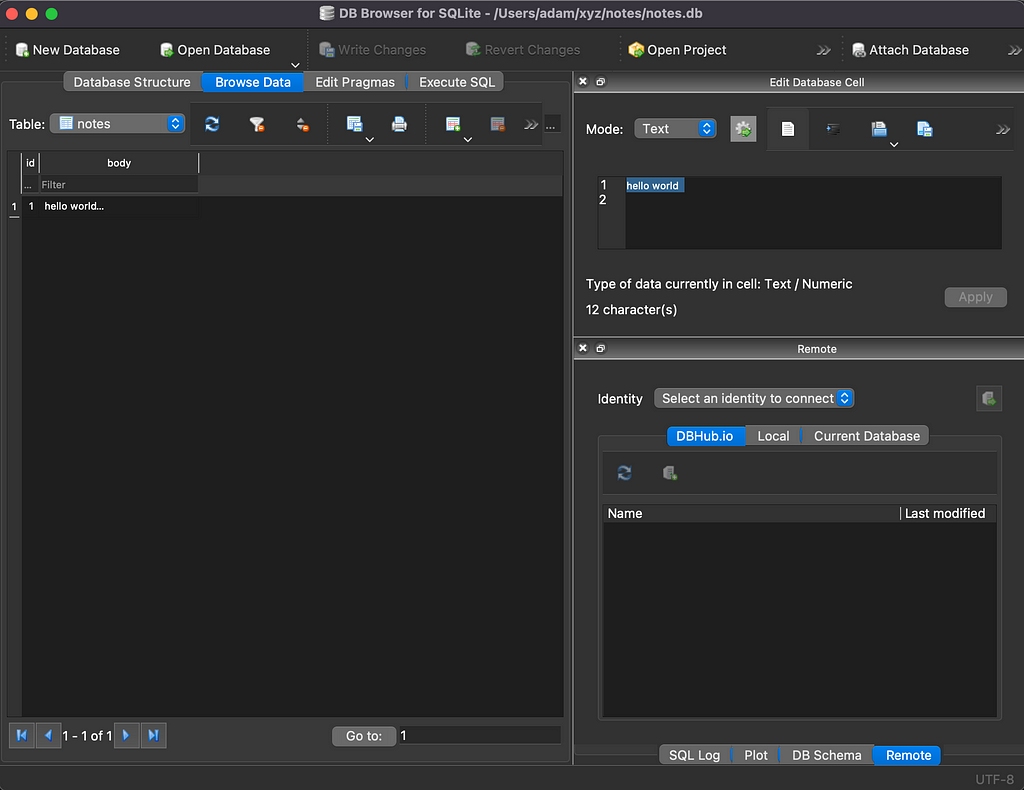
DB Browser Showing “hello world” note

This is pretty good, but the purpose of the program is to allow us to quickly capture many notes. We need some way to make it so the program doesn’t exit right away after the first note is submitted.

To accomplish this, we will use a loop — specifically a while loop.

use std::io;
use rusqlite::{Connection, Result};
fn main() -> Result<(), Box<dyn std::error::Error>> {
let conn = Connection::open("notes.db")?;
conn.execute(
"create table if not exists notes (
id integer primary key,
body text not null unique
)",
[],
)?;
  let mut running = true;
while running == true {
let mut buffer = String::new();
io::stdin().read_line(&mut buffer)?;
let trimmed_body = buffer.trim();
if trimmed_body == "" {
running = false;
} else {
conn.execute("INSERT INTO notes (body) values (?1)", [trimmed_body])?;
}
}
  Ok(())
}

To accomplish this, we introduce a boolean variable called running. When we start the program we want to continue accepting input so we initialize it to true.

The let trimmed_body = buffer.trim(); removes any whitespace at the end of the input line. This is necessary because the read_line returns the string with the new line character \n. This is invisible in most places you might view it, but is needed to make the trimmed_body == “” equality check work. As an additional benefit, the .trim() ensures that any trailing white space gets removed before we store to the databse.

We can now run again with cargo run and you should now be able to enter note after note without the program exiting. Once you have finished writing notes you can press enter with a blank line and the program will exit.

Multiple notes created during a single run

Wrapping Things Up

As mentioned at the start, this post is the beginning of a longer series that will cover how to build and design a notes application for the command line using Rust. Over the last year, I have used a simple notes application as the project I use to experiment with new technology. So far, I have built note apps (affectionately called engram) using Swift iOS, React Native for Android, React, and Vanilla JavaScript using a similar methodology described above.

I’m now documenting this process as it has proven to be very successful in getting me to learn what I need to know.

If you run in to any issues with any part of this tutorial, please leave a comment and I can update the content to be more clear. If you like where this is going, make sure to follow me here on medium or on Twitter to get notified when future parts are released.


How to Build a Note Taking Command Line Application With Rust: Part 1 was originally published in Level Up Coding on Medium, where people are continuing the conversation by highlighting and responding to this story.


This content originally appeared on Level Up Coding - Medium and was authored by Adam Berg


Print Share Comment Cite Upload Translate Updates
APA

Adam Berg | Sciencx (2021-11-30T03:39:00+00:00) How to Build a Note Taking Command Line Application With Rust: Part 1. Retrieved from https://www.scien.cx/2021/11/30/how-to-build-a-note-taking-command-line-application-with-rust-part-1/

MLA
" » How to Build a Note Taking Command Line Application With Rust: Part 1." Adam Berg | Sciencx - Tuesday November 30, 2021, https://www.scien.cx/2021/11/30/how-to-build-a-note-taking-command-line-application-with-rust-part-1/
HARVARD
Adam Berg | Sciencx Tuesday November 30, 2021 » How to Build a Note Taking Command Line Application With Rust: Part 1., viewed ,<https://www.scien.cx/2021/11/30/how-to-build-a-note-taking-command-line-application-with-rust-part-1/>
VANCOUVER
Adam Berg | Sciencx - » How to Build a Note Taking Command Line Application With Rust: Part 1. [Internet]. [Accessed ]. Available from: https://www.scien.cx/2021/11/30/how-to-build-a-note-taking-command-line-application-with-rust-part-1/
CHICAGO
" » How to Build a Note Taking Command Line Application With Rust: Part 1." Adam Berg | Sciencx - Accessed . https://www.scien.cx/2021/11/30/how-to-build-a-note-taking-command-line-application-with-rust-part-1/
IEEE
" » How to Build a Note Taking Command Line Application With Rust: Part 1." Adam Berg | Sciencx [Online]. Available: https://www.scien.cx/2021/11/30/how-to-build-a-note-taking-command-line-application-with-rust-part-1/. [Accessed: ]
rf:citation
» How to Build a Note Taking Command Line Application With Rust: Part 1 | Adam Berg | Sciencx | https://www.scien.cx/2021/11/30/how-to-build-a-note-taking-command-line-application-with-rust-part-1/ |

Please log in to upload a file.


There are no updates yet.
Click the Upload button above to add an update.

You must be logged in to translate posts. Please log in or register.