This content originally appeared on DEV Community and was authored by Afrar Malakooth
Hello Everyone! Welcome to another DEV Community post. This is going to be a continuation of my previous DEV Community post Integrating your Spring Boot project with Amazon S3. If you have directly visited here, you might have to go back and copy some code snippets from previous story for a fully working solution. If you’re ready, let’s get started without waiting further.
As per the implementation in the last DEV Community post whenever a user needs to upload a file, the file should be first uploaded to the server and from the server it will be uploaded to Amazon S3. Similarly when a user requests for a file it will be downloaded to the server first and then will be sent to the user. Whoever reads the above sentence will clearly understand that the implementation uploads a file twice and downloads it twice. Hence this will be a wastage of server resources and will double time taken to process a file. Luckily presigned URLs are there to save us!
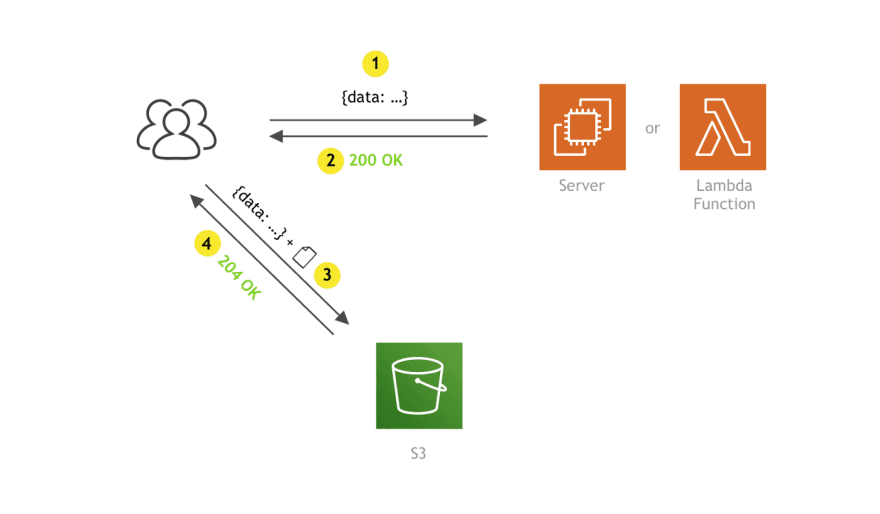
With presigned URLs first the user need to send the metadata about the file to server in order to create a key and to generate a presigned URL. Server will send the generated presigned URL back to user and user has to upload the file directly to Amazon S3 using the presigned URL along with request parameters sent by the server. Similarly when retrieving a file user has to send the filename (aka key) to the server and server will generate a presigned URL to download the requested resource. Once the presigned URL is returned, user has to make a request again to download the file directly from Amazon S3.
First open the FileService.java class from the previous story. We’ll be removing convertMultiPartFileToFile method which is no more needed and making changes to findByName, save methods. Make the changes by referring to below Gist.
Once you’re done making changes to the service class, open the FileController.java class to make some additional changes. Refer the code snippet shared below and make changes accordingly.
Once you’re done with the changes we have simple Spring Boot application which will interact with Amazon S3 to generate presigned URLs for file upload and download. Please note that above code is not production ready and should undergo several changes before being deployed.
As shown above make a request to server via Postman or any other client with requested metadata to generated a presigned URL to upload a file. Once the server returns a presigned URL, make another call via the client to upload the file as below.
We’re all set now, Happy Coding! Below is a DEV Community video I have recently published and if you’re interested check out my previous Medium story on Configuring multiple data sources with Spring Boot 2 and Spring Data JPA.

How to add an icon for an iOS app
Afrar Malakooth ・ Nov 18 ・ 1 min read
Cover Image: Photo by Maksym Kaharlytskyi on Unsplash
This content originally appeared on DEV Community and was authored by Afrar Malakooth
Afrar Malakooth | Sciencx (2021-12-01T05:05:03+00:00) Working with Amazon S3 presigned URLs in Spring Boot. Retrieved from https://www.scien.cx/2021/12/01/working-with-amazon-s3-presigned-urls-in-spring-boot/
Please log in to upload a file.
There are no updates yet.
Click the Upload button above to add an update.


 04:16
04:16