
This content originally appeared on Level Up Coding - Medium and was authored by Agus Richard
Containerized Development Environment with VSCode and Docker
Clear up the problem of “Hey, it’s working on my machine!” with these simple steps
If you’ve been working in a team, I guess you’d be familiar hearing such a phrase like “I don’t know what is the difference between the local and the server, but on my local machine it works!” or something similar.
The truth is I’ve faced this kind of problem a few times before and as you’ve guessed it, it’s a problem of my local machine and the server having a different kind of environment. For example, on your local machine you use Python 3.9 but the production server is using Python 3.6. Additionally, both have different sets of dependencies. So, no wonder that it works locally but not on the production server.
By having this kind of recurring problem, do we have some sort of solution for this? Well, you can imitate your local environment to be closely similar to your production server like using the same Python version and virtual environment. Or use nvm to manage a different set of node versions. But there is one that I like the most, which is using a containerized development environment.
Introduction and Prerequisites
Imagine that you’re working on multiple projects at once. The first one is using Node v12, the other one is using v14 and so on. It will be such a headache to adjust our local machine to each of these different set-ups. Hence, please introduce containerized development environment.
With this approach, there is no adjustment to make if you want to work on your project and switch to another project later. You’ll only need to start your containerized development environment and work inside it. Pretty simple right?
Let’s start by having the tools we need.
First, we need VSCode installed on our local machine. A good chance that you’ve had that by now. If you haven’t, you can download it first here https://code.visualstudio.com/Download and follow the installation steps.
After that, we need a Docker engine to containerize the development environment. You can install it depending on your operating system, go to https://docs.docker.com/engine/install/. The installation steps are fairly easy, pretty much the same as VSCode. You can look for the details on the official documentation.
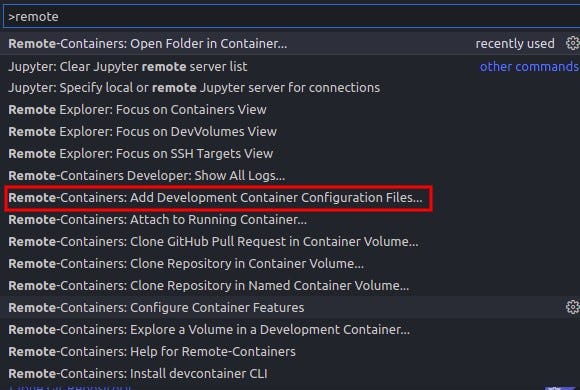
In the last step of setting up the prerequisites, we need to install Remote Development extension in VSCode. Search for ‘remote’ in the extension section.

Click Remote Development, then install it. In here I had installed the extension pack, therefore I got SSH, WSL and Containers. But you can solely install Remote Containers if you want to use containers only.
After you’ve successfully installed it, you’ll have an icon like this on the bottom left corner of your screen.

Now, we are ready to set up our first development environment. In the subsequent section, we’ll learn how to set up development environments for Python, JavaScript and Go projects.
Python
Let’s start with Python, in this case, we’ll use Django as our example. The only requirement is having Python 3.9 installed. For this section, we’ll use the auto-generated configuration by VSCode. We’ll see a different approach for more flexibility in the later section.
First, click the bottom left corner icon (you’ll see a hover text of “Open a Remote Window”).
You can also press F1 and search for remote, then choose “Remote-Containers: Add Development Container Configuration Files”.
If you click the bottom left corner, you’ll see these options. Similar to the above step, you should click “Add Development Container Configuration Files”

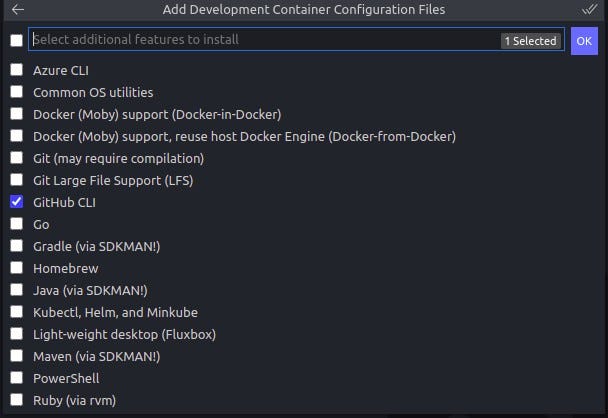
After that, you’ll see these options. Since we want to work on a Django project, then you have to choose Python 3.

Choose the Python version (in this case 3.9), then choose none when you need to pick Nodejs version (since we don’t actually need it). After that, you’ll have checkbox options. For this moment, you’ll probably only need GitHub CLI, but it is really up to you.
By this time, you have a folder named .devcontainer containing Dockerfile and devcontainer.json .
Below is the content of the Dockerfile.
Look at the Python version! Remember that we chose Python 3.9 but here we got 3.10. It’s okay, don’t be panic. Insidedevcontainer.json, you see that the version is still 3.9, in other words, Docker build-time variables (ARG) will be replaced by the value defined inside devconatainer.json .
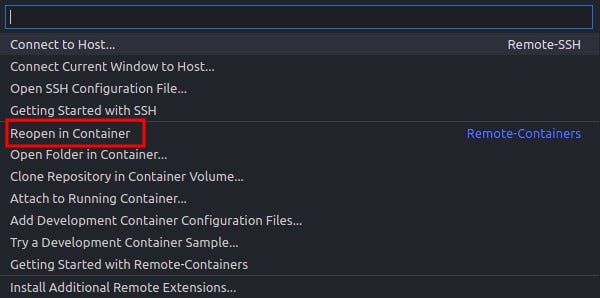
Now again, click the bottom left corner icon, but now choose “Reopen in Container”.
Before entering the development container, the image needs to be built. After the building process is done, you can open the terminal, most likely you’ll have a different look on the terminal. To make sure that you are indeed working in an isolated environment. You can type python version , you’ll see Python 3.9 (or 3.9.9) installed.

Now we are ready to develop our Django project. If you don’t know Django before, you can initialize a Django project using the following commands.
pip install django                     # installing django
django-admin startproject example .    # initialize django project
python manage.py runserver             # run the server
After you start a Django server. You’ll have a pop-up modal on the bottom left like this.

Now, choose “Open in Browser”. After that, on your browser, you’ll have a new tab showing some kind of greeting for the first time developing the project.

Up to this point, you can start to develop your project.
More to Python
Previously, we started the project from scratch. What if you already have your project, but don’t have the development configuration files yet?
If right now you have your Django project including therequirements.txt file. To set up a development container, you need to follow the same procedures as before, then after you get devcontainer.json file, you need to tweak something.
{
  ...
  "postCreateCommand": "pip install --user -r requirements.txt",
  ...
}
Add this line inside devcontainer.json . With this option, every time you rebuild the image of a development container, you don’t have to run pip install again. We’ll have a bit more detailed look to devcontainer.json later.
Node (React)
In the previous section, we are using the auto-generated configuration right away. It’s a bit inflexible especially if you want a different kind of terminal and VSCode extensions. This time, we’ll extend and tweak this configuration to meet our personal (or team) preferences.
The initial steps are pretty much the same as in the Python section. You need to open the remote window and add new development environment configuration files. But instead of choosing Python, you should choose NodeJS with your preferred version. After that, like before, you’ll have .devcontainer folder containing devcontainer.json and Dockerfile .
As an example, you could change the generated Dockerfile into this.
Here, we installed powerline fonts, zsh-syntax-highlighting , andzsh-autosuggestions . After all the plugins are installed, we copy.zshrc to the root folder. Note that, .zshrc is a configuration file for a zsh shell and here is the content of that file:
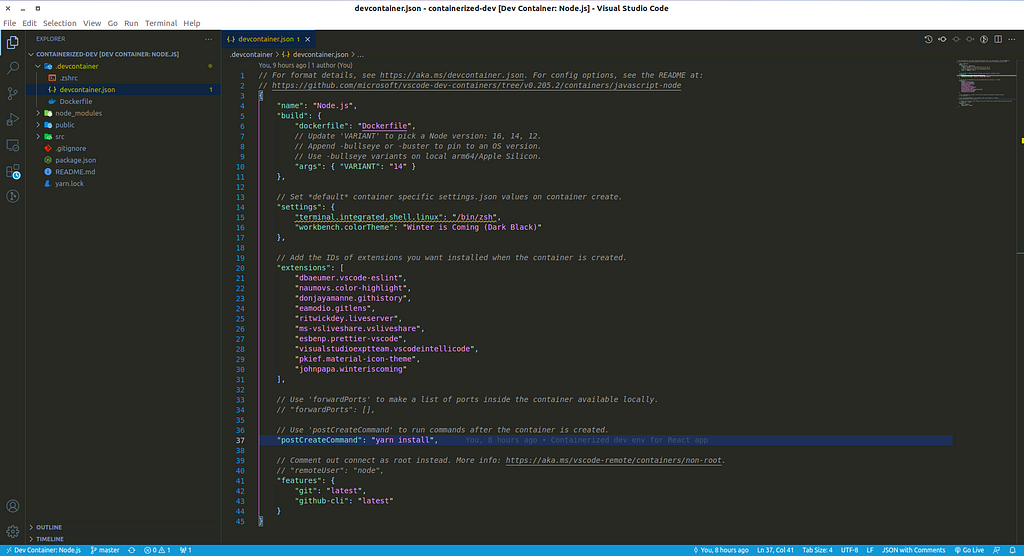
After that, you need to adjust devcontainer.json file.
Inside this file, I’ve picked several extensions for the VSCode. Certainly, you can choose your own by going to the extension toolbar. If you right-click one of those extensions, you’ll see an option of “Add to devcontainer.json”. By doing this, your chosen extension will be added to the extensions option inside your devcontainer.json file.
After you changed all of these files, you should rebuild the image of this development container. Later on, you’ll see a different look on your terminal and VSCode theme.
What I’ve provided above is one of many examples. You can adjust it based on your own preference, like using a different zsh theme, zsh plugins, using bash (by default) instead of zsh, have a different VSCode theme and many others. This is a playground to experiment on yourself.
After that, you can initialize a React project (inside the current folder) by running:
npx create-react-app .
By doing this, there is a chance that you need to move.devcontainer folder somewhere first. Because create-react-app won’t allow you to initialize the project inside your current folder. After it is successfully initialized, you can move back .devcontainer folder.
More about devcontainer.json
Let’s take a closer look at this file. You see that you have several configurable options. I’ll talk about some of them.
- Forsettings , this is the content usually seen inside settings.json file of your VSCode. This is your user settings. You can set theme, default terminal, editor, and many more.
- Extensions are the additional tools that help our work become much easier. You can add extensions you like for your development container by adding them to this configurable option.
- Option build is to specify how the container will be configured. Like using which context, Dockerfile, and argument variables.
- We’ve seen postCreateCommand before. You can provide a command or a list of commands to run after the container is starting.
- Lastly, name is a display name for the container and features is an object of dev container features and options to be added into your primary container.
For a general use case, we only need these options. But you can check out the documentation for more options.
Go
There is a time when your application needs to connect with a database. Well, you can connect to your team’s development database. But after a while of working together, surely a lot of junk data will pile up. So, having a personal database and working environment would be better, right?
With the help of containerized development environment, we can achieve the same thing as before. But this time, we’ll use docker-compose to manage multiple containers, one for our application and another one for the database.
First, create a development environment configuration the same way as before, but this time for a Go project.
If you’ve successfully created this configuration, then by now you have .devcontainer inside your project’s directory. One thing is missing, we don’t have docker-compose.yaml . So, let’s make one.
Write this inside your docker-compose.yaml file.
For devcontainer.json :
If you try to run docker ps -a to list all running containers, you’ll see two containers running. One is the application container and the other one is the database.
In the above example, We exposed port 3000 as the port of the database. So we can interact locally using hostname of localhost and port 3000. Note that you can configure the database name, username and password inside docker-compose file.
But, if our app needs to connect with the database, we need to set it to port 5432, not 3000. Since this is connected using containers’ network.
Conclusion
In this article, we have seen how we can use a development container as a solution to solve having a different environment between local and production servers.
In summary, first, we need to install VSCode, Docker engine, and remote development container extension. Then add a new development container configuration files and reopen the workspace inside a container.
We can also adjust our isolated working space to meet our needs and preferences. Such as using a different default shell, choosing a favourable theme, picking extensions specific to a project, and many other things.
Now, you can ship your source code to be used by others and the cool thing is, they’ll see what you see on your screen. No headache of having a different environment!
These are the code materials for this article:
- Python: https://github.com/agusrichard/django-workbook/tree/master/containarized-dev
- JavaScript: https://github.com/agusrichard/react-workbook/tree/master/containerized-dev
- https://github.com/agusrichard/go-workbook/tree/master/containerized-dev
Thank you for reading and happy coding!
Resources
Containerized Development Environment With VSCode and Docker was originally published in Level Up Coding on Medium, where people are continuing the conversation by highlighting and responding to this story.
This content originally appeared on Level Up Coding - Medium and was authored by Agus Richard
Agus Richard | Sciencx (2021-12-06T03:52:18+00:00) Containerized Development Environment With VSCode and Docker. Retrieved from https://www.scien.cx/2021/12/06/containerized-development-environment-with-vscode-and-docker/
Please log in to upload a file.
There are no updates yet.
Click the Upload button above to add an update.