This content originally appeared on DEV Community and was authored by Brian Barrow
Getting a database set up and running can be a difficult and time-consuming process. There are quite a few options these days for "quick" solutions. Supabase is one of those options and is gaining popularity very quickly. Let's dive in and see what Supabase offers. We'll walk through an example of setting up a database for a Reading List app and learn how to add, read, edit, and delete data from it.
Who this post is for
This post will be easier to follow if you have a general understanding of how databases work.
Setup
The first thing you'll need to do is sign up on Supabase. It asks you to sign up with GitHub, so if you don't have an account, you should also sign up for one of those.
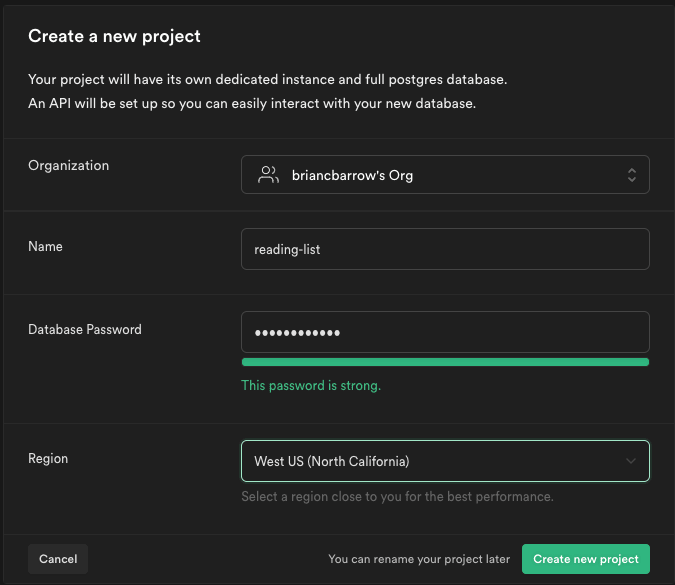
Once you are signed in, you'll click the green button that says "New Project" and select the default organization that was created when you logged in. Mine was called "briancbarrow's Org." This will bring up a box where we provide some info about the project. I'll name it reading-list, give it a strong password, and then I'm going to select the region West US (North California) because that is closest to me.
Click the "Create new project" button. It will take a few minutes for the project to be ready, so sit tight until that finishes.
Now that we have that set up, you should see a page with the name of the project you gave, and below that, it should say "Welcome to your new project." Below that, there are a few features that we can start exploring.
- Database: The Supabase Database is an instance of a Postgres Database. We'll be diving into this more below.
- Auth: The Supabase Auth service makes it relatively easy to set up authentication for your app and also manage your users. We won't be covering Auth in this post.
- Storage: Supabase offers a storage service for larger files like images or audio files. We won't be covering Storage in this post either.
Initializing the Database
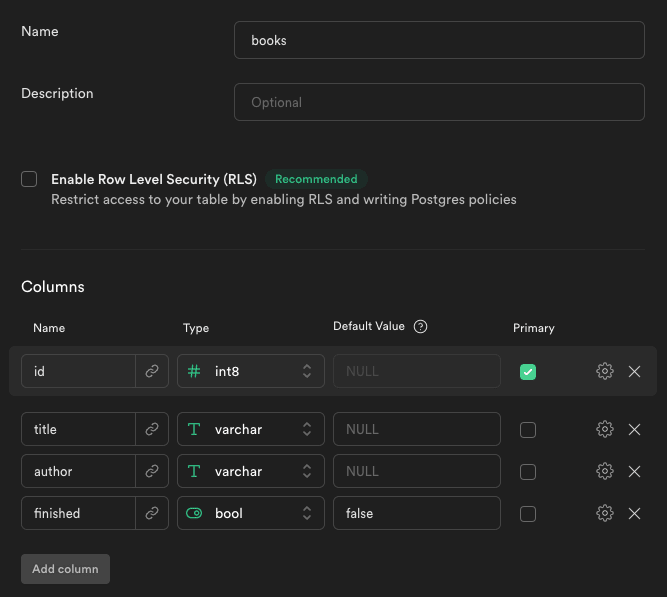
Click on the button in the "Database" card that says "Table editor." This takes us to a blank dashboard where we'll be able to add and edit our database tables. Click the + New table button on the left and give it the name books. For now don't check the "Enable Row Level Security (RLS)." This table will need a few columns in addition to the "id" column. I've listed them below.
- Column Name:
title, Type:varchar - Column Name:
author, Type:varchar - Column Name:
finishedType:bool
The table might already have a 'created_at' column in there by default. We won't need it so you can remove that one.
Save that, and you've created a table in your database. You should now be able to see it. Let's fill in some data now. Click the button that says "Insert Row" and fill in the data with a couple of books you like. Remember that you can only insert the type of data into columns that you specified in the table setup. For example, we couldn't store a string inside the "finished" column because it only accepts booleans. Here is a link to more info on data types.
Here is what my table looked like after I inserted two rows of data.
Querying the Database
With the data added, we can now look at how to send API requests to it in order to read that data.
In the left hand navigation, there is a link to the API documentation. This is auto-generated for us by Supabase and allows us to connect with our database in our code. Right now, we want to test that we can get the data we want from our books table. In the left hand menu, there is a section called "Tables and Views". Select the books table. Since we don't have a JavaScript app set up yet, select the "Bash" tab at the top of the right hand column above the code output. This will show us how a basic request is structured. I am going to be using Postman (which you can get here) to send these requests.
Reading data
Go down to the section that says "READ ALL ROWS", where you'll find the curl request to get the information from our database.
Here is what it should look like:
curl 'https://swmsbxvlhkqilunwmsgs.supabase.co/rest/v1/books?select=*' \
-H "apikey: SUPABASE_KEY" \
-H "Authorization: Bearer SUPABASE_KEY"
You can put this info into an app like Postman, or you can copy this code and put it directly into your terminal to get the results. Note that the SUPABASE_KEY in the above code is just a placeholder for your own key. To get your API keys to populated into the example requests, there is a dropdown labeled "Key" up at the top of the screen. Select anon key.
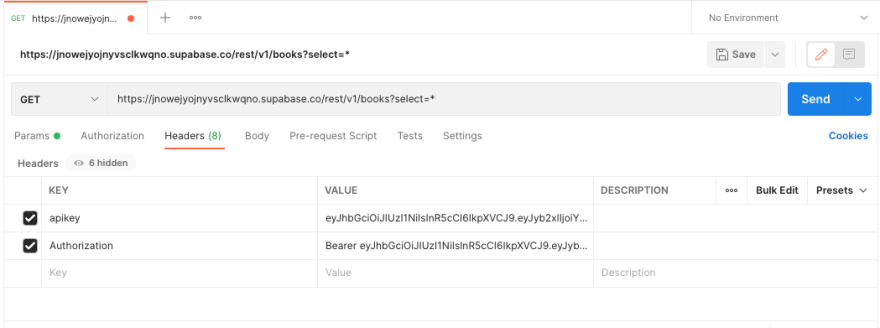
Since I'm using Postman for these requests I'll first copy the URL from the curl line and paste it into the request URL field in Postman. For this request we'll keep it as a GET request. I'll then click on the "Headers" tab inside Postman and add the apikey and Authorization headers respectively. It will look something like this, with your URL and API Keys instead of mine.
Inserting data via the API
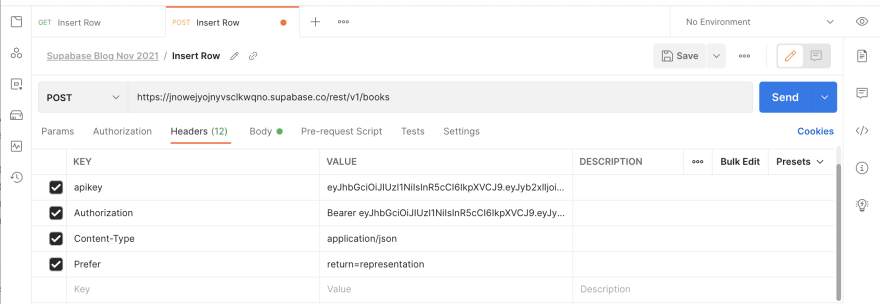
Now we can send the request and the results will show the contents of our books table. But what if we want to add or update data using the API? Inside of the API page of our Supabase app there are examples of all these types of requests. Let's try to insert data. I'll find the "Insert Rows" section of the API documentation and create a new request in Postman with the required fields.
The request with the new headers you'll need should look something like this.
This request requires a body of data to be sent to the API endpoint. Add some raw JSON data to the body tab of the request like this:
When we send this, if it is successful, it will return with the item we just inserted.
Updating data
A lot of times we have data in the app that needs to be changed/updated. In the API documentation this will be found under the "Update rows" section. This request is shaped a lot like the Insert request we did above. The first difference is that this is a PATCH request instead of a POST request. (Note that we use a PATCH to update instead of a PUT because PATCH allows us to update only specific fields, while PUT requires us to send the entire object with the request. We could have used PUT in this case, but the PATCH makes it more flexible in the future. See this link for more details on the difference). The second difference is in the URL. At the end of the URL there is a parameter. In the example from the API documentation they have it shown as ?some_column=eq.someValue. This is where we tell the database which row we want updated. So in our case, we can put ?id=eq.2 to update the book with the ID of 2. Let's update the title to "The Graveyard Book" and the author to "Neil Gaiman."
Deleting data
We also need to be able to delete data from our table. Like before, look at the example request in the API documentation page. It is similar to the Update request above. There aren't as many headers needed though and we don't pass any data. We need to specify which row though using a parameter again and make sure you change the type of request to a DELETE request. Let's delete the same book we just updated. The request will look something like this:
When you navigate back to the Tables page of the Supabase UI, you should only see the first book you created.
Conclusion
Now you know the basics of how to set up and use a Supabase Database. This tutorial just scratched the surface of Supabase, but it should give you a solid start.
Before you start using the database in an app, you'll also want to add the "Row Level Security" to your tables. This is beyond the scope of this introduction to Supabase blog, but basically it makes it so only authenticated users can affect the data in the tables. You can find out more in the Supabase documentation page.
This content originally appeared on DEV Community and was authored by Brian Barrow
Brian Barrow | Sciencx (2021-12-06T17:15:11+00:00) Getting Started with Supabase. Retrieved from https://www.scien.cx/2021/12/06/getting-started-with-supabase/
Please log in to upload a file.
There are no updates yet.
Click the Upload button above to add an update.


