This content originally appeared on Telerik Blogs and was authored by Peter Vogel
Here’s how to convert any test into a data-driven test that lets you prove your app works with every set of data that matters.
So you’ve created your first end-to-end (E2E) test and it’s proving that, even as more changes are made to your application, your application continues to process your test transaction “as expected.”
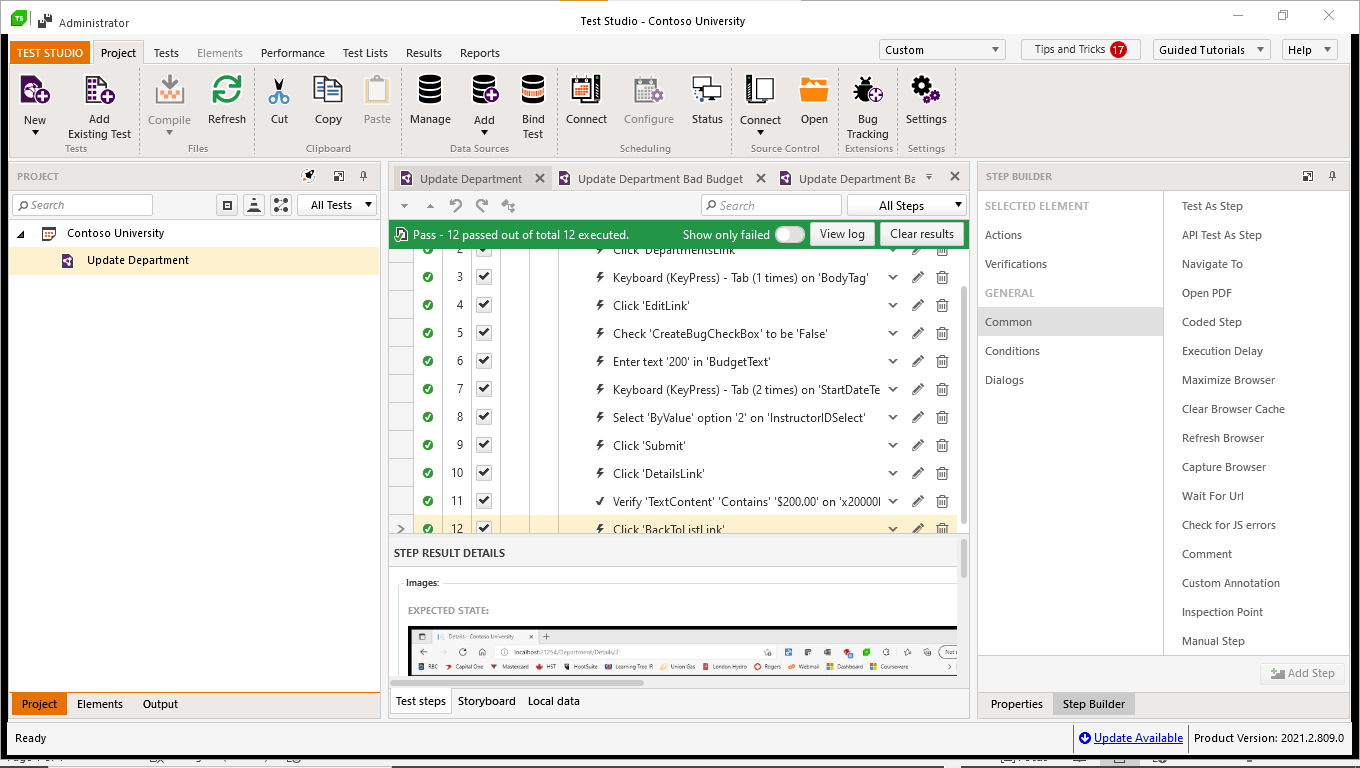
And you’d like to run that test again, but with different data. You’ve done your equivalence partitioning to determine what groups of data exist that are relevant to your application (i.e., where “significant” differences exist in the application’s potential inputs). You’ve also pulled at least one set of data from each group. Now you want to prove that your application works “as expected” with each set of data that you’ve identified.
What you don’t want to do is write a new test for each set of data. While the data is different, the application should be able to process each set of data just like the inputs from your original test. You also don’t want to make your test so complicated that the test itself needs to be tested. One of the benefits of Test Studio’s data-driven tests is that you can incorporate multiple sets of data into a single test without violating that rule.
For example, my case study is built around updating department data in the fictional Contoso University app. (Feel free to download both my version of the Contoso University application and the Test Studio project I used to test it.) The user should be able to change the department’s name, its start date, budget and administrator. Within the budget alone, I want to make sure the application will accept “typical” budget amounts (e.g., $5,000) and very large numbers (e.g., $1,000,000). The application should even accept negative numbers like -$200 (some departments actually bring in more money than they spend and, as a result, return money to the university).
The test script for all of these sets of data looks the same—just the inputs change (if the test script is different from one set of data to another, it suggests that you’re testing a different transaction). Eventually, you’ll want to check that the application handles bad data correctly, but I’ll cover that in a separate post.
There are real benefits to creating one test that handles all the data items for this transaction. If, for example, you do have to come back and change your test, you’ll only have to update one script instead of many similar scripts. It may make even more sense to create a data-driven test when you have only a single set of data. By moving your test values out of your test and into a separate source, it’s not only easier to change that data (as you’ll see here), but you can share that dataset among multiple test scripts, when that makes sense.
It’s a good idea to start off by creating a test without worrying about making it data-driven (much like the test I created in the post at the start of this article). Test Studio makes integrating multiple sets of data into a test easy.
Setting Up Your Data
Once you’ve created a standard test, your next step is to create the sets of data you intend to use with your test—your data source. You don’t need to do a lot of planning here because, as you’ll see, it’s easy to go back and modify your data source if you need to make a change.
Test Studio provides a convenient built-in tool for creating and holding your data (you can find it on the “Local Data” tab at the bottom of your test steps). However, you can use almost any tool that holds data to drive your test (including pulling data from an actual database). For this case study, I’ll use Excel because, I assume, you’re already familiar with it.
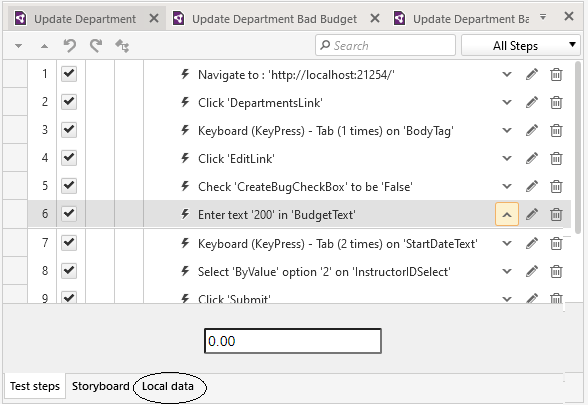
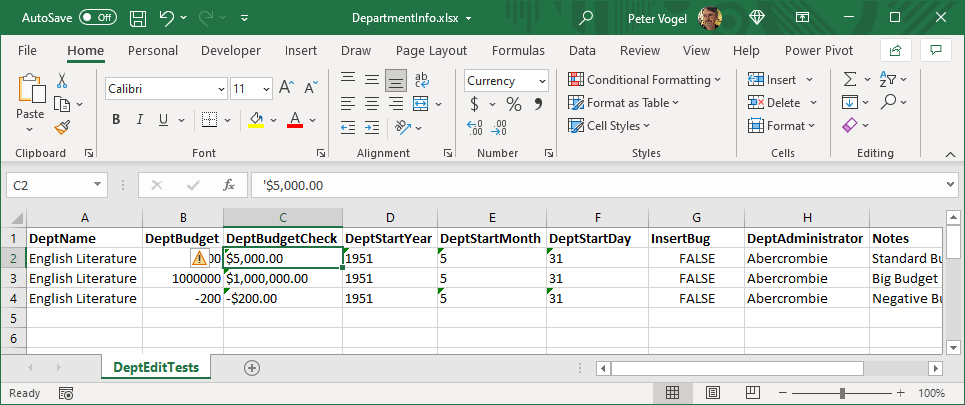
After you start Excel, you must first set up the columns that will hold the data you need. You can do that by scanning your test steps and inventing some appropriate names for the data the columns will hold. Looking at both the Edit Department page and my sample test, I’ll need one column for each field the Department Edit page lets me update. I’ll call three of those columns DeptName, DeptBudget and DeptAdministrator.
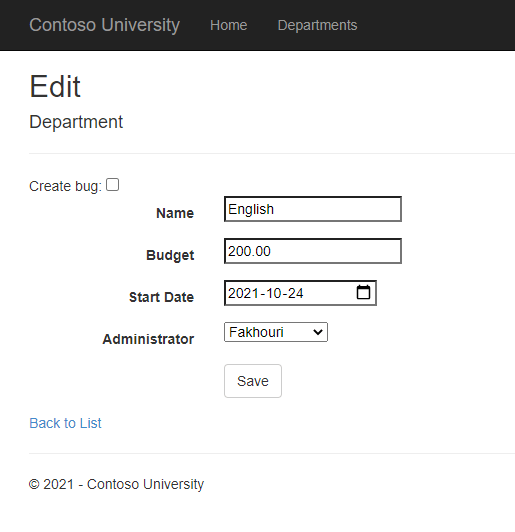
I’ve used a coded step to handle entering the date and, because of the way I’ve written that step, I’ll need three more columns for it: DeptStartYear, DeptStartMonth and DeptStartDay. In addition, for the purposes of this case study, I added a checkbox to the page that lets me create a failing test whenever I need to demonstrate an error in this case study. I’ll add a column called InsertBug for that.
Finally, I’ll put in a column called Notes so that I can document the intent of each test row.
I don’t need to set up columns for anything that doesn’t change from one test to another (e.g., clicking the submit button at the end) and, as my Notes column suggests, I don’t have to use every column I set up in my data source. Purely for documentation purposes, I give my worksheet a name (DeptEditTests), save it and close it.
The result, with my test data, looks something like this:
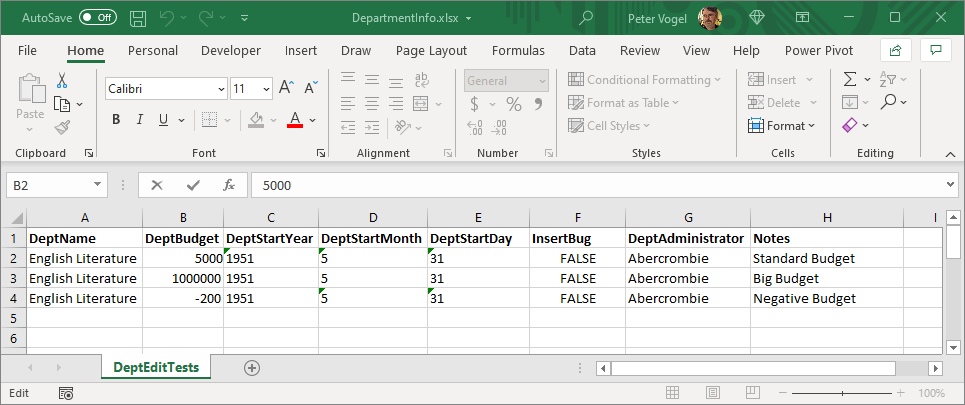
One word of warning when working with Excel: Make sure that the rows that follow your test data really are empty. A blank space in a cell in a row following your test data will convince Test Studio that it should feed that row to your application as part of your test. Select the row following your test data and press the Delete key to clear it.
Now that I’ve prepared my data, I can add my Excel spreadsheet as a data source in Test Studio. Back in Test Studio, I first switch to the Project tab and then, in the Data Sources section, click the arrow under the Add+ icon to get a list of the formats that Test Studio accepts. I select Excel File, which opens a file open dialog. In the dialog, I surf to the folder with my spreadsheet, select it and click the Create button. Test Studio copies the file to my test project’s data folder.
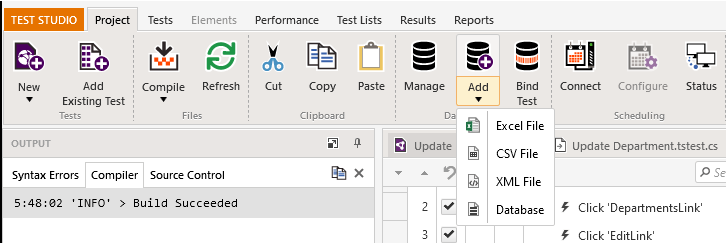
With my data source loaded, I can bind it to my test by clicking the Bind Test icon. This opens another dialog with a Select Data Source dropdown list at the top. Clicking that reveals my Excel data source, which I select. That causes the dialog to display another dropdown list, labeled Select Table—clicking that lets me select which sheet in my Excel spreadsheet I want to use for this test script. When I select my spreadsheet, the dialog gives me a preview of my data.
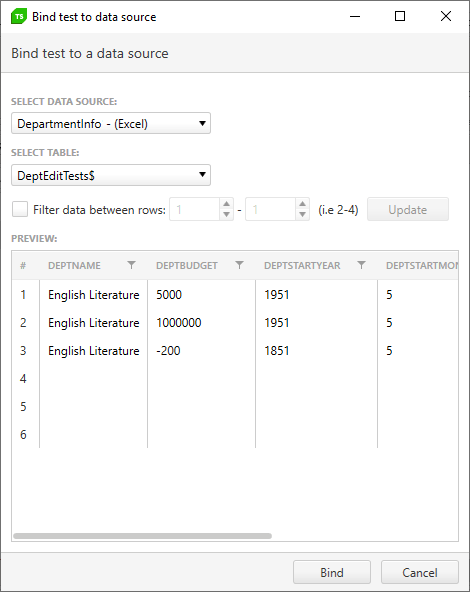
Clicking the Bind button at the bottom of the dialog completes adding the spreadsheet to my project. I’m ready to have my test script use this data.
Binding a Test Step
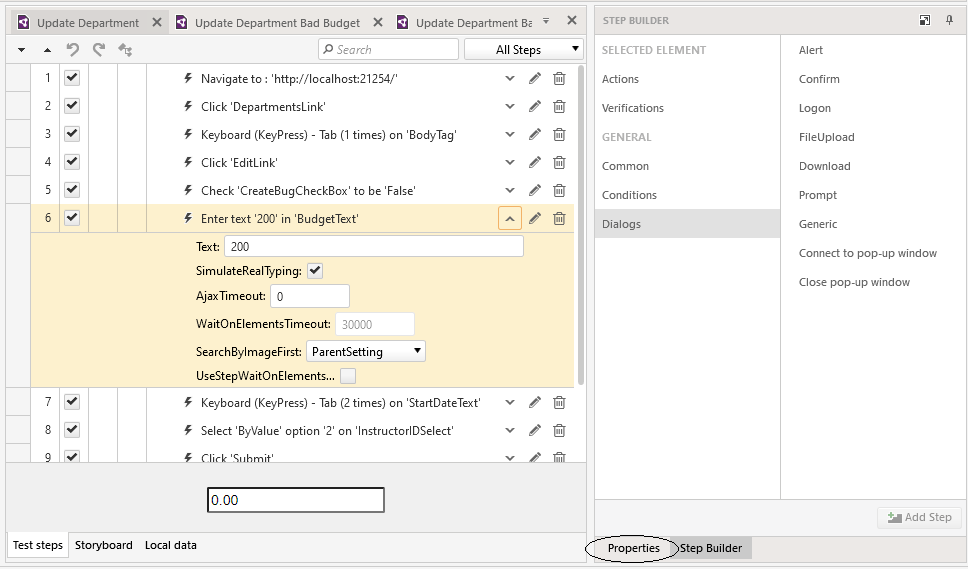
All that’s required to data-bind a test step is to tie a column in your data source to the value used by the test step. You do that in the Properties window for the step you want to data-bind. After you select the step, you’ll find the Properties window to the right of your step list, tabbed together with the Step Builder—just click on the Properties tab to show the window. I’ll start by binding the step where my original, non-data-driven test currently types in the number 200.
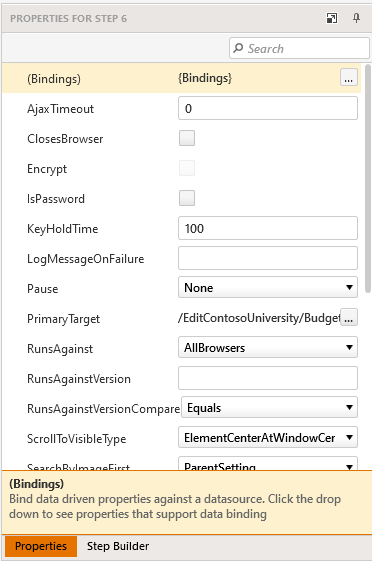
Once the step’s Properties tab is displayed, you’ll find the Bindings builder button (the button with the three dots) at the top of the property pane. Clicking the Bindings button will let you replace your fixed value with the name of a column from the data source bound to your test.
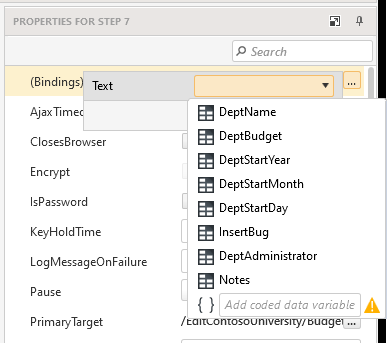
When I click the builder button, I get a popup dialog with a dropdown list that displays the column names from my Excel spreadsheet: DeptName, DeptBudget, DeptStartMonth and so on. Since this step is entering the budget data, I select DeptBudget and click the Set button on the dialog. The title of my step in the test script is updated to show that the step is now Data Driven. I then repeat that process with the other data entry steps in my test script.
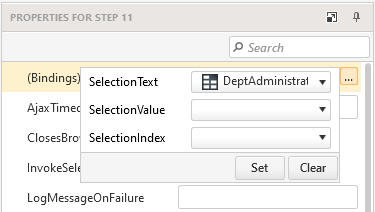
When I bind the dropdown list, however, the Bindings dialog gives me a different set of options: I can set one or more of SelectionText, SelectionValue and SelectionIndex. I entered the name of my administrator into my spreadsheet and, on the Department Edit page, the administrator’s name is displayed in a dropdown list as the list’s Text. As a result, I’ll need to set the SelectionText option to my Excel spreadsheet column to have the dropdown list select the correct option using the data from my data source.
In addition to binding my actions, I also need to bind any verification steps I set up when I created my manual so that I’m checking my results against what’s being pulled from my data source (fortunately, binding a verification step is just like binding a textbox). This is typical of data-driven tests: You have one set of columns for your inputs (what you think of as your “test data”) and another set of columns holding the data you’ll use to validate the test (your “expected results”).
By the way, if your application includes checkboxes or radio buttons and you’re binding data from an Excel spreadsheet, just use Excel’s TRUE and FALSE values in your spreadsheet columns when setting, unsetting or verifying them.
Updating the Data Source
As I’m binding my verification step, I realize that I could use two columns to represent my budget amount. When I enter the data on the Department Edit page, I just want to enter digits (200, for example) because that’s all the textbox will accept. But, because of the way that the data is displayed on Department Display page, when I want to verify the data, I want to use the character string “$200.00”.
My verification step can handle that difference if I use the “Contains” operator in my verification test (the string “$200.00” contains the digits 200, after all). But I’d be more comfortable using the “Exact” match to make sure the data is being displayed correctly (to ensure the negative sign is in the proper place, for example).
Fortunately, updating my data source is easy: First, I click on the Manage icon in the Data Sources box on the menu to display a list of my data sources.
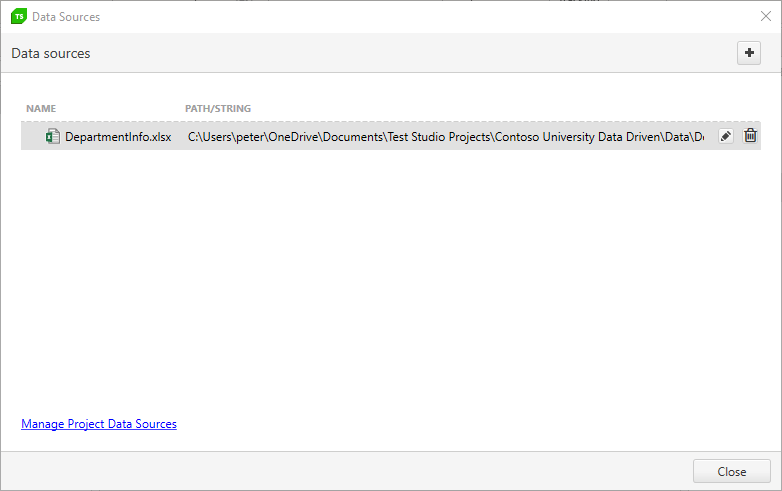
Clicking on the pencil icon for the Excel spreadsheet driving this test will open my spreadsheet in Excel. I add a new column to my spreadsheet called DeptBudgetChecked and fill it with the formatted display I’ll get on the Department Display page (make sure you enter the string with an apostrophe in front of it—‘$5,000.00—or Excel will store it as a number). I then just close and save my spreadsheet to update my data source in Test Studio.
Back in Test Studio, in my verification step, when I return to the Bindings dialog, I find the DeptBudgetChecked column is there for me to use. I can use the same process to add, update or remove the data that drives my test.
Running the Test
After I’ve bound all my steps, I can run my test. With my sample data, I’ll see the test run three times as Test Studio processes each row in my dataset. If all my tests pass, a green bar will be displayed at the top of my test script.
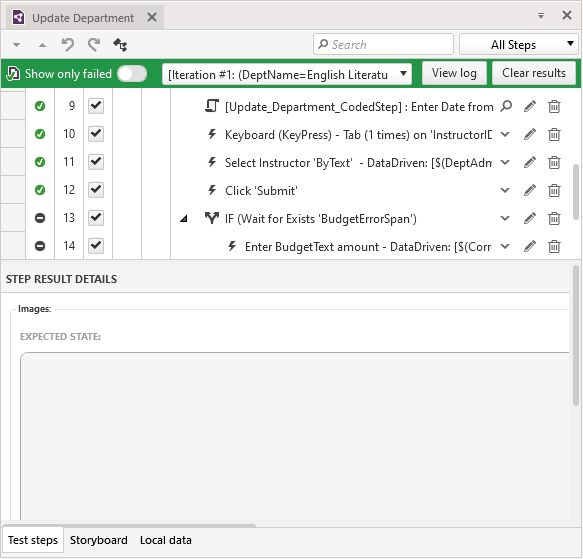 .
.
If one of my test runs has failed, I’ll get a red bar at the top of my test script.
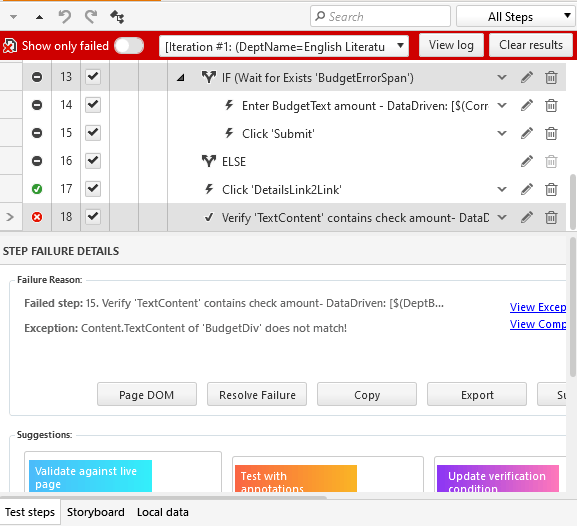
To determine which run(s) failed, you can use the dropdown list to select each run. As you select each run, those runs which failed will have a Step Failure Details pane beneath your test script.

The runs that succeeded will have a Step Result Details pane beneath your test script.
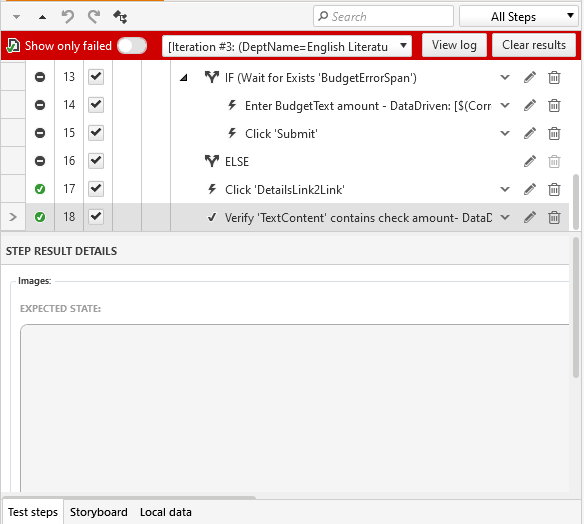
With data-driven testing, effectively every row in your data source is another test. With a single test script and a data source with multiple rows of data, you can start running more tests earlier (and cheaper) than if you had to craft individual test scripts.
Maintenance becomes easier and faster. Also, as you come up with more test cases, you just add them to your data source; if your application changes and starts to produce different output, you just update your “expected results” columns. Either way, you don’t have to write new tests or make changes to an existing test. It’s hard to beat easier, cheaper and faster, but data-driven tests can let you do all three.
Learn more about Test Studio, and start your free trial today!
This content originally appeared on Telerik Blogs and was authored by Peter Vogel
Peter Vogel | Sciencx (2021-12-15T15:02:04+00:00) Test Studio Step-by-Step: Data-Driven Tests. Retrieved from https://www.scien.cx/2021/12/15/test-studio-step-by-step-data-driven-tests/
Please log in to upload a file.
There are no updates yet.
Click the Upload button above to add an update.
