This content originally appeared on DEV Community and was authored by marcelkatz
This article contains two main stages:
(1) Containerizing a Node.js server application and a Redis database instance into two separate Docker containers, using Dockerfile and Docker Compose, and showing how these two applications communicate with each other.
(2) Load-balancing the Node.js server, using a containerized Nginx reverse-proxy.
Let’s start with Stage 1:
(1) Containerizing a Node.js server application and a Redis instance into two separate Docker containers, using Dockerfile and Docker Compose, and showing how these two applications communicate with each other
Starting with a simple Node.js server application (we’ll call it “test-webapp”) that responds to an HTTP GET request by displaying the “numbers of visits”. The numbering scheme below (i.e. (1.1), (1.2), (1.3) etc.), matches the numbering in the diagram below:

Figure 1.a - Schematic diagram of the components
In "Figure 1.a - Schematic diagram of the components" above we have the following components:
(1.1) "Docker Container 1" - container running the Node.js server called "test-webapp" that communicates with the browser on the left. Each time we refresh the URL localhost:80 i.e. we send a GETcommand to the Node.js server "test-webapp", the server code increments the number of visits, then saves this value into the Redis database instance that runs on "Docker Container 2", and also displays the value back in the browser.
(1.2) “Dockerfile” - defines and controls the Node.js server process in “Docker Container 1”.
(1.3, 1.3.1, 1.3.2) “docker-compose.yml” – the Docker Compose config file defines and controls both “Docker Container 1” and “Docker Container 2”. “Docker Container 1” runs the Node.js server process “test-webap_p”. “_Docker Container 2” runs the Redis database instance.
(1.3.3) Docker Compose establishes by default a communication network between “Docker Container 1” and “Docker Container 2” which allow the Node.js server process “test-webapp” to communicate with the Redis database instance, and exchange between them the “number of visits to the app/web server” (numVisits) value.
(1.3.4) Docker Compose maps local hosting machine Port 80 to “Docker Container 1” Port 5000. Port 5000 is the port on which the Node.js server “test-webapp” listens and reacts to the GETcommands sent by the browser.
(1.4) Connecting to the shell of “Docker Container 2” and then to the client command line of the Redis database instance via “redis-cli” we can see that the value of numVisits (which represents the number of times the browser issued a GETcommand to the Node.js server) is in sync with the value displayed in the browser by the Node.js server – thus showing that inter-process communication occurs between the processes “test-webapp” in “Docker Container 1” and the Redis process in “Docker Container 2”.
(1.5) This step illustrates the restart directive and capability in Docker Compose (specified in config file “docker-compose.yml”) – when connecting to the Linux shell of “Docker Container 1”, we can kill -9 the Node.js server process, but the Node.js server process will be restarted automatically by Docker Compose – illustrating the automatic recovery provided by Docker Compose.
And now let’s describe the steps and the flow of this scenario. The numbering scheme in the description below (i.e. (1.1), (1.2), (1.3) etc.), matches the numbering in “Figure 1.a – Schematic diagram of the components”.
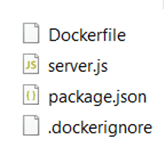
(1.1) File structure:
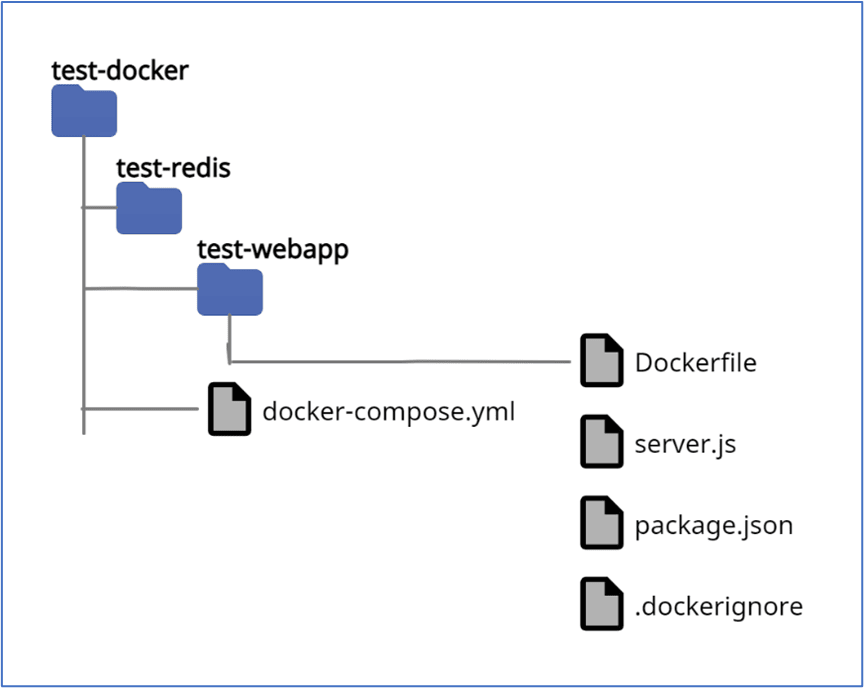
Figure 1.b – File structure for Stage 1
Node.js files for process ‘test-webapp’:
The contents of directory “test-webapp”, where the source code for the Node.js server “test-webapp” resides:
(1.2) The Dockerfile _containerizes and controls the Node.js application by downloading the “_node:alpine” image from Docker Hub, installing Node.js on the container, copying to the container the source files – then launching the Node.js server web app (see source code in file “server.js”).
(1.3) Going one directory above, we see the "docker-compose.yml" file that organizes the containerization and sets up the architecture of all the components. (File
“docker-composer-nginx.yml” will be presented and explained in Stage 2 of this article)
Purge all images and containers:
We run command docker system prune -a to clear all Docker images and containers and start with a clean slate.
C:\test-docker\test-redis>docker system prune -a
WARNING! This will remove:
- all stopped containers
- all networks not used by at least one container
- all images without at least one container associated to them
- all build cache
Are you sure you want to continue? [y/N] y
(1.3) Build and run the 'test-webapp' image with Docker Compose
Use command docker-compose -f <config-filename> build to build containers and the applications that will be running in each container:
C:\test-docker\test-redis>docker-compose -f docker-compose.yml build
See the results below of the built Docker image:
C:\test-docker\test-redis>docker images
REPOSITORY               TAG       IMAGE ID       CREATED         SIZE
test-redis_test-webapp   latest    e8145bea0fec   4 minutes ago   175MB
Run the 'test-webapp' and 'redis' containers with 'docker-compose':
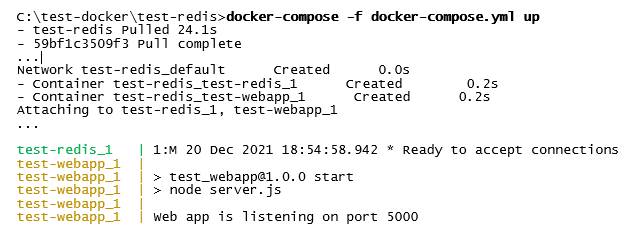
Let’s launch both “test-webapp” and “redis” services, as described in config file
“docker-compose.yml”, using the docker-compose -f <config-filename> up command.
We can see from the output above, that both the “redis” container (“test-redis_1” – corresponding to “Docker Container 2” in Figure 1.a) and the “test-webapp” container (“test-webapp_1” corresponding to “Docker Container 1” in Figure 1.a) are running and printing to stdout in the command line window where we launched Docker Compose to run these two containers.
View the 'test-webapp' and 'redis' running containers:
C:\test-docker\test-redis\test-webapp>docker ps
CONTAINER ID   IMAGE                    PORTS
NAMES
928b8b07415d   test-redis_test-webapp   0.0.0.0:80->5000/tcp   test-redis_test-webapp_1
a8756127bff5   redis:alpine             6379/tcp               test-redis_test-redis_1
(1.3.1, 1.3.2) The two containers above match the containers “Docker Container 1” and “Docker Container 2” in the Figure 1.a above. Note the “CONTAINER ID” column whose values we will use below to perform operation on each individual running container.
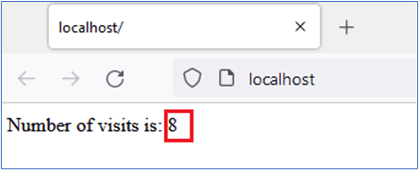
(1.3.4) Port 5000 in the Node.js server "test-webapp" container is mapped to local (hosting) Port 80, so when one connects in the local (hosting) browser to URL http://localhost:80, for each refresh, the Node.js process in the “test-webapp” container increments the number of visits in variable numVisits which is set and saved in the Redis in variable numVisits -- and this value is also send back and displayed in the browser.
“Docker-compose” sets-up by default a network with both “test-webapp” container (“Docker Container 1” in Figure 1.a) and “redis” container (“Docker Container 2” in Figure 1.a) within this network, and both containers are reachable by each other via this network.
The local browser communicates with the Node.js server container. When refreshing the connection in the browser, the server callback is invoked which responds to the browser with the updated number of visits.
(1.4) We are using the docker exec -it command that allows us to connect to a running container while the -it option allows us to capture the stdin/stdout of that container. Then we specify the CONTAINER ID a8756127bff5 obtained from docker ps command above, followed by the shell (sh) that we want to launch as we enter the container.
C:\test-redis\test-webapp>docker exec -it a8756127bff5 sh
Then, once we are inside the container’s shell, we connect to the Redis database using the redis-cli command. At the Redis prompt we use get numVisits to obtain the value of the variable “numVisits” inside “redis”. We can see that the “redis” instance communicates with the “test-webapp” process in its respective container and the variable “numVisits” in the Redis database instance is in sync with its value in the browser. In this case both have the value “8”, because we refreshed 8 times the “localhost:80” URL thus issuing a GET command in the browser that is intercepted by the *Node.js server * which increments the “number of visits” (numVisits) variable. The “number of visits” value is sent back to the browser by the “test-webapp” process which also saves the value in the “redis” database in variable numVisits).
/data # redis-cli
127.0.0.1:6379> get numVisits
"8"
127.0.0.1:6379>
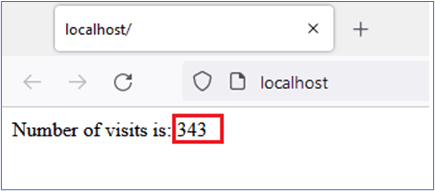
From within the “redis-cli” in the “redis” container (“Docker Container 2”) we can also set in Redis manually the “numVisits” variable to a random value of let’s say “342”…
…the numVisits variable is updated in the “test-webapp” Node.js server (running in “Docker Container 1”), and therefore in the browser (due to the fact that in order to invoke the callback in the Node.js server, one needs to refresh the connection to “localhost:80”, the number of visits increases by 1, thus 342 + 1 = 343. This shows that we have two-way inter-process communications between the processes running in “Docker Container 1” and “Docker Container 2”.
(1.5) A useful feature provided by Docker Compose is the capability to specify in “docker-compose.yml” a “restart” option.
This will allow us when connecting to the shell of “Docker Container 1”, to “kill” the Node.js server process, but the Node.js server process will be restarted automatically by the Docker Compose “restart” directive.
C:\test-docker\test-redis>docker ps
CONTAINER ID   IMAGE                      PORTS                    NAMES
c675ff6c0464   test-redis_nginx           0.0.0.0:80->80/tcp       test-redis_nginx_1
3137d1468ec7   test-redis_test-webapp-2   0.0.0.0:3009->5000/tcp   test-redis_test-webapp-2_1
57d399295421   redis:alpine                                        test-redis_test-redis_1
b30635f44151   test-redis_test-webapp-1   0.0.0.0:3008->5000/tcp   test-redis_test-webapp-1_1
Connect to the Docker container whose ID is 928b8b07415d and invoke the shell (sh).
C:\test-redis\test-webapp>docker exec -it 928b8b07415d sh
Inside the container, at the shell prompt, show all process id’s using ps -al.
/usr/src/app # ps -al
PID   USER     TIME  COMMAND
1     root     0:00  npm start
19    root     0:00  node server.js
30    root     0:00  sh
36    root     0:00  ps -al
Proceed with “killing” the “node server.js” process by issuing a kill -9 <process-id> command:
/usr/src/app # kill -9 19
In the command line window that is running Docker Compose we can see how the “test-webapp” receives a “kill signal” (SIGKILL), exited with code ‘1’, and then restarted automatically.
Conclusion
In Stage 1 of this example we showed how Docker Compose allows us to easily establish independent environments that communicate with each other, and also the automatic fault-tolerance (restart on failure) capability of Docker Compose.
Let’s continue with Stage 2:
(2) Load-balancing the Node.js server, with the help of a containerized Nginx reverse-proxy
The diagram in “Figure 2.a – Schematic diagram of the components for Stage 2” describes an architecture similar to the one described earlier in “Figure 1.a – Schematic diagram of the components” but with the changes described below.
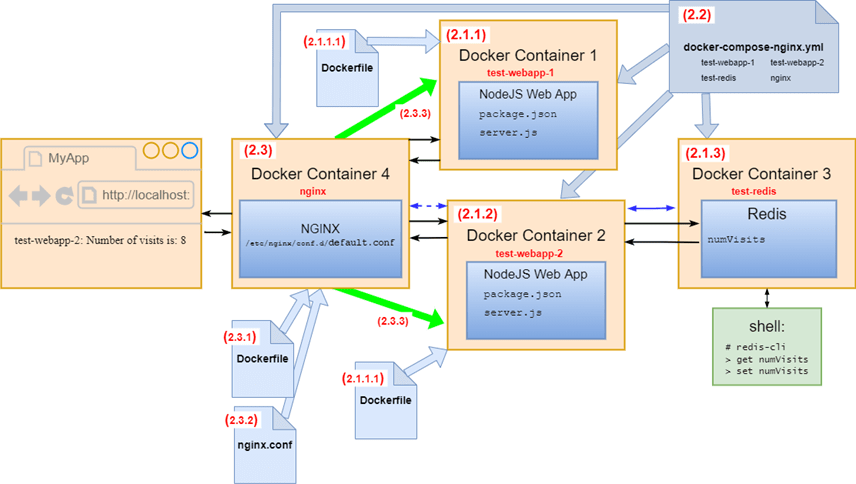
Figure 2.a – Schematic diagram of the components for Stage 2
In “Figure 2.a – Schematic diagram of the components for Stage 2” we have the following components:
(2.1.1, 2.1.2) “Docker Container 1” and “Docker Container 2” – two identical containers whose source code reside in directories “test-webapp-1” and “test-webapp-2” (as shown in “Figure 2.b – File structure for Stage 2” below), that are almost identical copies of the application “test-webapp” that was described earlier in Stage 1. This time we are using two Node.js server processes that will serve the client browser from the local host machine, scaling up and load-balancing the original one-server configuration from Stage 1. These two containers are defined and controlled each by their respective “Dockerfile” (2.1.1.1) and (2.1.1.2). Each Node.js server “Docker Container 1” and “Docker Container 2” counts the number of visits coming from the local host browser. Then it saves the number of visits into the Redis database, and it also responds back to the browser with the number of visits and with which specific Node.js server served each individual HTTP GET request coming from the browser, by sending back to the browser a message of type:
“test-webapp-1: Number of visits is: ”, or
“test-webapp-2: Number of visits is: ”
…thus highlighting the load-leveling nature of this stage.
(2.1.3) “Docker Container 3” – the container running the Redis database instance, identical to the one described in Stage 1, storing the “number of visits” performed by the localhost machine browser to “localhost:80”. The number of visits is stored by the Node.js server processes “test-webapp-1” and “test-webapp-2” in the Redis variable numVisits whose value is transmitted by each Node.js server to the Redis database on each refresh on the local host browser.
(2.2) “docker-compose-nginx.yml” – the main Docker Compose config file defines and controls: (I) “Docker Container 1” running Node.js server “test-webapp-1”, (II) “Docker Container 2” running Node.js server “test-webapp-2”, (III) “Docker Container 3” running Redis, and (IV) “Docker Container 4” running Nginx.
(2.3) “Docker Container 4” running “Nginx” – This is an additional container introduced in Stage 2, defined and controlled by its own Dockerfile (2.3.1), that runs an “nginx” instance, and acts a as reverse-proxy that routes the HTTP GET requests coming from the local host browser. The “Nginx” process in “Docker Container 4” routes the HTTP GET requests coming from local host browser “localhost:80”, in a round-robin manner ((2.3.3) and (2.3.4)), to either the “test-webapp-1” Node.js server in “Docker Container 1” or to “test-webapp-2” Node.js server in “Docker Container 2”. The “nginx” process in “Docker Container 4” is defined and controlled by the _Nginx _config file “nginx.conf” which is copied by Nginx container’s Dockerfile to the “Docker Container 4” environment file “/etc/nginx/conf.d./default.conf” (this is a standard Nginx setup). The “nginx” instance distributes the incoming traffic from the local host browser, thus scaling up and load- balancing the single-container web/app server architecture presented in Stage 1.
And now let’s describe the steps and the flow of this scenario. The numbering scheme in the description below (i.e. (2.1), (2.2), (2.3) etc.), matches the numbering in “Figure 2.a – Schematic diagram of the components for Stage 2”.
(2.1) File structure:
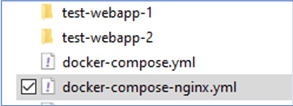
The file structure described in “Figure 2.b – File structure for Stage 2” is almost identical to the files structure described earlier in “Figure 1.b – File structure for Stage 1” with the following changes:
(2.1.1, 2.1.2) The files from directory “test-webapp” from Stage 1 were copied into directories “test-webapp-1” and “test-webapp-2”.
(2.2) Going one directory above, we see the "docker-compose-nginx.yml" config file that organizes the containerization and sets up the architecture of all the components:
Purge all images and containers:
As in Stage 1, we run command docker system prune -a to clear all Docker images and containers and start with a clean slate.
(2.3) Build and run the 'test-webapp-1', 'test-webapp-2', ‘redis’, and ‘nginx’ images with Docker Compose
Build with Docker Compose:
C:\test-docker\test-redis>docker-compose -f docker-compose-nginx.yml build
Run with Docker Compose:
C:\test-docker\test-redis>docker-compose -f docker-compose-nginx.yml up
In the command line window where we issue the docker-compose -f docker-compose-nginx.yml up command, Docker Compose replies with:
...showing that all 4 Docker containers have started successfully and are up and running: “test-redis_1” corresponds to the Redis process running in “Docker Container 3”, “test-webapp-2_1” corresponds to the Node.js server process running in “Docker Container 2”, “test-webapp-1_1” corresponds to the Node.js server process running in “Docker Container 1”, and “nginx_1” corresponds to the Nginx server running in “Docker Container 4”.
View the 'test-webapp-1', ‘test-webapp-2’, 'redis', and ‘nginx’ running containers:
C:\test-docker\test-redis>docker ps
CONTAINER ID   IMAGE                       PORTS       NAMES                                            c675ff6c0464   test-redis_nginx            0.0.0.0:80->80/tcp        test-redis_nginx_1
3137d1468ec7   test-redis_test-webapp-2    0.0.0.0:3009->5000/tcp
test-redis_test-webapp-2_1
57d399295421   redis:alpine                                                                         test-redis_test-redis_1
b30635f44151   test-redis_test-webapp-1    0.0.0.0:3008->5000/tcp   test-redis_test-webapp-1_1
The four containers above match containers “Docker Container 1” through “Docker Container 4” in “Figure 2.a – Schematic diagram of the components for Stage 2”
above. Note the “CONTAINER ID” column whose values we will use below to potentially perform operations on each individual running container.
Let’s run first two instances of the browser on the hosting machine, and point them to URL “localhost:80”:
Notice how due to the round-robin routing mechanism employed by the Nginx reverse-proxy, the “GET localhost:80” request is routed once to “test-webapp-1” Node.js server, and once to the “test-webapp-2” Node.js server, achieving the scaling-up and load balancing that we intended to demonstrate.
Let’s connect to the container that is running Redis, to its sh (shell) environment:
C:\test-docker\test-redis>docker exec -it 57d399295421 sh
Then, inside the container, let’s connect to Redis itself using “redis-cli”:
/data #
/data # redis-cli
127.0.0.1:6379>
127.0.0.1:6379> get numVisits
"8"
127.0.0.1:6379>
Note how the get numVisits command in Redis returns the expected value of “number of visits” that is communicated to the “redis” container from the containers that are running the Node.js app servers.
Conclusion
In Stage 2 of this example we showed how Docker Compose allows us to easily establish multiple containers with their independent environments that communicate with each other, and also how scaling and load-balancing achieved with Nginx.
Source code:
https://github.com/marcelkatz/test-docker-nodejs-redis-nginx
This content originally appeared on DEV Community and was authored by marcelkatz
marcelkatz | Sciencx (2021-12-24T21:35:16+00:00) Node.js and Redis deployed in Docker containers, using Docker Compose – then load-balancing the Node.js servers with Nginx. Retrieved from https://www.scien.cx/2021/12/24/node-js-and-redis-deployed-in-docker-containers-using-docker-compose-then-load-balancing-the-node-js-servers-with-nginx/
Please log in to upload a file.
There are no updates yet.
Click the Upload button above to add an update.

