This content originally appeared on Level Up Coding - Medium and was authored by Yasuhito Nagatomo

Using the iOS/iPadOS AR Quick Look API, you can create an AR app for iOS/iPadOS with very few lines of Swift code.
In this article, I’ll walk you through the process of preparing 3D data for AR, creating an animated and interactive AR scene, and developing an AR app using the AR Quick Look API.
- 3D data preparation: Generate 3D data from photos of a real object using Computer Vision processing (Photogrammetry).
- AR scene creation: Place virtual objects and create AR scenes with animation and interactivity intuitively through GUI.
- AR app creation: Create an AR app using Swift code that uses AR Quick Look API.
Basics of AR Quick Look
Before explaining the development process, let’s review AR Quick Look (ARQL).
ARQL is the AR version of the Quick Look feature, announced at WWDC18 for iOS 12 and later. It allows you to display 3D virtual models in AR from Safari, Mail, Messages, Files, etc. In addition, ARQL features are provided as APIs, so you can use them in your own apps.
The main features of ARQL are
- Virtual 3D models can be placed on a horizontal plane, vertical plane, face, or image, and gestures can be used to change the location, size, rotation, and height (two-finger swipe).
- USDZ and REALITY files are supported. If they contain animation or interactivity data, it will be executed.
Guidelines for 3D data for ARQL as presented at WWDC18: 100k polygons, a set of 2048 x 2048 PBR textures, 10 sec of animation. - Physically Based Rendering (PBR) for realistic rendering of virtual objects reflecting their surface materials.
Supported texture types: Albedo, Metallic, Roughness, Normal, Ambient occlusion, Emissive
Texture data is automatically downsampled according to the capability of the execution device. - The camera image and the virtual object are combined and displayed in a natural-looking manner.
From the beginning, environment texturing and contact shadows are used to create a realistic presence. Ray-traced shadow, Camera noise, People Occlusion, Depth of field, and Motion blur have been added in line with RealityKit, which was introduced at WWDC19, to make the display more familiar with the camera image and real scene.
The advanced AR display features provided by ARQL depend on the capabilities of the device. For example, Object Occlusion only works on LiDAR devices, and Ray-traced shadow is only available on A12+ SoC devices. The determination of such device capabilities is automatic and the display is optimized for the device. This is also the case when using the ARQL API. You do not need to check the device capabilities at all, you can leave everything to the ARQL API.
It is very easy to put an ARQL-enabled file in a web page link and display it in Safari or Web View component, or open it in a standard application that supports ARQL. On the other hand, if you don’t want to expose your 3d data files directly, or if AR is only a part of your app’s functionality and the main functionality is elsewhere, you can create an app and store your data files in its internal bundle or local files to protect them. You can use the ARQL API to create an AR app with less code.
1 - Prepare the 3D data
The first step is to prepare the 3D data. In general, 3D data is created using DCC (Digital Content Creation) tools for 3DCG. Another method is to take photos of the real object and generate 3D data by computer vision processing (Photogrammetry). Apple provides a sample app for iPhone/iPad to take photos and a sample command-line tool for Mac to run Photogrammetry.
Although it is more common to use DCC tools to prepare 3D data, Photogrammetry allows you to generate realistic 3D data from real objects on hand, so it is a method that can be adopted even if you do not have 3D modeling skills. The method of using photogrammetry is not easy because it requires a lot of time and effort to take pictures and process the data, but after repeating the process a few times, you will gradually get the hang of it and be able to do it with ease.
From here on, we will use the Photogrammetry tool provided by Apple to prepare the 3D data.
1 - 1 Take photos of the real object
We take about 20 to 200 photographs of the actual object to be converted into 3D data. These photos will be processed by Computer Vision to generate 3D data. It is convenient to use the sample application for iPhone/iPad provided by Apple for taking photos.
- Apple Sample Code: Taking Pictures for 3D Object Capture
- Xcode 13.0+, iOS/iPadOS 15.0+, Device with Dual Rear Cameras
Get the Sample Code (a set of Xcode Project) and build it with Xcode to create the CaptureSample app. Run this app on a compatible iPhone/iPad and take many pictures of the real object in all directions continuously. It is convenient to use the CaptureSample app’s ability to take a series of pictures at regular time intervals. Multiple HEIC files containing Depth information and related files are stored in the CaptureSample app’s Document Folder. Depth information can be used to generate data that reproduces the size (dimensions) of the actual object. The operation of storing photos in a folder is a little confusing, but if you create a New Session by pressing the “+” button on the folder screen, the set of photos you have already taken will be saved in the folder.
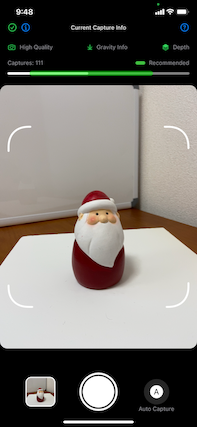
Some tips on how to take good pictures of a real object were introduced at WWDC21. (There is also an explanation in the help screen of CaptureSample app.)
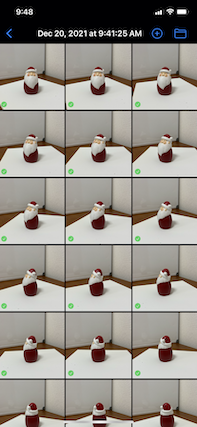
- Use a plain background. Set the lighting so that there is no shade on the real object.
- The real object should be opaque and have little surface reflection.
- Be careful not to change the shape of the real object when changing its orientation.
- Take about 20 to 200 pictures from all angles with more than 70% overlap.
It is recommended to take more than 100 pictures to get better results. For more information, please refer to this article.
- Apple Article: Capturing Photographs for RealityKit Object Capture
Since the Photogrammetry process is performed on a Mac, copy the saved folder to the Mac via AirDrop or iCloud using the Files app.
1 - 2 Generate 3D Data with Photogrammetry
Photogrammetry is a computer vision process that generates 3D data from 2D images. Although there are dedicated software for this purpose, the RealityKit - Object Capture API has been available since macOS 12, and Sample Code is also provided from Apple, so you can easily run it on your Mac.
- Apple Sample Code: Creating a Photogrammetry Command-Line App
- macOS 12.0+, Xcode 13.0+, All Apple Silicon Mac or AMD GPU(4MB) and 16MB RAM Intel Mac
If you get the Sample Code (a set of Xcode Project) and build it with Xcode, you will have a command-line tool called HelloPhotogrammetry. It is easy to use by copying it to your working folder. In the working folder, put the folder with the photos you have taken. When you run the command-line tool, it will output the 3D data in USDZ format.
At runtime, specify the following parameters:
input-folder (photo folder), output-filename (name of the USDZ file to output), detail (level of detail), sample-ordering (whether the photos are spatially contiguous or not), and feature-sensitivity (degree of feature sensitivity of the target).
% ./HelloPhotogrammetry -h
OVERVIEW: Reconstructs 3D USDZ model from a folder of images.
USAGE: hello-photogrammetry <input-folder> <output-filename> [--detail <detail>] [--sample-ordering <sample-ordering>] [--feature-sensitivity <feature-sensitivity>]
ARGUMENTS:
   <input-folder>          The local input file folder of images.
   <output-filename>       Full path to the USDZ output file.
OPTIONS:
   -d, --detail <detail>
       detail {preview, reduced, medium, full, raw}  Detail of
       output model in terms of mesh size and texture size .
       (default: nil)
   -o, --sample-ordering <sample-ordering>
       sampleOrdering {unordered, sequential} Setting to sequential
       may speed up computation if images are captured in a
       spatially sequential pattern.
   -f, --feature-sensitivity <feature-sensitivity>
       featureSensitivity {normal, high}  Set to high if the scanned
       object does not contain a lot of discernible structures,
       edges or textures.
   -h, --help              Show help information.
The detail parameter specifies the level of detail of the 3D model data to be generated. The higher the detail level, the better the reproducibility, but the larger the data size. The full and raw parameters are used for professional workflows that require high quality data (five types of texture or raw data). For ARQL, use the reduced or medium. Geometry meshes and textures (Diffuse, Normal, Ambient Occlusion - AO) are output in USDZ format with sizes suitable for mobile apps. Reduced is considered to be the best for web distribution due to its smaller data size. medium is considered to be the best for complex objects and use for applications.
If the photos taken are spatially contiguous, adding `-o sequential` will speed up the process. If the USDZ file is not output after the tool finishes running, adding or removing the `-o sequential` may succeed.
The resulting USDZ file can be easily viewed in Quick Look on macOS. If the quality is not good enough, for example, the shape (mesh) is broken or the textures are not well continuous, it may be improved by increasing the number of photos or the overlapping area.
A Santa Claus ornament (11 x 7 x 7 cm) was taken with the CaptureSample app (166 photos) and processed with the HelloPhotogrammetry tool, resulting in USDZ files size of 2MB for preview, 9.4MB for reduced, and 28MB for medium.
Example of execution at the medium level:
% ./HelloPhotogrammetry SantaImages santa_m.usdz -d medium
 -o sequential
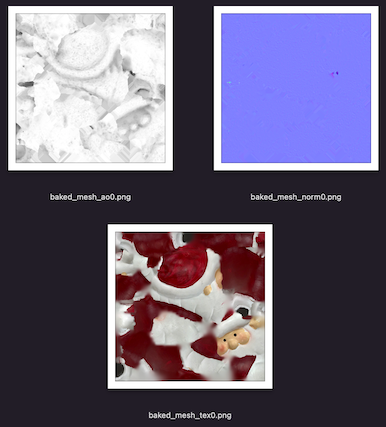
The USDZ textures (Diffuse, Normal, AO) generated by medium had a resolution of 4096 x 4096 [px] each. Reduced had a resolution of 2048 x 2048 [px], which meets the ARQL guidelines.
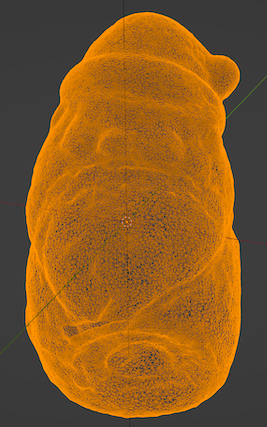
Checking the mesh count with the DCC tool - Blender 3.0, the mesh for the medium was vertexes: about 25,000 and faces: about 50,000. The mesh for the reduced was vertexes: about 12,000 and faces: about 24,000.
Now that we have prepared the 3D data using Photogrammetry, we will use the USDZ file generated by medium to create the AR scene.
2 - Create an AR scene
While you can simply use the ARQL API to display USDZ files in AR, you can use Reality Composer to compose scenes with multiple USDZ files and to specify how the virtual objects are arranged in relation to the real world (planar, vertical, etc.). Reality Composer is a development tool that was introduced at WWDC19 with RealityKit, available for macOS and iPadOS. It is common to create a scene on a Mac first, and then check and modify the AR display on an iPad.
Reality Composer outputs your AR scenes as reality or rcproject files. ARQL can open reality files for AR display, so they can be used as an exchange format like USDZ. The reality files are optimized for RealityKit, so the file size is smaller and the performance is better than USDZ. At WWDC20, as the ability to export USDZ files from Reality Composer was announced, it is also possible to return the content created in Reality Composer to the DCC tool to adjust the 3D data in the workflow. When bringing an AR scene created in Reality Composer into Xcode, it is more efficient to use the standard Reality Composer rcproject file format.
In an AR app that uses the ARQL API, the app will simply play and execute the AR scene created in Reality Composer. There is no other programmatic control. In other words, the AR scenes and interactivity displayed by the AR app are all created in Reality Composer and embedded as files in the app. Because of this, the AR app program will be very simple and independent of the AR scene.
Reality Composer is versatile enough to create AR scenes with complex behaviors, yet intuitive enough to use. Virtual objects are placed using drag and drop, and behaviors such as animation and interaction are designed using the GUI. For details on how to use it, check out the Reality Composer introduction video at WWDC19.
- WWDC19 Video: Building AR Experiences with Reality Composer
We will create an AR scene using the Santa’s USDZ file that we prepared earlier. Launch Reality Composer from the menu - `Open Developer Tool > Reality Composer` in Xcode. (adding it to the Dock will make it easier to launch the next time.) In the `Choose an Anchor` dialog, select where in the real world you want the virtual object to be associated with. According to this specification, ARQL will display AR. In this case, we choose `Vertical` to place Santa on a vertical surface such as a wall.
Next, drag and drop Santa’s USDZ file (the medium one) that we prepared earlier to the center of the screen. This will load the USDZ into Reality Composer. Rotate Santa to adjust the orientation of his face. Santa is a small scanned figurine, so to make it a little larger than the default size for AR display, select Santa, press the Properties button, and set the Transform — Scale attribute to 600 % to enlarge it 6 times. Use the arrows to move the Santa so that he is aligned with the origin.
The next step is to add interactivity to Santa Claus, which responds with a simple animation when he is tapped. Click the Behaviours button at the top to open the Behavior editing area. Press the “+” button to add the Tap & Flip behavior. This sets the behavior when an object is tapped. (There are also various other behaviors available, such as sound playback, timing adjustment, etc.) Select the Trigger panel, click on Santa, and press Done to set Santa as the target of the Tap Trigger. Next, select the Action Sequence panel, click on Santa, and press Done to set Santa as the target of the Action Sequence. The motion pattern and time can be set in the panel. In this example, we will change the Motion Type to Blink. Press the Play button in the upper right corner of the panel to see the motion. If you press the Play button at the top of the screen, you can see the motion from Tap to Action. Tap on Santa to confirm that the Blink animation is playing.
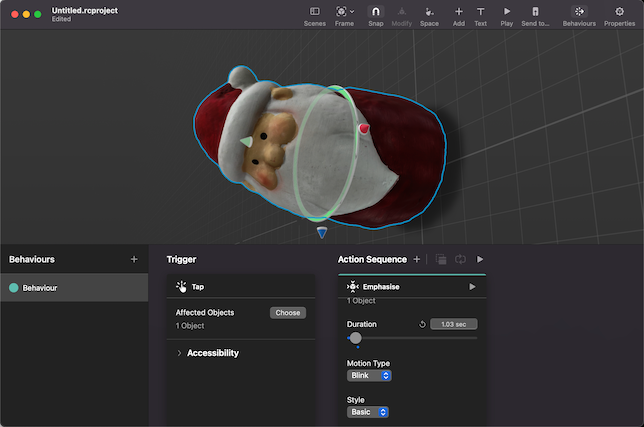
You can also send the scene created on a Mac to an iPad to check out the AR display. Install and launch Reality Composer on the iPad, and press the `Send to…` button at the top of Reality Composer on the Mac to send the scene data to Reality Composer on the iPad. Press the AR button on Reality Composer on the iPad to see the AR display. The AR display in Reality Composer on the iPad may not match the ARQL display in some areas, such as Object Occlusion not working, but it is useful for checking the scene composition.
When the AR scene is complete, save it as santaScene.rcproject from Reality Composer’s File > Save… menu. You can also export the scene in USDZ or Reality file format, but we’ll use the standard rcproject format to bring it into Xcode.
We’ve used Santa’s USDZ data to create a simple AR scene as an example, but Reality Composer’s intuitive GUI makes it easy to understand. You can create complex animations and interactivity, so I think it’s a good idea to watch Apple’s video and get used to it little by little.
3 - Create an AR app
We will create an app that uses the ARQL API to display AR. It loads and displays a Reality or USDZ file bundled with the app. In a Reality file, AR scene is displayed and played back according to the placement (horizontal plane, vertical plane, etc.) and behavior settings. A USDZ file without a placement specification is treated as a horizontal plane placement, and if the USDZ file has animation, it will be played.
The ARQL API is used to display AR scenes and encapsulates the latest features of ARKit / RealityKit and makes them easily available. Device optimized features work without any checks on the capabilities of the running device (People Occlusion, Object Occlusion, Ray-traced shadow, etc.). There is no need to even add keys to Info.plist for camera access.
On the other hand, there is no way to externally configure functions or programmatically control behavior, and AR scene playback is completely left to the ARQL API. Therefore, the richness of the AR experience as an AR app depends on the AR scenes you create with Reality Composer. If you want to do complex programmatic control, you can use ARKit / RealityKit APIs other than ARQL APIs to control it completely by yourself, but of course this requires complex Swift code.
To create an AR app that uses the ARQL API, first create an Xcode Project using the iOS - App template. The ARQL API is based on UIKit, so the Project Interface can be UIKit or SwiftUI. The ARQuickLookPreviewItem class used to configure the ARQL behavior is compatible with iOS / iPadOS 13.0+. We will use the iOS 14 target here.
- Xcode 13.2.1
- iOS Deployment Target: 14.0
First, add the rcproject file we created earlier in Reality Composer by dropping it into the project, and check `Copy items if needed` to copy it. The rcproject file will be converted to a reality file at build time and bundled into the app, so the Swift code will treat it as a reality file with the same name.
The next step is to write Swift code, which is very simple. This code does not depend on the AR scene file, so once you create it, you can use it in your AR app for various AR scenes. The ARQLViewController class is a UIViewController that conforms to the QLPreviewControllerDataSource protocol. For the sake of clarity, the variable parts are summarized in the first four let statements.
- assetName : rcproject, USDZ, reality Name of the file
- assetType : usdz or reality (the type of the file) (rcproject should also be reality)
- allowsContentScaling : If set to false, gesture scaling is disabled.
- canonicalWebPageURL : Specify the web URL to be shared by Share Sheet. nil means the AR scene file will be shared.
ARQL has a built-in sharing feature. By clicking on the Share button, you can give the AR scene file (USDZ or reality file) to the other person. If you set the canonicalWebPageURL to a Web URL, the URL will be shared instead of the AR scene file. If you don’t want to share the AR scene file, you can set the relevant web URL. If you want to share the AR scene file, set it to nil.
To use it from SwiftUI, wrap it with UIViewControllerRepsentable to make it a SwiftUI View.
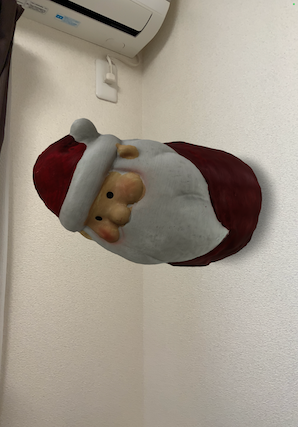
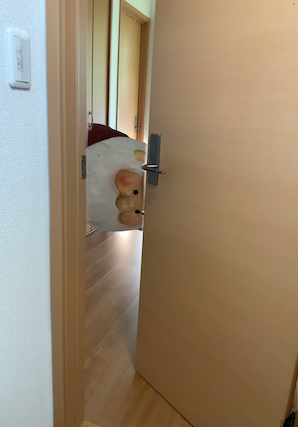
In the Simulator and SwiftUI preview, you can build and run the application, but it shows `Unsupported file format` and does not show the 3D scene. The 3D scene should be checked on a real device.
When run on a real device, Santa will stick to the wall and peek through the door due to Object Occlusion (in the case of LiDAR equipped devices). When Santa is tapped, the behavior plays a humorous animation.
Conclusion
Originally, 3D data creation was a highly specialized field that required dedicated DCC tools. The Object Capture API (macOS) announced at WWDC21 has made 3D data creation using Photogrammetry more accessible, and when combined with Reality Composer, you can create 3D scenes visually using the GUI, and then distribute and play back the AR scenes with a simple AR app that uses the ARQL API. The app code is simple, but the AR expressiveness is automatically configured to maximize the capabilities of the device with the latest ARKit / RealityKit.
The framework for developing AR apps using a combination of Object Capture, Reality Composer, and the AR Quick Look API was introduced in a session at WWDC21. See the WWDC video if you like.
- WWDC21 Video: AR Quick Look, meet Object Capture
The Swift Code and rcproject described in this article are available on GitHub.
- GitHub: ARQL Santa
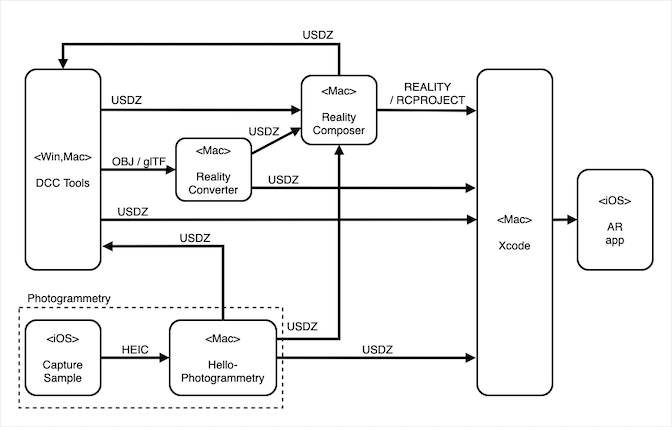
Finally, here is a diagram of the production flow described in this article. Reality Converter is not mentioned in the article, but it is an Apple tool for converting 3D files. Beta version of it is available from the Apple Developer site.
Reference:
- Apple Article: Previewing a Model with AR Quick Look
- Apple Article: Adding Visual Effects in AR Quick Look and RealityKit
Creating an iOS AR app using the AR Quick Look API was originally published in Level Up Coding on Medium, where people are continuing the conversation by highlighting and responding to this story.
This content originally appeared on Level Up Coding - Medium and was authored by Yasuhito Nagatomo
Yasuhito Nagatomo | Sciencx (2021-12-29T23:00:52+00:00) Creating an iOS AR app using the AR Quick Look API. Retrieved from https://www.scien.cx/2021/12/29/creating-an-ios-ar-app-using-the-ar-quick-look-api/
Please log in to upload a file.
There are no updates yet.
Click the Upload button above to add an update.
