
This content originally appeared on DEV Community and was authored by Dilmohit
Hi there, in this post i will be talking about how we can create a beautiful bubble navigation bar in our android project. Just like Navigation drawer, navigation bar is also used by most of the android apps if not all. There are a lot of ways to implement navigation bar in your project. But today we will be using a library to implement bubble navigation bar in our android project.
Step 1 - Create a project using empty activity

Step 2 - Add this library in your build.gradle
implementation 'com.gauravk.bubblenavigation:bubblenavigation:1.0.7'
Step 3 - Add this code in your activity_main.xml
<?xml version="1.0" encoding="utf-8"?>
<RelativeLayout xmlns:android="http://schemas.android.com/apk/res/android"
    xmlns:app="http://schemas.android.com/apk/res-auto"
    xmlns:tools="http://schemas.android.com/tools"
    android:layout_width="match_parent"
    android:layout_height="match_parent"
    tools:context=".MainActivity">

    <FrameLayout
        android:id="@+id/fragment_container"
        android:layout_width="match_parent"
        android:layout_height="match_parent"/>

    <androidx.cardview.widget.CardView
        android:layout_width="match_parent"
        android:layout_height="90dp"
        android:layout_marginBottom="20dp"
        android:layout_marginLeft="10dp"
        android:layout_marginRight="10dp"
        app:cardCornerRadius="30dp"
        android:layout_alignParentBottom="true">

        <com.gauravk.bubblenavigation.BubbleNavigationLinearView
            android:id="@+id/bubblenavigationbar"
            android:layout_width="match_parent"
            android:layout_height="match_parent"
            android:background="@color/white"
            android:orientation="horizontal">

            <com.gauravk.bubblenavigation.BubbleToggleView
                android:id="@+id/homefrag"
                android:layout_width="wrap_content"
                android:layout_height="wrap_content"
                app:bt_active="true"
                app:bt_colorActive="@color/purple_200"
                app:bt_colorInactive="@color/black"
                app:bt_title="Home"
                app:bt_icon="@drawable/home"/>

            <com.gauravk.bubblenavigation.BubbleToggleView
                android:id="@+id/searchfrag"
                android:layout_width="wrap_content"
                android:layout_height="wrap_content"
                app:bt_active="true"
                app:bt_colorActive="#F51662"
                app:bt_colorInactive="@color/black"
                app:bt_title="Search"
                app:bt_icon="@drawable/search"/>

            <com.gauravk.bubblenavigation.BubbleToggleView
                android:id="@+id/notificationfrag"
                android:layout_width="wrap_content"
                android:layout_height="wrap_content"
                app:bt_active="true"
                app:bt_colorActive="#E0F41D"
                app:bt_colorInactive="@color/black"
                app:bt_title="Notify"
                app:bt_icon="@drawable/notifications"/>

            <com.gauravk.bubblenavigation.BubbleToggleView
                android:id="@+id/profilefrag"
                android:layout_width="wrap_content"
                android:layout_height="wrap_content"
                app:bt_active="true"
                app:bt_colorActive="@color/teal_200"
                app:bt_colorInactive="@color/black"
                app:bt_title="Profile"
                app:bt_icon="@drawable/profile"/>

       </com.gauravk.bubblenavigation.BubbleNavigationLinearView>

    </androidx.cardview.widget.CardView>

</RelativeLayout>
logic - So lets understand what is happening here in this xml code. First we have added a library in our project. Now even if you are a beginner in android development you would have known what libraries are.
Now First we have selected Relative Layout as our root view. Then we have added a Framelayout, here in framelayout we will transact our fragments.
Now by implementing this library in our project we get some of its features that we can use in our project. First we get two NavigationViwes -
BubbleNavigationConstraintView: supports spread, inside and packed mode
BubbleNavigationLinearView: allows equal distribution using weight or packed mode
In our project we have used BubbleNavigationLinearView. Now these NavigationViews will contain our UI Components such as Home, Search, Notification and profile. You can add upto 5 UI elements.
I have Also used card view to give our navigation bar round shapes to make it look more attractive
This library also provides us another feature that is BubbleToggleView. This view is used to create new UI Components.
Step 4 - Add these vector assets in your drawable

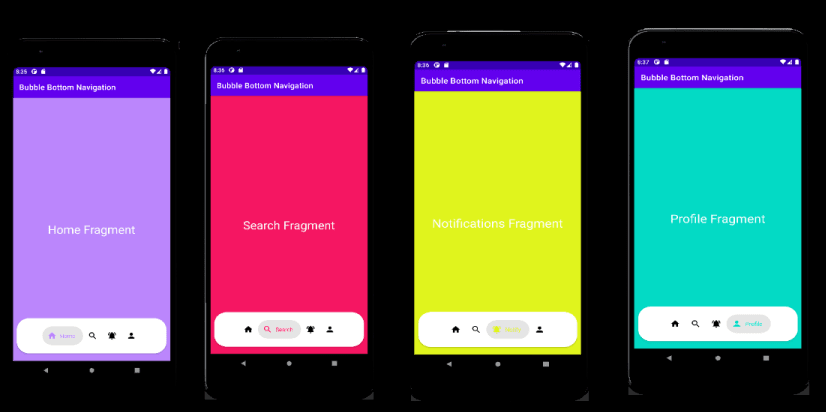
Step 5 - Create blank fragments and name them as shown in the image or you can choose name as per your requirements

Step 6 - Add this code in your MainActivity.java
package com.example.bubblebottomnavigation;

import androidx.appcompat.app.AppCompatActivity;
import androidx.fragment.app.FragmentManager;
import androidx.fragment.app.FragmentTransaction;
import android.os.Bundle;
import com.example.bubblebottomnavigation.fragments.HomeFragment;
import com.example.bubblebottomnavigation.fragments.NotificationsFragment;
import com.example.bubblebottomnavigation.fragments.ProfileFragment;
import com.example.bubblebottomnavigation.fragments.SearchFragment;
import com.gauravk.bubblenavigation.BubbleNavigationLinearView;

public class MainActivity extends AppCompatActivity {

    BubbleNavigationLinearView bubbleNavigationLinearView;

    @Override
    protected void onCreate(Bundle savedInstanceState) {
        super.onCreate(savedInstanceState);
        setContentView(R.layout.activity_main);

   bubbleNavigationLinearView =
   findViewById(R.id.bubblenavigationbar);

        FragmentManager manager = getSupportFragmentManager();
        FragmentTransaction transaction =
        manager.beginTransaction();
        transaction.replace(R.id.fragment_container, new
        HomeFragment());
        transaction.commit();

        bubbleNavigationLinearView.setNavigationChangeListener((view, position) -> {
            switch (position){

                case 0:
                    FragmentManager manager1 =
                    getSupportFragmentManager();
                    FragmentTransaction transaction1 =
                    manager1.beginTransaction();
                    transaction1.replace(R.id.fragment_container,
                    new HomeFragment());
                    transaction1.commit();
                    break;

                    case 1:
                    manager1 = getSupportFragmentManager();
                    transaction1 = manager1.beginTransaction();
                    transaction1.replace(R.id.fragment_container,
                    new SearchFragment());
                    transaction1.commit();
                    break;

                    case 2:
                    manager1 = getSupportFragmentManager();
                    transaction1 = manager1.beginTransaction();
                    transaction1.replace(R.id.fragment_container,
                    new NotificationsFragment());
                    transaction1.commit();
                    break;

                    case 3:
                    manager1 = getSupportFragmentManager();
                    transaction1 = manager1.beginTransaction();
                    transaction1.replace(R.id.fragment_container,
                    new ProfileFragment());
                    transaction1.commit();
                    break;
            }
        });

    }
}
Logic - Here in our MainActivity first we have initialize our BubbleNavigationLinearView Method. Than we have replaced our home fragment with our container using Fragment Manager to keep our home fragment as default fragment.
Next we have used switch statement in .setNavigationChangeListener method to find and then replace our fragments with our container based on there positions.
Output -
If you find this library usefull i request you to visit its creators github page here and give a star there.
Thanks for reading this article. Write down your thoughts in comments or any suggestions for me or anything you think could be improved.
This content originally appeared on DEV Community and was authored by Dilmohit
Dilmohit | Sciencx (2022-01-02T15:56:19+00:00) Create Bubble Navigation Bar In Android Using Java. Retrieved from https://www.scien.cx/2022/01/02/create-bubble-navigation-bar-in-android-using-java/
Please log in to upload a file.
There are no updates yet.
Click the Upload button above to add an update.