This content originally appeared on DEV Community and was authored by Rounak Banik
Introduction
2021 saw a major boom in web3 education and developer content. There a plethora of excellent tutorials available online that teach you everything you need to get started in web3, from building simple Hello World contracts to creating full-fledged decentralized exchanges and NFT marketplaces.
However, almost every tutorial (including the ones published by us) show you how to launch apps on testnets with fake money. There is extremely little coverage on how to launch on a mainnet, and the considerations and challenges involved with the process.
This article, therefore, is on one of the most-requested topics on our Discord: how to develop and deploy a smart contract in the real world with real money.
Disclaimer
We make the assumption that you are already familiar with developing smart contracts on EVM-compatible chains using tools like Solidity, Ethers, and Hardhat. If some of these terms sound alien to you, we strongly suggest going through this article first.
Step 1: Developing Contract on Testnet
The first step remains the same as with every other tutorial. You develop and test your contract on a testnet of the blockchain (or sidechain) that you wish to launch on. For example, you would use Rinkeby or Ropsten if your network of choice was Ethereum and Mumbai if you preferred Polygon.
Most testnets do a very good job of mimicking their corresponding mainnet and also provide free fake tokens to work with through faucets.
You can reasonably expect your contract’s behaviour on a testnet to be almost identical to that on the mainnet.
Step 2: Auditing and Optimizing Contract
Deploying a contract on a testnet costs the same amount of gas as deploying to a mainnet (note that I’m referring to gas units and not gas price).
Checking how much gas contract deployment consumes should give you a good early indication of how expensive deployment is going to be. In some cases, it may be possible to significantly reduce gas consumption (for example, using an ERC-1155 implementation in place of ERC-721 for an NFT dapp).
Do take the time out to evaluate your choices and ensure that reduction of gas consumption does not come at the expense of security.
Once you’re satisfied with the final version of the contract, you should get it audited.
There are excellent services like solidity.finance that will audit your contract for a fee. Do note that the fee may be steep for a lot of projects. But if your dapp is going to be handling assets of other people worth millions of dollars, then I believe that an audit is mandatory and definitely worth the price.
On the other hand, if your project is of a significantly smaller scale (for example, a generative NFT project), then a professional audit may be overkill. In such cases, just ensure that the contract has been tested and walked through by at least two smart contract developers.
Step 3: Estimating Cost of Deployment
Once you’re satisfied with the way your dapp behaves and are convinced that there are no glaring security loopholes, you can proceed to computing the total cost of deployment.
As mentioned earlier, the amount of gas consumed across testnets and the mainnet is the same. To arrive at an estimate of deployment cost on a mainnet, all you need to do is multiply gas consumed with the gas price.
Typically, deployments on Ethereum cost thousands of dollars whereas deployment to sidechains like Polygon and Binance can be done in under five dollars.
We have a detailed tutorial on how to estimate costs and consider your chain options here.
Step 4: Acquiring tokens
This step may seem way too obvious to warrant an entire section but we have seen a few of our community members trip up in this step, especially when working with sidechains.
Remember that you need to acquire a particular token in the chain that you’re working with. This means you need ETH on the Ethereum Mainnet, MATIC on the Polygon network, and BNB on the Binance Smart Chain.
The easiest way to acquire these tokens on their respective chains is by using a ramp service like Moonpay that allows you to purchase crypto using just a credit card.
However, these services don’t work in all countries (India, for example). In such cases, you will unfortunately have to deal with steps like buying on centralized exchanges, KYCs, and withdrawal to Metamask.
During withdrawal, make sure that your tokens are being transferred to the correct network. By default, most exchanges will send your MATIC and BNB to the Ethereum network. They are useless there and bridging them to the correct network is complicated and expensive. Make sure you only use exchanges that have a direct ramp to the network you want to use.
We will be releasing an article on the options you have while purchasing MATIC, BNB, FTM, and other sidechain cryptocurrencies soon.
Step 5: Configuring Hardhat and Alchemy
It is now time for deployment!
In order to deploy to a particular chain, we will need an RPC URL. We’ve already discussed how to acquire this using Alchemy for the Rinkeby and Polygon Mumbai testnets.
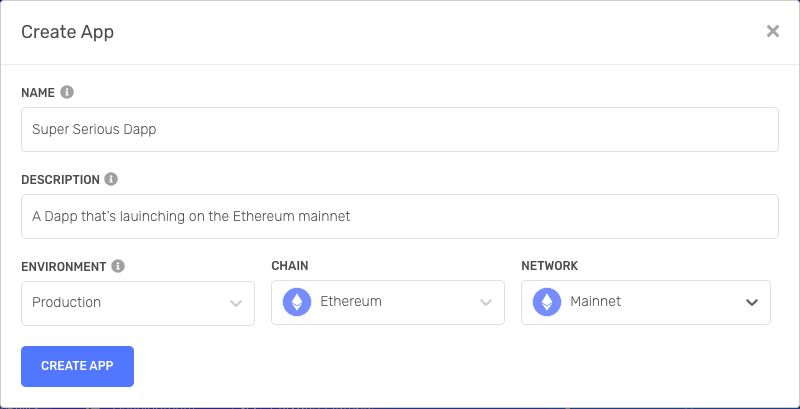
For the corresponding mainnets, the process is identical: create an Alchemy app, set the network to the chain of your choice, and copy the HTTP RPC URL. Below is an app created for the Ethereum mainnet.
Do note that Alchemy, at the time of writing, does not provide RPC URLs for every chain that you could potentially want to work with.
For chains not supported by Alchemy (for example, Fantom Opera), you can use the public RPC URLs available. For instance, https://rpc.ftm.tools/ for Fantom.
We now have everything to configure hardhat.config.js. Add the mainnet network of your choice to module.exports.
module.exports = {
    solidity: "0.8.4",
    networks: {
        rinkeby: {
            url: RINKEBY_RPC_URL,
            accounts: [`0x${PRIVATE_KEY}`],
        },
        mainnet: {
            url: ETHEREUM_RPC_URL,
            accounts: [`0x${PRIVATE_KEY}`],
        },
        polygon: {
            url: POLYGON_RPC_URL,
            accounts: [`0x${PRIVATE_KEY}`],
        },
    }
};
As is good practice, we have defined our RPC URLs and our wallet’s private key in a .env file that will not be committed to our git repository.
Now, running
npx hardhat run scripts/deploy.js --network mainnet
Will deploy your contract to the Ethereum mainnet. Similarly, running
npx hardhat run scripts/deploy.js --network polygon
Will deploy your contract to the Polygon mainnet.
Setting Gas Price
Do note that if you deploy your contract using our deploy.js script from the previous tutorials, ethers will automatically set a gas price and deploy using that price.
In testnets and sidechains like Polygon and Binance, this may not really be an issue. However, lower gas fees could result in savings worth thousands of dollars on Ethereum. Which is why it is prudent to set a gas price yourself.
This is very easy to with ethers. In deploy.js, add an argument to the deploy() method to set a gas price as follows:
const factory = await hre.ethers.getContractFactory('MyContract');
const contract = await factory.deploy(arg1,
                                      arg2,
                                      {gasPrice:50000000000});
await contract.deployed();
As you can probably deduce, we have deployed this contract by setting a gas fee of 50 Gwei.
(Optional) Deploying using Metamask & Remix
When you deploy using hardhat, it automatically drains your wallet of the funds that it needs to perform the request. In other words, there is no confirmation step in between. You issue a command to run the deployment script and boom! your funds are gone and your contract is deployed.
If this is somewhat anxiety-inducing to you, you can consider using Remix as a viable alternative. Remix is world class IDE for developing and deploying contracts on Ethereum and EVM-based chains.
Remix allows you to deploy your contracts using Metamask. By doing so, it places an important confirmation step in between where you can evaluate and approve the total amount you’re spending, and modify gas fees using Metamask’s interface.
You also have the option of getting popup notifications from Metamask as and when your transaction is complete.
We will be doing a tutorial on Remix very soon. There are plenty of great tutorials online that use Remix by default though so you shouldn’t find it too hard to learn.
Conclusion
We hope this article has given you a good idea on the things you need to consider before you take the big step of launching your dapp to a mainnet and have real people use real money on it.
If you have any questions, please feel free to drop them on the #suggestions-and-qna channel of our Discord.
If you don’t have questions, come say hi to us on our Discord anyway! Also, if you liked our content, we would be super grateful if you tweet about us, follow us(@ScrappyNFTs and @Rounak_Banik), and invite your circle to our Discord. Thank you for your support!
About Scrappy Squirrels
Scrappy Squirrels is a collection of 10,000+ randomly generated NFTs. Scrappy Squirrels are meant for buyers, creators, and developers who are completely new to the NFT ecosystem.
The community is built around learning about the NFT revolution, exploring its current use cases, discovering new applications, and finding members to collaborate on exciting projects with.
Join our community here: https://discord.gg/8UqJXTX7Kd
This content originally appeared on DEV Community and was authored by Rounak Banik
Rounak Banik | Sciencx (2022-01-14T16:16:48+00:00) Deploying a Dapp to Mainnet. Retrieved from https://www.scien.cx/2022/01/14/deploying-a-dapp-to-mainnet/
Please log in to upload a file.
There are no updates yet.
Click the Upload button above to add an update.


