
This content originally appeared on Bits and Pieces - Medium and was authored by Lakindu Hewawasam
Provide Web Loaders to your application efficiently
Developers widely use web loaders in asynchronous data fetching processes. They help keep end-users engaged, and increase the user experience.
React 16.6 introduced React Suspense as an experimental feature, and it has now revolutionized the web loader integration process. Presently, it is fully fine-tuned and set to be released as a complete feature with React 18.
Thus, this article will guide you through the steps of implementing web loaders using React Suspense.
Web Loaders without React Suspense
Before getting into React Suspense implementation, let’s discuss the complexity of implementing web loaders without React Suspense.
Without React Suspense, the process is complex. Accordingly, you need to use state variables to indicate the loading state while using conditional rendering to render the loader/component.
Now, let’s implement a simple React application to have a better understanding of this process.
Here, I will be using the react-loading-skeleton library to implement the loader and two directories named src/api and src/components for APIs and components will be created respectively.
Step 1. Add the API
To begin with, the fake JSON API will be used to fetch data and it can be accessed with the URL — https://jsonplaceholder.typicode.com/posts.
const ENDPOINT = "https://jsonplaceholder.typicode.com/posts";
export const getPosts = () => {
 return fetch(ENDPOINT).then((res) => res.json());
}
Step 2. Add the Posts components
Next, create a component named Posts to consume the API and display the output.
import { useEffect, useState, useCallback } from "react";
import { getPosts } from "../api/api";
import Skeleton from "react-loading-skeleton";
import "react-loading-skeleton/dist/skeleton.css";
export const Posts = () => {
const [posts, setPosts] = useState([]);
const [loading, setLoading] = useState(false);
const getPostsFromAPI = useCallback(async () => {
setLoading(true);
try {
const resp = await getPosts();
setPosts(resp);
} catch (err) {
console.log(err);
} finally {
setLoading(false);
}}, []);
useEffect(() => {
getPostsFromAPI();
}, [getPostsFromAPI]);
return (
<>
{loading ? (
<><Skeleton count={10} /></>
) : (
<>
{posts.map((post) => (
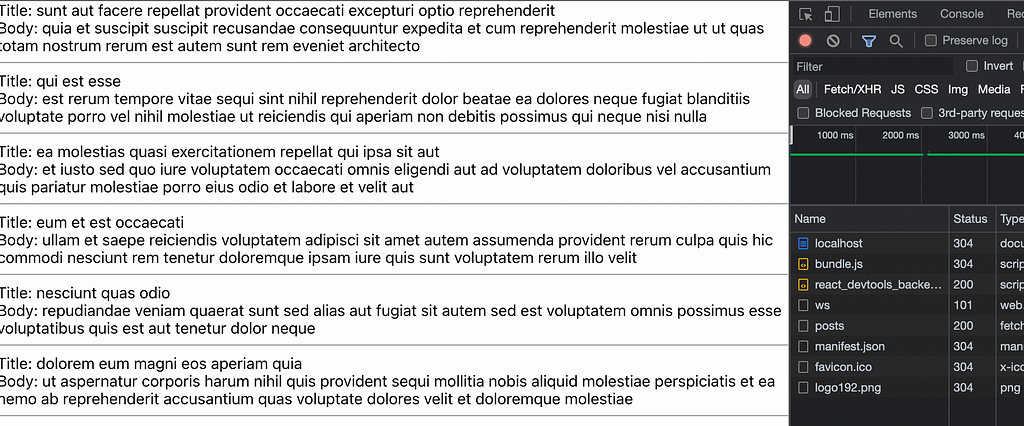
<div key={post.id}><span>Title: {post.title}</span><br /><span>Body: {post.body}</span><hr /></div>
))}
</> )}
</>
);
};In the above snippet, the useEffect Hook triggers the API call when React mounts it onto the DOM. It calls the method getPostsFromAPI() that fetches the API data. There, you can observe a state variable, loading being updated to indicate the progress of the API call.
When the HTML is returned, conditional rendering checks the loading state, and if it is equal to true, the spinner gets rendered.
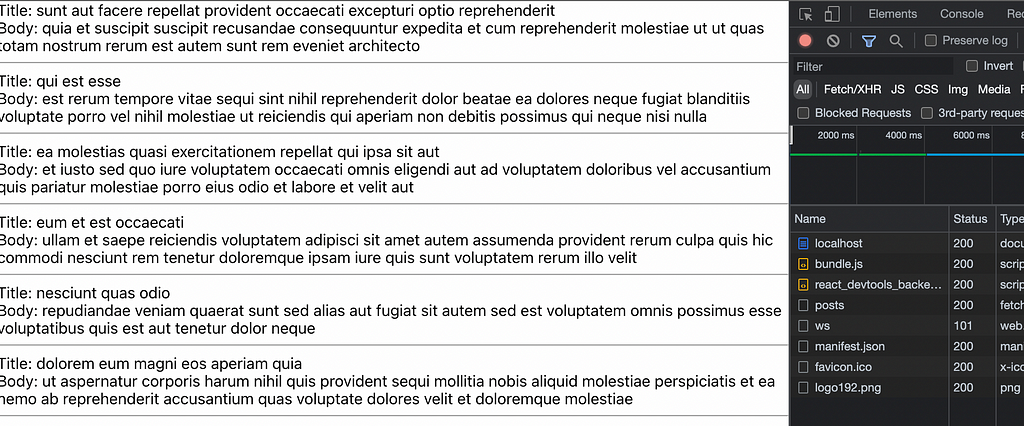
If you observe the browser, you can see the skeleton component rendered while the API fetches data. After the data gets fetched, it displays the Posts component.
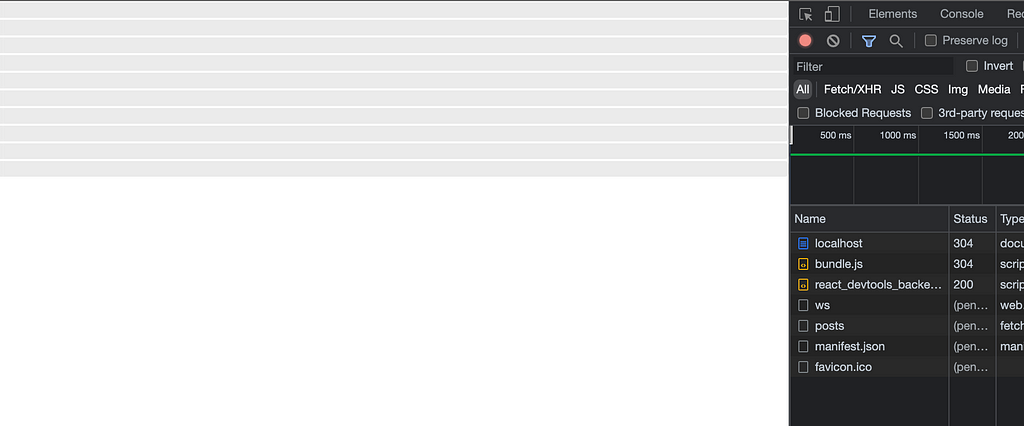
Implementing web loaders in this way is complex and is called fetch-then-render because data is not fetched until the component renders on the screen. This in turn creates a synchronous rendering tree for an asynchronous flow and increases the application loading time.
Now then, let’s see how React Suspense resolves this complexity and improves performance.
Web Loaders with React Suspense
React 18 provides a Suspense component which allows waiting for any asynchronous operation to complete without checking for its progress.
React does this by suspending the component when no data is available, and retrying to render the component until the data flows into it. Upon data flow, React completes the rendering process.
This process is known as render-as-you-fetch since React fetches the data as early as possible and starts to render the component while it loads the data.
To understand this behavior, let’s modify the previous example using the Suspense component.
Prerequisites
Before starting the implementation, you need to update React to the latest beta version.
npm i react@beta react-dom@beta
Then, you should have a basic understanding of the Suspense component. React expects a component to be wrapped with the Suspense component. It ensures that the wrapped component is suspended until the data is available.
<Suspense fallback={<Skeleton/>}
	<Posts resources={resources}/>
</Suspense>
To do so:
- React requires a child component wrapped by the Suspense component to throw a promise that will read the data.
- When this promise gets thrown, React suspends the component and executes the fallback mechanism. In our case, we load the Skeleton as the fallback.
- React retries to render the component until data is ready, and once prepared, it displays the data.
Let us look at each step in detail.
Step 1. Throw a Promise that loads the data.
First, a new method is required to help throw the promise while loading the data.
const wrapCallInPromise = (promise) => {
	let status = "pending"; // status of execution
 	let result; // data to be returned
 	let suspender = promise
 		.then((resp) => {
 			status = "success";
 			result = resp;
 		})
 		.catch((err) => {
 			status = "error";
 			result = err;
 		});
return {
readData() {
if (status === "pending") {
throw suspender; // suspend the component by throwing the suspender
} else if (status === "success") {
return result; // return the data successfully fetched
} else if (status === "error") {
throw result; // throw the error and suspend the component
}
},
};
};In the above example, wrapCallInPromise() method accepts a promise, and checks its response and error. Two variables are declared to handle the state and the outcome.
- status: This handles the state of the action, and React expects the values to be "success," "error," or "pending." "pending" informs React that the action is currently executing and the component must be suspended.
- result: This contains the outcome, the data/ error returned.
wrapCallInPromise() method returns an object with a method readData() , and React Suspense uses it to suspend the component. You can observe that when data is loading (status = pending), the suspender is thrown, informing React to suspend the component. When data is fetched (status = success), the result is returned allowing React to render the component.
This method is then invoked when getPosts() is executed. And the asynchronous call is wrapped using this method so that the suspender can be thrown.
export const getPosts = () => {
	 return wrapCallInPromise(fetch(ENDPOINT).then((res) => res.json()));
};
Step 2. Integrate React Suspense and display the fallback UI.
After updating the API, you can add the React Suspense component. First, the Suspense component needs to be imported from React.
import { Suspense } from "react";This component is placed over the child component. Therefore, the Posts component will be wrapped using the Suspense component.
The updated App component is shown below.
import "./App.css";
import { Posts } from "./components/posts";
import Skeleton from "react-loading-skeleton";
import "react-loading-skeleton/dist/skeleton.css";
import { Suspense } from "react";
import { getPosts } from "./api/api";
const resources = getPosts();
function App() {
 	return (
 		<div>
 			<Suspense fallback={<Skeleton count={10} />}>
				<Posts resources={resources} />
 			</Suspense>
 		</div>
 	);
}
export default App;
The resources prop is passed to the Posts component to access the data returned from the asynchronous API call while the Skeleton loader is used as the fallback prop.
Now, you can remove the Hooks and conditional rendering from the Posts component and replace it with a single line that invokes the readData() method.
The code for the updated Posts component is shown below.
export const Posts = (props) => {
 	const { resources } = props;
 	const posts = resources.readData();
	return (
 	 <>
		  {posts.map((post) => (
 			<div key={post.id}>
 				<span>Title: {post.title}</span>
 				<br />
 				<span>Body: {post.body}</span>
 				<hr key={post.id} />
 			</div>
 		))}
   	 </>
   	);
  };
The above code will render the component only when data is ready. The method readData() will throw the suspender when the API fetches data causing React to suspend the Posts component and render the fallback component.
The output for the updated code is shown below.
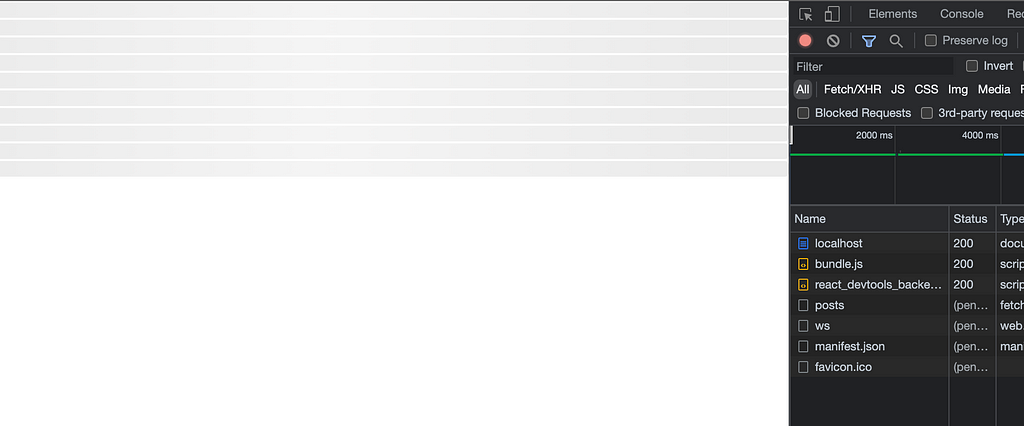
Why use React Suspense?
As you have already seen in figures 03 and 04, React Suspense generates the same output but with cleaner, more effective code.
It avoids:
- Using effects inside the component.
- Using conditional rendering by avoiding all if(loading)checks.
React Suspense helps maintain clean, bug-free, scalable, and readable code to support design growing applications.
Tip: Build & share independent components with Bit
If you want to create re-usable web loaders in your web application, try Bit. Bit is an ultra-extensible tool that lets you create truly modular applications with independently authored, versioned, and maintained components.
Use it to build modular apps & design systems, author and deliver micro frontends, or simply share components between applications.
It’s fun, give it a try →

Conclusion
In this article, we have discussed the importance of React Suspense and how it provides a very simple approach to implementing web loaders. You can find the complete code of the example used, in my GitHub repository
I do hope you have found this article very useful. Thank you for reading.
Implement Web Loaders with React Suspense was originally published in Bits and Pieces on Medium, where people are continuing the conversation by highlighting and responding to this story.
This content originally appeared on Bits and Pieces - Medium and was authored by Lakindu Hewawasam
Lakindu Hewawasam | Sciencx (2022-01-20T08:03:08+00:00) Implement Web Loaders with React Suspense. Retrieved from https://www.scien.cx/2022/01/20/implement-web-loaders-with-react-suspense/
Please log in to upload a file.
There are no updates yet.
Click the Upload button above to add an update.