This content originally appeared on Bits and Pieces - Medium and was authored by Kyle DeGuzman

A few articles ago, we learned how to Get Started with JavaScript’s native Fetch API. This promise-based API allowed us to asynchronously make HTTP requests to fetch resources available on the internet.
And by making such requests, we can enhance our own websites and applications. We can use data collected by third parties to make our own products more useful for our users.
For example, we can use fetch to work with PayPal or Stripe for payment processing. We can use fetch to collect weather data from Weather APIs. We can do a lot of different things.
So, now we’re going to build on this idea by adding in a new key player: Node.js. If you don’t know what Node.js is, check out An Introduction to Node.js. But for a quick rundown, Node.js is a runtime environment that allows us to use JavaScript to create applications that can exist outside of web browsers.
If you haven’t encountered Node.js thus far in your journey, it is only a matter of time. Hop on it.
So a beautiful thing about Node.js is that this runtime environment has packages (or libraries). And these libraries can give you some functionality that can make your life a billion times easier. One of those packages is Axios.
What is Axios?
Similar to JavaScript’s Fetch API, Axios is a promise-based solution that we can use to asynchronously fetch data.
If you understand JavaScript’s Fetch API, picking up Axios should be extremely easy. For the most part, they look nearly identical.
If they’re doing the same thing, getting the same results, and look nearly identical, what’s the point? Why not just use the Fetch API?
In Node.js projects, you cannot simply use the Fetch API. It does not work.
A quick fix is the npm module node-fetch. According to their npm page, it is “A light-weight module that brings Fetch API to Node.js.” All you have to do is install the module in your project, import it at the very top of your script, and use the Fetch API like normal. There are no syntax changes. It’s exactly the same.
But a more popular tool is Axios. According to this npm ranking chart, axios is the 15th most depended-upon package, while node-fetch sits at rank 58. You can probably use them interchangeably, but for bigger projects, you should go with Axios.
So with all that said, let’s get started with Axios.
Install Node.js
Before we can do anything, we need to make sure we have Node.js installed. If it’s not installed yet on your device, install it from the Node.js official site. Hit the download button. And if you’re still new and have no preferences for how it should be installed, just repeatedly hit “next” during the installation process. You will be completely fine.
By installing Node.js, you can also now access npm — which is a package manager. This package manager will allow you to utilize the many different packages available. You can build React and Vue.js projects. You can install minifiers like Gulp or bundlers like webpack. Obviously, you can also install Axios.
If you want to check out the most popular packages that people in the community are using, check out: Top 1000 most depended-upon packages. Or you can also search directly on npm’s official website.
Install VS Code
We also need to install Visual Studio Code. This is a very popular text editor by Microsoft. You can use whatever text editor you want. However, if you want to follow along with this tutorial, I recommend installing VS Code.
Note: This is different from Microsoft’s Visual Studios Application
You can find the installation link on VS Code’s official website.
Create New Project
Open up VS Code.
At the top right, hit File > Open Folder. Select an empty folder for your Project. If you don’t have one, simply right-click in the pop-up window and create a new folder.
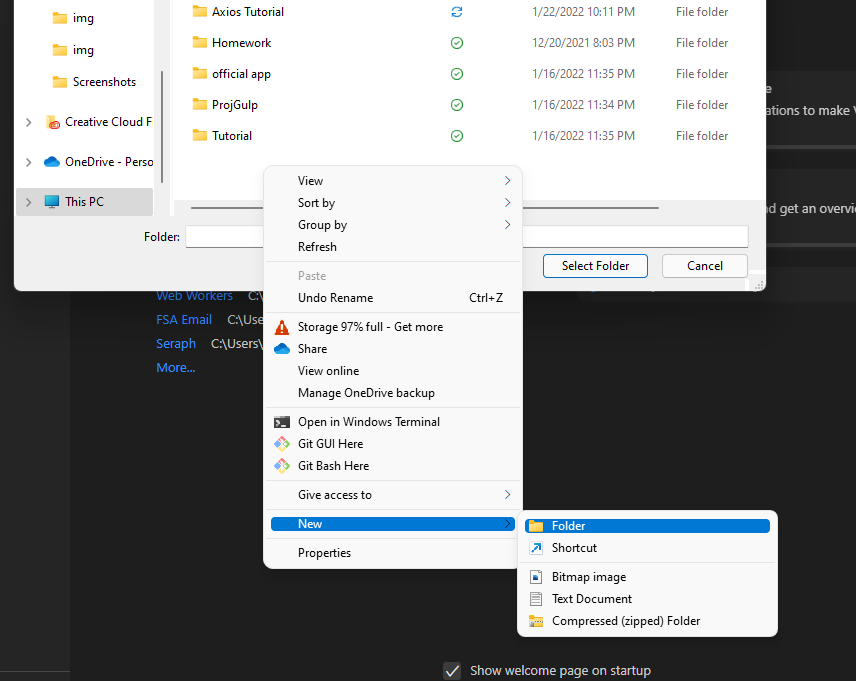
Very simple stuff.
At the top bar, you should also see a tab called Terminal. Click New Terminal

That will open up a terminal at the bottom of your screen like such:
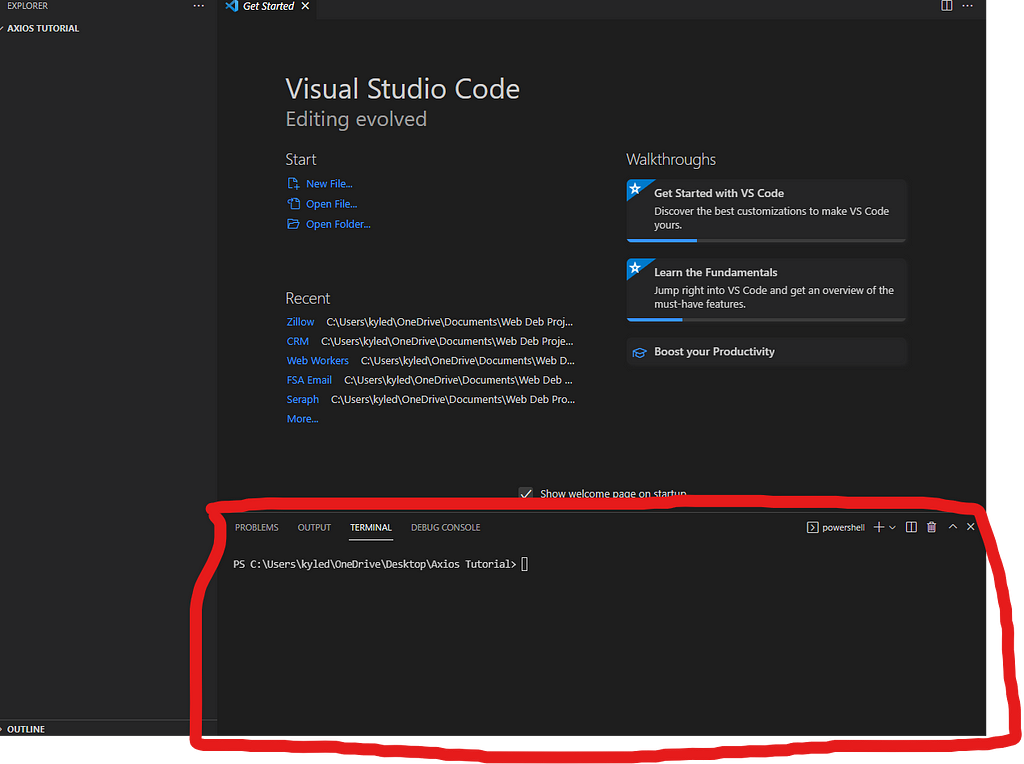
And this terminal is how we are going to interact with Node.js.
Install Axios
The first thing you will always do for a Node.js project is to generate an npm project.
In other words, any time you want to use an npm package, like Axios, this is the first thing you will always do.
Go to the terminal and run this command.
npm init -y
If done correctly, it will generate a package.json file.
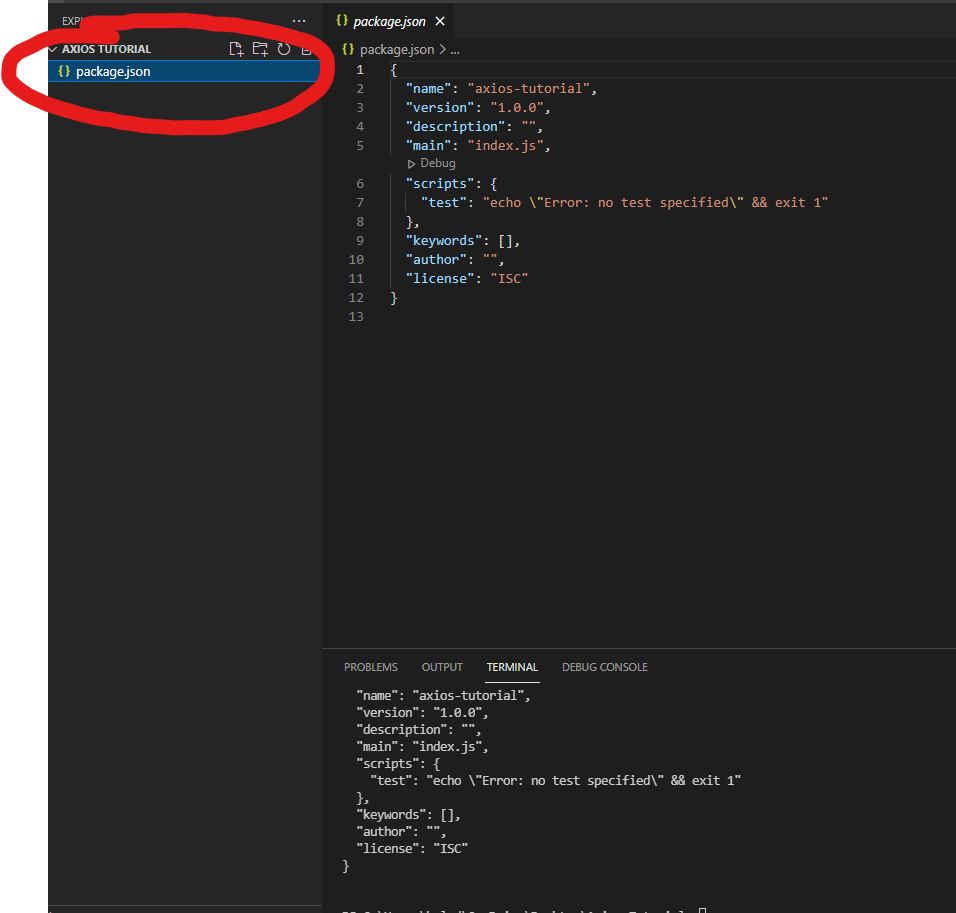
This is absolutely essential. This json file will tell our project which npm packages it's using. In our case, it will tell NodeJs that we’re going to use Axios.
To install Axios, go in your terminal and run the following command:
npm install axios
or alternatively
npm i axios
Now that Axios is installed, we can begin using Axios.
Create index.js
To get started, create a script.
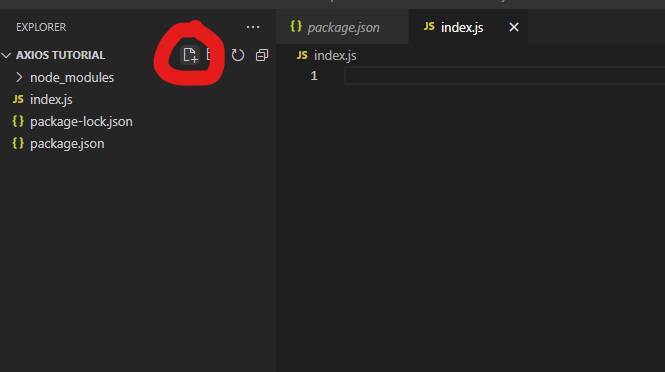
To create any file, click that button as shown. You can name the script whatever you want. Just make sure you write the file extension .js at the very end.
Require Axios
To use Axios, we have to import it. We have to make it usable in our code. This is how we do that.
const axios = require("axios");After doing this, we can use functions from the Axios package.
The most notable functions are GET, POST, PATCH, and ALL.
With GET, we can read data. With POST, we can write/overwrite data to our resource. With PATCH, we can update data within our resource. And with ALL, we can get, patch, and post more than once in a single HTTP Request.
Axios Get
First, let’s start with the easiest. Get allows us to read data.
Take this api: https://api.kanye.rest/ . If you view it, you will see it returns a JSON file as shown:

To fetch this resource in Axios, it will look like this:
const axios = require("axios");axios.get("https://api.kanye.rest/") .then(response => {console.log(response.data);
})
Let’s break it down.
We start by requiring Axios. Here, we did const axios = require("axios") Just for clarity, you can name the const variable anything you want. You could do const banana = require("axios") if you wanted. But for clarity and readability, especially if you are working in a team, you will normally see people call it axios.
Next, you will notice we wrote axios.get() . This establishes the fact that we are using Axios’ get function.
Note: the axios in axios.get() refers to the const variable. So again, if you did const banana = require("axios") you would have to consequently write banana.get() You see how that works?
Within the parentheses of axios.get(), you will see a link in double-quotes. You can also use single quotes if you want. That is the resource we are trying to read.
Finally, we see a then function. This is basically saying: if we can successfully read data from this source, then execute the following code. If Axios cannot read the provided resource, nothing will happen.
And if you don’t understand arrow functions, here’s how it looks with normal functions:
const axios = require("axios");axios.get("https://api.kanye.rest/") .then(function(response){console.log(response.data);
})
Notice that the .then() function has a function as a parameter. That embedded function will execute if the GET was successful. If the GET was successful, you can say the HTTP request was successful. And if the HTTP request was successful, we can expect an HTTP response. That is what response stands for.
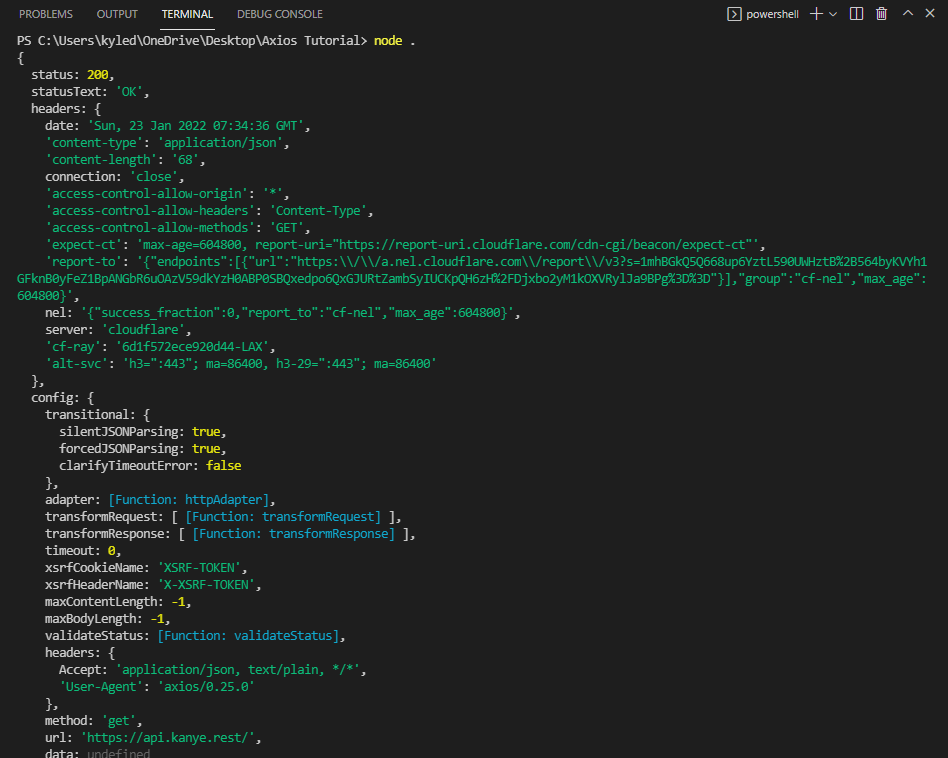
If we did console.log(response) it would return the entire HTTP response. We only want the data. In this case, we want the quote (because the API we’re making requests to generate quotes). We want to see the JSON information. So that is why we wrote response.data . I encourage you to run the code yourself.
Here is the response for console.log(response)
Here is the response for console.log(response.data)
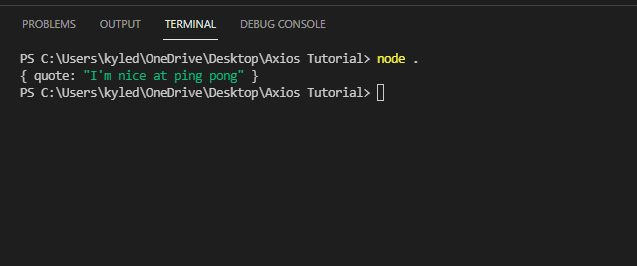
Note: To run/compile your script, type in “node .” in the terminal. Yes, this command includes a period. Make sure you save your script, prior to running this command so you’re running the most updated version of your script.
Now that you understand how the GET function works, let’s look at other ways you can write it. They all do the same exact thing. They just look different.
axios("https://api.kanye.rest/") .then(function(response){console.log(response.data);
})
Notice how it does not say axios.get . This is because it defaults to the get function. I don’t recommend this. Writing axios.get will improve readability.
const axios = require("axios");axios({method: "get",
   url: "https://api.kanye.rest/"
})
.then(function(response){console.log(response.data);
});
In this approach, we are passing the following object:
{method: "get",
url: "https://api.kanye.rest/"
}
Into axios(). We are stating the method and the URL to the resource. And then if the GET is successful, we use .then() as shown previously.
AXIOS POST
axios.get allowed us to read data. The POST function allows us to send data. What if we wanted to add a completely new customer to our database?
If we wanted to add a new entry to the resource, we would simply use axios.post
const axios = require("axios");axios({method: "post",
url: "https://api.kanye.resst/",
data : {name: "Kyle",
age : "21",
role : "student"
}
})
.then(function(response){console.log(response.data);
})
Here, the value of the method property is “post”. We will need the URL of the resource we’re going to send the data to, and we also need data to send. The data sent is in the form of a JavaScript object.
Here is an alternative way you can use the POST function:
const axios = require("axios");axios.post("https://api.kanye.resst/",{name: "Kyle",
age : "21",
role : "student"
})
.then(function(response){console.log(response.data);
})
Axios Put/Patch
If we wanted to update an existing entry of data, we can use either PUT or PATCH.
Let’s imagine our resource looked like this:
{"name": "Kelly",
"age": "34",
"role": "teacher"
}
… and we wanted to update it with new information.
axios.put would overwrite our data.
If we sent {“name”:“Kelly” , “age”: “35”} with PUT, it would erase the role property in our entry since it was not mentioned. The resource entry would now look like {“name”:“Kelly” , “age”: “35”}
If we sent {“name”:“Kelly” , “age”: “35”} with PATCH, it would update the name and age in our database. And since the role property was never mentioned, it will leave it alone. It will not delete the role property. The resource entry would now look like {“name”:“Kelly” , “age”: “35”, "role: "teacher"}
Let’s dive into the code so we can see how to implement it.
const axios = require("axios");axios.put("https://api.kanye.resst/",{name: "Kyle",
age : "22",
role : "student"
})
.then(function(response){console.log(response.data);
})
Or you can replace put with patch . It just depends on what you want to do.
Alternatively, it can also look like this:
const axios = require("axios");axios({method: "patch",
url: "https://api.kanye.resst/",
data : {name: "Kyle",
role : "teacher"
}
})
.then(function(response){console.log(response.data);
})
Axios All
We learned how to GET, PUT, POST, and PATCH. But notice that we had to do it one at a time.
In a single HTTP request, we can either GET, PUT, POST, or PATCH. We cannot do all of them within a single HTTP request. Or what if we wanted to perform GET five times in a single HTTP request?
This is where ALL comes in.
ALL will take in an array of requests and execute them all.
Here’s how that happens:
axios.all([
axios.get(“https://api.kanye.rest/”),
axios.get(“https://api.kanye.resst/”)
])
.then(response => {console.log(response[0]);
console.log(response[1]);
}))
You can use GET, PUT, POST, PATCH, and any other Axios functions you come across. In this example, we used GET twice.
Notice that these two GET requests are in an array. And like any other array, the array items are separated by commas.
Also, notice the .then() . It’s similar to the previous examples. However, now the response is an array of HTTP responses.
response[0] represents the HTTP response to the first GET request. And response[1] represents the HTTP response to the second GET request. See how that works?
This is not a complete guide to Axios; however, it should be enough to get you started.
For more information, you can check out Axios’ official GitHub page or Axios’ official npm page. Both resources will have information that outlines more tools offered by Axios.
Happy Coding!
Unlock 10x development with independent components
Building monolithic apps means all your code is internal and is not useful anywhere else. It just serves this one project. And as you scale to more code and people, development becomes slow and painful as everyone works in one codebase and on the same version.
But what if you build independent components first, and then use them to build any number of projects? You could accelerate and scale modern development 10x.
OSS Tools like Bit offer a powerful developer experience for building independent components and composing modular applications. Many teams start by building their Design Systems or Micro Frontends, through independent components. Give it a try →
Getting Started with Axios was originally published in Bits and Pieces on Medium, where people are continuing the conversation by highlighting and responding to this story.
This content originally appeared on Bits and Pieces - Medium and was authored by Kyle DeGuzman
Kyle DeGuzman | Sciencx (2022-01-25T11:20:36+00:00) Getting Started with Axios. Retrieved from https://www.scien.cx/2022/01/25/getting-started-with-axios/
Please log in to upload a file.
There are no updates yet.
Click the Upload button above to add an update.
