Deploy Node.js application over Google Cloud with CI/CD

How to automate the deployment of a Node.js app with CI/CD using Google Kubernetes Engine, Jenkins, DockerHub and ArgoCD

High Level architecture

Introduction

We will be deploying a containerized Node.js application using Docker over Google Kubernetes Engine using Jenkins for CI (building pipelines to build, test and upload image to Docker Hub) and argoCd with Helm for CD.

It will sync up with our charts repo, pull images uploaded by Jenkins to dockerHub and accordingly apply changes to the GKE cluster infrastructure.

This will also work with any other application too if you can write a Docker file for it.

Table of Contents

  1. Prerequisites
  2. Project set-up
  3. GKE Cluster setup on Google Cloud
  4. Jenkins setup on Google Cloud
  5. Jenkins CI set-up:
    – Pipeline setup
    – Register web-hook to trigger build
  6. ArgoCD set-up:
    – Integrate chart git Repo
    – Create public charts registry
    -Install argoCd over GCP
    – Configure ArgoCd to Sync with Git Chart Repo

Prerequisites

  • You need Docker installed
  • You need Helm package manager
  • You need Node.js installed
  • You need a docker hub repository (create a free tier account on docker hub if you don’t have one)
  • You need a Google cloud account:
    – If you don’t have create a free account you will get 300$ initially and you will not be charged until you manually update your account to paid account.
    – Activate your billing as Kubernetes, Jenkins resources requires it. Your 300$ will be used for this.

Project Setup

We will clone the project git repo and test it locally once. You can clone the sample repository devopspractice for uniformity.

Run the below commands to build and spin up a local container for testing:

npm install
docker build .
docker run -itd -p 3000:3000 — name <containerName> <image>
curl — location — request GET ‘http://localhost:3000/v1/dev/data'

If you get a ‘201 created’ everything works great.

GKE Cluster Setup on Google Cloud

From GCP Dashboard > kubernetes-Engine > create > take below reference for the fields (Fig 1).

Change defaultPool > numberOfNodes > 2 (to save money). It will take few minutes to create the cluster.
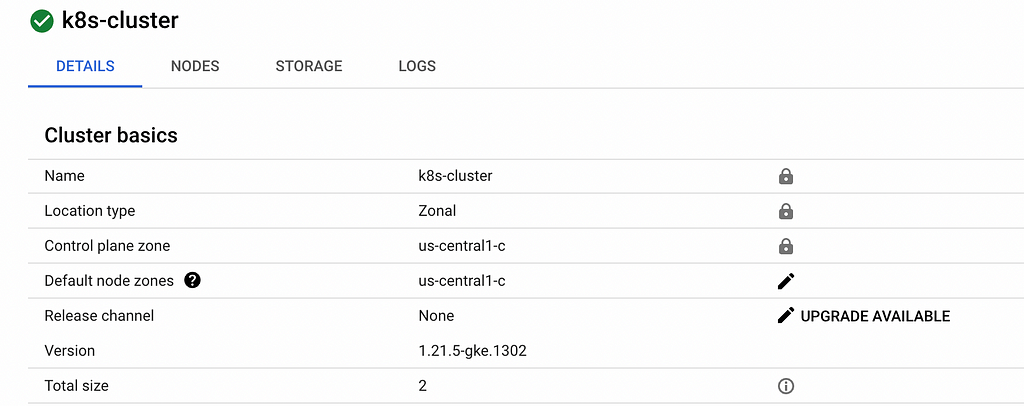
Fig 1

Jenkins Setup On GCP

We will be using GCP managed Jenkins service and set it up.

GCP Dashboard > marketplace > Jenkins packaged by Bitnami > launch.

Give a name and zone (us-central1-c) and create.

Once created go to site address (Fig 2) add fill in the username, password and you will be able to access it (If not try removing /jenkins from the end).

Click on SSH (Fig 2) > open in browser window. Then follow the below steps.

Install docker using this link on Vm(complete all steps from section Install using the repository and Install Docker Engine).

In one of the steps a specific version of docker is asked either you select one in the list or just paste this command.

sudo apt-get install docker-ce=5:20.10.12~3–0~debian-buster docker-ce-cli=5:20.10.12~3–0~debian-buster containerd.ioC

Once docker is installed we need to give docker access and install kubectl using below commands:

sudo usermod -aG docker jenkins
sudo apt-get install kubectl

We need to restart Jenkins vm for these changes to appear (dashboard (navigation menu) > compute engine > Jenkins VmInstance > Stop > and then Start).
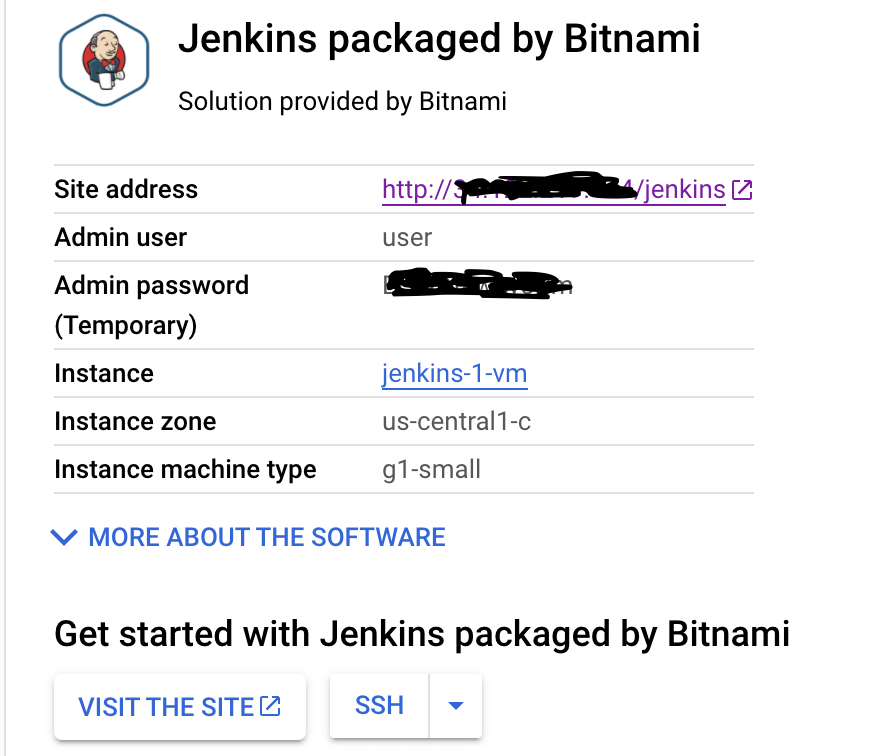
Fig 2

Jenkins CI Setup

Here we will connect Jenkins to our project git Repo, build pipelines and add a Webhook for automatic build trigger over Jenkins on any commits in our Repo.

Go to your Jenkins Dashboard > manageJenkins > managePlugins > Install ‘Docker pipeline’ and ‘Google Kubernetes Engine’.

From Jenkins Dashboard > manageJenkins > Manage Credential > global(below) > add credential.

Create new credential for GIT using your git username and password.

Create new credential for DockerHub using your dockerHub username and password (Fig 4 after successful creation).
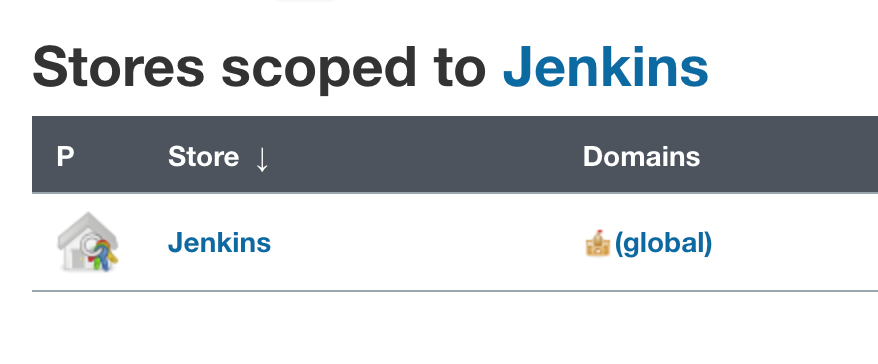
Fig 3
Fig 4

Now we will setup the pipeline. From Jenkins Dashboard > new Item > give project name and select pipeline.

In General section > tick Github Project and add Git project URL (e.g. https://github.com/aashirwad3may/devopspractice.git/).

In BuildTriggerSection > tick GitHub hook trigger for GITScm polling.

In pipeline Section add below fields (Fig 5) and rest remains same and save.
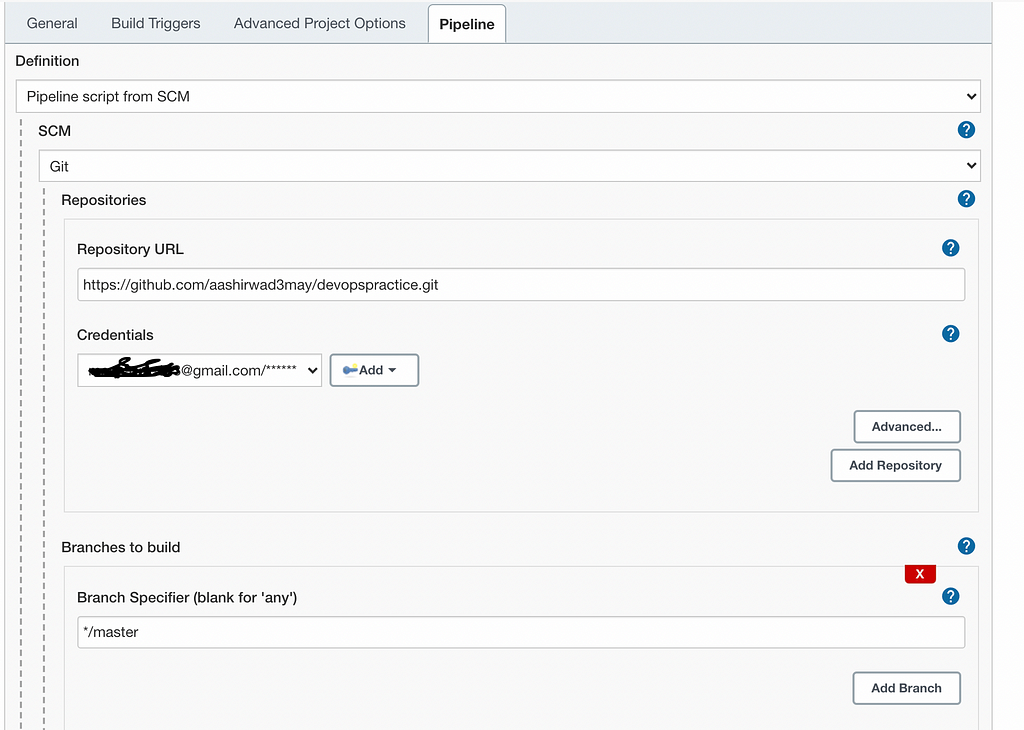
Fig 5

The steps to be taken inside the pipeline are mentioned in project git repo with file name Jenkins… change your docker hub username in Jenkins’s file (ref fig 6).

Fig 6

On the Jenkins Dashboard the project will be shown click on it and trigger the build using BuildNow you should see pipeline execution with below result.

Fig 7

Here we are manually triggering the build to automate this we will use webhook so whenever you commit in git build will be triggered and image will be uploaded in your dockerHub Repo.

In order to add a webhook from Git project settings -> webhook -> add Webhook.

In Payload add only ip (e.g 14.112.217.344)(http://<Jenkins GCP SITE IP>/github-webhook/).

Content type application.json.

Create a webhook and commit in your local repo build should be triggered automatically.

ArgoCD Setup

Here we will setup helm on local system, create and use Cloud storage keep all our charts version (charts storage), install ArgoCd on GCP, create a secret to store dockerHub credentials on GKE and finally setup ArgoCD to sync with our git chart repo.

Install Helm on your local system use this link for ref.

As you can see in architecture diagram at the top, we have two git repo one for development and other for deployment (charts and values.yaml) as it is recommended. You can clone my charts repo here for ref and uniformity.

We need a charts storage where argoCD will pull helms charts we will use google cloud storage for this.

From GCP Dashboard->CloudStorage->createBucket (choose region as below and rest default) (Fig 8).

fig 8
Fig 9

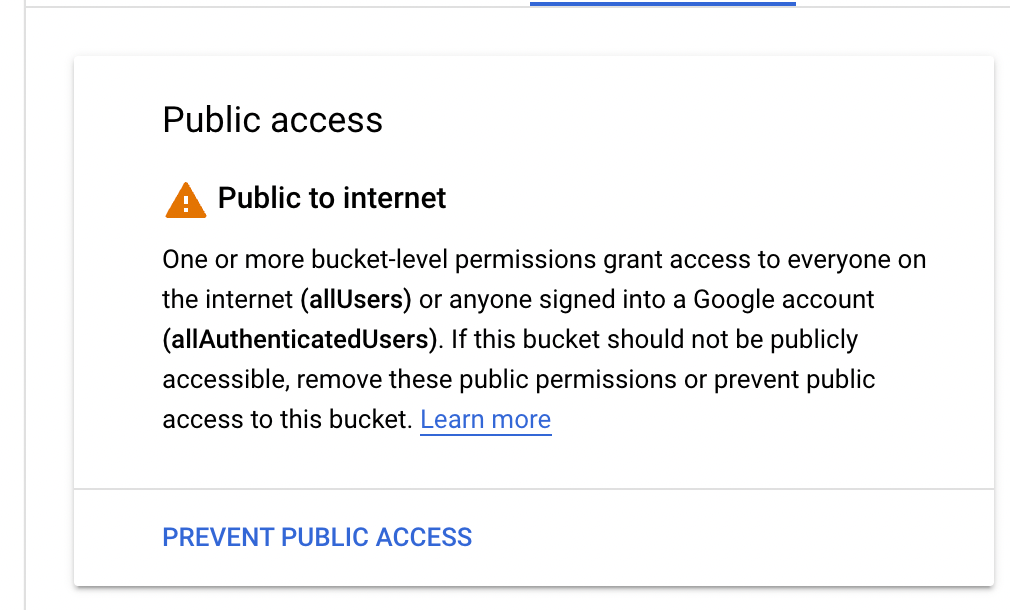
Once created we need to change it read access to public for this go inside bucket->permission->add (Fig 10).

Fig 10
Fig 11

Add the role and save it should now show the access as public just as above (Fig 11).

Now we will configure deployment.yaml to connect to dockerHub and create a secret to hold dockerHub credentials and finally create and upload charts to Cloud Storage.

Project Git Repo > helm > templates > deployment.yaml (update your username as mentioned Fig 12).

Fig 12

As you can see dockerHub credentials will be stored in secrets name regcred (Fig 12 imagePullSecrets) so run the below command with your dockerHub credentials to create it so argoCd can pull latest images (earlier we put credential in Jenkins to push the image).

kubectl create secret docker-registry regcred — docker-server=https://index.docker.io/v1/ — docker-username=<your-name> — docker-password=<your-pword> — docker-email=<your-email>

Run below commands to build your charts:

helm package helm -d charts 
helm repo index charts

This will create charts zip and index file in charts folder which you can upload to the cloud storage bucket created above (Fig 13 here i have multiple charts you will have one only first time).

Either you can upload it manually in GCP bucket or write a script to combine the steps.

Fig 13

Install ArgoCD on GCP

Here we will host ArgoCd on GCP and connect ArgoCd to sync our git chart repo.

Follow this link steps 1,3(Service Type Load Balancer) and 4 run the mentioned commands on google cloud shell.

If everything successful, you should see this (Fig 13) in GCP Dashboard > kubernetesEngine > service&ingress.

Click on the Ip External load balancer (Fig 13) and use your Ip password from above steps to login in ArgoCd.

Fig 14

Configure ArgoCd to Sync with Git Chart Repo

Once logged in, click ‘new app’.

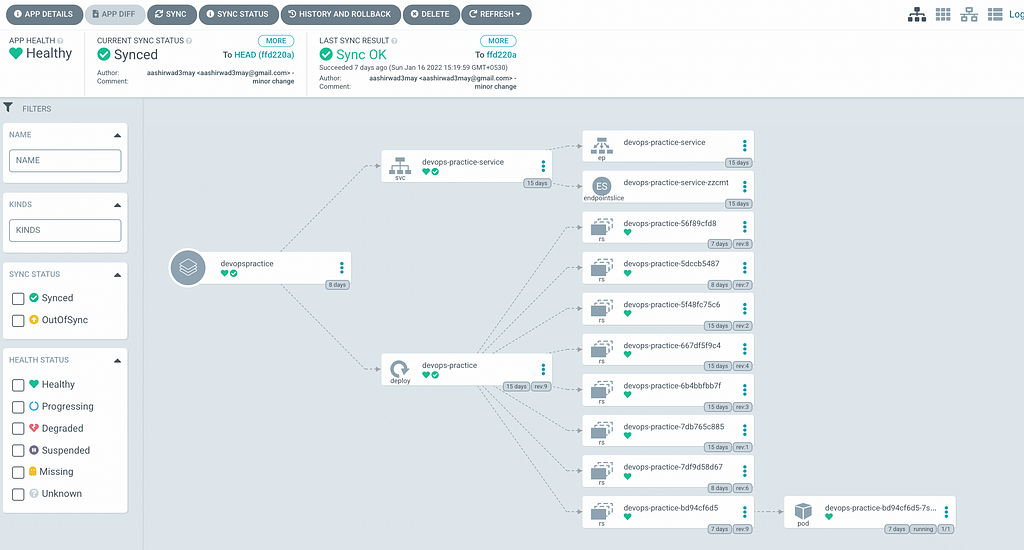
Hit create you see a beautiful UI for your system (figure 15) after it has synchronised and created the pods .

Fig 15

Go ahead and change replica count in git chart repo values.yaml and you can see changes being reflected. It takes some time to sync you can click on refresh to sync immediately.

It is recommended to upgrade chart version if you make any changes in your helm template. Upload new chart to bucket and update the version in git chart repo argoCd will sync relevant changes.

Conclusion

And there we have it. You should know have a working Node.js app set up with Docker, with a full CI/CD build pipeline in place. Please let me know if anything I have missed or can be added in the comments. For more backend related content follow me on Twitter, LinkedIn.

Unlock 10x development with independent components

Building monolithic apps means all your code is internal and is not useful anywhere else. It just serves this one project. And as you scale to more code and people, development becomes slow and painful as everyone works in one codebase and on the same version.

But what if you build independent components first, and then use them to build any number of projects? You could accelerate and scale modern development 10x.

OSS Tools like Bit offer a powerful developer experience for building independent components and composing modular applications. Many teams start by building their Design Systems or Micro Frontends, through independent components. Give it a try →

An independent product component: watch the auto-generated dependency graph


Deploy Node.js application over Google Cloud with CI/CD was originally published in Bits and Pieces on Medium, where people are continuing the conversation by highlighting and responding to this story.


This content originally appeared on Bits and Pieces - Medium and was authored by Aashirwad Kashyap

How to automate the deployment of a Node.js app with CI/CD using Google Kubernetes Engine, Jenkins, DockerHub and ArgoCD

High Level architecture

Introduction

We will be deploying a containerized Node.js application using Docker over Google Kubernetes Engine using Jenkins for CI (building pipelines to build, test and upload image to Docker Hub) and argoCd with Helm for CD.

It will sync up with our charts repo, pull images uploaded by Jenkins to dockerHub and accordingly apply changes to the GKE cluster infrastructure.

This will also work with any other application too if you can write a Docker file for it.

Table of Contents

  1. Prerequisites
  2. Project set-up
  3. GKE Cluster setup on Google Cloud
  4. Jenkins setup on Google Cloud
  5. Jenkins CI set-up:
    - Pipeline setup
    - Register web-hook to trigger build
  6. ArgoCD set-up:
    - Integrate chart git Repo
    - Create public charts registry
    -Install argoCd over GCP
    - Configure ArgoCd to Sync with Git Chart Repo

Prerequisites

  • You need Docker installed
  • You need Helm package manager
  • You need Node.js installed
  • You need a docker hub repository (create a free tier account on docker hub if you don’t have one)
  • You need a Google cloud account:
    - If you don’t have create a free account you will get 300$ initially and you will not be charged until you manually update your account to paid account.
    - Activate your billing as Kubernetes, Jenkins resources requires it. Your 300$ will be used for this.

Project Setup

We will clone the project git repo and test it locally once. You can clone the sample repository devopspractice for uniformity.

Run the below commands to build and spin up a local container for testing:

npm install
docker build .
docker run -itd -p 3000:3000 — name <containerName> <image>
curl — location — request GET ‘http://localhost:3000/v1/dev/data'

If you get a ‘201 created’ everything works great.

GKE Cluster Setup on Google Cloud

From GCP Dashboard > kubernetes-Engine > create > take below reference for the fields (Fig 1).

Change defaultPool > numberOfNodes > 2 (to save money). It will take few minutes to create the cluster.

Fig 1

Jenkins Setup On GCP

We will be using GCP managed Jenkins service and set it up.

GCP Dashboard > marketplace > Jenkins packaged by Bitnami > launch.

Give a name and zone (us-central1-c) and create.

Once created go to site address (Fig 2) add fill in the username, password and you will be able to access it (If not try removing /jenkins from the end).

Click on SSH (Fig 2) > open in browser window. Then follow the below steps.

Install docker using this link on Vm(complete all steps from section Install using the repository and Install Docker Engine).

In one of the steps a specific version of docker is asked either you select one in the list or just paste this command.

sudo apt-get install docker-ce=5:20.10.12~3–0~debian-buster docker-ce-cli=5:20.10.12~3–0~debian-buster containerd.ioC

Once docker is installed we need to give docker access and install kubectl using below commands:

sudo usermod -aG docker jenkins
sudo apt-get install kubectl

We need to restart Jenkins vm for these changes to appear (dashboard (navigation menu) > compute engine > Jenkins VmInstance > Stop > and then Start).

Fig 2

Jenkins CI Setup

Here we will connect Jenkins to our project git Repo, build pipelines and add a Webhook for automatic build trigger over Jenkins on any commits in our Repo.

Go to your Jenkins Dashboard > manageJenkins > managePlugins > Install ‘Docker pipeline’ and ‘Google Kubernetes Engine’.

From Jenkins Dashboard > manageJenkins > Manage Credential > global(below) > add credential.

Create new credential for GIT using your git username and password.

Create new credential for DockerHub using your dockerHub username and password (Fig 4 after successful creation).

Fig 3
Fig 4

Now we will setup the pipeline. From Jenkins Dashboard > new Item > give project name and select pipeline.

In General section > tick Github Project and add Git project URL (e.g. https://github.com/aashirwad3may/devopspractice.git/).

In BuildTriggerSection > tick GitHub hook trigger for GITScm polling.

In pipeline Section add below fields (Fig 5) and rest remains same and save.

Fig 5

The steps to be taken inside the pipeline are mentioned in project git repo with file name Jenkins… change your docker hub username in Jenkins's file (ref fig 6).

Fig 6

On the Jenkins Dashboard the project will be shown click on it and trigger the build using BuildNow you should see pipeline execution with below result.
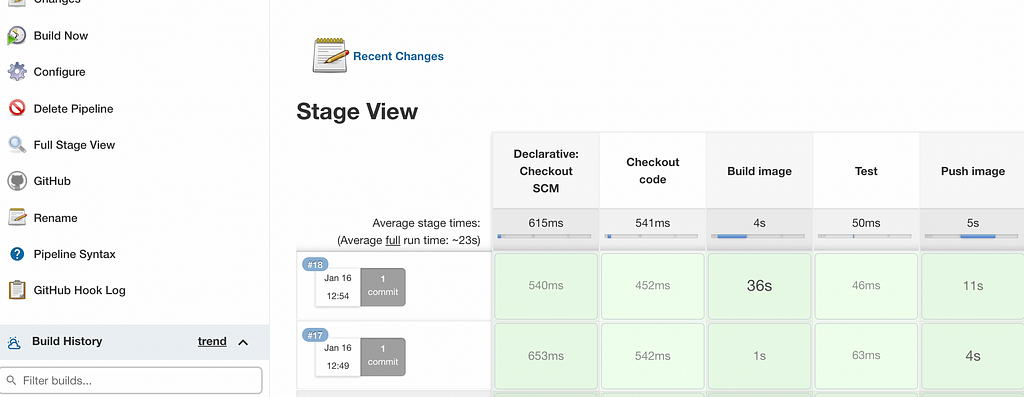
Fig 7

Here we are manually triggering the build to automate this we will use webhook so whenever you commit in git build will be triggered and image will be uploaded in your dockerHub Repo.

In order to add a webhook from Git project settings -> webhook -> add Webhook.

In Payload add only ip (e.g 14.112.217.344)(http://<Jenkins GCP SITE IP>/github-webhook/).

Content type application.json.

Create a webhook and commit in your local repo build should be triggered automatically.

ArgoCD Setup

Here we will setup helm on local system, create and use Cloud storage keep all our charts version (charts storage), install ArgoCd on GCP, create a secret to store dockerHub credentials on GKE and finally setup ArgoCD to sync with our git chart repo.

Install Helm on your local system use this link for ref.

As you can see in architecture diagram at the top, we have two git repo one for development and other for deployment (charts and values.yaml) as it is recommended. You can clone my charts repo here for ref and uniformity.

We need a charts storage where argoCD will pull helms charts we will use google cloud storage for this.

From GCP Dashboard->CloudStorage->createBucket (choose region as below and rest default) (Fig 8).
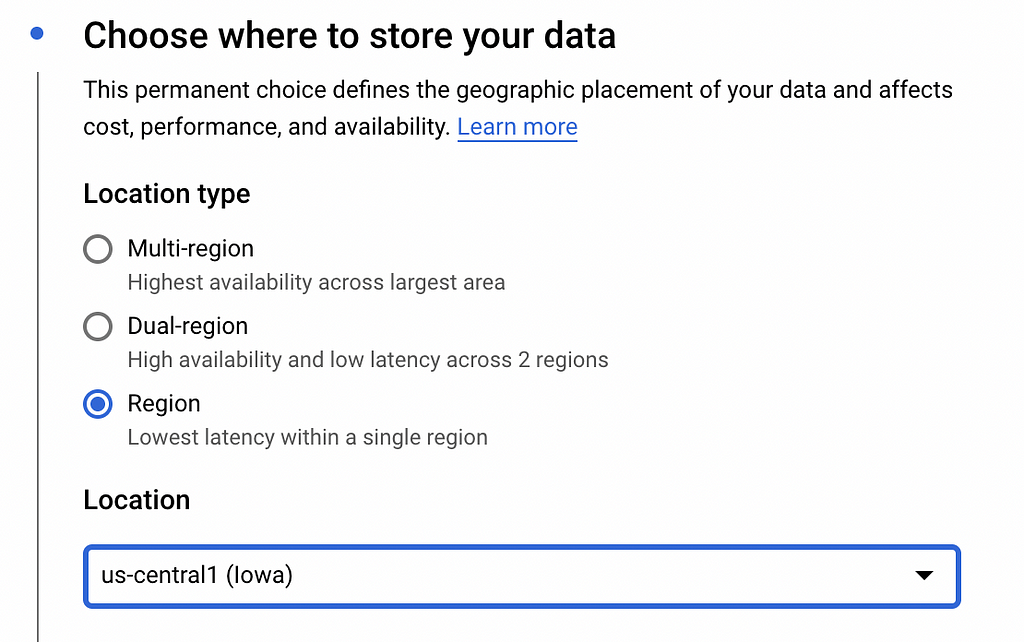
fig 8
Fig 9

Once created we need to change it read access to public for this go inside bucket->permission->add (Fig 10).
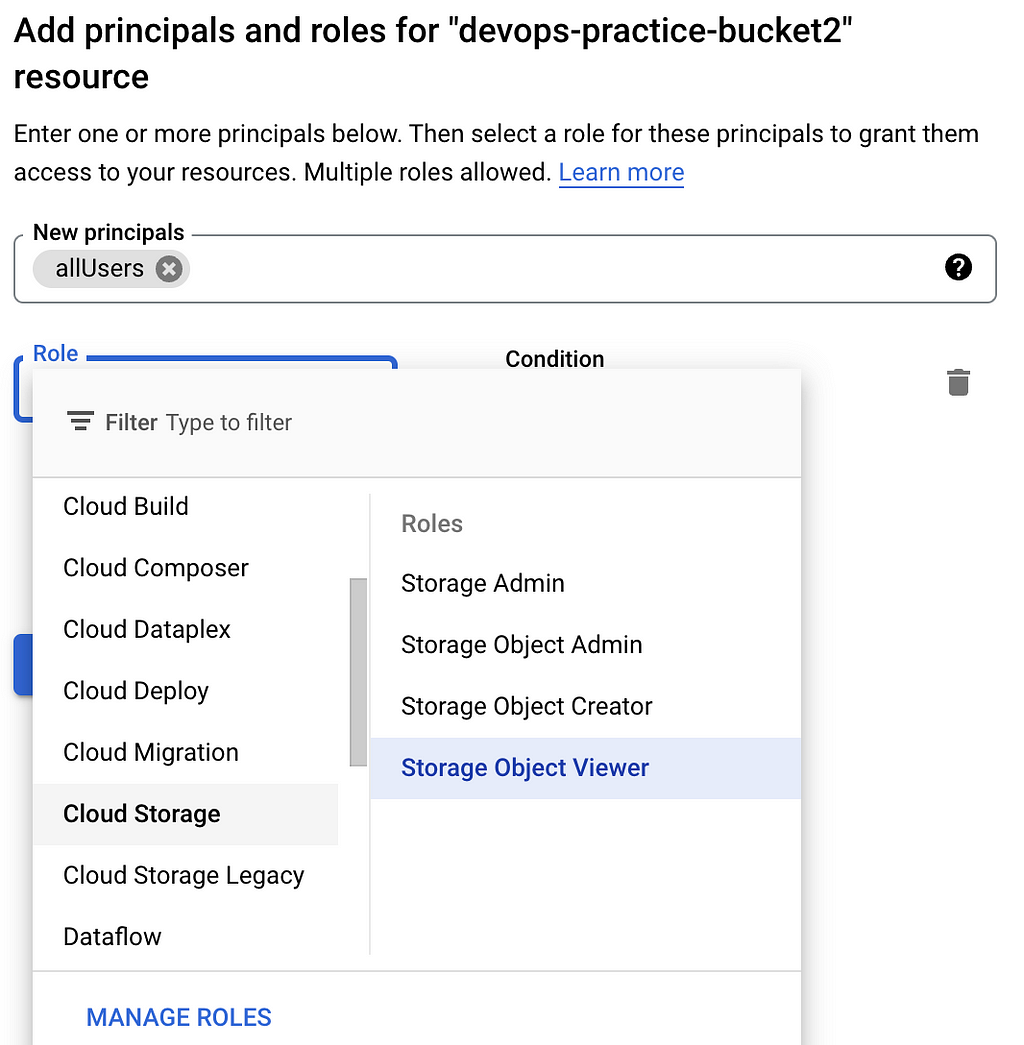
Fig 10
Fig 11

Add the role and save it should now show the access as public just as above (Fig 11).

Now we will configure deployment.yaml to connect to dockerHub and create a secret to hold dockerHub credentials and finally create and upload charts to Cloud Storage.

Project Git Repo > helm > templates > deployment.yaml (update your username as mentioned Fig 12).

Fig 12

As you can see dockerHub credentials will be stored in secrets name regcred (Fig 12 imagePullSecrets) so run the below command with your dockerHub credentials to create it so argoCd can pull latest images (earlier we put credential in Jenkins to push the image).

kubectl create secret docker-registry regcred — docker-server=https://index.docker.io/v1/ — docker-username=<your-name> — docker-password=<your-pword> — docker-email=<your-email>

Run below commands to build your charts:

helm package helm -d charts 
helm repo index charts

This will create charts zip and index file in charts folder which you can upload to the cloud storage bucket created above (Fig 13 here i have multiple charts you will have one only first time).

Either you can upload it manually in GCP bucket or write a script to combine the steps.
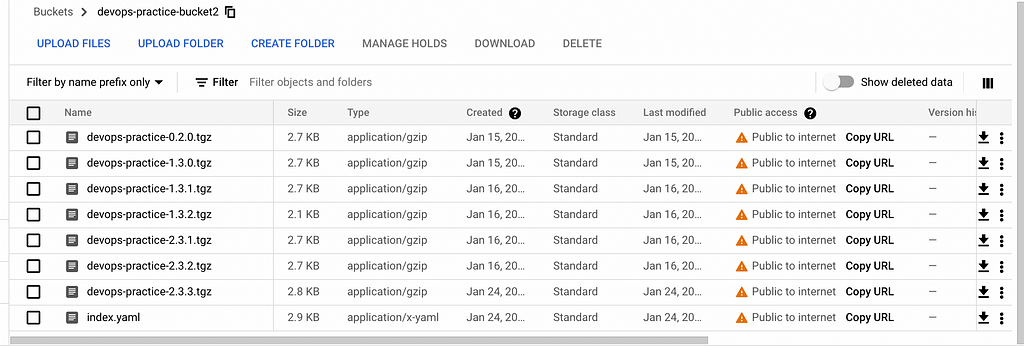
Fig 13

Install ArgoCD on GCP

Here we will host ArgoCd on GCP and connect ArgoCd to sync our git chart repo.

Follow this link steps 1,3(Service Type Load Balancer) and 4 run the mentioned commands on google cloud shell.

If everything successful, you should see this (Fig 13) in GCP Dashboard > kubernetesEngine > service&ingress.

Click on the Ip External load balancer (Fig 13) and use your Ip password from above steps to login in ArgoCd.

Fig 14

Configure ArgoCd to Sync with Git Chart Repo

Once logged in, click ‘new app’.

Hit create you see a beautiful UI for your system (figure 15) after it has synchronised and created the pods .
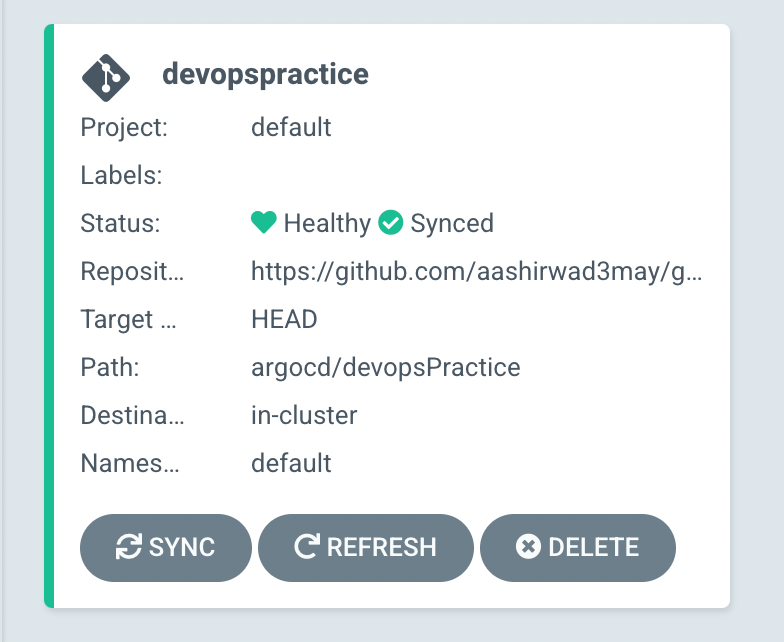
Fig 15

Go ahead and change replica count in git chart repo values.yaml and you can see changes being reflected. It takes some time to sync you can click on refresh to sync immediately.

It is recommended to upgrade chart version if you make any changes in your helm template. Upload new chart to bucket and update the version in git chart repo argoCd will sync relevant changes.

Conclusion

And there we have it. You should know have a working Node.js app set up with Docker, with a full CI/CD build pipeline in place. Please let me know if anything I have missed or can be added in the comments. For more backend related content follow me on Twitter, LinkedIn.

Unlock 10x development with independent components

Building monolithic apps means all your code is internal and is not useful anywhere else. It just serves this one project. And as you scale to more code and people, development becomes slow and painful as everyone works in one codebase and on the same version.

But what if you build independent components first, and then use them to build any number of projects? You could accelerate and scale modern development 10x.

OSS Tools like Bit offer a powerful developer experience for building independent components and composing modular applications. Many teams start by building their Design Systems or Micro Frontends, through independent components. Give it a try →

An independent product component: watch the auto-generated dependency graph

Deploy Node.js application over Google Cloud with CI/CD was originally published in Bits and Pieces on Medium, where people are continuing the conversation by highlighting and responding to this story.


This content originally appeared on Bits and Pieces - Medium and was authored by Aashirwad Kashyap


Print Share Comment Cite Upload Translate Updates
APA

Aashirwad Kashyap | Sciencx (2022-02-03T08:02:52+00:00) Deploy Node.js application over Google Cloud with CI/CD. Retrieved from https://www.scien.cx/2022/02/03/deploy-node-js-application-over-google-cloud-with-ci-cd/

MLA
" » Deploy Node.js application over Google Cloud with CI/CD." Aashirwad Kashyap | Sciencx - Thursday February 3, 2022, https://www.scien.cx/2022/02/03/deploy-node-js-application-over-google-cloud-with-ci-cd/
HARVARD
Aashirwad Kashyap | Sciencx Thursday February 3, 2022 » Deploy Node.js application over Google Cloud with CI/CD., viewed ,<https://www.scien.cx/2022/02/03/deploy-node-js-application-over-google-cloud-with-ci-cd/>
VANCOUVER
Aashirwad Kashyap | Sciencx - » Deploy Node.js application over Google Cloud with CI/CD. [Internet]. [Accessed ]. Available from: https://www.scien.cx/2022/02/03/deploy-node-js-application-over-google-cloud-with-ci-cd/
CHICAGO
" » Deploy Node.js application over Google Cloud with CI/CD." Aashirwad Kashyap | Sciencx - Accessed . https://www.scien.cx/2022/02/03/deploy-node-js-application-over-google-cloud-with-ci-cd/
IEEE
" » Deploy Node.js application over Google Cloud with CI/CD." Aashirwad Kashyap | Sciencx [Online]. Available: https://www.scien.cx/2022/02/03/deploy-node-js-application-over-google-cloud-with-ci-cd/. [Accessed: ]
rf:citation
» Deploy Node.js application over Google Cloud with CI/CD | Aashirwad Kashyap | Sciencx | https://www.scien.cx/2022/02/03/deploy-node-js-application-over-google-cloud-with-ci-cd/ |

Please log in to upload a file.


There are no updates yet.
Click the Upload button above to add an update.

You must be logged in to translate posts. Please log in or register.