
This content originally appeared on Bits and Pieces - Medium and was authored by mayank porwal
How to get your React app ready for production

In this article, we’ll learn to create a production-level React application, with simple and easy steps. To set up this React project, we will follow modern coding practices and make use of the latest technologies.
This article will help beginners understand a React project better and also help professional developers in setting up a React application for a professional project.
The complete process is divided into simple steps:
- Create a React project
- Write some code
- Webpack
- Babel
- Build and Run project
- Eslint (and Prettier)
- Husky (pre-commit Git hooks)
- SonarQube (Optional)
Note 1: Try to follow every step individually, one by one, in the mentioned order, to set up the complete project.
Note 2: To set up a specific feature in an existing project, you can follow every step individually, independent of other steps.
Prerequisites:
- Node and Git should be installed in your system.
- At the time of writing, we are using the latest available versions of Node (v16 (16.13.2)) and React (v17 (17.0.2)).
1. Create a React project
First of all, you need to create a folder in your working directory:
mkdir react-project
cd react-project
Now, in the react-project folder, we need to initiate a new Node.js project, using the npm init command:
npm init
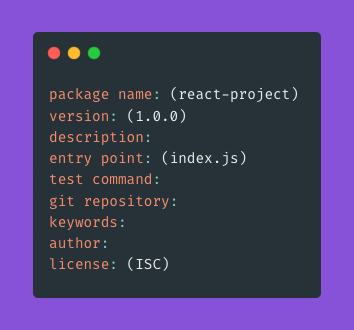
It will ask for some inputs, for which you can just press enter/return or edit them if you want.
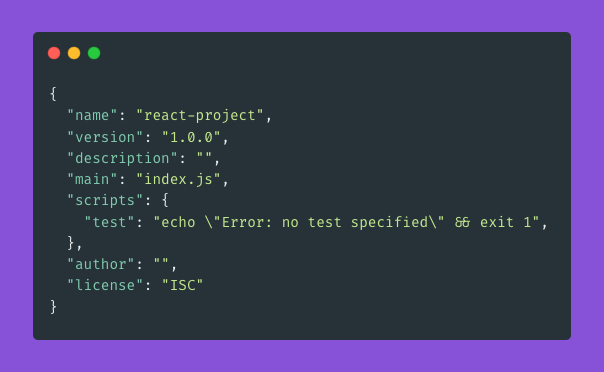
After completing this, it will create a new file in the react-project folder, named package.json.
Your package.json file will look something like this, based on the inputs you provided during the npm init command:
The next step is to initiate Git (a version control system).
To initiate Git in our project folder (react-project) we need to run the following command:
git init
The next step is to install React in our project.
For this, we’ll run the following command:
npm install react react-dom
This will install React and react-dom in our project.
Now the React is installed, let's install one more library, Axios in our project.
npm install axios
Axios is a promise based HTTP client for the browser and Node.js
This will help us to integrate backend APIs in our frontend project when we need them.
2. Write some code
Let’s move further, now we’ll write some code.
For this, create a new folder in the project’s root directory, run the following commands (one by one) to create an src folder and some files in it.
mkdir src
cd src
touch index.js
touch index.html
touch main.scss
The src directory will be our main folder in which all the code, components, and programming logic go.
First open the index.js file, in your favorite IDE / Text Editor. You can use software of your choice. Some popular choices are VS Code, Webstorm IDE (paid), Sublime Text or Atom Text Editor, etc.
For this project, I’m using VSCode.
Now write the following code in the index.js file.
Here, we imported App.js and main.scss file. We’ll write those files’ code soon.
Now, open the index.html file and write the following code:
Next open main.scss file and write some CSS:
Now it’s time to create our first component, the <App/> component.
For this create a new folder app in src, and create a new file App.js:
mkdir app
touch App.js
Open App.js and write:
Next, we need to create a .gitignore file before we proceed further.
First, reach to your project's root directory and create a .gitignore file.
cd ../..
touch .gitignore
Add the text node_modules into your .gitignore file. This tells Git to not add the node_modules directory when pushing any of your code to a place like GitHub.
Now it’s time to move to the next phase of this React project setup.
3. Webpack
Create a new file in the projects’ root directory:
touch webpack.common.js
Generally, we need to create a webpack.config.js file, which is used to be a default file used by webpack.
A good practice is to separate different (production, development, staging, local, etc) configurations.
Since we need a production-ready environment, we are creating a webpack.common.js file, which will be imported to our different Webpack config environment profiles like prod, dev, etc.
Here, we defined the module and its entry and output config for the Webpack.
Now let’s install some plugins to be used by Webpack.
First, we’ll install html-webpack-plugin, which is used by Webpack to do work related to our main html file i.e. index.html
To install this plugin, run the following command in the projects’ root directory:
npm install html-webpack-plugin --save-dev
Now import the newly installed plugin in your webpack.common.js file.
const HtmlWebpackPlugin = require('html-webpack-plugin');And write the following code, inside of module.exports:
plugins: [
  new HtmlWebpackPlugin({
    template: path.join(__dirname, 'src', 'index.html')
  })
]
Your webpack.common.js file should now look something like this:
We need to install one more plugin, mini-css-extract-plugin, to work with our (yes you guessed it right again) SCSS/CSS i.e. styling.
To install this plugin run:
npm install mini-css-extract-plugin --save-dev
After installing it, import it in our webpack.common.js file, as we did for the html-webpack-plugin above.
const MiniCssExtractPlugin = require('mini-css-extract-plugin').default;And insert its config code in the module.exports:
new MiniCssExtractPlugin({
  filename: 'main.css',
  chunkFilename: 'main.[id].css'
})
After writing this code snippet, your webpack.common.js will look like this:
Our Webpack setup is not completed yet, but before we proceed, it’s time to define some rules for Webpack.
For this, we need to install babel in our project.
4. Babel
Babel is a JavaScript compiler. In short, it is a compiler which compiles modern JavaScript code (which includes JSX and ES6+ code, etc.) into simple (vanilla) JavaScript code, which browser understands.
To install Babel in our project, run:
npm install @babel/core babel-loader --save-dev
This will install @babel/core and babel-loader (for transpiling JavaScript files using Babel and Webpack).
Let's install other required dependencies first before we write rules for the Webpack.
In terminal (at project’s root directory), run:
npm install @babel/preset-env @babel/preset-react --save-dev
Create a new file .babelrc in the root directory. And add this code to it.
{"presets": ["@babel/preset-env"]
}
Note: .babelrc file config is optional. If this causes any problem/issue to Webpack while building or running the project, just remove this file.
Complete remaining webpack setup
Install other loaders and presets also.
For CSS/SCSS:
npm install sass --save-dev
npm install css-loader sass-loader --save-dev
For file loader:
npm install file-loader --save-dev
For SVG (icons):
npm install @svgr/webpack --save-dev
Now to add webpack rules and options, write this code in the webpack.common.js:
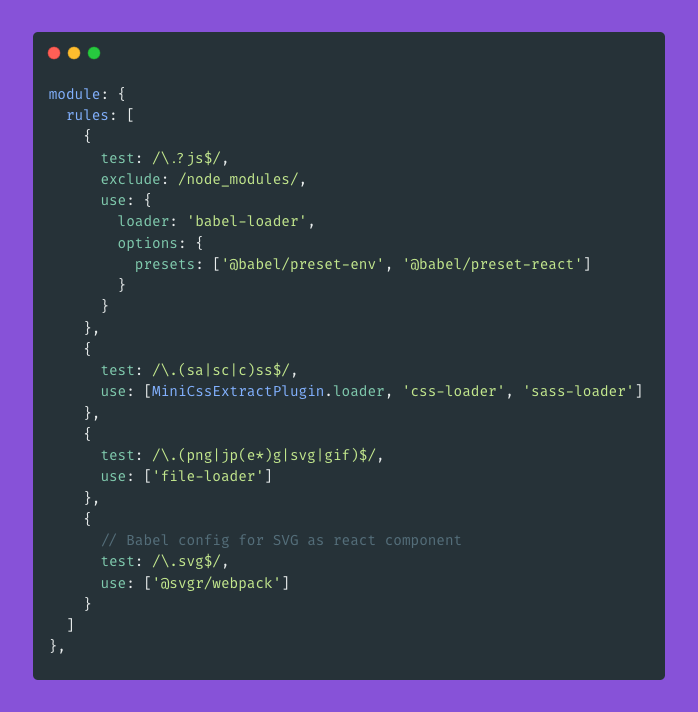
After adding these rules, our webpack.common.js will look something like this,
Since we need a production-grade setup, now we’ll set up other webpack files: webpack.prod.js & webpack.dev.js.
So let’s create two more files:
touch webpack.prod.js
touch webpack.dev.js
To set up these, we need one more dependency.
npm install webpack-merge --save-dev
It is to merge the common config which is defined in our webpack.common.js into our new environment level files.
Write some code as shown below, in webpack.dev.js:
And in webpack.prod.js we need to write some more config:
In our production config, we defined some performance and optimization configs also.
Now add run scripts in package.json file.
Add these commands in the scripts object.
"start": "webpack-dev-server --config webpack.dev.js --open",
"dev": "rimraf dist && webpack --config webpack.dev.js",
"build": "rimraf dist && webpack --config webpack.prod.js",
And it’s done.
5. Build and Run project
Build the project using Webpack
You can build your project locally using these commands:
- For development build: npm run dev
- For a production build: npm run build
After the build is completed, you can see a new folder (named dist) in your projects’ root directory, in which all the compiled files (index.js, index.html, main.scss, etc.) are there.
I know you are very excited now, as you are now realizing the true power of webpack.
Now as you have already done all the configurations, and to build, your project you just need to run some commands.
Pretty amazing, right?
You can also share or deploy on production the dist folder very easily, as it is actually your whole React project compiled in just one folder.
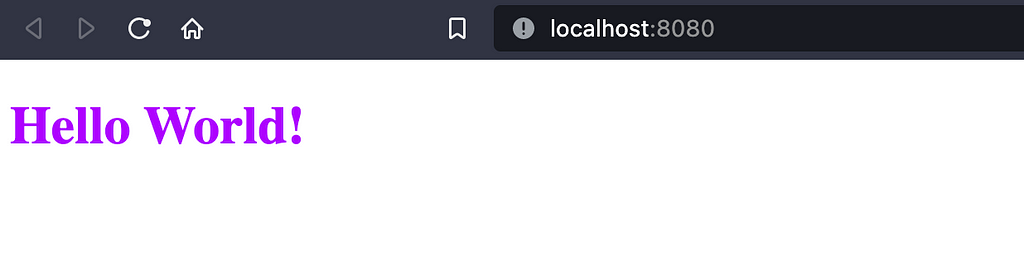
Run project locally
To run your project, just run this command: npm run start.
And a new tab in your browser will automatically open (with URL: http://localhost:8080) and you’ll see a Hello World!
6. Eslint (and Prettier)
Eslint
ESLint is a tool that statically analyses our code to find any error or problem.
It is a good practice to follow eslint rules, as using eslint keeps our codebase clean and makes our project faster and more optimised.
To install eslint in our project, run the following commands:
npm install eslint --save-dev
npm install eslint-plugin-react@latest --save-dev
npm install eslint-plugin-prettier --save-dev
Now that it is installed in our project, we need to initiate and configure it.
To configure we have two options, either we can directly run a command (eslint — init), or we can manually create a .eslintrc.json config file, in our root directory.
We’ll run the command to create our .eslintrc.json file.
eslint --init
It will ask some basic questions, which looks like this:
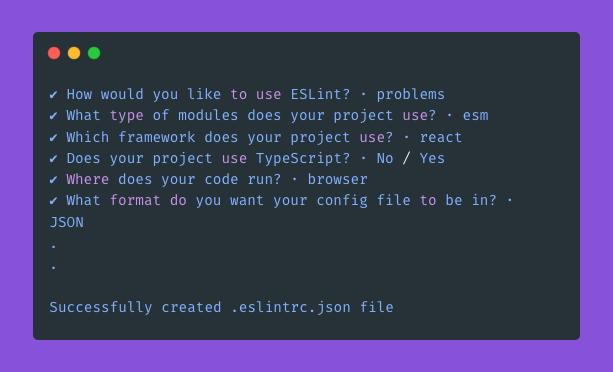
If it asks you to install any required dependency, just select Yes.
Now you have a .eslintrc.json file in your project’s root directory.
To make it work according to our needs, we need one more dependency called prettier.
Prettier
Prettier auto formats your code, so that you don’t have to worry about things such as spacing, use of single or double quotes etc.
To install Prettier, run:
npm install eslint-config-prettier --save-dev
After that, create a prettier config file called .prettierrc:
touch .prettierrc
Open the .prettierrc file and write some rules.
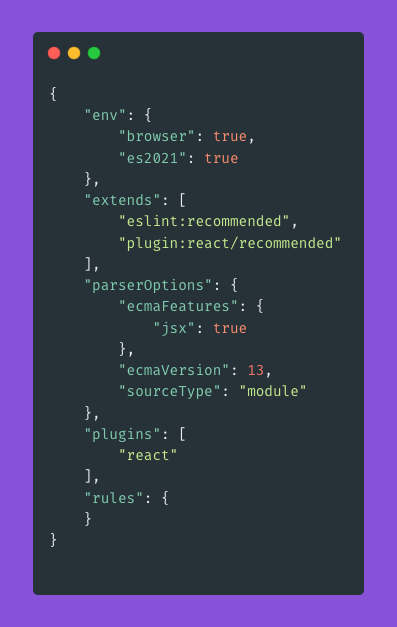
Now add a Prettier plugin and some other rules and configs in the .eslintrc.json file.
Just copy and paste the code shown below.
Its time to add some scripts in scripts object in package.json:
"lint": "eslint ./src",
"lint:fix": "eslint --fix",
"format": "prettier --write './**/*.{js,jsx,ts,tsx,json,css,scss,html,md}' --config ./.prettierrc",Setup Ignore files
Create (if not already) these new files .eslintignore and .prettierignore, to add files and folders which you want to exclude from eslint and prettier, respectively.
7. Husky (pre-commit Git hooks)
Husky is a pre-commit hook to Git. It helps us to run custom commands when we run git commands like commit or push, etc.
To set up Husky, we first need to install it in our project.
Run these commands:
npm install husky --save-dev
npm install lint-staged --save-dev
Now run Rusky to install itself (its configs):
npx husky install
npx husky add .husky/pre-commit “npx --no-install lint-staged”
Now add Husky and lint-staged code in the package.json file.
Now commit changes and in commit also include newly created .husky folder present in the root directory of the project.
And it’s done.
Now when you will try to commit and push any changes, these husky lint commands will be executed and your code will be formatted and pushed. This will maintain consistency and better code quality at a large scale.
8. SonarQube (Optional)
SonarQube helps us to write a better quality code with better code security.
It is an advanced setup and generally more helpful in large projects which includes CI/CD at a large scale.
I will cover SonarQube and its setup in a separate article/blog.
Clone Project
If you want to skip this setup and start working right away, just clone/fork my project (already set up and ready to use) here.
Project link (GitHub): react-boilerplate
Or if you want any help in setting up, you can just refer to the same project (link provided above)
Thank you for reading this article. I hope this helps you in setting up your new production level React application project.
If you find this article useful in any sense, do clap and share it with your friends. This helps in motivating an author to write more. As you can see, writing an article takes a lot of effort.
If you find any mistake or issue in this article, feel free to comment it down, I’ll correct it.
Follow me on GitHub: codr-mayank and here on Medium
Unlock 10x development with independent components
Building monolithic apps means all your code is internal and is not useful anywhere else. It just serves this one project. And as you scale to more code and people, development becomes slow and painful as everyone works in one codebase and on the same version.
But what if you build independent components first, and then use them to build any number of projects? You could accelerate and scale modern development 10x.
OSS Tools like Bit offer a powerful developer experience for building independent components and composing modular applications. Many teams start by building their Design Systems or Micro Frontends, through independent components. Give it a try →
How to Create Production-Grade React Applications was originally published in Bits and Pieces on Medium, where people are continuing the conversation by highlighting and responding to this story.
This content originally appeared on Bits and Pieces - Medium and was authored by mayank porwal
mayank porwal | Sciencx (2022-02-09T15:34:40+00:00) How to Create Production-Grade React Applications. Retrieved from https://www.scien.cx/2022/02/09/how-to-create-production-grade-react-applications/
Please log in to upload a file.
There are no updates yet.
Click the Upload button above to add an update.