This content originally appeared on Telerik Blogs and was authored by Ifeoma Imoh
In this article, we look at two popular options for creating client-side routing in React applications: React Router and React Location. What’s the difference and when would you use one vs. the other?
Client-side routing can be achieved in React applications using different external libraries. The most popular of these libraries is React Router—a lightweight open-source routing library for React.js built and maintained by the Remix team. In late 2021, Tanner Linsley introduced React Location, an enterprise routing library for React applications, to solve some of the limitations of previous routing mechanisms. Today, React Location has evolved into a full-fledged routing library.
In this post, we’ll point out the significance of client-side routing vs. server-side routing before walking through the process of implementing React Router in a simple React application. Finally, we will introduce React Location as an alternative to React Router and go through some of its unique capabilities. To proceed, you need a basic understanding of React.js.
Server-Side Routing vs. Client-Side Routing
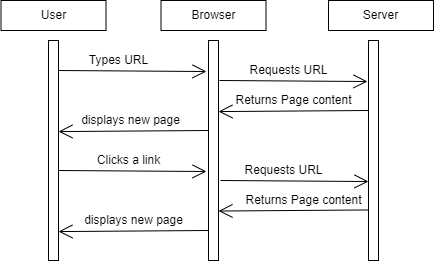
Server-side routing is the traditional approach to handling routes in web applications. The process involves requesting a new page from the server and providing it to the user every time a link is clicked. One major issue with server-side routing is that every request results in a full page refresh, which is not performance efficient in most cases.

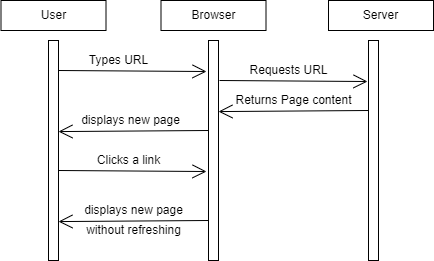
Unlike server-side routing, client-side routing involves JavaScript handling the routing process internally. In client-side routing, a request to the server is prevented when a user clicks a link, hence no page refresh even when the URL changes.

Client-Side Routing in React.js
Client-side routing in React.js can be achieved in different ways. As stated earlier, we will focus on using these two helper libraries: React Router and React Location. To proceed, we will create a simple React application that implements React Router and then look at React Location, and some of its additional features as an alternative.
What Is React Router?
React Router is a JavaScript library used to handle client and server-side routing in React applications. It allows the creation of single-page web or mobile apps that allows navigation without the page refreshing. React Router also gives us access to browser history features while maintaining the correct view of the application.
React Router uses a component-based approach to routing. It provides different routing components as needed by the application. If you’d like to learn more about its uses, this blog is worth checking out: Programmatically Navigate with React Router.
How To Use React Router
To illustrate how React Router works, we need to create a new React project. Run the following command in your terminal:
npx create-react-app demo-routing-app
Please note we will be using React Router v6 in our application, which is the latest version of the library to date. After successfully running the above code, change into the new project directory and run the following command to bring react-router into the application:
npm install react-router-dom
React Router provides us with two variants—react-router-dom for web applications and react-router-native for mobile applications.
To proceed, we need to import React Router’s BrowserRouter into the highest component level of the application. The BrowserRouter component helps keep the user interface in sync with the URL, so it must be placed above every component that uses Router in the application. To achieve that, update the code in your index.js file with the following:
import React from "react";
import ReactDOM from "react-dom";
import "./index.css";
import App from "./App";
import { BrowserRouter } from "react-router-dom";
ReactDOM.render(
  <BrowserRouter>
    <App />
  </BrowserRouter>,
  document.getElementById("root")
);
Now that we’ve wrapped our application with the BrowserRouter component, we can go ahead and explore other core components of React Router.
Let’s create three components that we can navigate to in our application: the Home component, which will serve as the index of our application, the Contact component and the Info component.
In your src directory, create a file called Home.js and add the following to it:
import React from "react";
const Home = () => {
  return (
    <div>
      <h1>This is the Home page of the application</h1>
    </div>
  );
};
export default Home;
Create another file named Contact.js and add the following to it:
import React from "react";
const Contact = () => {
  return (
    <div>
      <h1>This is the Contact page.</h1>
    </div>
  );
};
export default Contact;
Lastly, create a file called Info.js and add the following to it:
import React from "react";
const Info = () => {
  return (
    <div>
      <h1>Info page of the application</h1>
    </div>
  );
};
export default Info;
Now that we have our UI components in place, we can go ahead and create our routes and link them to our components.
Replace the code in your App.js file with the following:
import { Routes, Route, Link } from "react-router-dom";
import Home from "./Home";
import Contact from "./Contact";
import Info from "./Info";
import "./App.css";
function App() {
  return (
    <div className="App">
      <ul>
        <li>
          <Link to="/">Home</Link>
        </li>
        <li>
          <Link to="/contact">Contact</Link>
        </li>
        <li>
          <Link to="/info">Info</Link>
        </li>
      </ul>
      <Routes>
        <Route path="/" element={<Home />}></Route>
        <Route path="/contact" element={<Contact />}></Route>
        <Route path="/info" element={<Info />}></Route>
      </Routes>
    </div>
  );
}
export default App;
We import the Routes, Route and Link components in the code above. The Routes ensure that only one route is handled at a time, while the Route component helps declare which component will be rendered on which route. Link is provided by React Router in place of the traditional anchor tag and is used to link to the various routes.
You can start your development server and head over to your browser. Here’s how our application looks:
We’ve successfully implemented React Router in a simple application and have seen how its core components work. Now let’s look at how to implement routing in a React application using React Location.
What Is React Location?
React Location is a routing library for client-side React applications. It is a more declarative alternative to React Router and was initially introduced as a wrapper for the beta release of React Router v6. Still, it grew to become a full-fledged routing library. React Location does everything React Router does but in a more declarative style.
React Location Compared to React Router
React Location has a lot of similarities to React Router, and it is often recognized as a better alternative. In fact, React Location has many unique features that give it an edge over React Router. We will limit our scope in this article to some features that are unique to React Location.
Some of the features React Location offers are:
- Route loaders
- React location JSURL
- Deeply integrated search params API
- React devtools
- Asynchronous route elements
- Code splitting
- Pending states
Installing and Implementing React Location
To install React Location, run the following command in your terminal:
npm install react-location --save
After installation, let’s refactor our demo routing application to use React Location. Update your App.js file with the following:
import React from "react";
import { ReactLocation, Router, Outlet, Link } from "react-location";
import Home from "./Home";
import Contact from "./Contact";
import Info from "./Info";
import "./App.css";
const routes = [
  {
    path: "/",
    element: <Home />,
  },
  {
    path: "/contact",
    element: <Contact />,
  },
  {
    path: "/info",
    element: <Info />,
  },
];
const location = new ReactLocation();
function App() {
  return (
    <div className="App">
      <Router routes={routes} location={location}>
        <ul>
          <li>
            <Link to="/">Home</Link>
          </li>
          <li>
            <Link to="/contact">Contact</Link>
          </li>
          <li>
            <Link to="/info">Info</Link>
          </li>
        </ul>
        <Outlet />
      </Router>
    </div>
  );
}
export default App;
In the code above, we’re importing ReactLocation, Router, Outlet and Link components from the React Location library. The ReactLocation component is the foundation of React Location, and we created an instance of it on line 23 and passed it to the Router component as a prop.
The Router component is the root provider component for the instance of React Location and the application’s route configurations. It handles the routing configurations of the application. The Outlet component is used to render the content of the components based on the matched path, and the Link component is used to trigger navigation.
Our application should now look similar to what we had before.
Some Unique Features of React Location
As mentioned, React Location offers a lot of the features provided by React Router plus several unique ones. Let’s look more closely at a few of those that are unique to React Location.
Route Loaders
The traditional way to implement routes requiring data is to render the route first, then fetch the required data asynchronously from the server. This approach might be OK in some cases, but React Location provides a different approach to rendering routes that require data.
One common feature of React Location is route loaders. A route loader is a function that can be used to specify data requirements that can be fetched from a server using your preferred data-fetching approach (Axios, fetch, etc.). Route loaders are often used to delay the loading of a route until an asynchronous action has been completed.
const routes = [
  {
    path: "/products",
    loader: async () => ({
      loadedProducts: await fetch("/api/products"),
    }),
  },
]
In the code above, we defined our route for the path/products and then implemented a route loader that makes an HTTP call and returns an object believed to be a list of products stored in the loadedProducts key. To learn more about route loaders, click here.
React Location JSURL
JSURL is an elision of JSON and URL encoding. It makes it possible to pass complex values via URL query parameters. JSURL has been designed to be compact, readable, and easy to generate and parse. React Location provides a JSURL powered stringifier and parser.
A simple usage of React Location JSURL is shown below:
import { ReactLocation } from "react-location";
import { parseSearch, stringifySearch } from "react-location-jsurl";
const reactLocation = new ReactLocation({
  parseSearch,
  stringifySearch,
})
React Location Devtools
Unlike React Router, React Location also provides devtools. The devtools help visualize the inner workings of React Location in our applications, and it can also be used for debugging purposes.
The devtools can be imported into the application without additional installations by adding the following line of code to the application.
import { ReactLocationDevtools } from "react-location-devtools";
It’s worth noting that the React Location library provides many more features, and we have only scratched the surface.
Conclusion
In this article, we looked at two popular options for creating client-side routing in React applications: React Router and React Location. You now know how to use them in your React applications and what some of their distinguishing features are. If you’ve already made your choice on using one or the other, drop a note in the comments and share what influenced your decision.
This content originally appeared on Telerik Blogs and was authored by Ifeoma Imoh
Ifeoma Imoh | Sciencx (2022-02-09T10:19:03+00:00) What Is React Router & What Is React Location. Retrieved from https://www.scien.cx/2022/02/09/what-is-react-router-what-is-react-location/
Please log in to upload a file.
There are no updates yet.
Click the Upload button above to add an update.


